1. Install the client
After the download is successful, double-click on it to start the installation
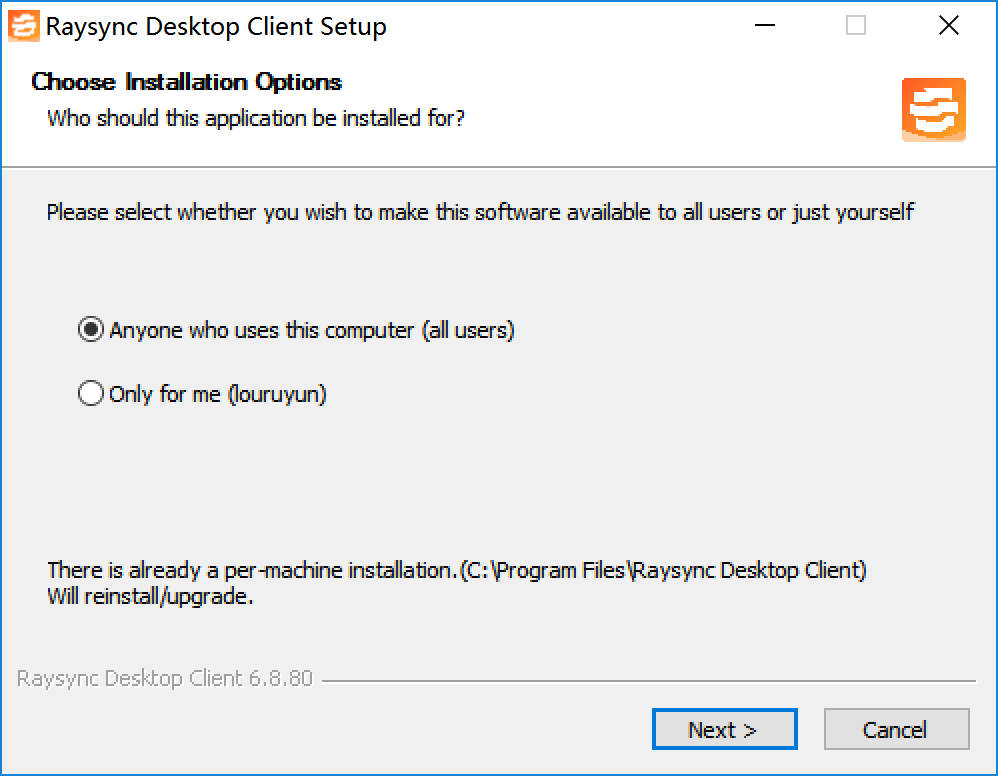
- Select installation options and click [Next]
- Select the path to install and click [Install]
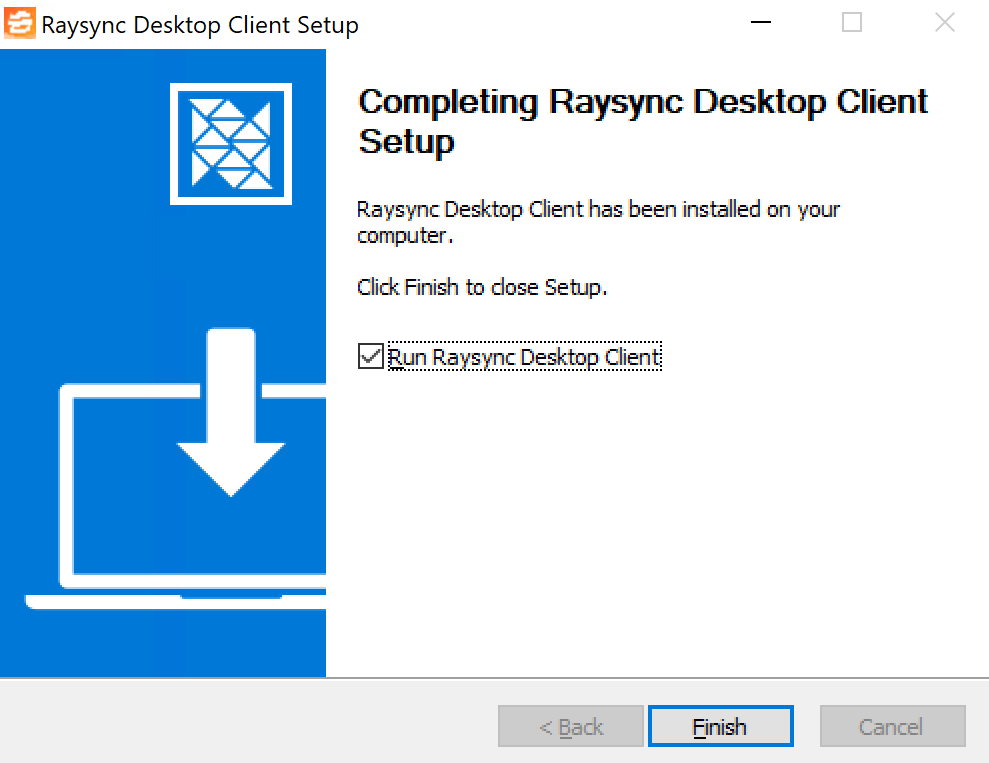
- After the installation is complete, click [Finish] to run the desktop client
2. Log in
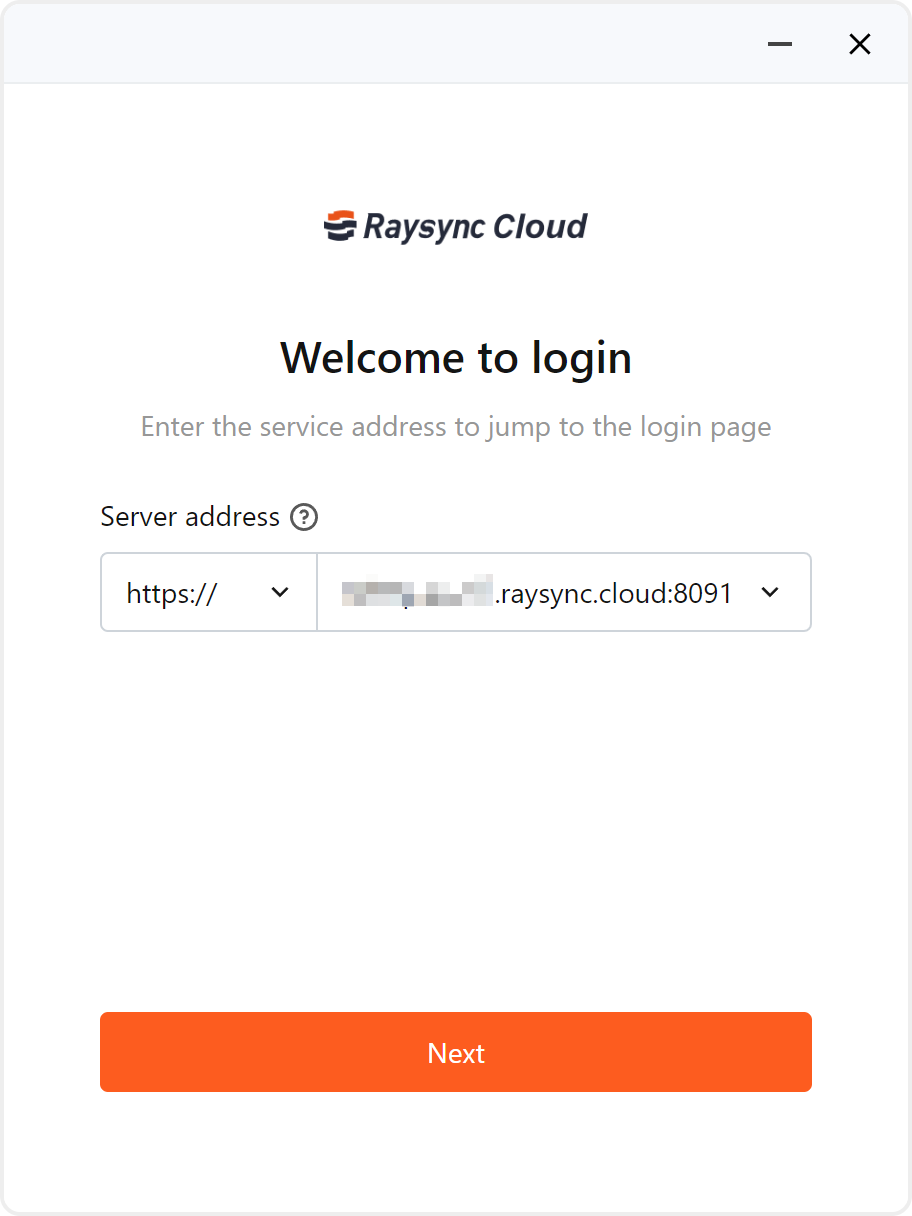
After starting the desktop client, enter the Raysync server address, and click [Next]. Then enter your account and password, click to [Log In] to log in to the desktop client for high-speed transfer.
3. Create transfer task
We provide 3 transfer methods:
- General transfer task: manually upload your local files to the storage, or download files from the storage .
- Sync transfer task: regularly synchronize your local directory to the storage, or regularly synchronize from the storage directory to your local. You can also synchronize your local directory with the directory on the storage in both directions to keep the directories on both sides consistent.
- Peer to peer transfer task: you can send your local files directly to other partners' devices without uploading the files to the storage first.
3.1 General task
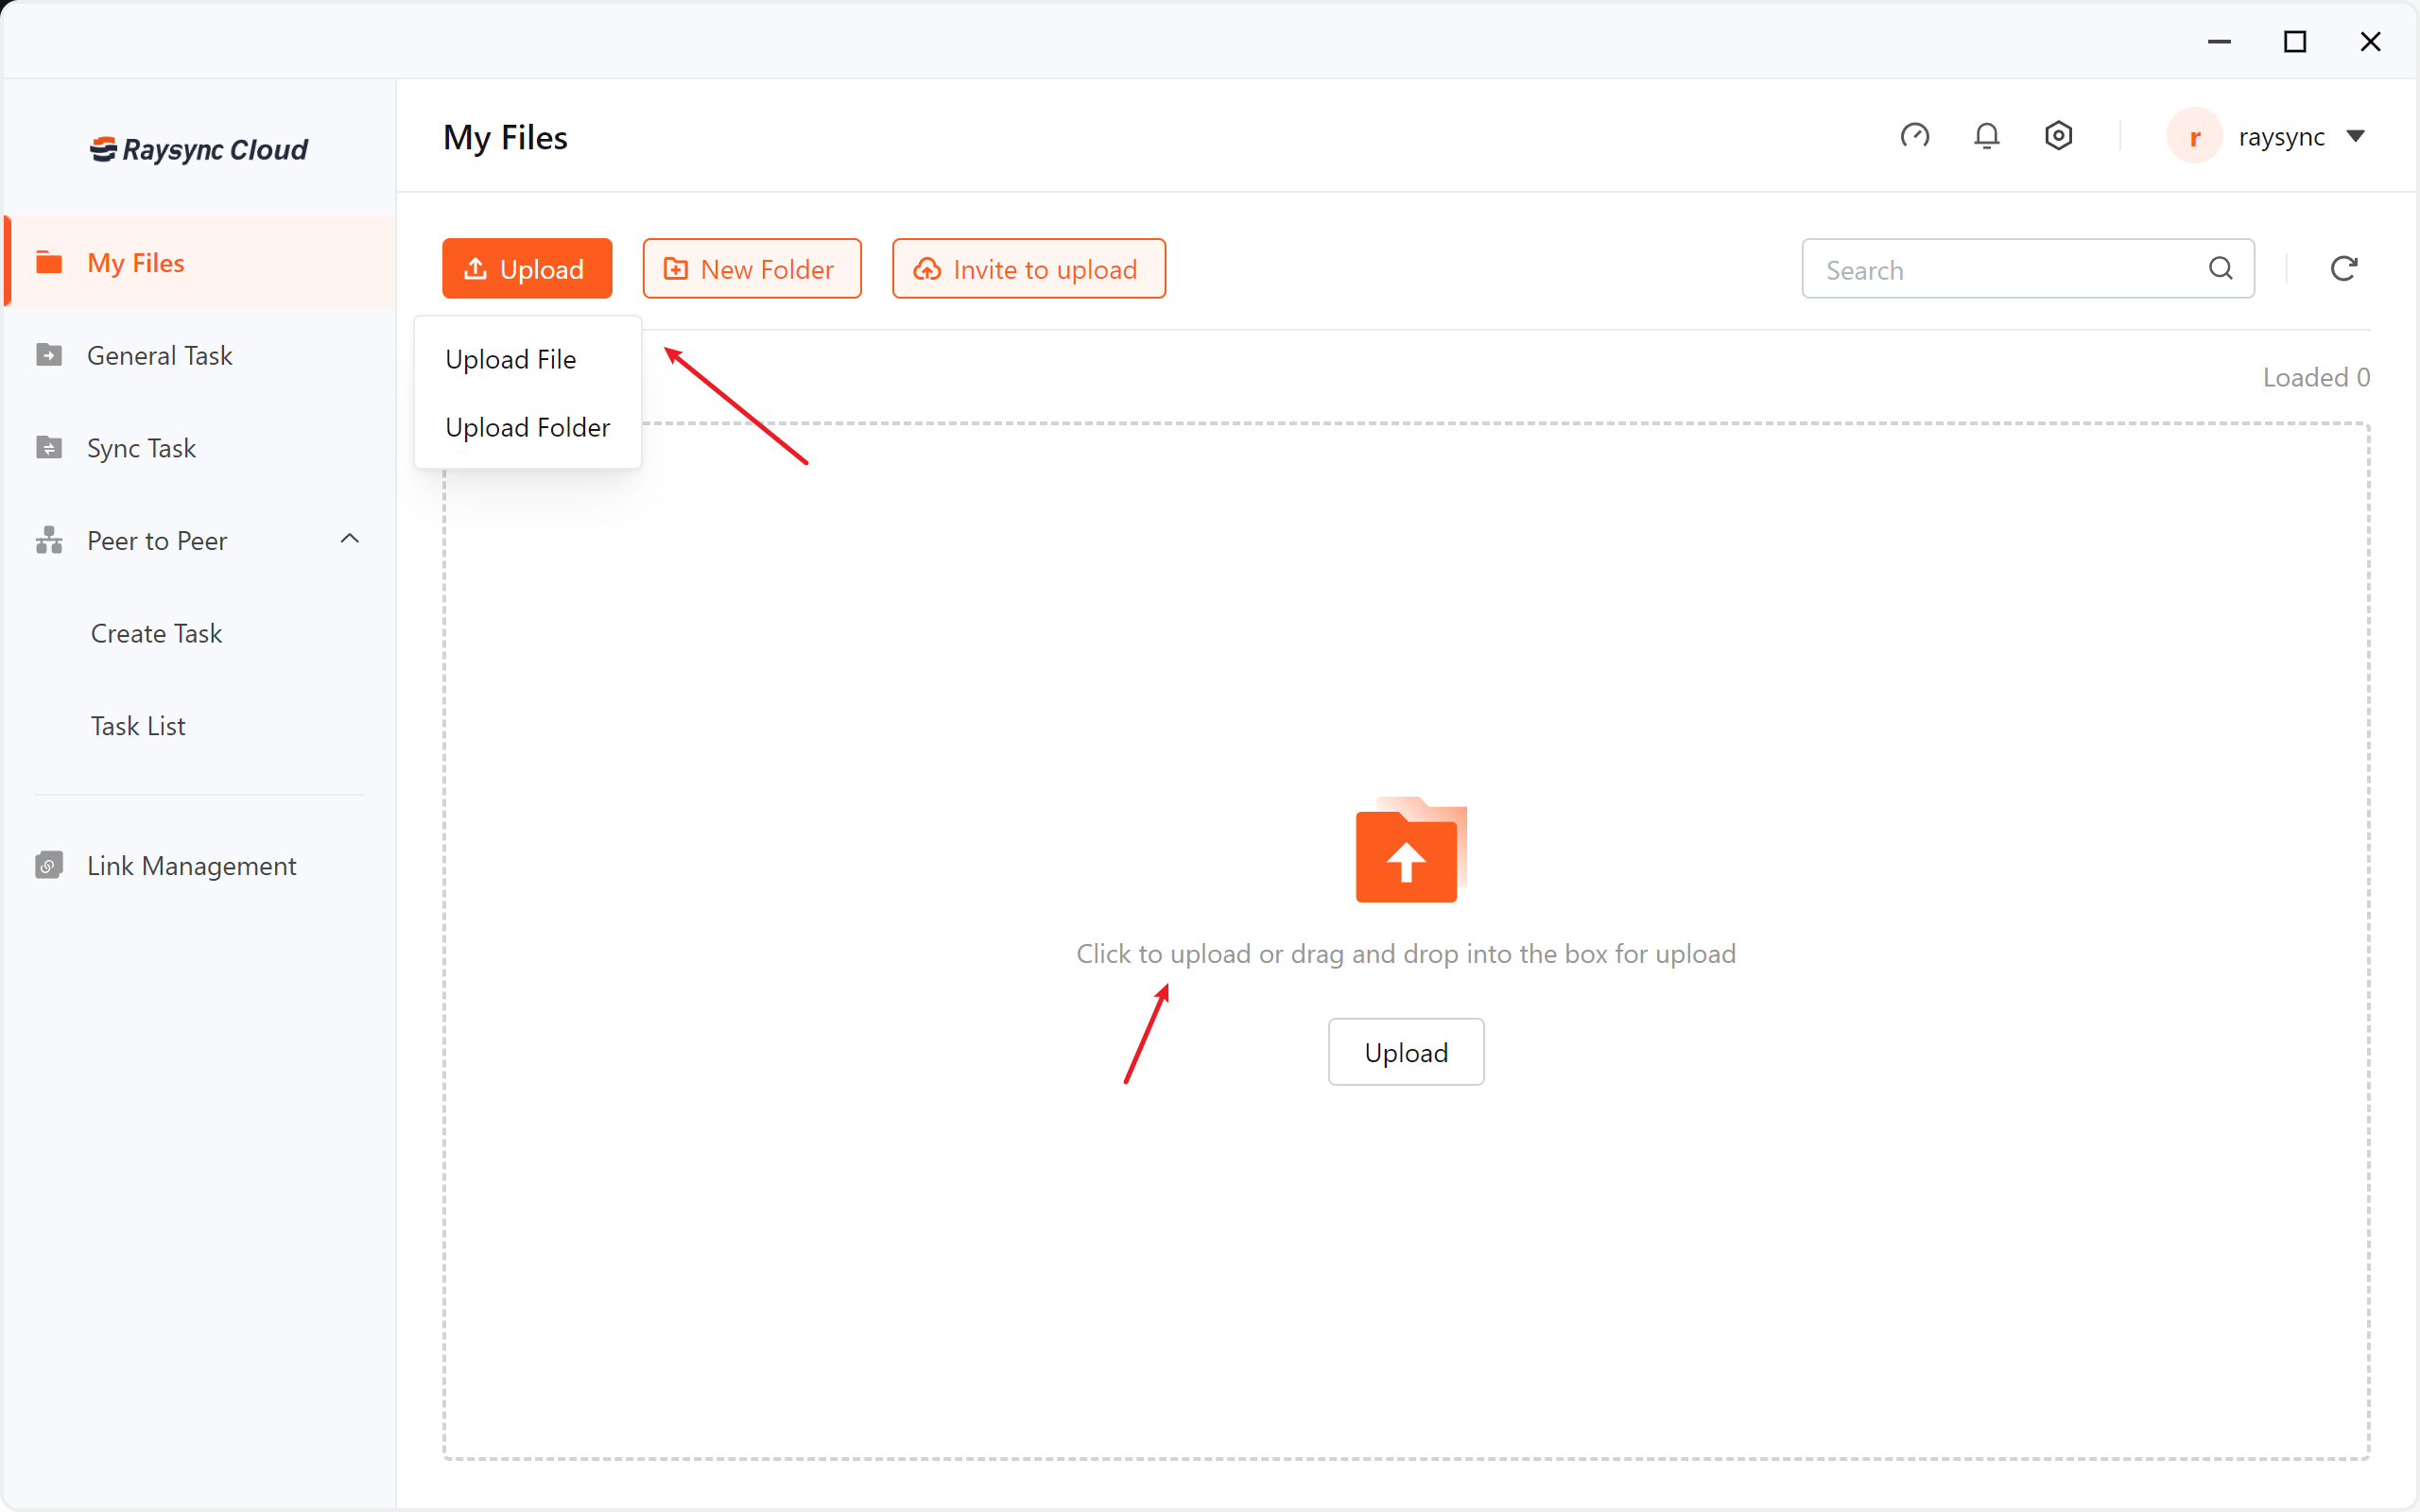
Upload files or folders
- In the [My files] , you can click [Upload] or drag and drop the files to upload the files or folders you want to upload.
- You can view the upload transfer task progress in [General Task].
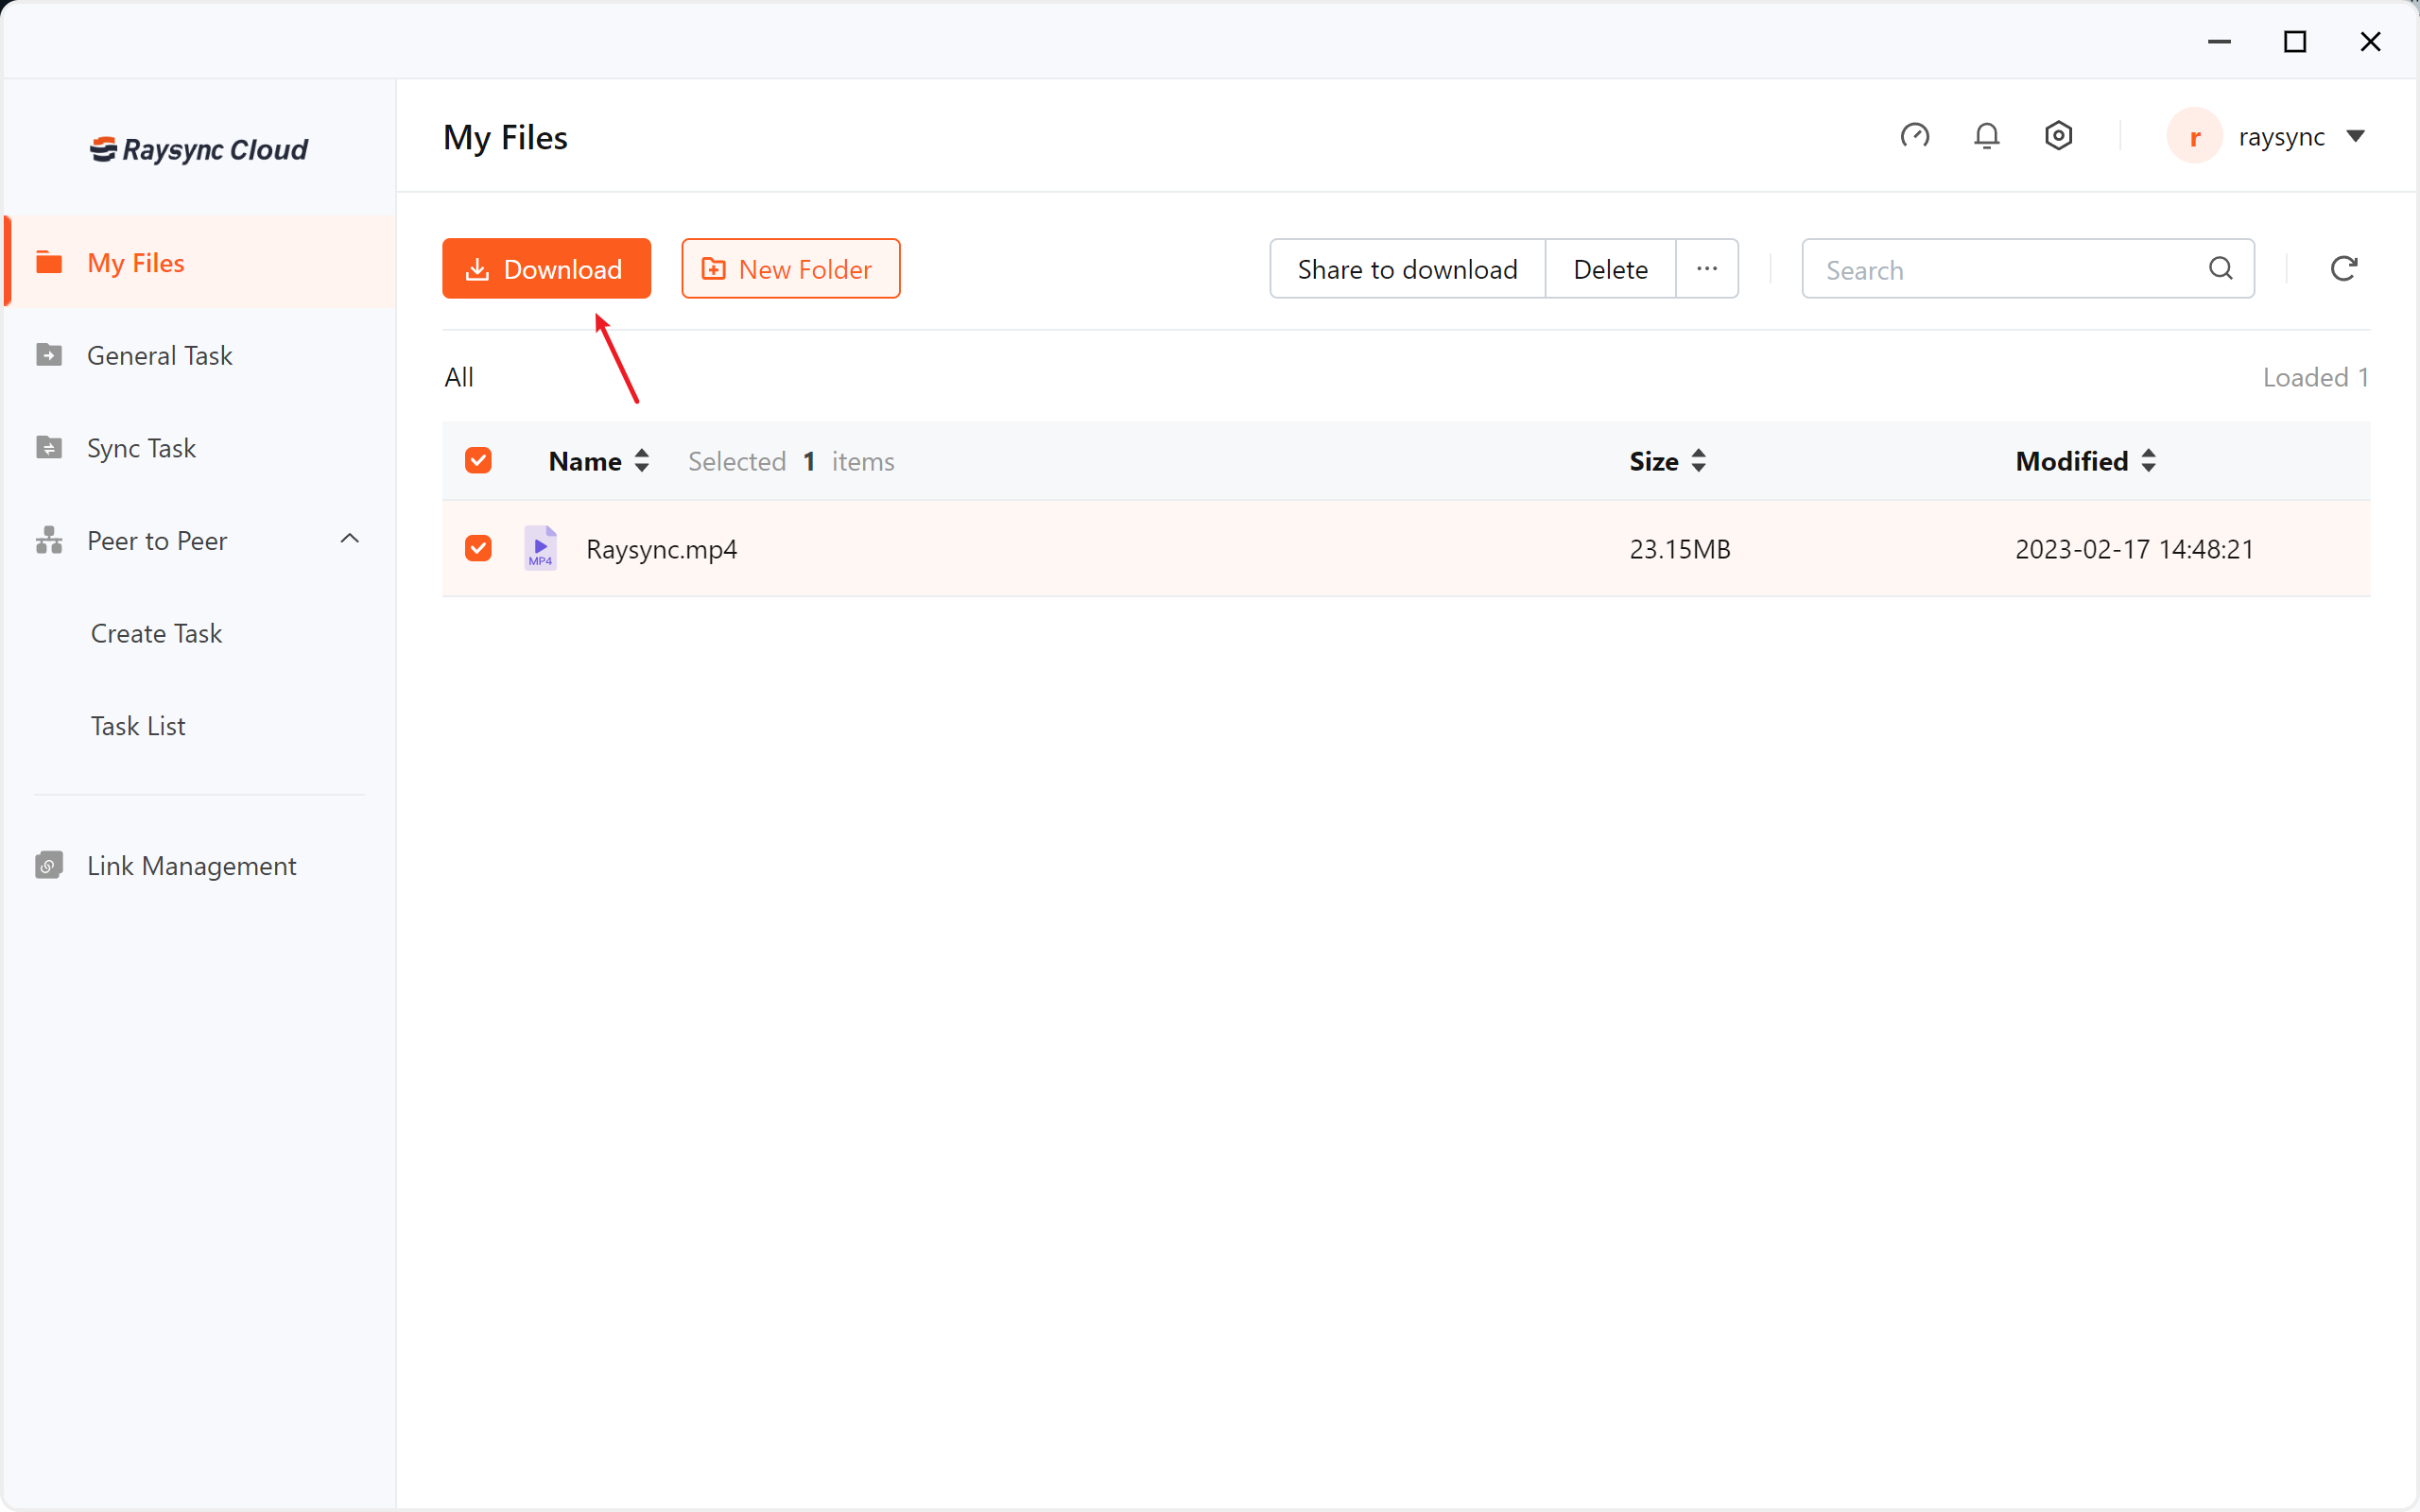
Download files or folders
- Select the files or folders you want to download and click [Download].
- You can view the download transfer task progress in [General Task].
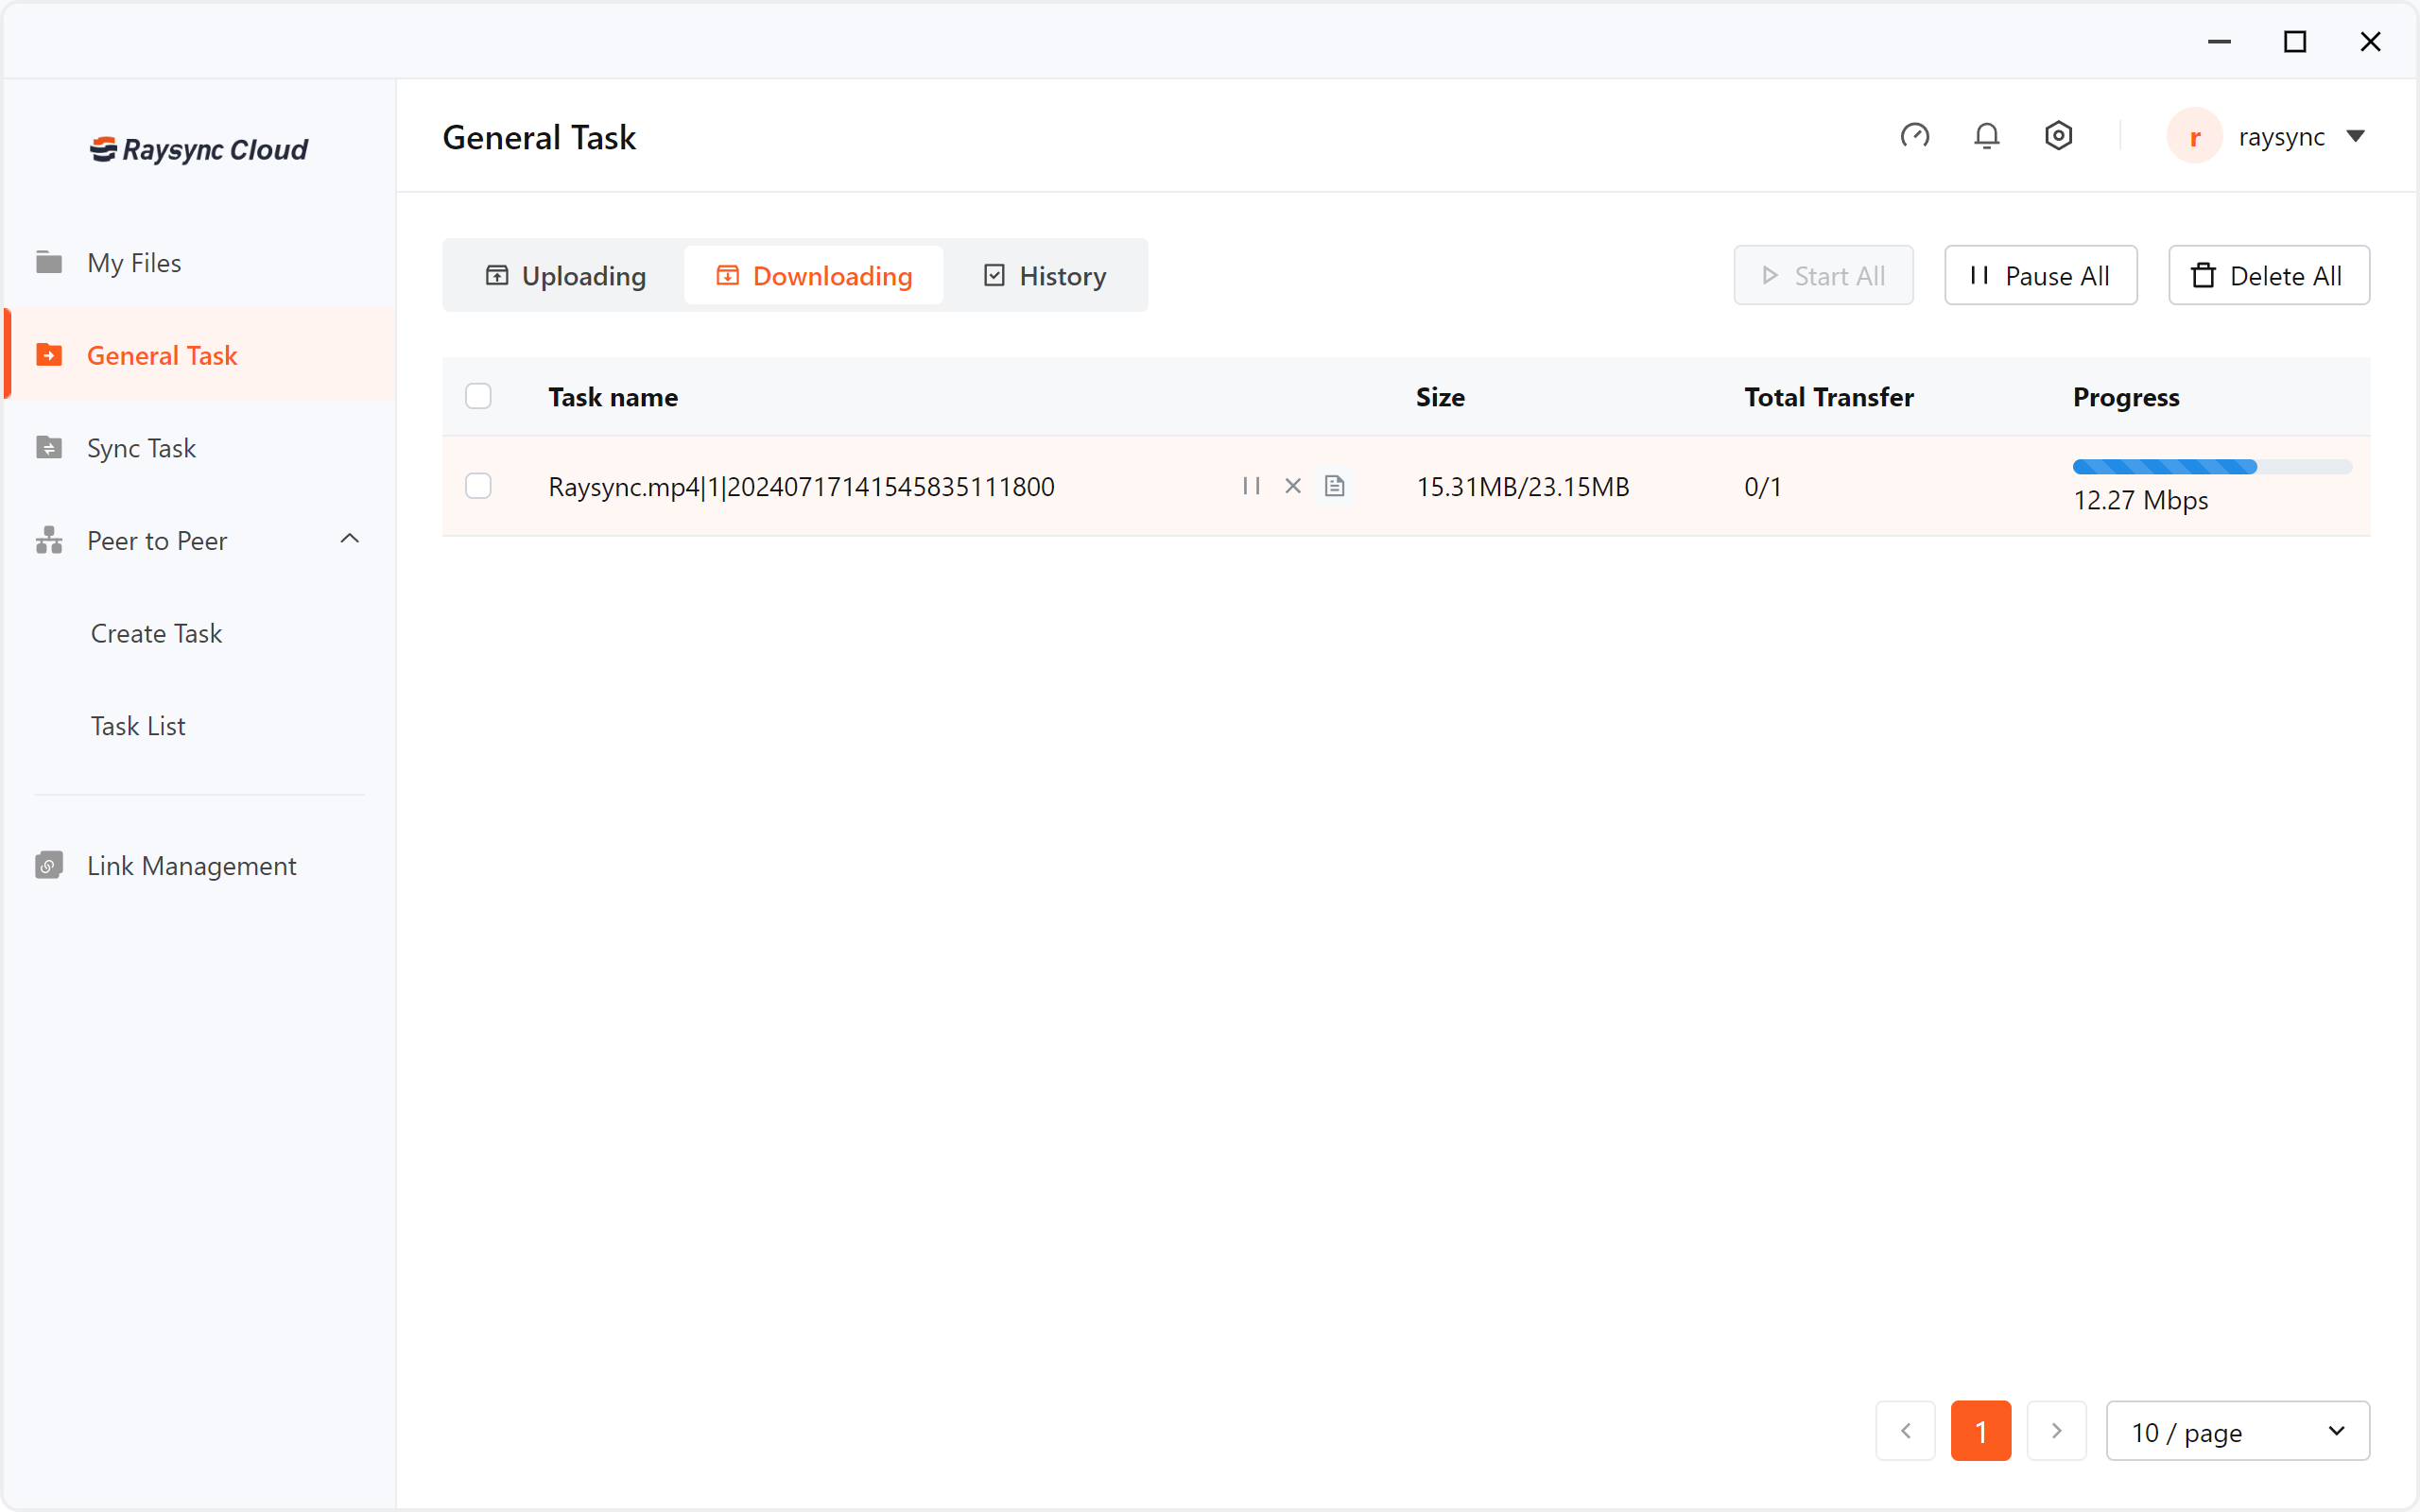
View transfer tasks
- In the [General Task], you can view manual upload/download transfer tasks and transfer history.
- You can pause, delete, start, and view the transfer details of the task in progress.
3.2 Sync task
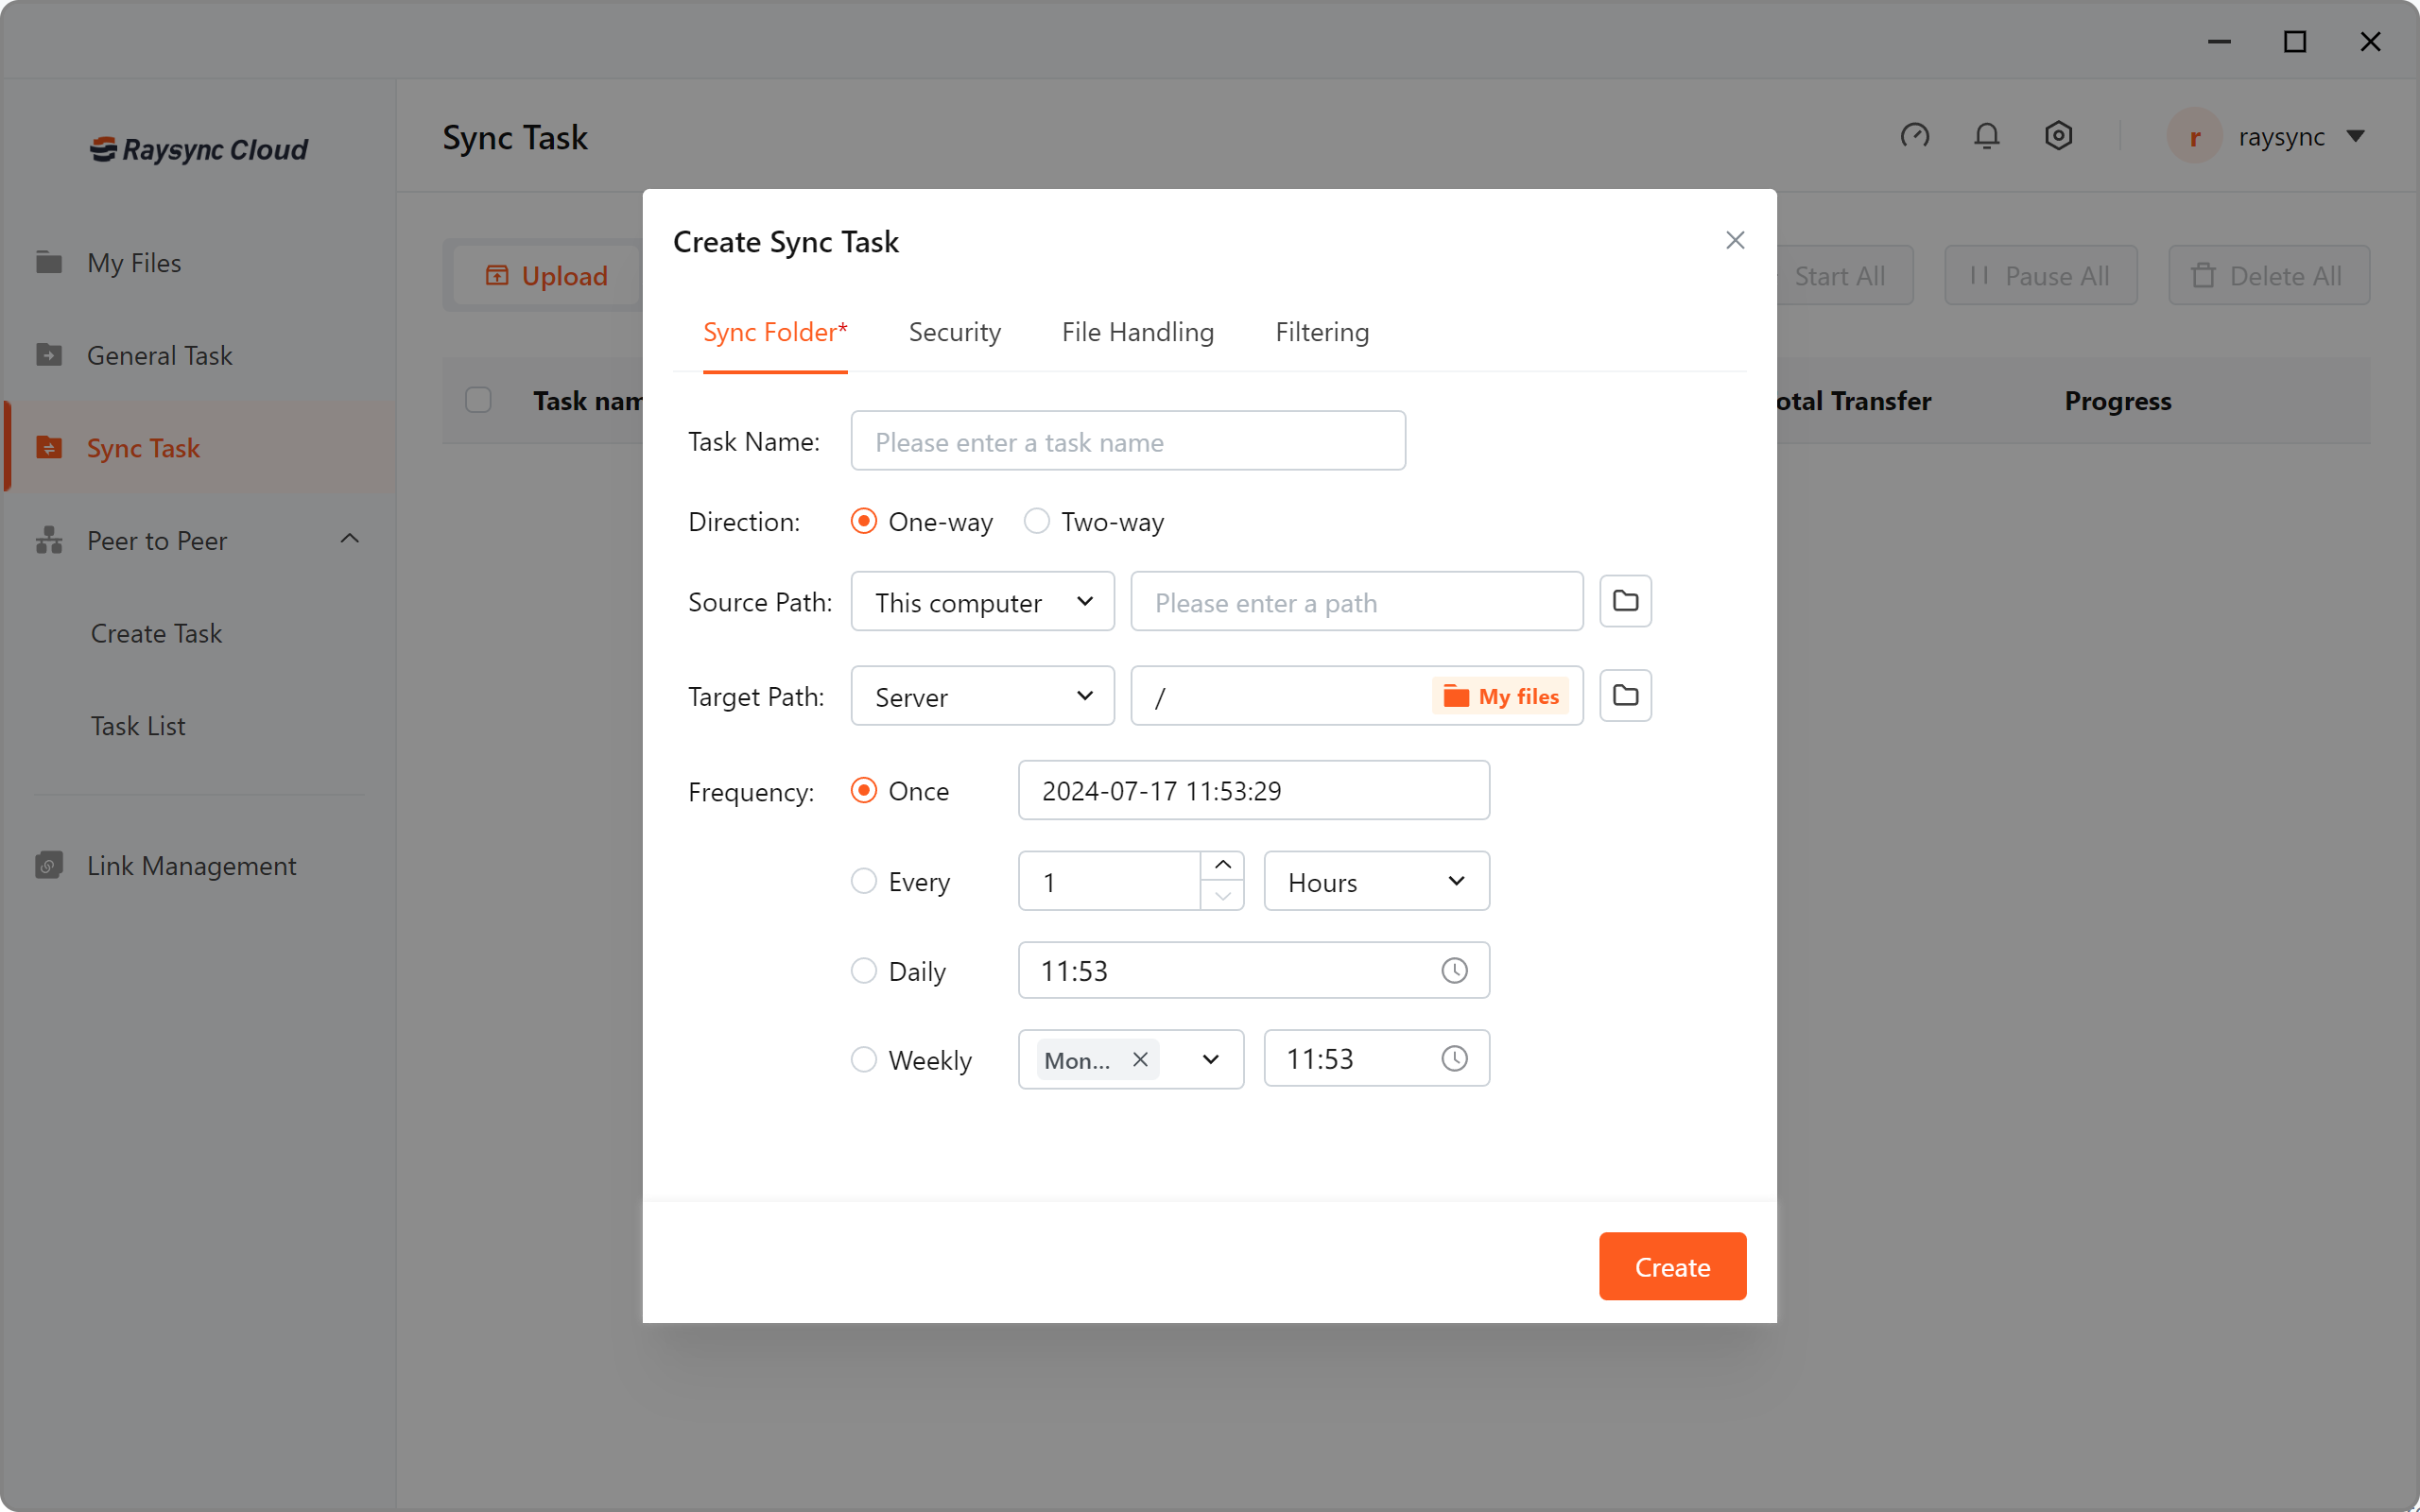
- In the Sync Task, Click the [Create Sync Task] .
-
Enter the task name of the sync task, the source directory path to be synchronized, the target path, the sync frequency and other optional configuration. Then click [Create].
| Function | Description |
| Task name | The name of a synchronization task is displayed in the task list after it is successfully created. |
| Direction |
1) One-way
When the source path is the server,the folder is synchronized from the server to the local.When the source path is the computer ,the folder is synchronized from the local to the server. 2) Two-way Raysync service will conduct two-way synchronization between radium speed server and local directories. After the two-way sync is enabled, Raysync will first upload the locaI directory files to the server directory, and then download the files of the server directory to the local directory, so as to maintain the consistency between the server directory and the local client directory files. |
| Source path |
Select the source folder path to be synchronized,support two-way. When the source path is the computer, it is a synchronous upload. When the source path is the server, it is a synchronous download. When two-way synch is used, the source and target paths are not distinguished. When selecting folder, you can select multiple paths of the same level to transfer. |
| Target path |
Select the target path for synchronization to the server or local. |
| Sync schedule |
Select the start time of the synchronization task,support two synchronization frequency settings. 1) Synchronize once a day at a fixed time. For example, select "Daily 18:22", the synchronization task will start synchronization at 18:22 every day. 2)Synchronize every time period. For example, select Every 60 seconds,the synchronization task will start synchronization every 60 seconds. 3)Synchronize once only. For example,select"Once 12:00",the synchronization task will start synchronization once at 12:00. 4)Synchronize by week If one or more dates are specified in a week,the synchronization will be performed at a certain time of the specified week. For example,if you set 20:14 synchronization on Monday and Wednesday every week,you can synchronize at 20:14 on Monday and Wednesday. |
| Security-enable encryption transfer |
Use encrypted transfer to make transfer more secure. |
File Handling-Preserve modification time Enabled |
Enabled: After the synchronization task is completed, the modification time of the file is the same with the local modification time. Disabled: After the synchronization task transfer is completed, the modification time of the file is the same with the current client transfer completion time. |
File Handling- |
Enabled: The folder of the first layer will not be transmitted Disabled: All files and folders in the directory will be transferred. |
File Handling- Delete target file synchronously when source deleted |
Enabled: if the file of the source or destination path is deleted, the other party's file will also be deleted synchronously. For example, if the local directory A is synchronized to the server, if the "test" file in the A directory is deleted, the "test" file on the server will be deleted synchronously. Tips: Root directory is not supported; "Delete Synchronously" and "Transfer source files only" can notenabled both. |
File Handling-Preserve file ACL attribute |
It is a mechanism for permission control of files or directories. It can control the access permissions of users or groups to files or directories. Acls enable administrators to finer control file or directory access permissions to better protect system security. Retention is only supported between the same systems. |
File Handling-Check before transfer start ,It will not start until file is no change in 3~30s |
The transfer will be checked once at the beginning of the transfer, when the file has not changed within 3-30 years, the file will actually start the transfer. When the file is changed within the specified time, the file will not be transferred. Avoid transferring files that are in use and ensure the integrity of the transferred files. |
File Handling-The processing mode of source files after synchronization is complete |
1, after synchronization, automatically delete the source directory (for synchronous upload, download)
1) Delete all source directories and files
For example, after the synchronization is complete, directory A and the files in directory A are automatically deleted.
2) Retain the source directory structure and delete only the files in directory A. Neither directory A nor the directories in Directory A are deleted
2. After synchronization, transfer the source file and delete it (only applicable to upload)
The uploaded source file is automatically transferred to the path xx after xx hours, and the source file is automatically cleared after xx days.
|
File Handling-Synchronous transfer Supports synchronization when the source file is updated |
Synchronize only when the source file has been modified or added, which can avoid unnecessary duplicate synchronization operations
|
File Handling-handling of existing target files |
When the target file already exists and content is inconsistent with the source file,you have two updatesways 1) Overwrite target file Directly overwrite existing file contents 2) Overwrite if sou rse newer Overwrite if the last modification time of the uploaded or downloaded file is newer than the time of the target file. 3) Append to the target file (Notapplicable to object storage) Append the new file contents to the end of the target file 4) Rename file Rename the source file when the source file has the same name as the target file For example: if test exists in the target path, if a test with different content is uploaded, the newly uploaded file will be renamed to test(1). |
| Filtering-transfer files and folder |
Supports setting files that are allowed to be transferred or filtered. Files and folder that meet the conditions will be filtered or transferred. Supports the use of wildcards. For example, if you need to filter all files starting with "test" during transfer, you can enable the blacklist and enter test*. |
| Filtering-filter files of a specified size filter | Files file whose size exceeds the set size when transferring |
After successful creation, you can see the transfer status of the sync task in the list. You can pause, start, delete, view task transfer details, and edit sync task configuration.

3.3 Peer to Peer task
3.3.1 Send Peer to Peer transfer file
-
In the Peer to Peer, click [Create Task].
-
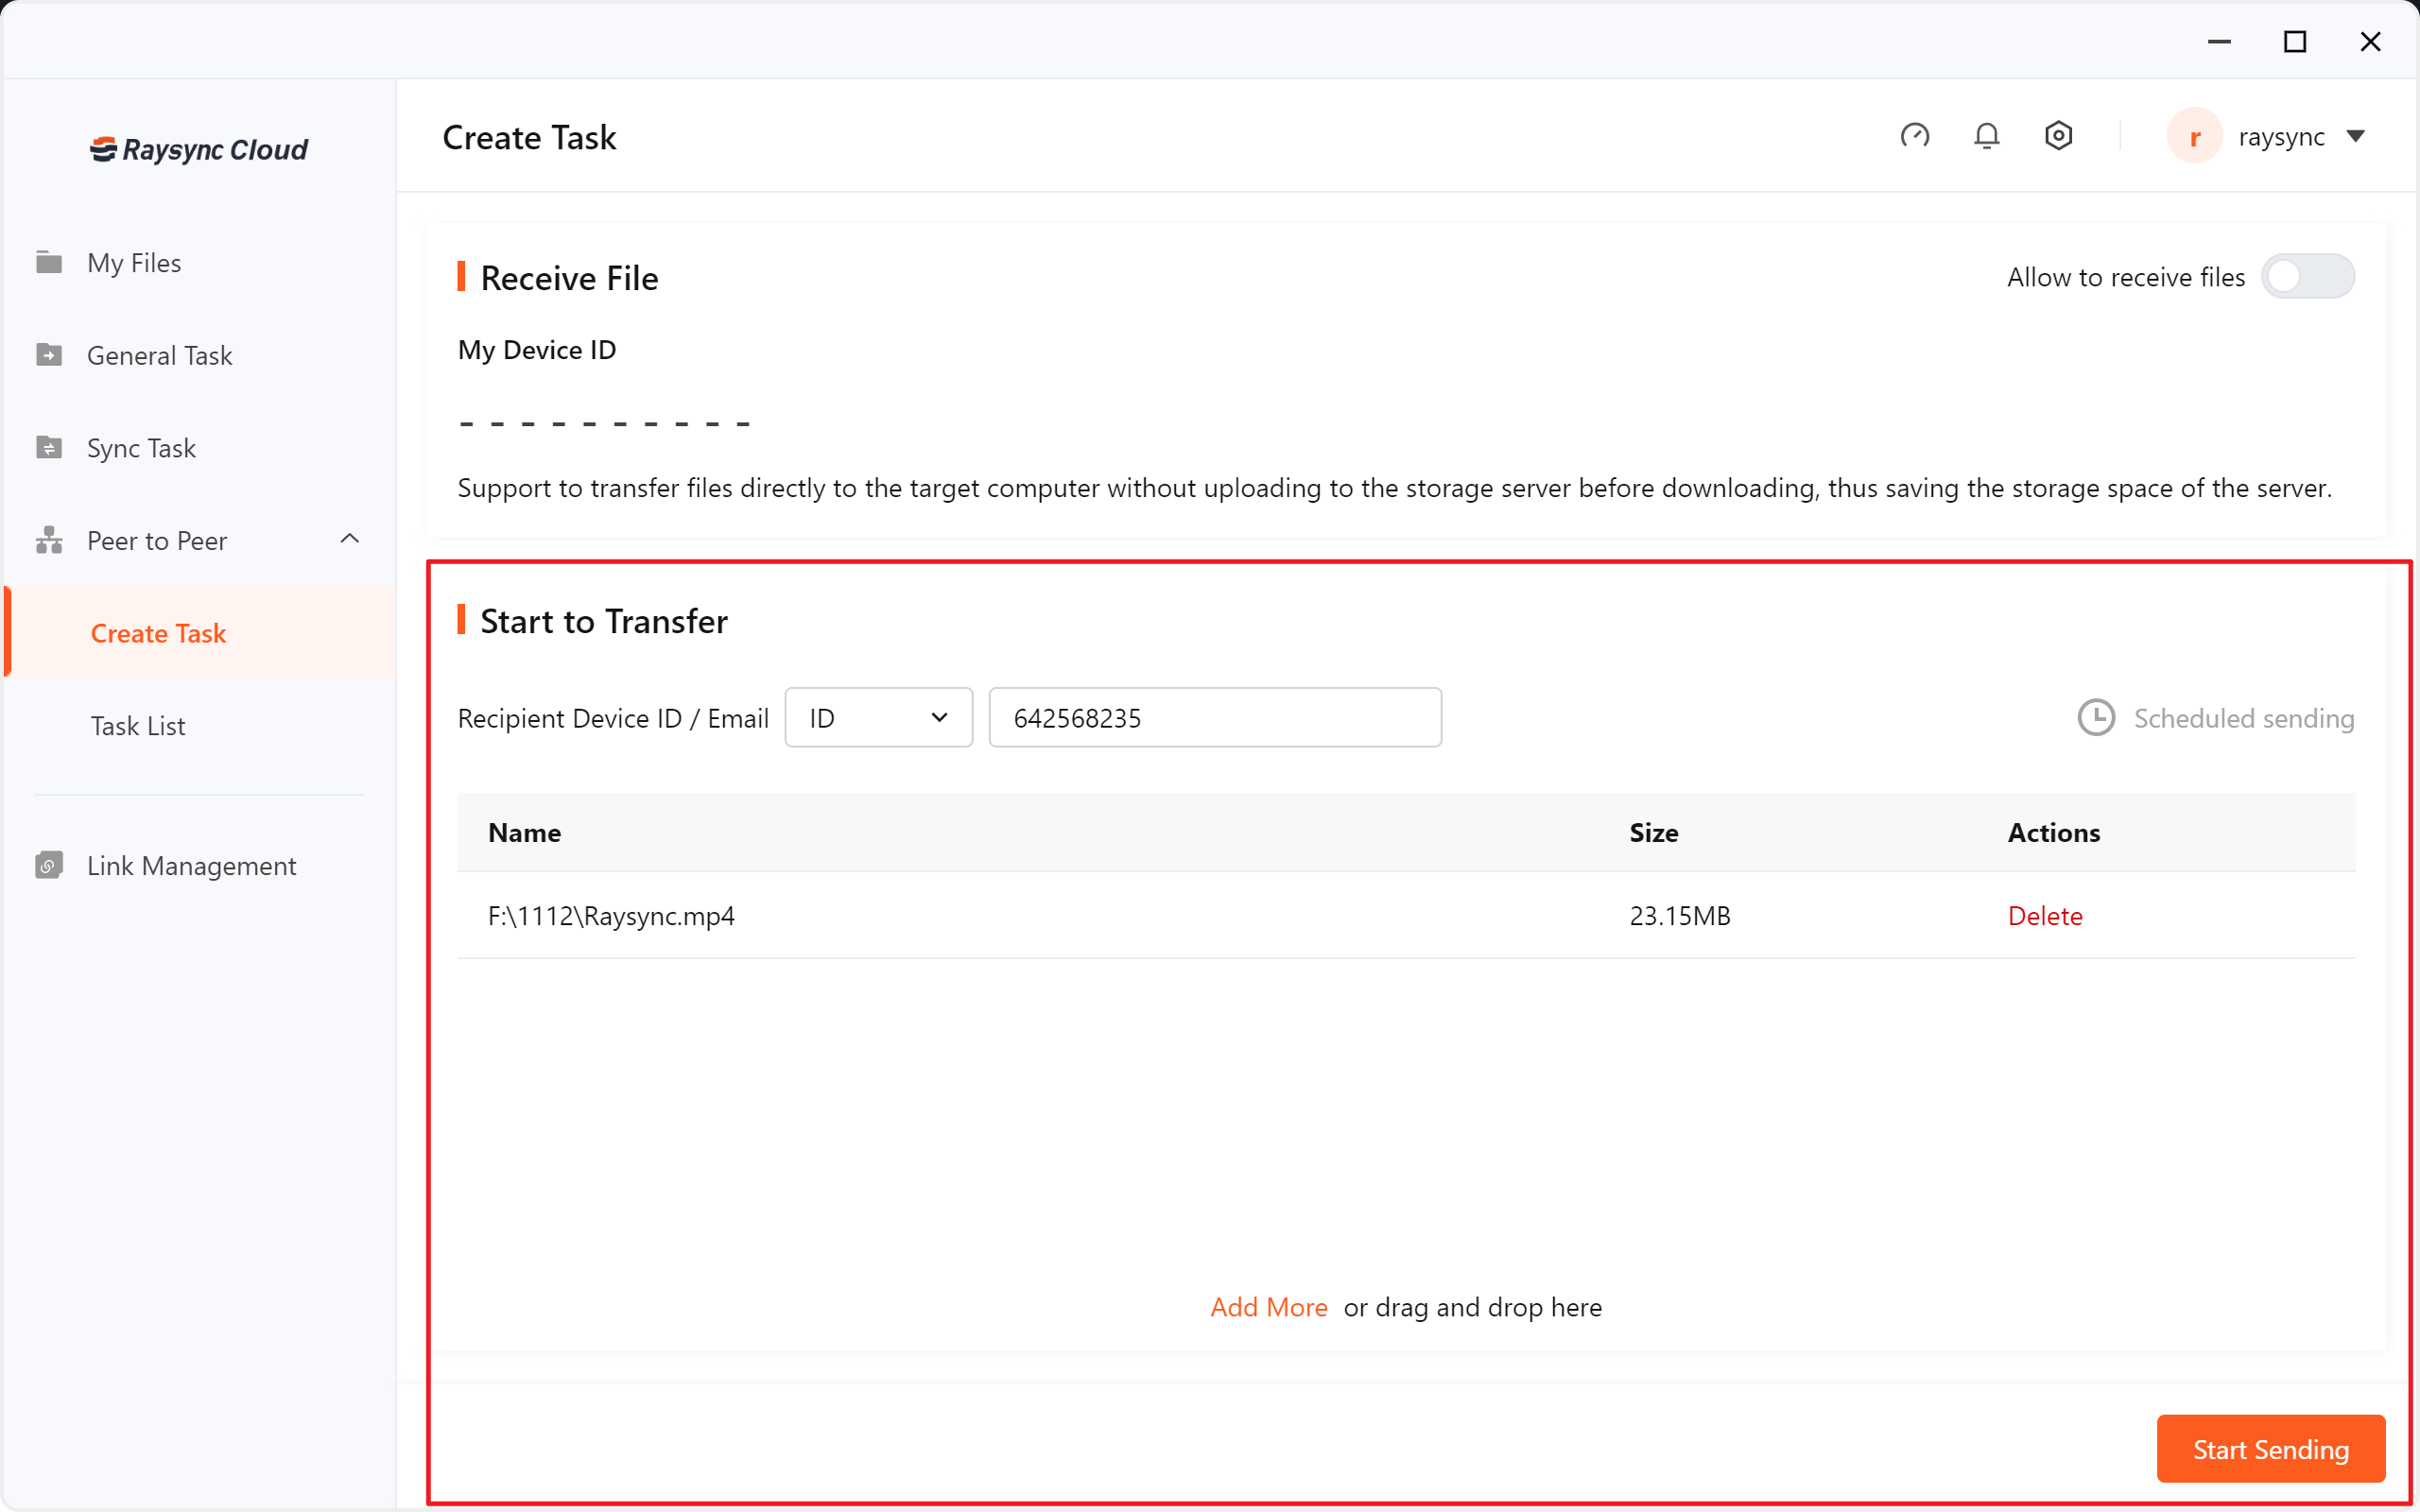
In the Start to Transfer , Enter the recipient's device ID or Email. Click to [upload] or drag and drop to select the files or folders you want to send. Click [Start Sending].
Note: The recipient needs to turn on the [Allow to receive files]
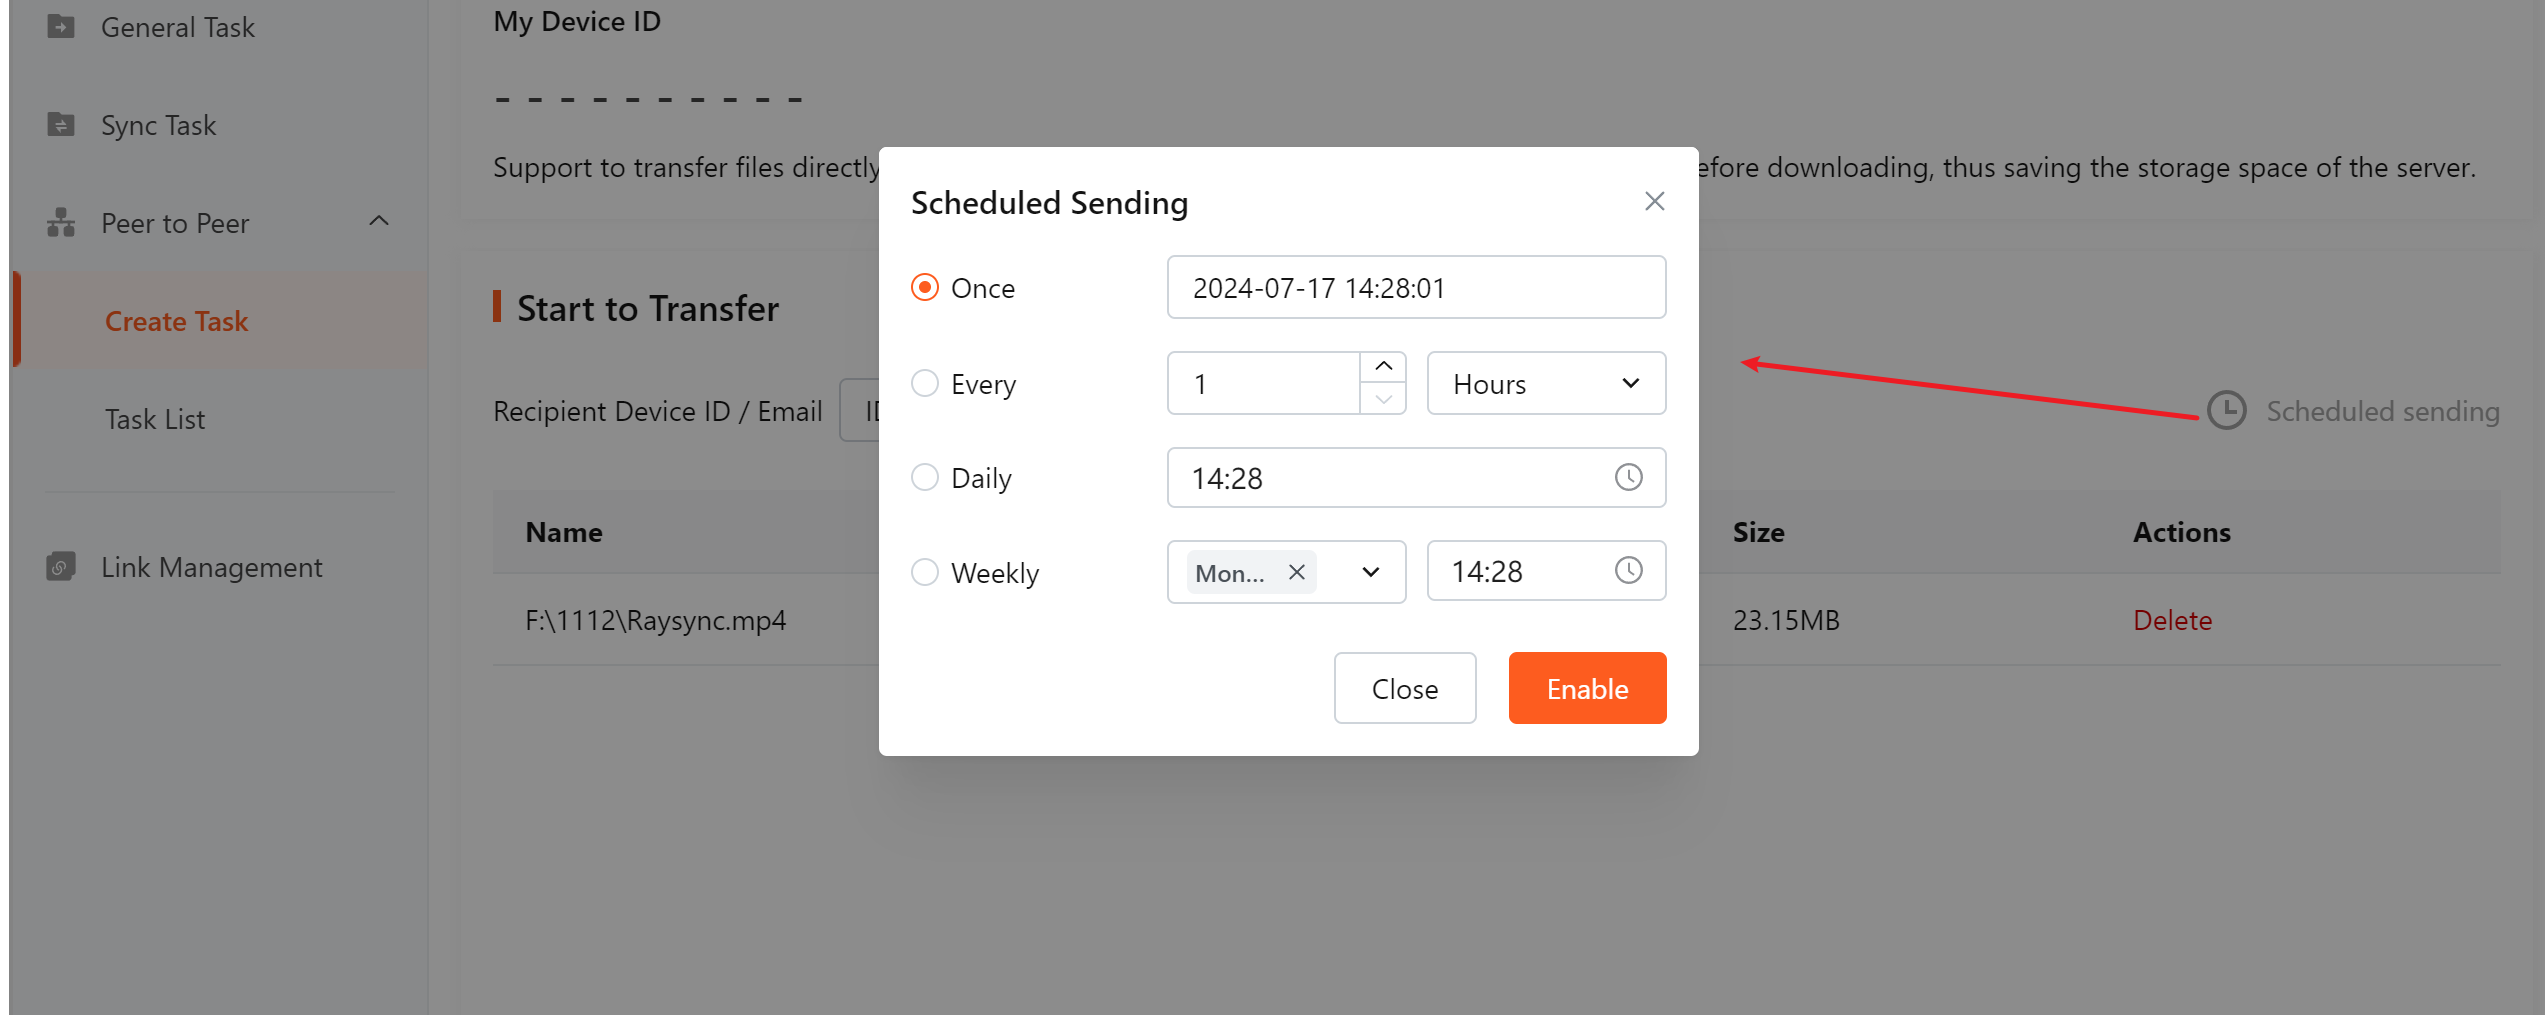
If you want to create a scheduled Peer to Peer task, click [scheduled sending] to set the scheduled when creating it.
3.3.2 Receive peer to peer files
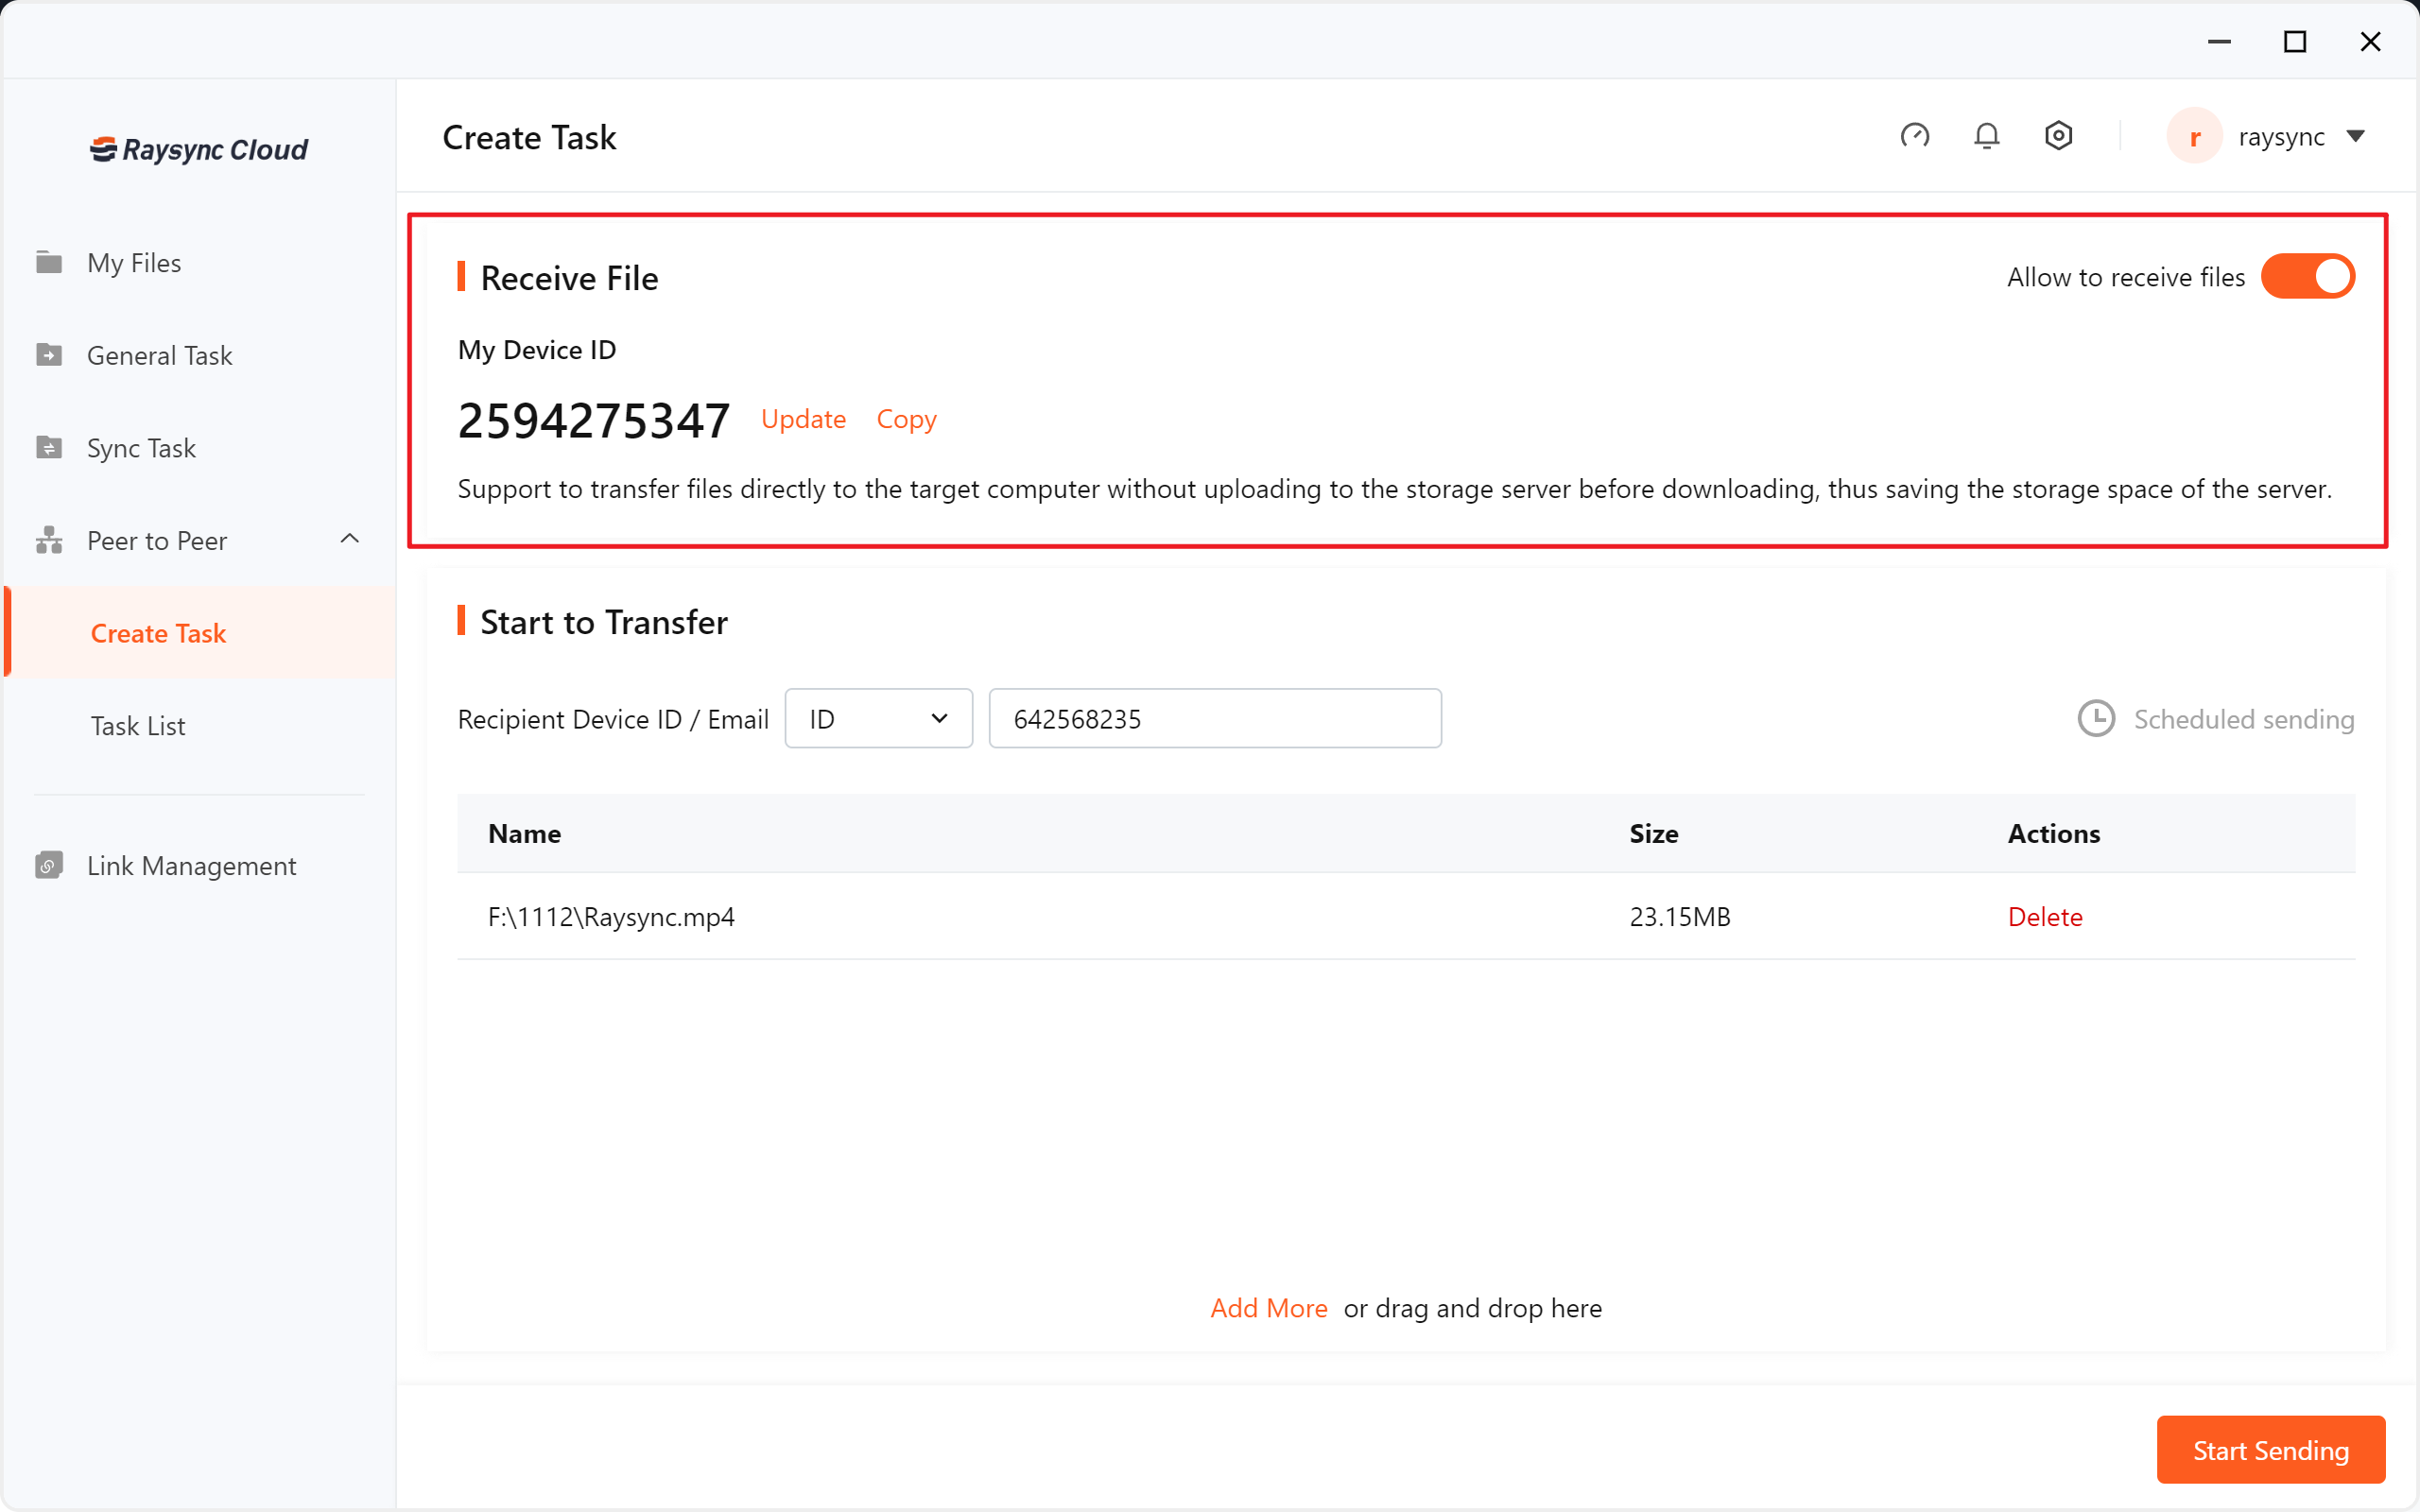
- In the Peer to Peer, Enable [Allow to receive files], then others can send files to you.
- If the recipient does not want to receive files sent by others, Disable [Allow to receive files].
- You can set the default save path for accepted files in the [Settings]-[Transfer]-[Peer to Peer].
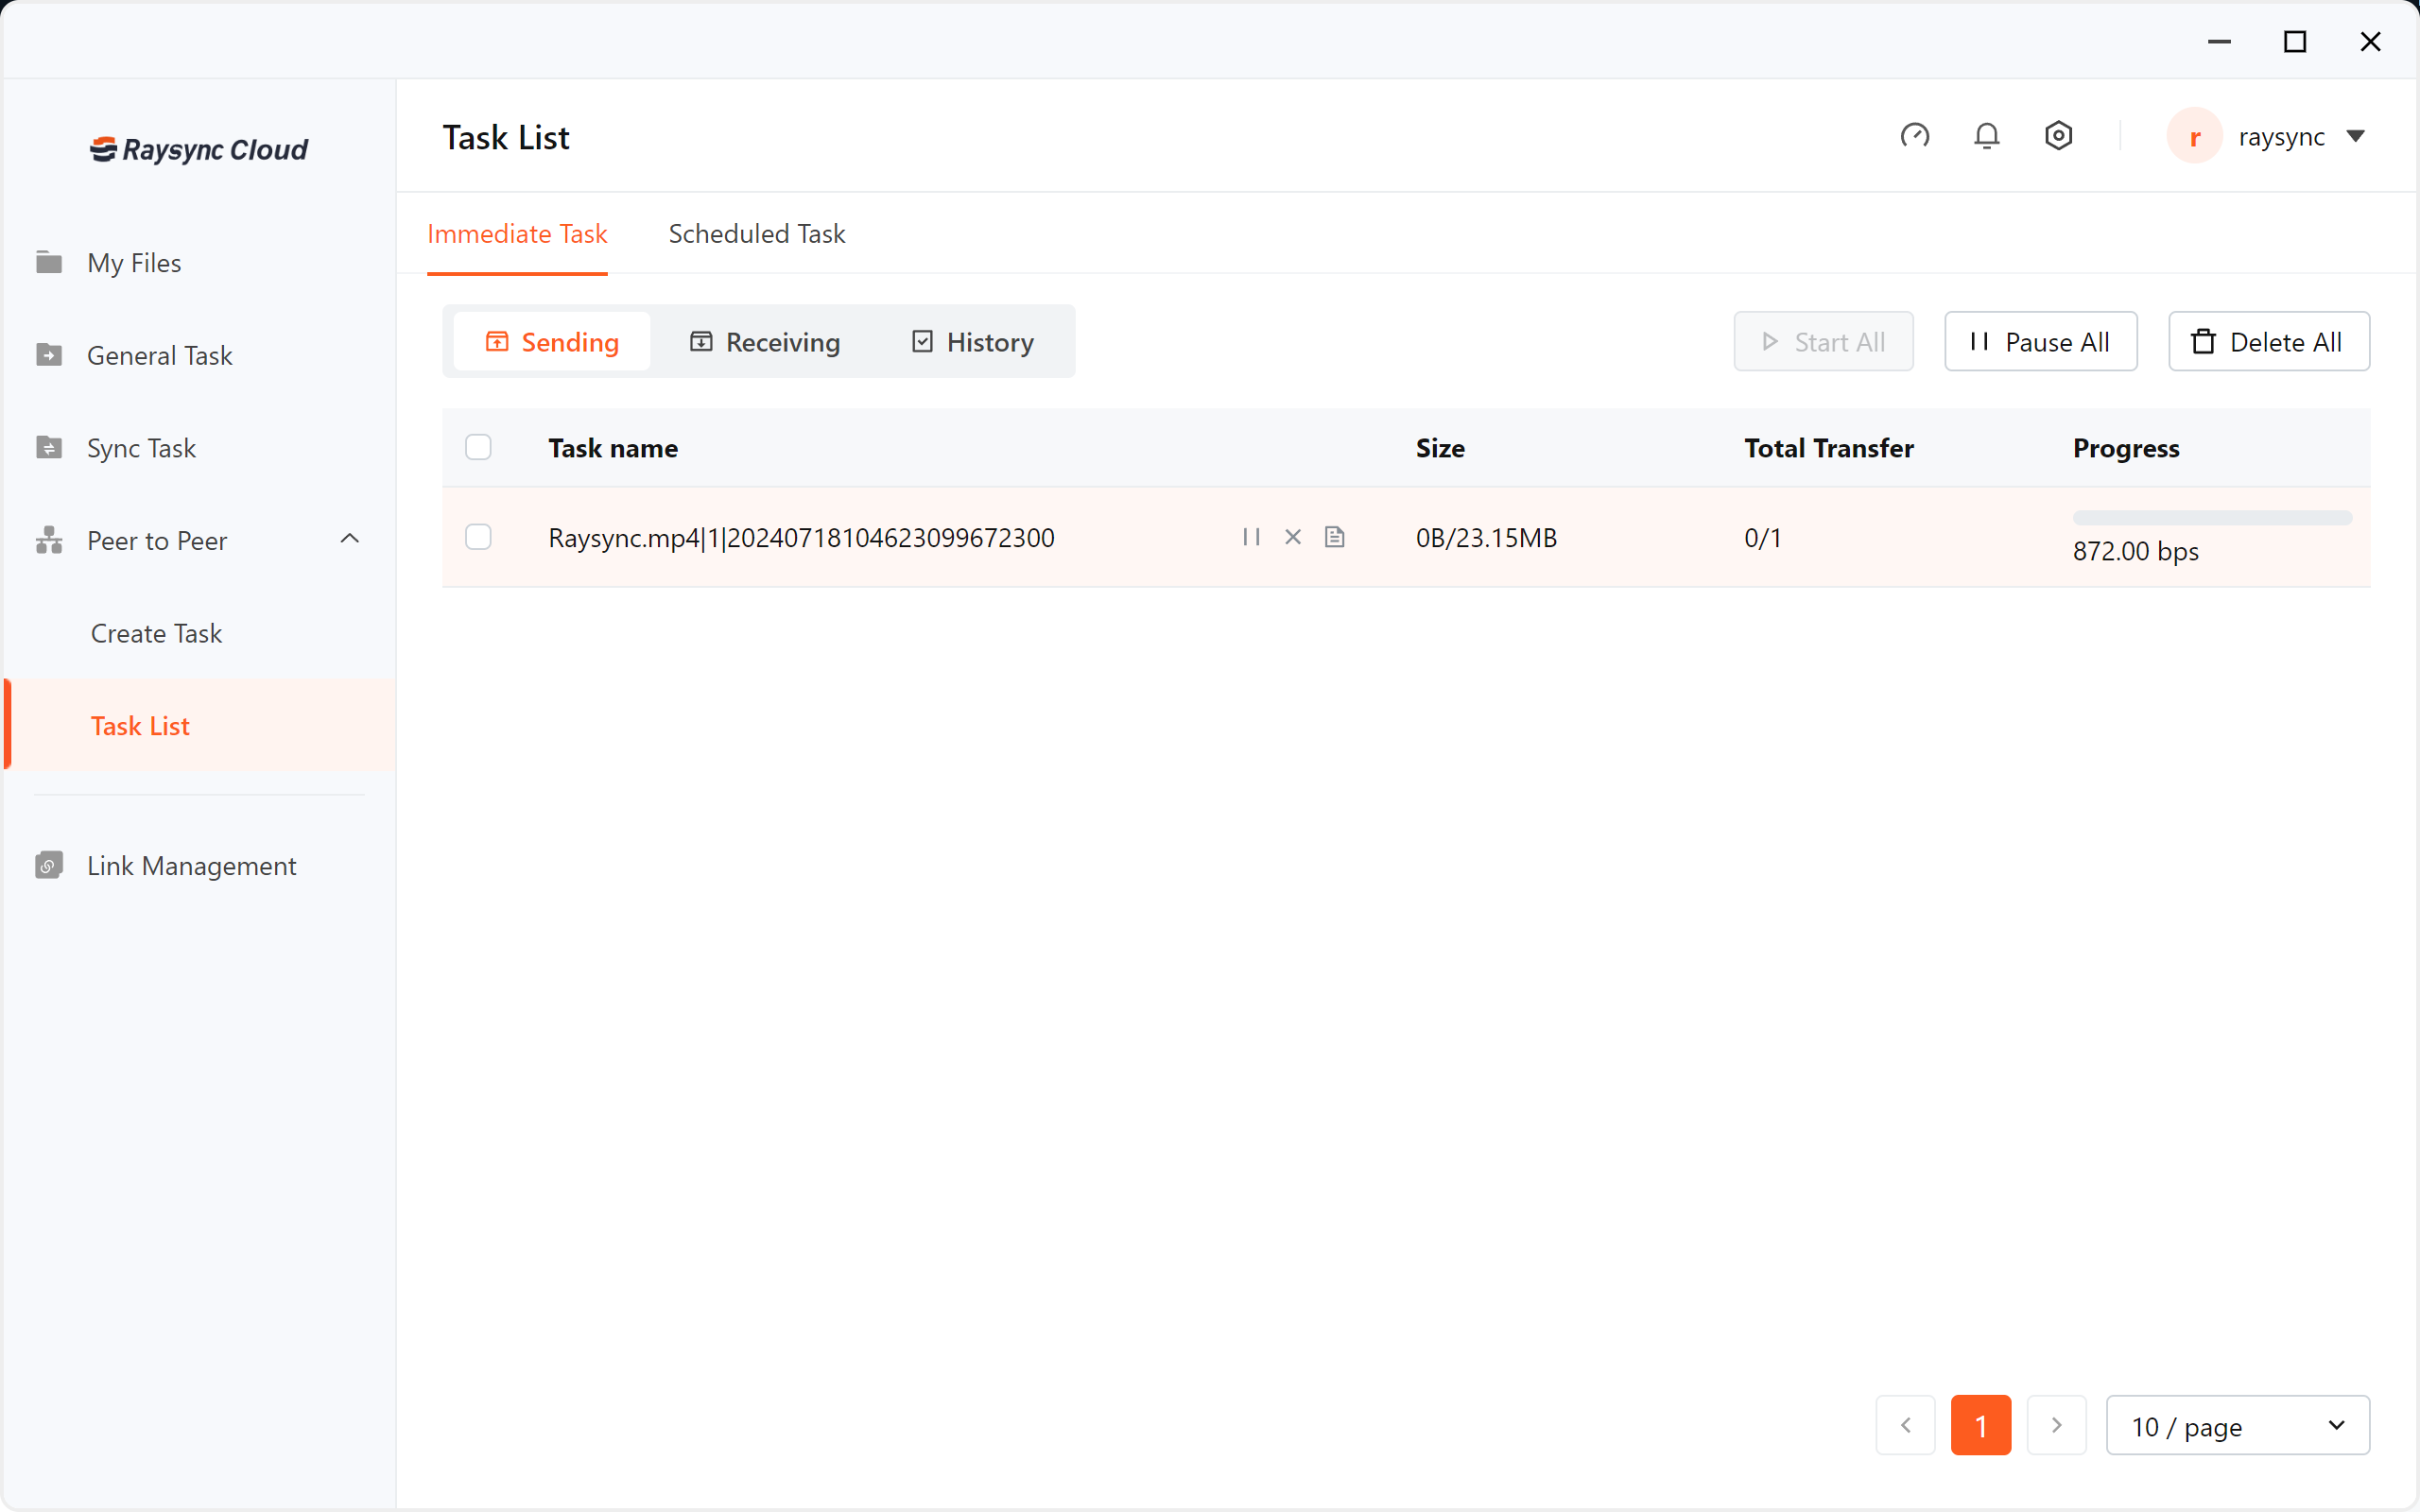
After successful creation, you can see the transfer status of the peer-to-peer task in the task list. You can pause, start, delete the task, and view the task transfer details.
4. Create share link
You can share the files (folders) on the storage with other partners to download.
-
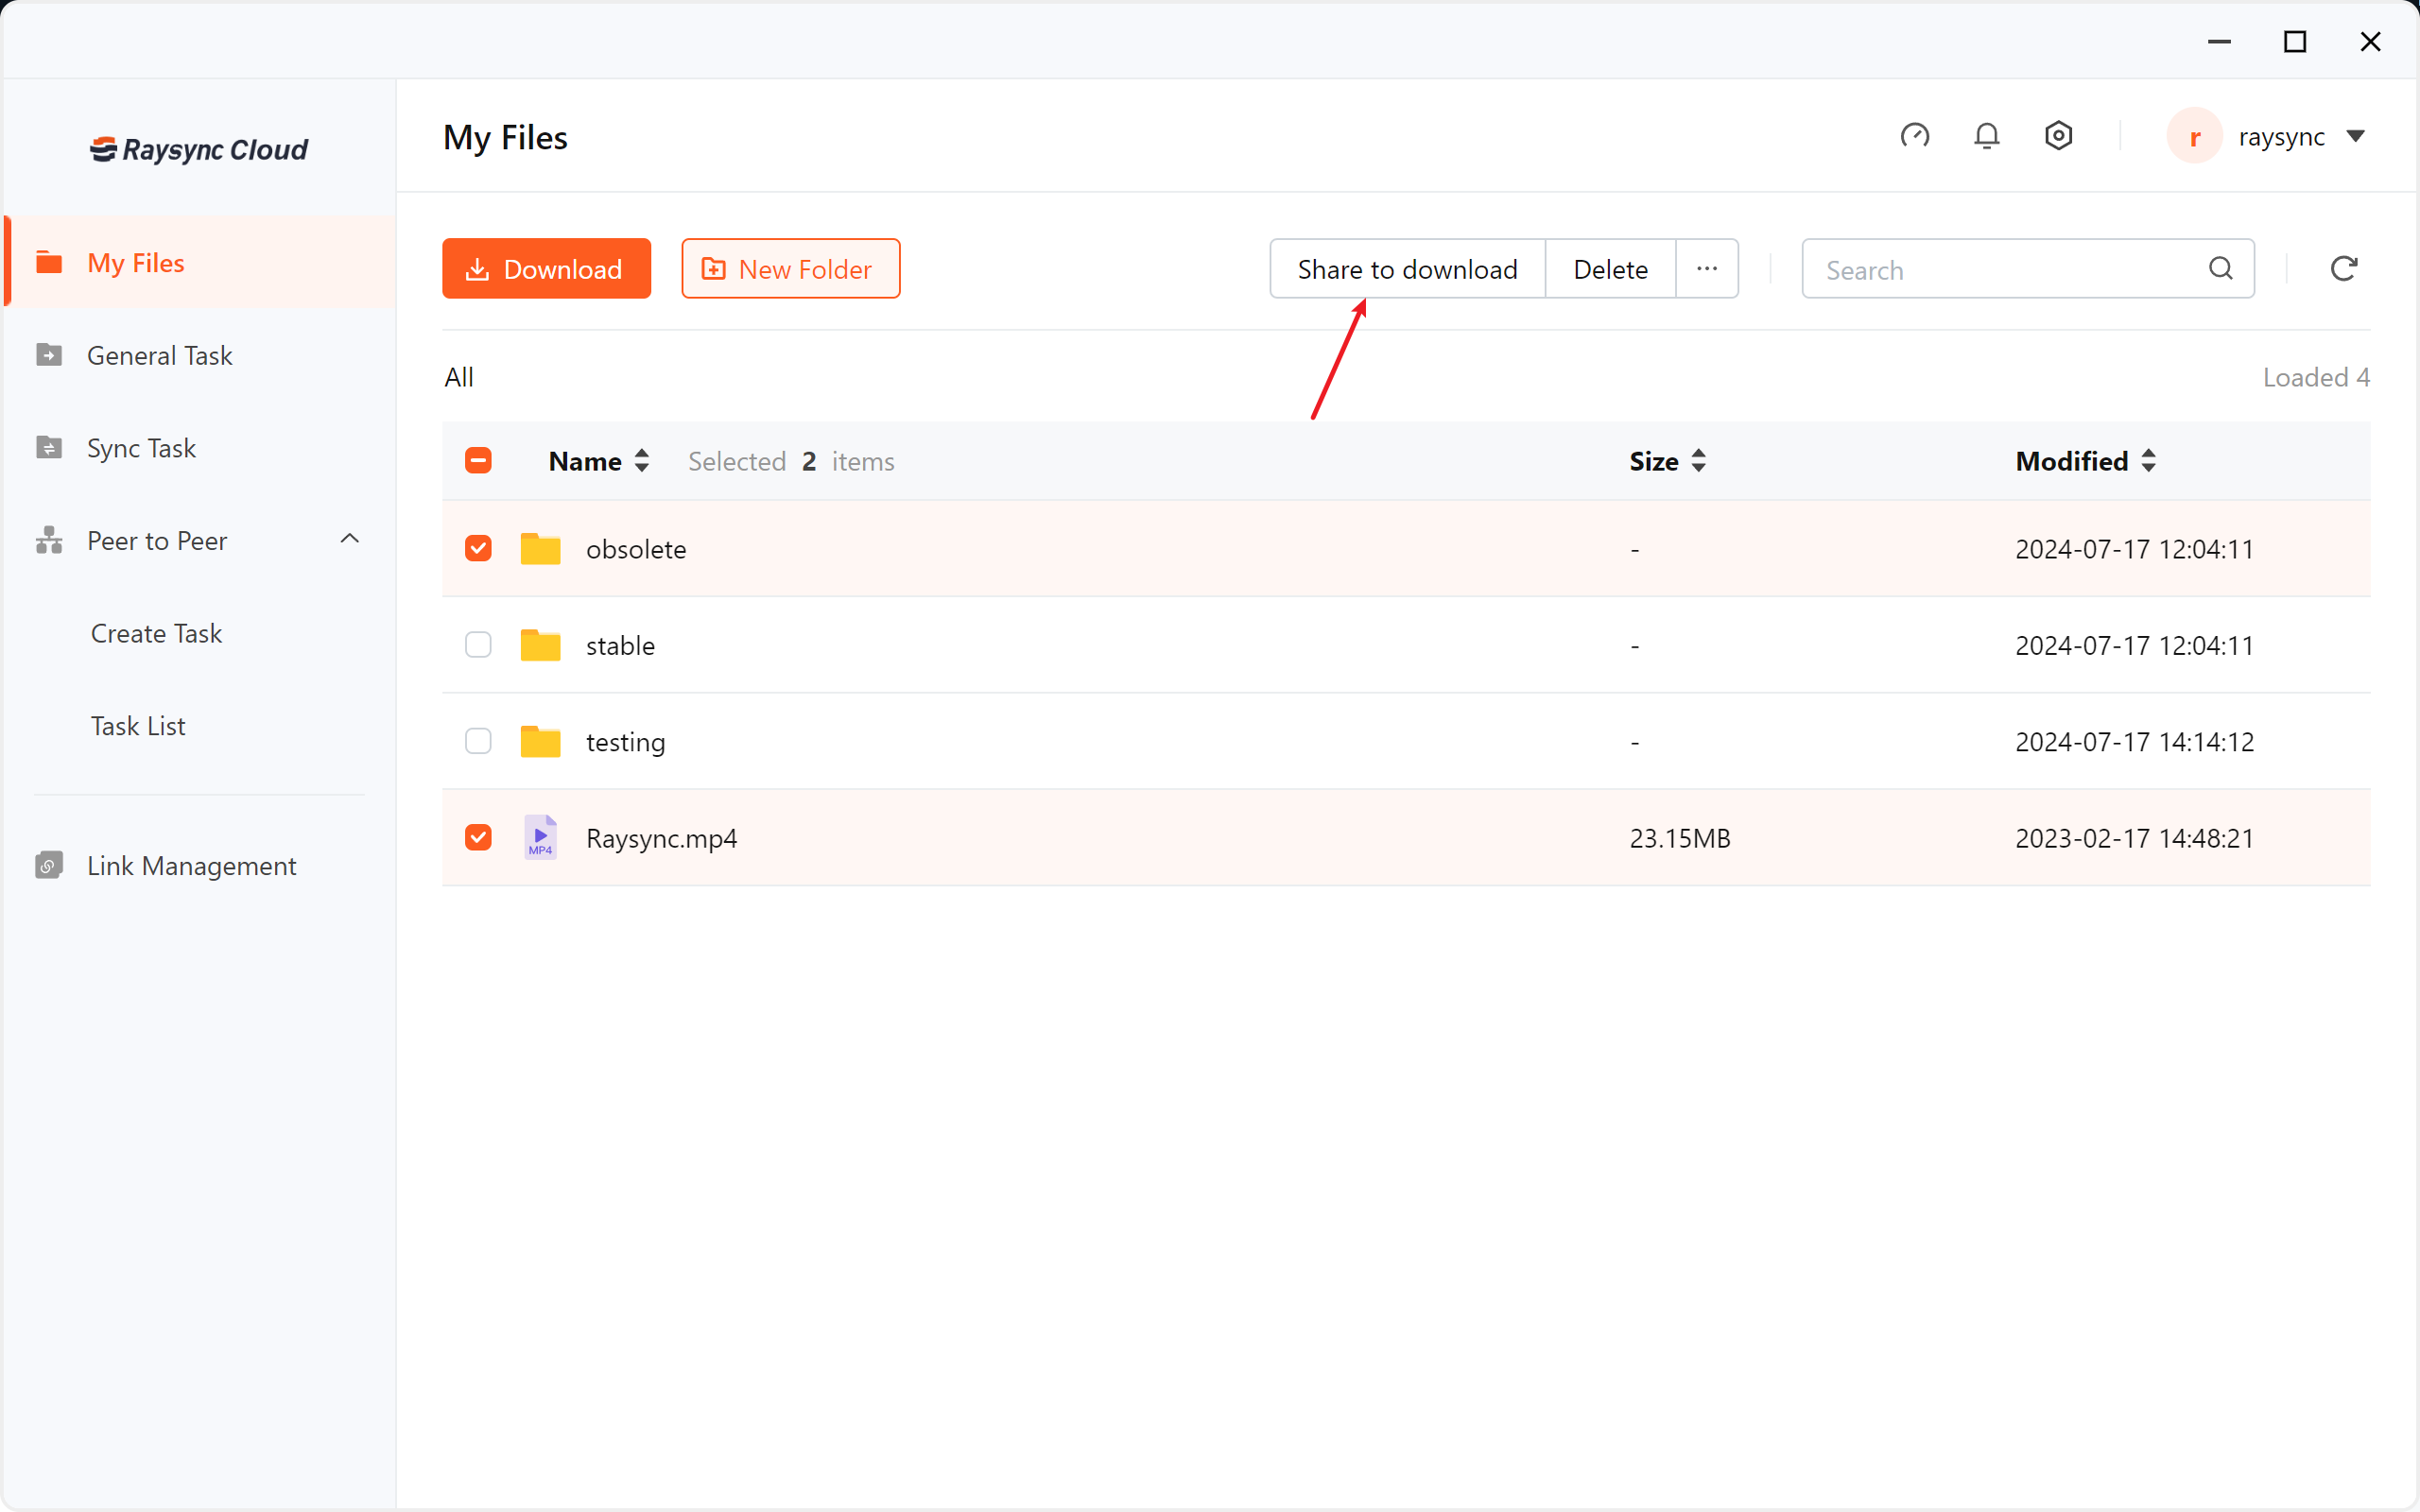
Select the file/folder you need to share, support select multiple files/folders to share at the same time. Click [Share to download].
- Click [Create Link], the link access password will be automatically generated.
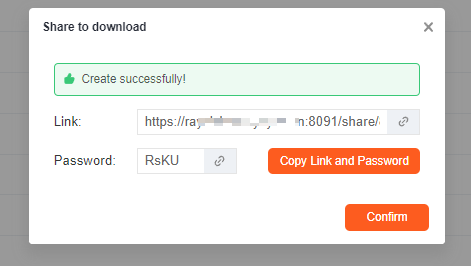
- Click [Copy Link and Password], you can copy the link and password and send it to your partner.
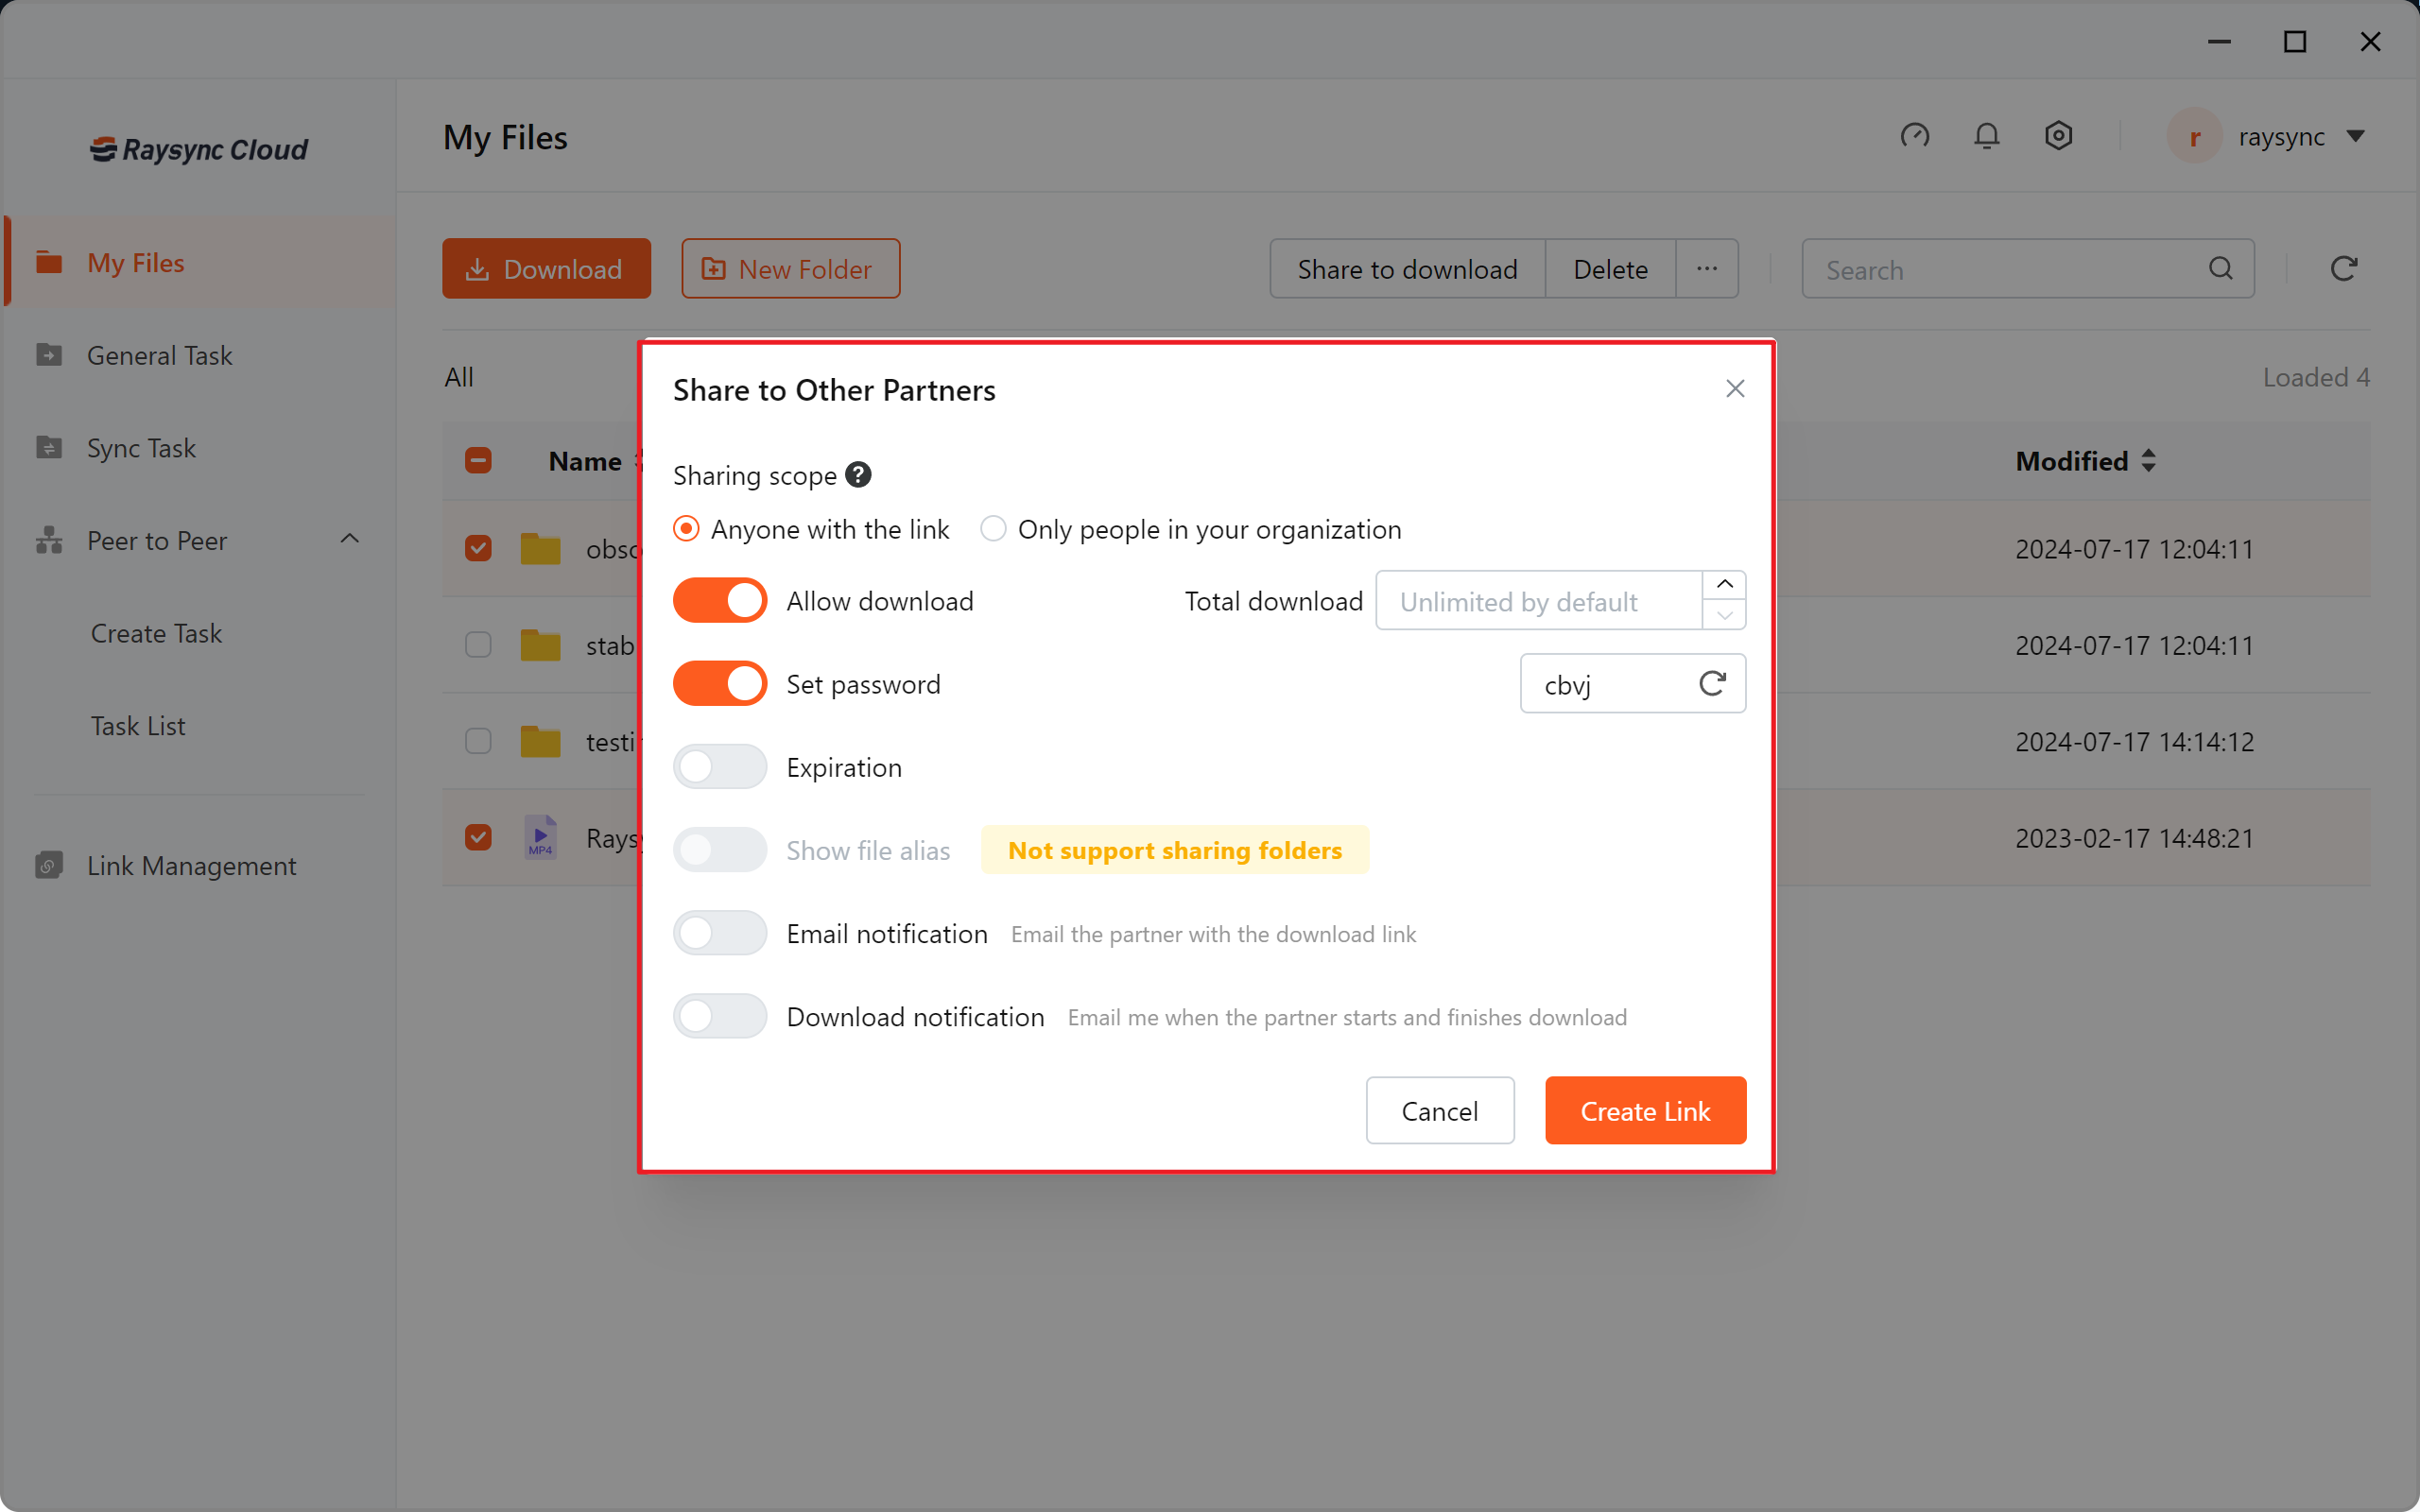
| Options | Function Description |
|---|---|
| Sharing scope | Anyone with the link: No user authentication, anyone with the link can get the file. Only people in your organization: After obtaining the link, the user needs to log in to the Raysync account to get the file. |
| Whether to allow users to download | After turning it off, the shared files cannot be downloaded. |
| Download times |
Anyone with the link: The total number of times the link was viewed, the number of downloads shared by all people who accessed the link. Only people in your organization: Individual downloads for each visiting user. |
| Whether to set a password |
Without setting a password: any user who obtains the link can access the shared file. Set a password: You need to verify the correctness of the password when accessing the link. |
| Link expiration time | Set link expiration time. |
| File aliases | Only for files, you can set an alias for the file and then share it. The shared file will be displayed with the alias. |
| Email notifications to partners |
Notify others to open the link when it is created. Supports scheduled email notifications. After setting the timer, the system will send emails to notify others to open the link at the set time. |
| Download notifications | Notification when download starts and when download is completed |
4.1 Access the share link
-
Enter the share link address in the browser, enter the password, and click [Log in].

-
Enter the file list of shared download links and click [download] to start downloading.

4.2 Share link management
- In [Link Management]-[Share to download], Select the link you click [Detail] can view the details of the shared link.
- Select the link that needs to be canceled in the sharing link, click [Disable] to cancel the shared link.
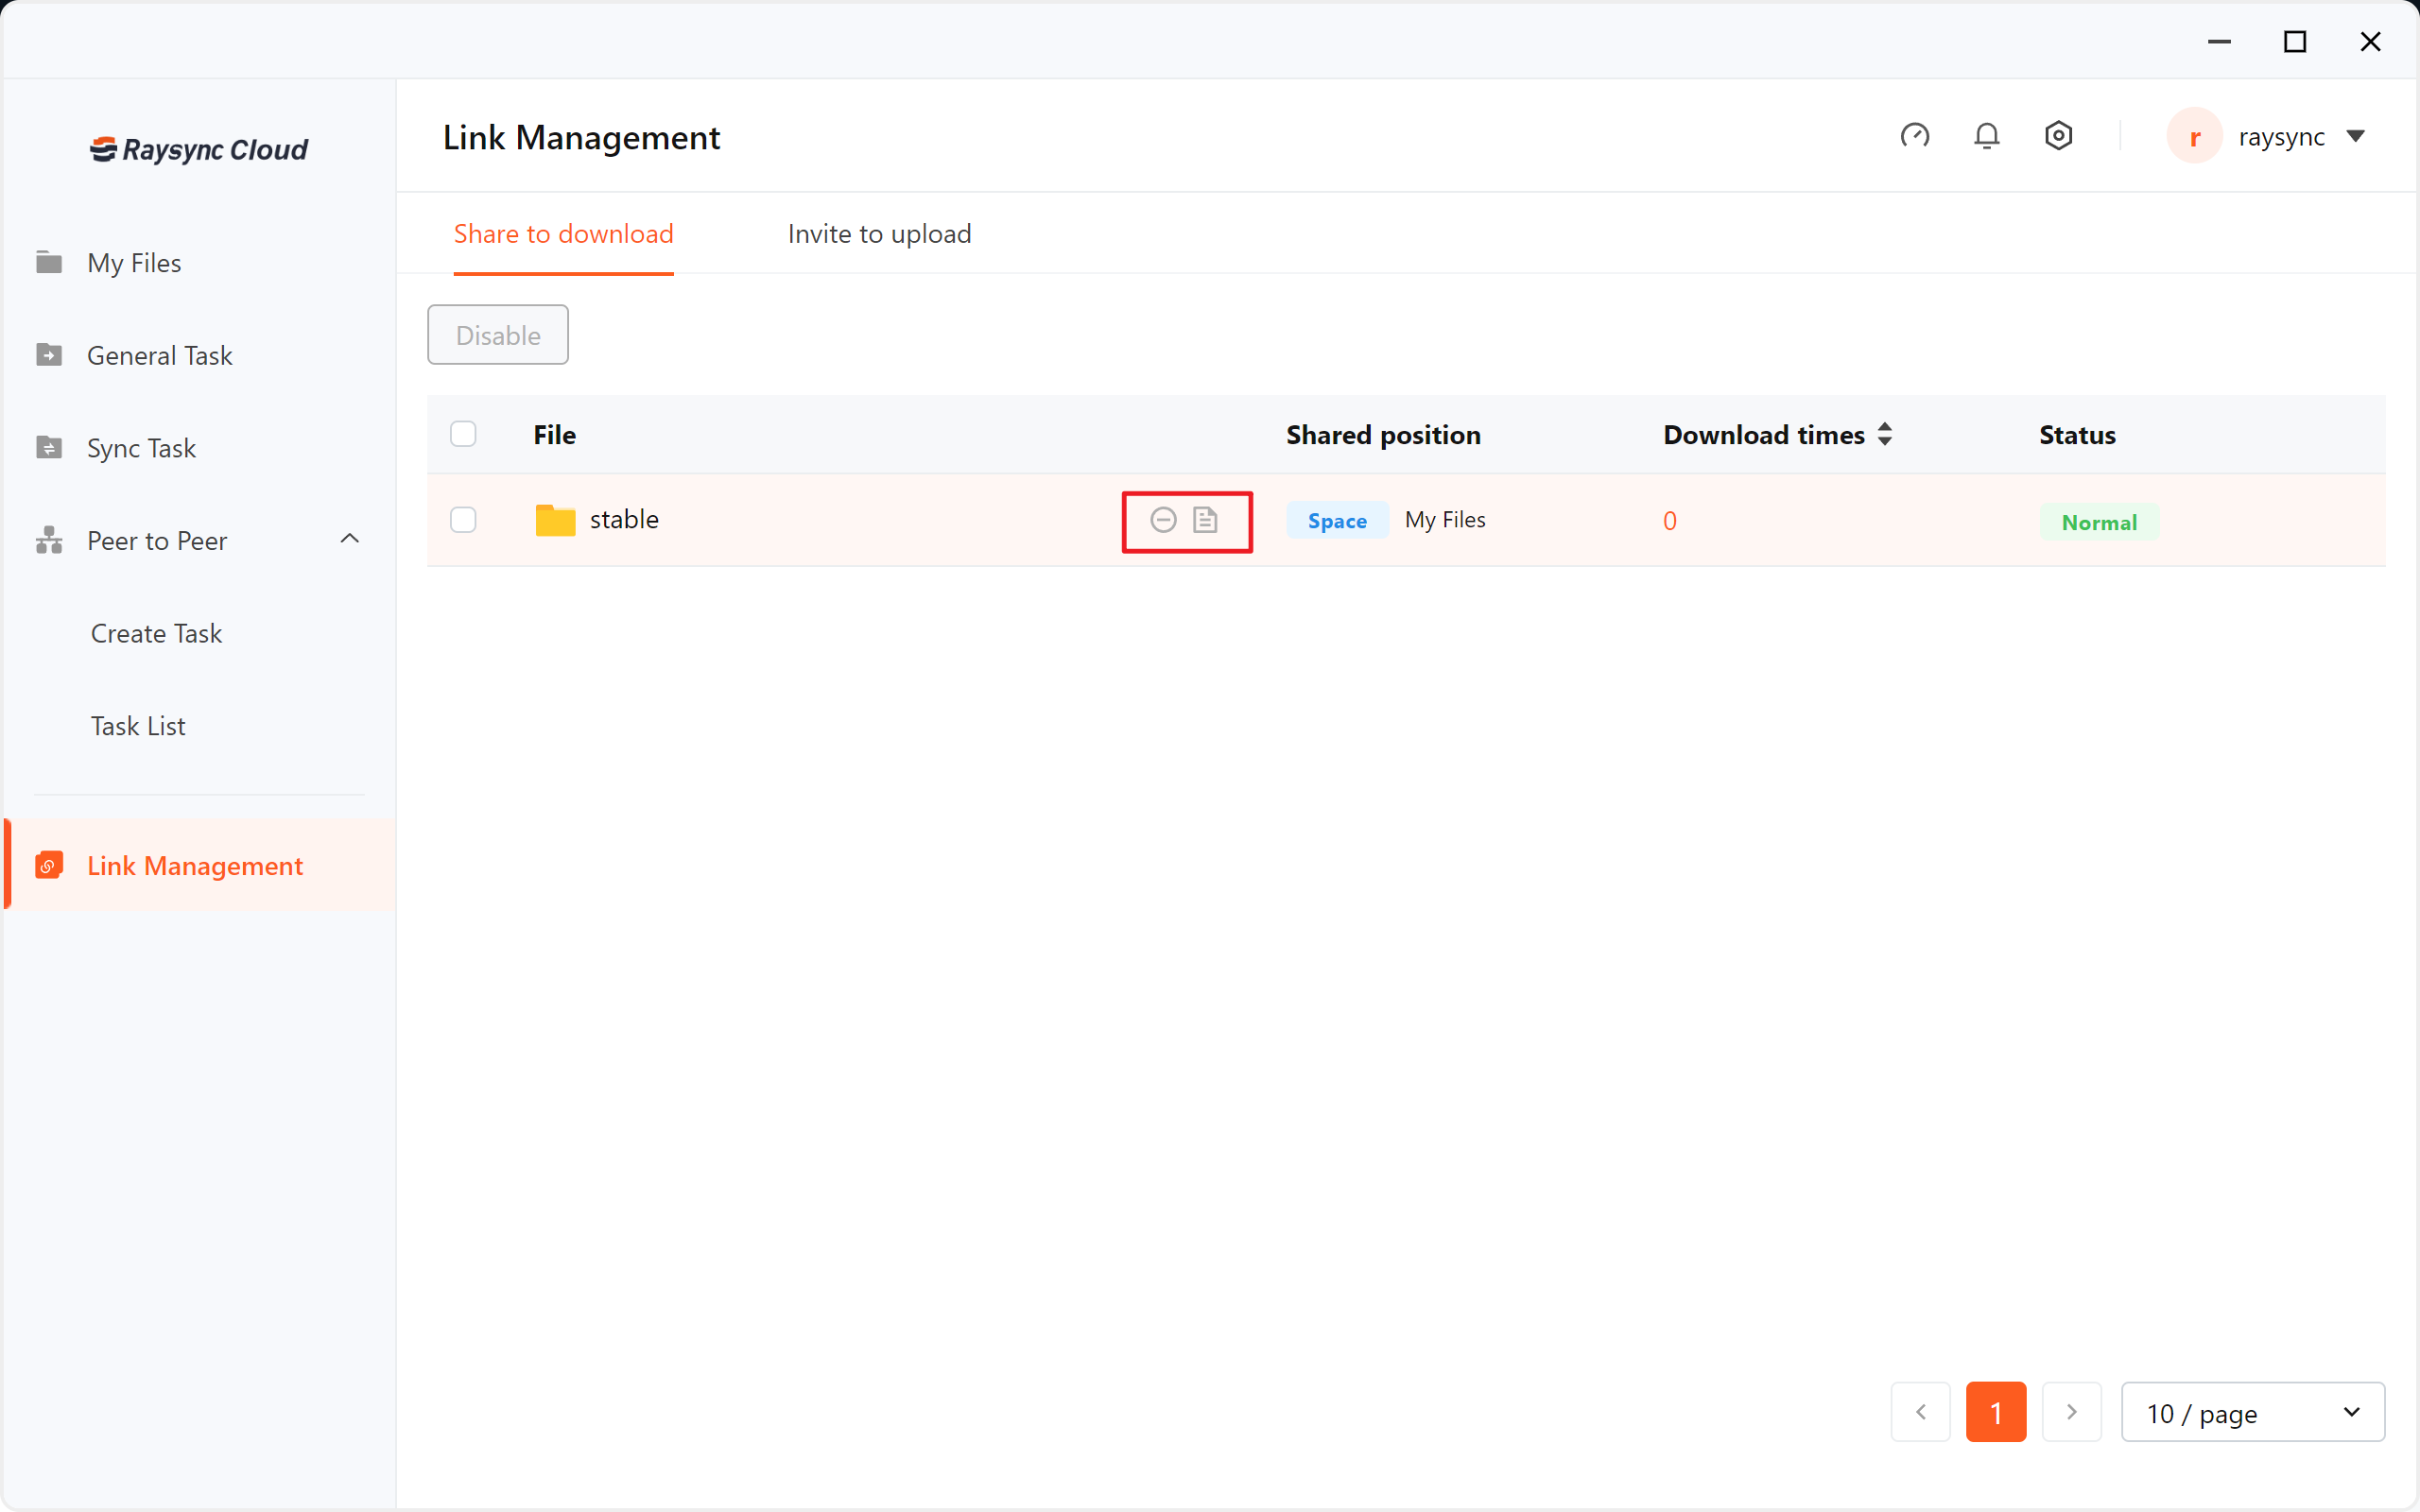
- After canceling, the link will no longer be accessible

5. Create invite link
Invite other partners to upload files to your storage.
-
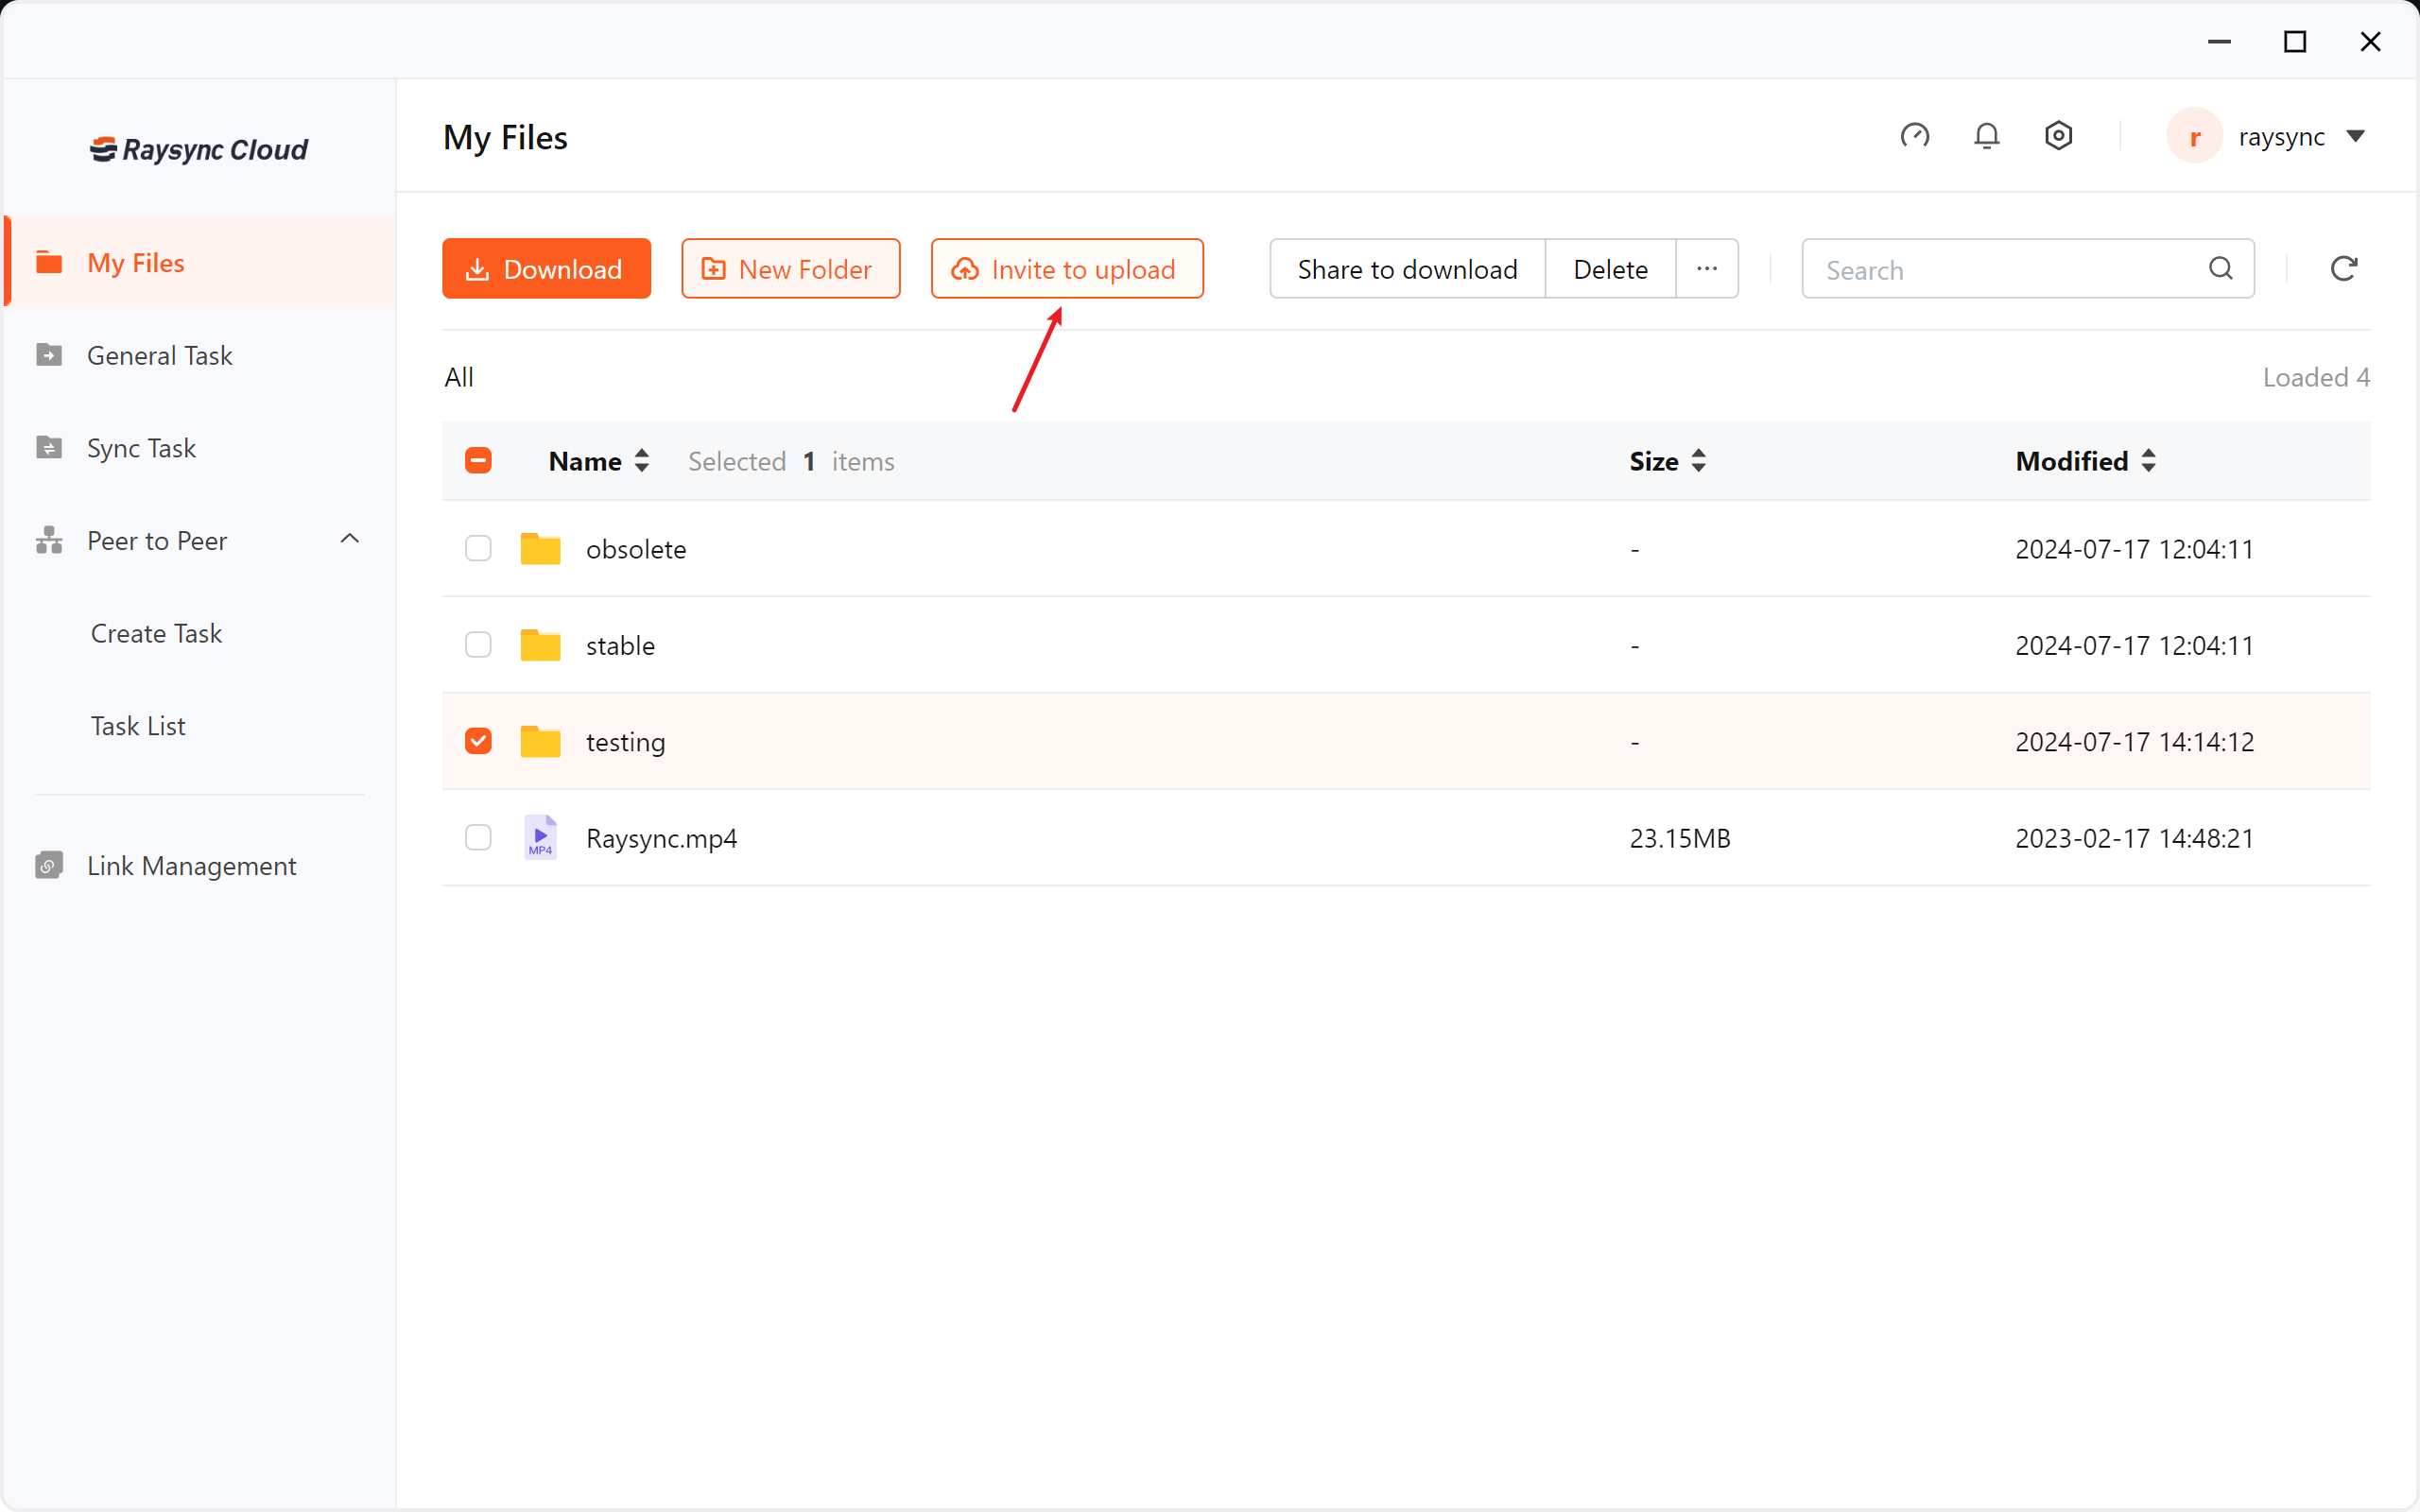
Enter the folder where you want to invite uploads, such as the "Raysync" directory, and click the [Invite to upload] button.
-
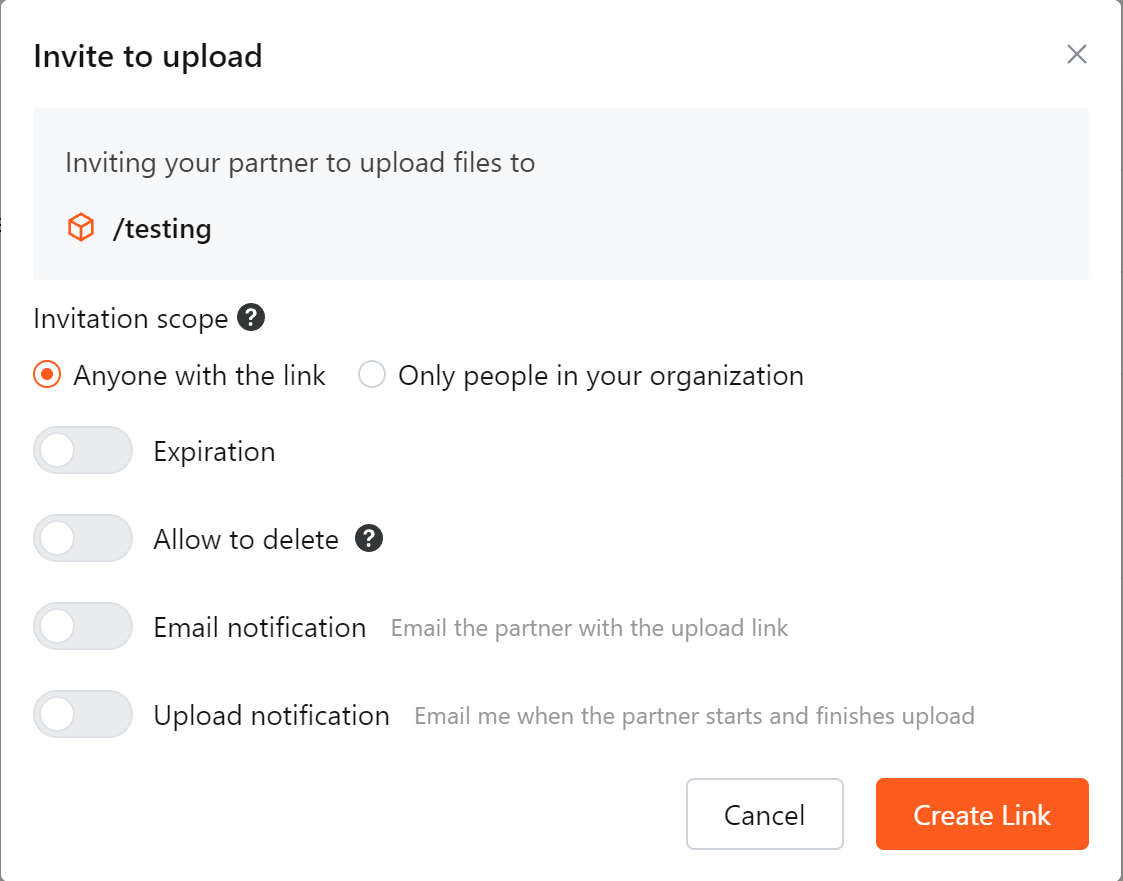
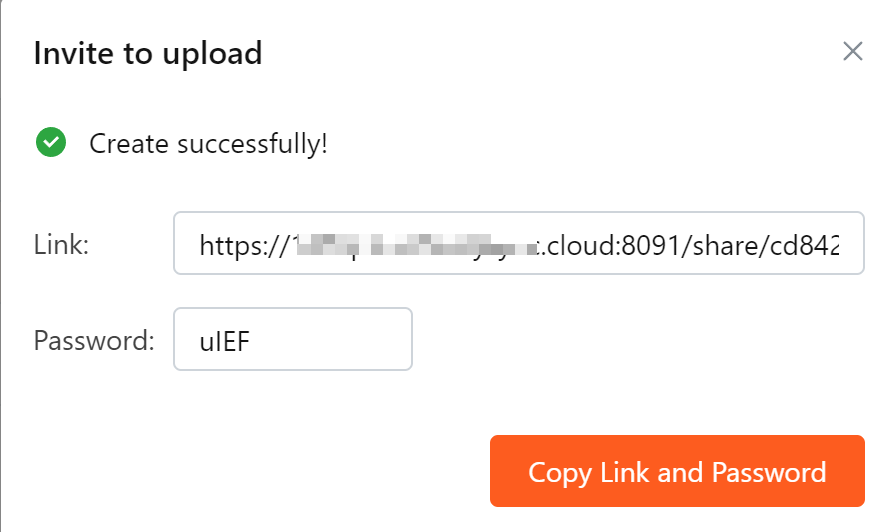
Click [Create Link], a link and an access password will be generated by default
-
Click [Copy Link and password], you can copy the link and password and send it to your partner.
| Options | Function Description |
|---|---|
| Invitation scope |
Anyone: No user identity login verification is required. Anyone who obtains the link can upload files to the invited directory. Only people in your organization: After obtaining the link, the user needs to log in to the Raysync account to upload the file. |
| Link expiration time |
Set link expiration time. |
| Allow deletion |
When enabled, others can delete files in the invitation link. |
| Email notifications to partners |
Notify others to open the link when it is created. |
| Upload notification |
Notification when upload starts and when upload is completed. |
5.1 Visit the invite to upload link
-
Enter the link address of invite to upload in your browser, enter your password and click [Log in] .

-
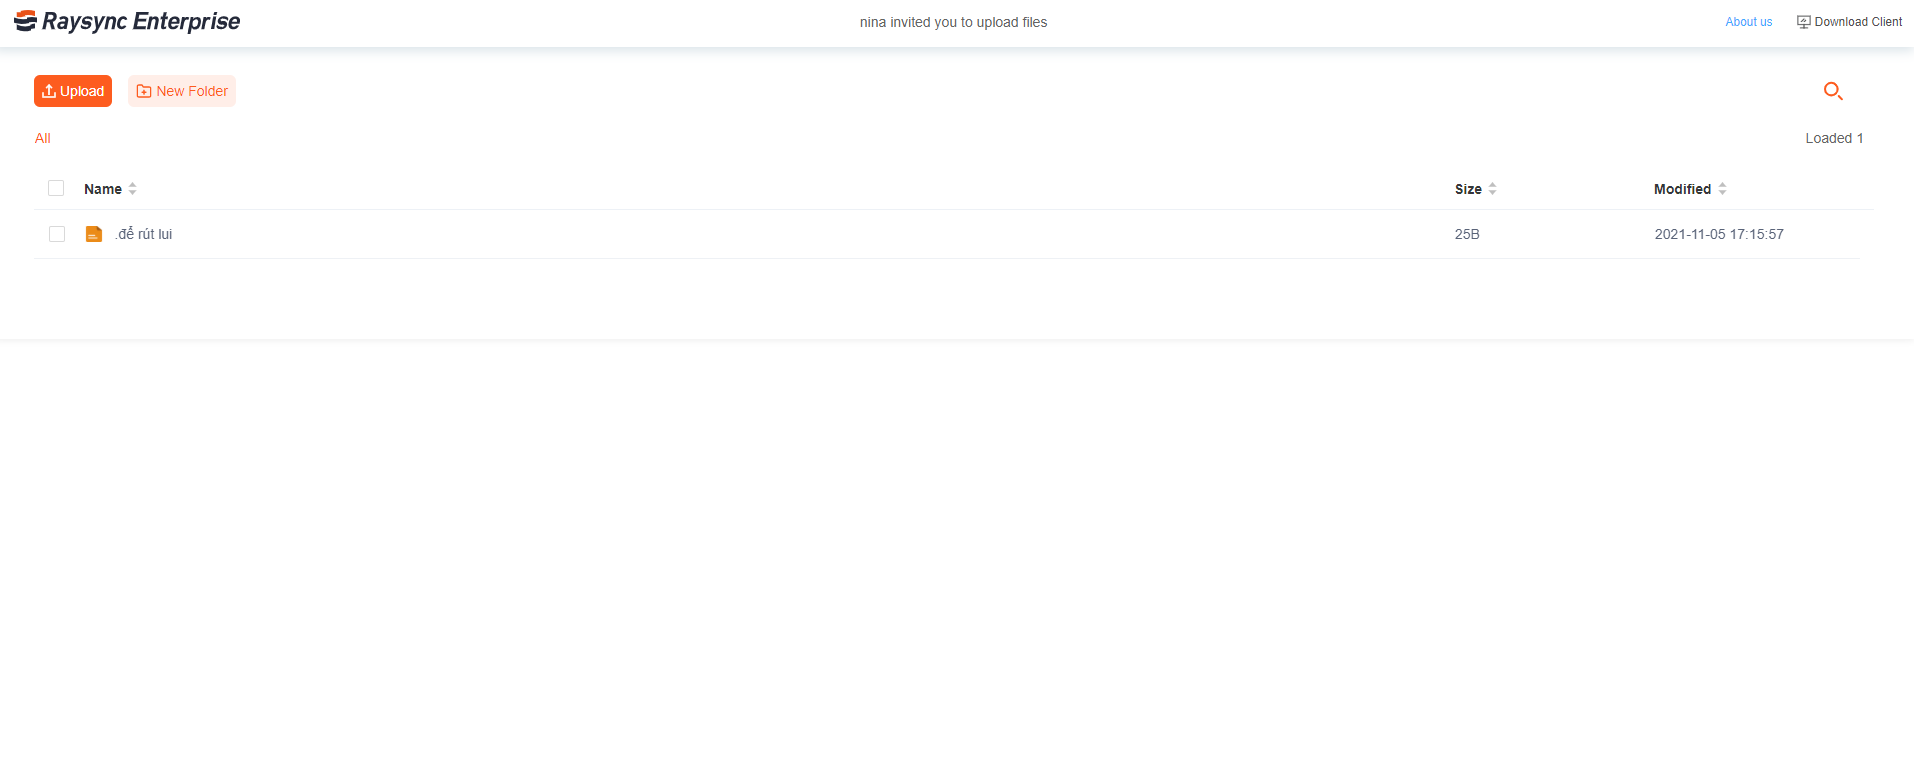
Enter the file list of invite to upload link, click [Upload] to start uploading files.
- Enter the file list of invite to upload link, click [New Folder], you can create a new folder, or upload files to the new folder. Note: The file list shows all the files and folders in the invited directory, for example, if the invitation is uploaded to "Raysync" directory, it will show all the files and folders in the directory of "Raysync".
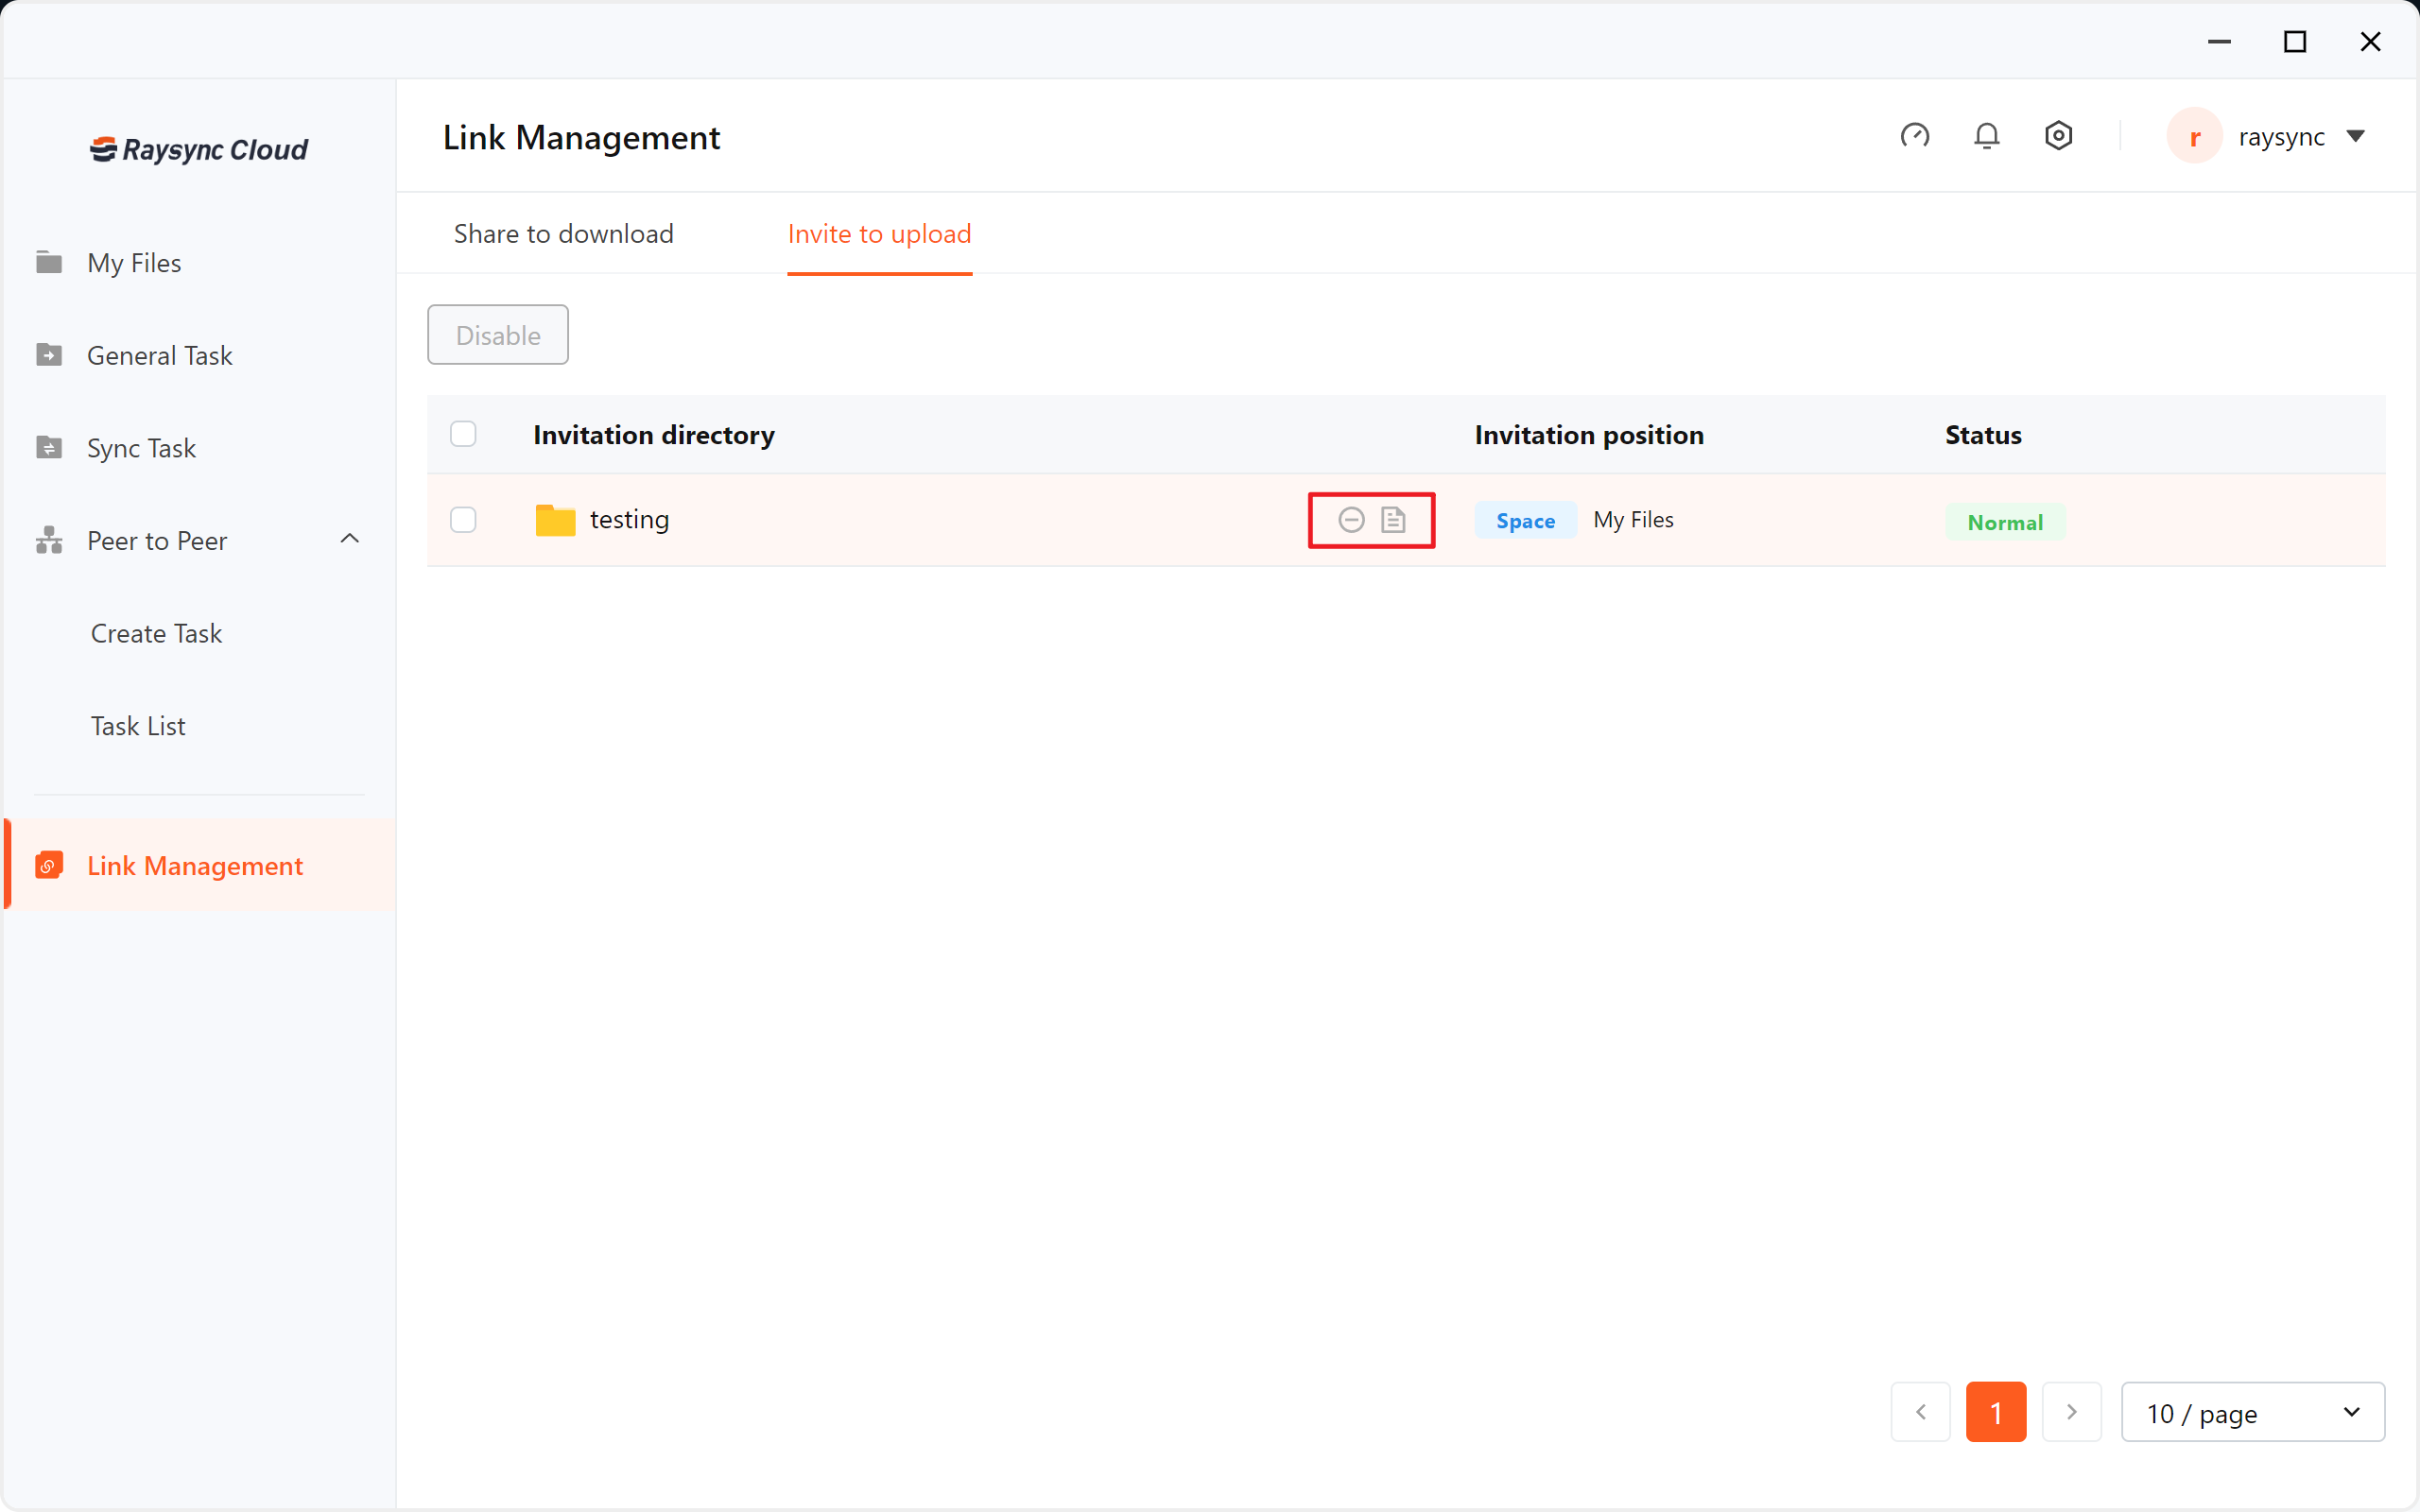
5.2 Manage invite to upload links
- In [Link Management]-[Invite to upload], Select the link you click [Detail] can view the details of the shared link.
- Select the link you want to cancel and click [Disable] to cancel.
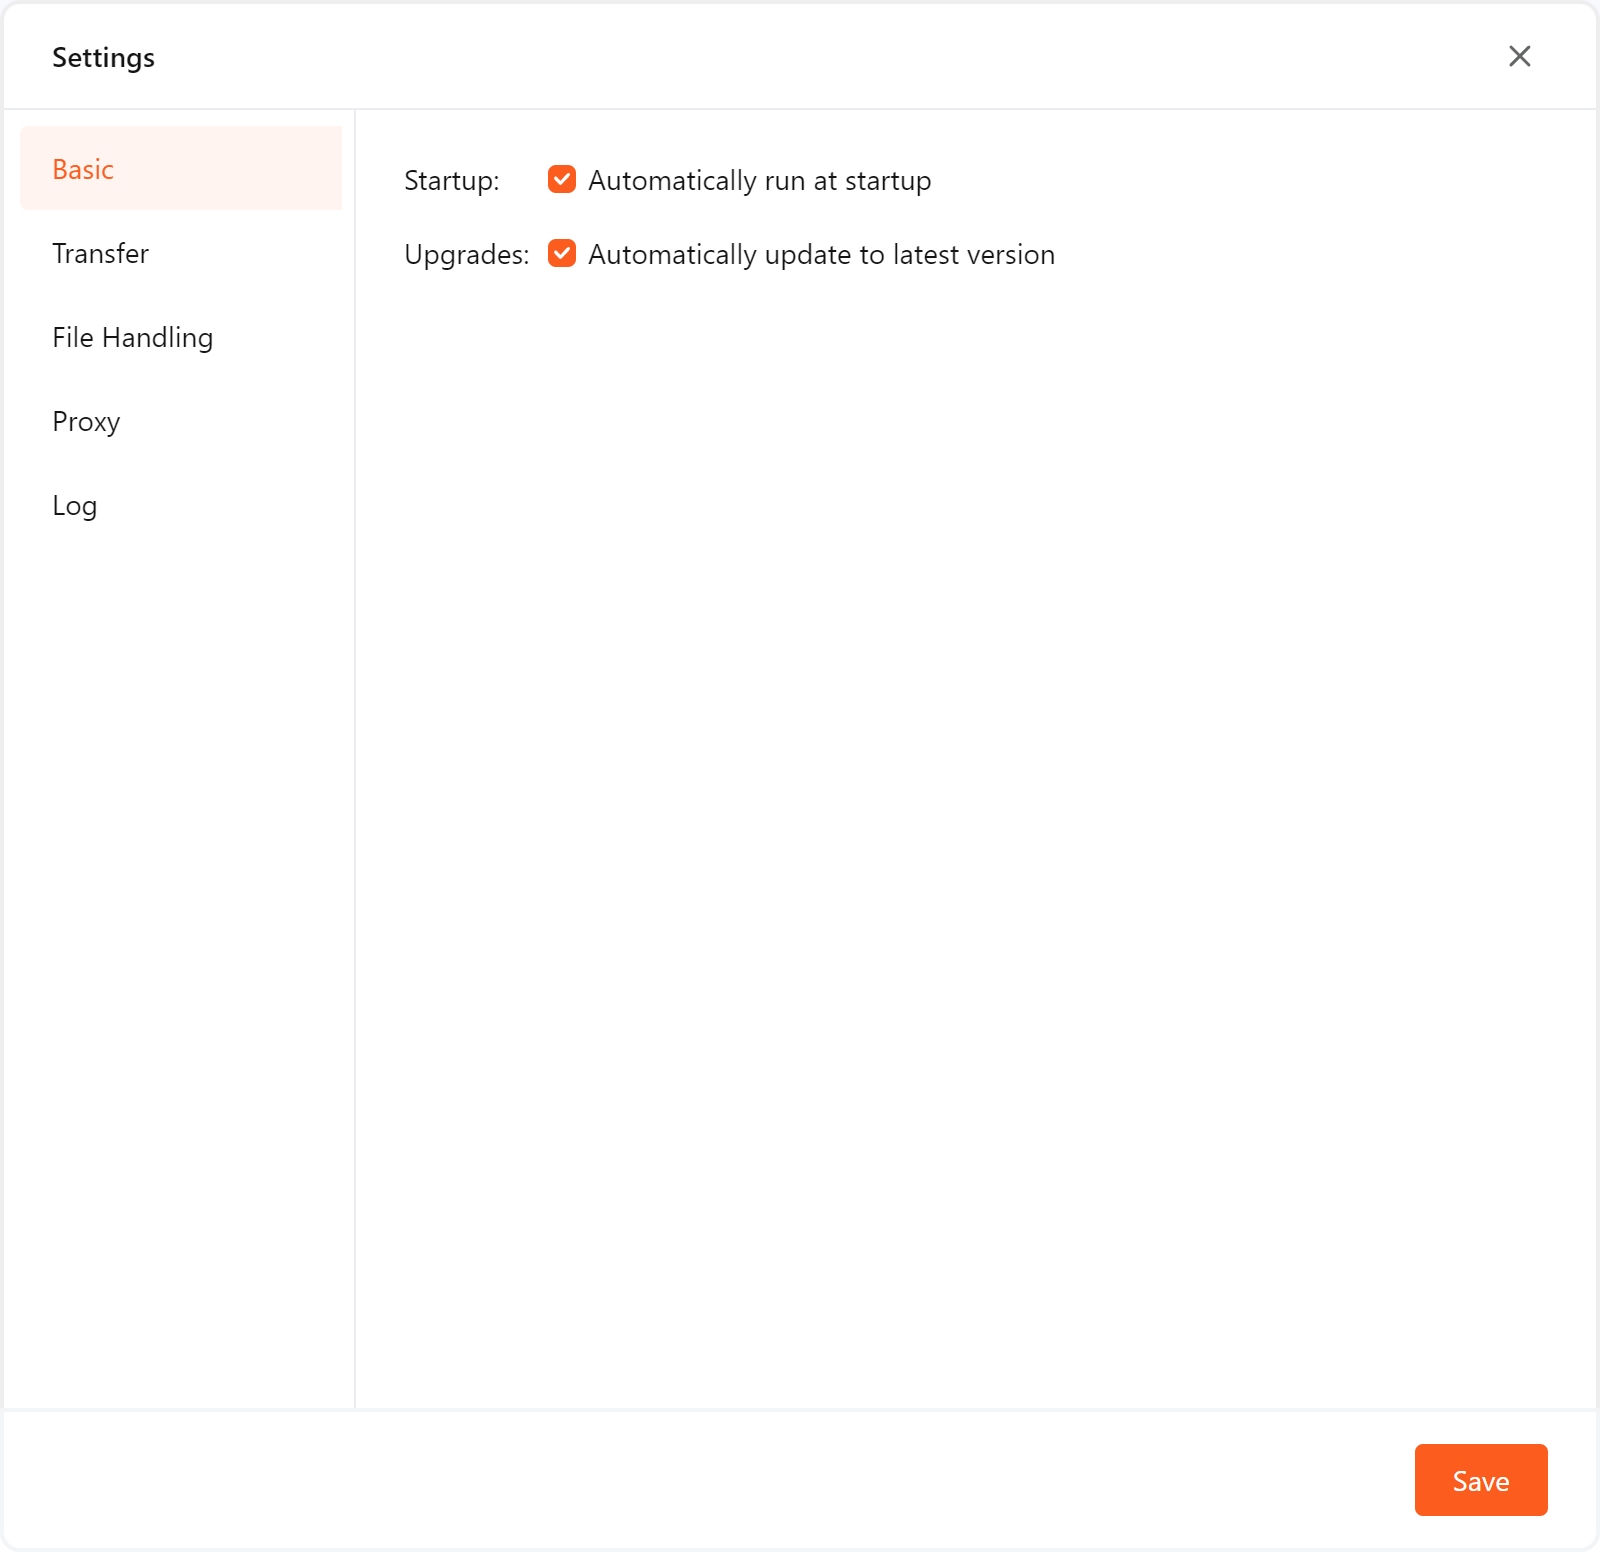
6. Client setting
In the ![]() , You can perform client settings, error detection, and view client information.
, You can perform client settings, error detection, and view client information.

| Function | Description | |
|---|---|---|
| Basic | startup |
Raysync client will automatically run when the computer reboot unexpectedly. |
| Upgrades |
Automatically detect new versions and prompt to upgrade when a new version is available |
|
| Transfer | Download Path | Support setting the default download path and manually selecting the path when downloading. |
| Task and file parallel |
Task parallel: Setting the maximum number of parallel upload tasks and the maximum number of parallel download task, up to 10. Parallel files per task: Setting parallel files per task, the default is automatic, and the parallel files per task is automatically calculated based on the number of cpu cores. |
|
|
Bandwidth
|
Limit max speed Upload limit: maximum upload speed for a single task Download limit: maximum download speed for a single task If not set, the maximum speed of the local bandwidth will be used for transfer by default. |
|
|
Limit min speed When the network condition is unstable and the current client upload transmission speed does not fully utilize the bandwidth, you can manually set the minimum sending speed to increase the transmission speed. Minimum Send speed: indicates the minimum upload speed of the current client Minimum Accept speed: The minimum download speed of the current client (Usually set to 1/2 of the bandwidth with the current transmitting client. If the bandwidth of the transmission server is smaller than the current client bandwidth, it is set to the bandwidth value of the server) |
||
|
Transfer Security
|
Enable encrypted for transfer Enable encrypted transmission, encrypt the transmission process, and ensure transmission security. |
|
|
Enable hash verification Enabling hash verification can verify every single file when upload or download, and ensure the integrity and correctness of files. If the hash check of the local file and the server file are inconsistent, the file will be retransmitted. If the hash check of the two files is consistent, the transmission will continue. |
||
|
Transfer Protocol |
Priority to use TCP When your network condition is good, you can enable TCP transmission. The tcp transmission mode will be preferentially used during the transmission after enabled. Ensure the reliability of file transfer. |
|
|
Peer to Peer |
Save path when receiving file Set the default save path for accepted files. |
|
|
Incremental Transfer |
Enable Rsync verification If the local file and the server file Rsync check result are inconsistent, the file will be retransmitted; If only part of the two files is not the same, the consistent part will be skipped and the different part will be transferred. If the two file have the same Rsync verification, It will continue to transfer. |
|
|
Advanced
|
Enable data compression during transfer When enabled, the data will be compressed before being transfer during transfer to improve transfer efficiency. |
|
|
Preserve the full structure of the source directory when upload to the target When uploading files, a complete directory structure will be automatically created on the target side. |
||
|
UDP packet size When the network bandwidth is good, it is recommended to set the large the UDP packet size, the better the transfer effect. |
||
|
Timeout Increasing the timeout time can maintain the effect of Raysync transfer when the network is poor. |
||
| File Handling |
File Properties
|
Preserve file modification time Keep the modification time of the transmitted file after enabled. |
|
Preserve file ACL attribute It is a mechanism for permission control of files or directories. It can control the access permissions of users or groups to files or directories. Acls enable administrators to finer control file or directory access permissions to better protect system security. Retention is only supported between the same systems. |
||
|
Handling of existing target files |
|
|
|
Source file handling
|
Check before transfer start, it will not start until file is no change in xx second. The transfer will be checked once at the beginning of the transfer, when the file has not changed within 3-30 second, the file will actually start the transfer. When the file is changed within the specified time, the file will not be transferred. Avoid transferring files that are in use and ensure the integrity of the transferred files. |
|
|
Delete the source file after sync every file done 1) Delete all source directories and files
For example, after the synchronization is complete, directory A and the files in directory A are automatically deleted.
2) Retain the source directory structure and delete only the files in directory A. Neither directory A nor the directories in Directory A are deleted
2. After synchronization, transfer the source file and delete it (only applicable to upload)
The uploaded source file is automatically transferred to the path xx after xx hours, and the source file is automatically cleared after xx days.
|
||
|
Download files |
Only download new files When the target file already exists,the user will fail to download when the file has not been modified. |
|
|
Proxy |
Proxy |
For the needs of company's security control, employees' computers do not have direct access to the Internet, but need to go through the company's proxy server to access the Internet. SOCKS5 is currently the most commonly used generic proxy server.
|
|
Log
|
Log
|
Save cycle xx days Configuring the client log retention period. Logs that exceed the log period will be automatically cleared. |
|
Log operation Collect the Client logs for the day so that you can provide them to our technical support for problem location. |
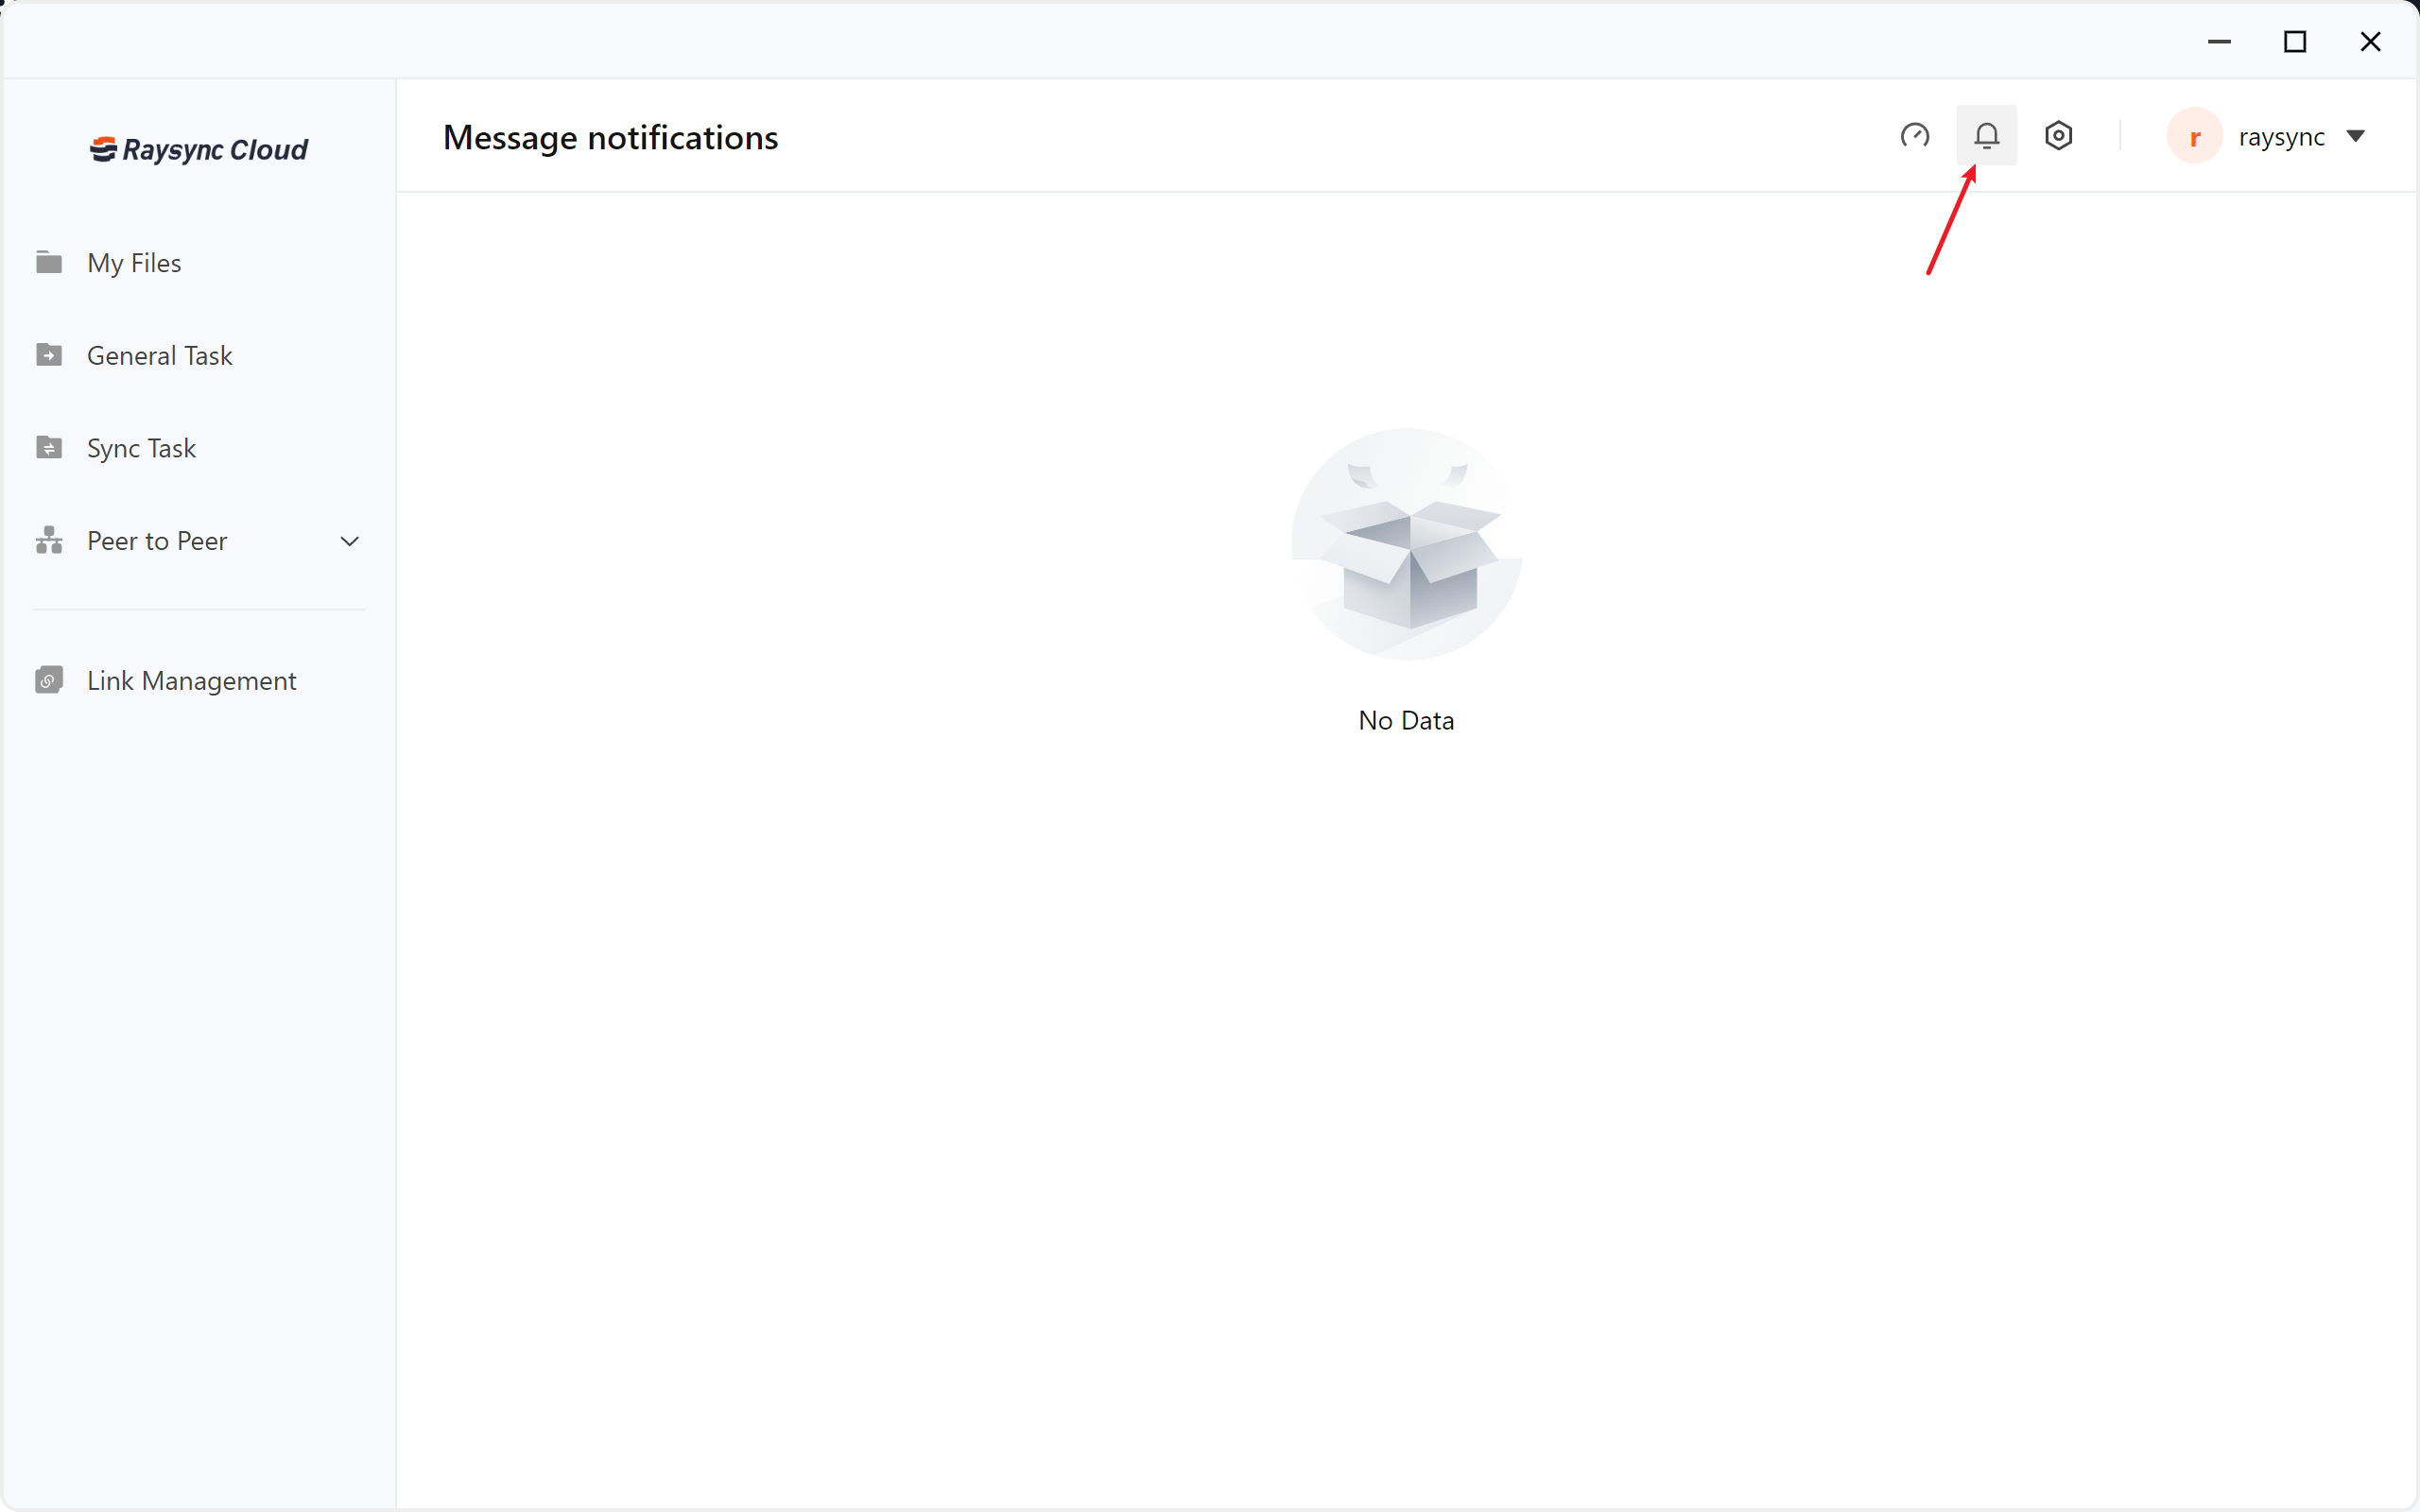
7. Notification
Click ![]() , You can view the notifications sent to you by the administrator.
, You can view the notifications sent to you by the administrator.
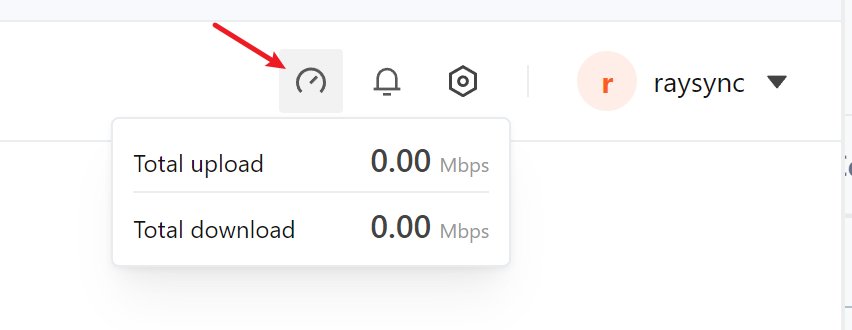
8. Total Speed
Hover the mouse to ![]() , You can view the total upload and download speed of the current client.
, You can view the total upload and download speed of the current client.
9. Profile
In the [Profile], You can view your account information, modify your account, email, and password.
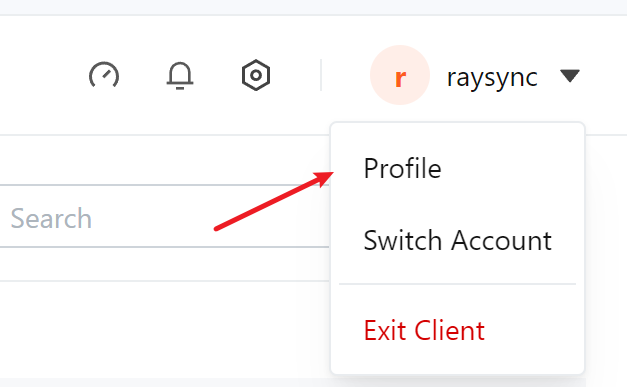
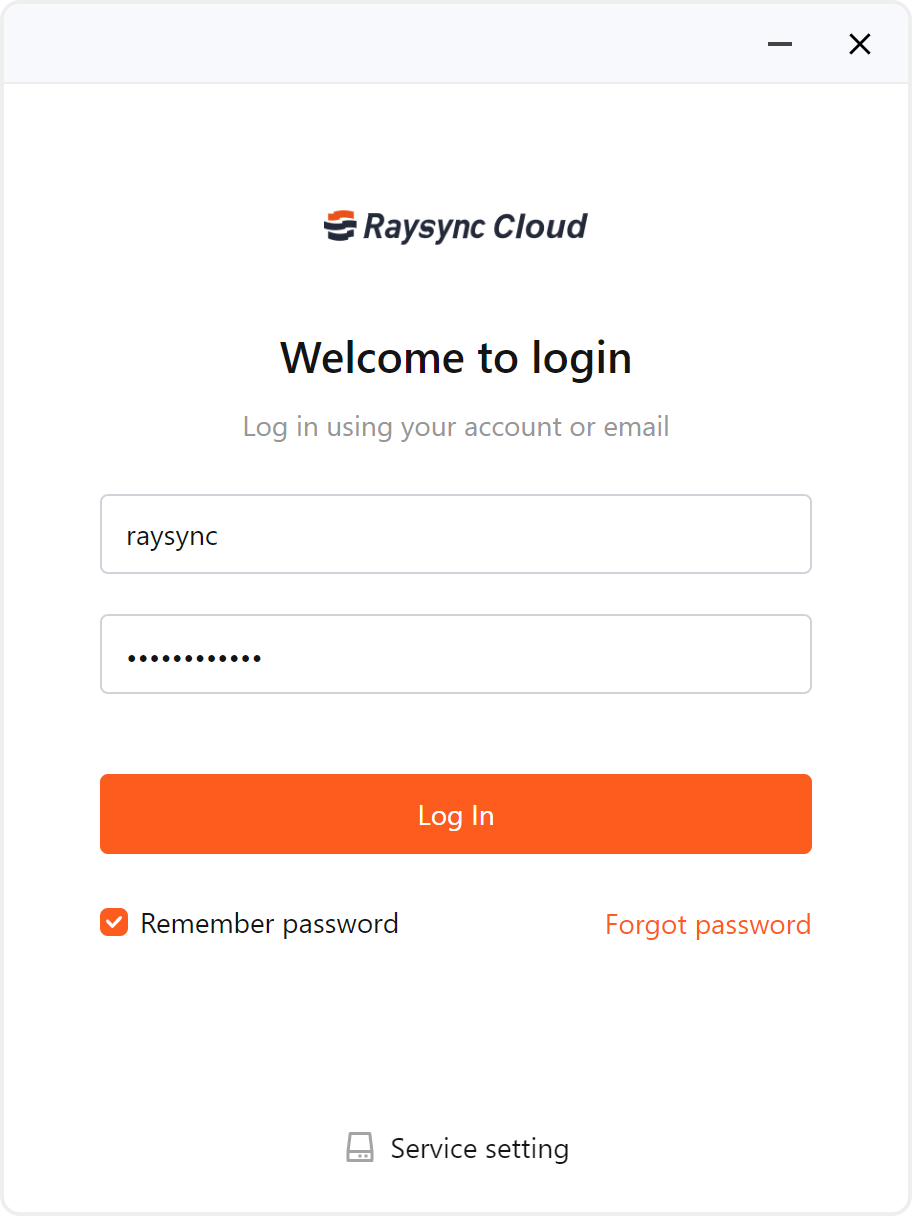
Click [Switch Account], You can log in to other accounts and log out of the current account.
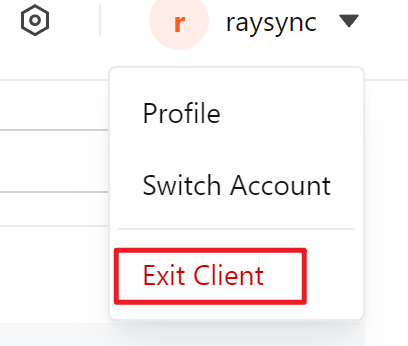
Click [Exit Client], It will shut down the raysync client.
