1. Menu Navigation Overview
This chapter provides a panoramic overview of the system core menus, clarifies each module entry and core purpose, and helps you quickly locate functions.
|
Primary Group |
Secondary Menu |
Core Purpose |
|
Home |
Dashboard |
System data overview, server information viewing, License management, and real-time monitoring of bandwidth and transfer tasks |
|
Node
|
Transfer Node |
Transfer node registration, deployment and onboarding, status monitoring, and routine O&M management |
|
Node Update |
Node installation package upload, version release, update, and lifecycle management |
|
|
Transfer |
Transfer Task |
Create, edit, start/stop, and configure file transfer tasks |
|
Task Activity |
View dynamic information such as running transfer batches, progress, and speed in real time |
|
|
Transfer Log |
Query all historical transfer records, task details, and single-file transfer logs |
|
|
Account |
Administrators |
Add, edit, lock, and delete console administrator accounts |
|
Configuration |
Settings |
Basic system parameter configuration such as email notification, SSL certificate, and MySQL database |
|
Management |
Operation Log |
Records all console management operations for operation audit and issue tracing |
2. Feature Description
2.1 Dashboard
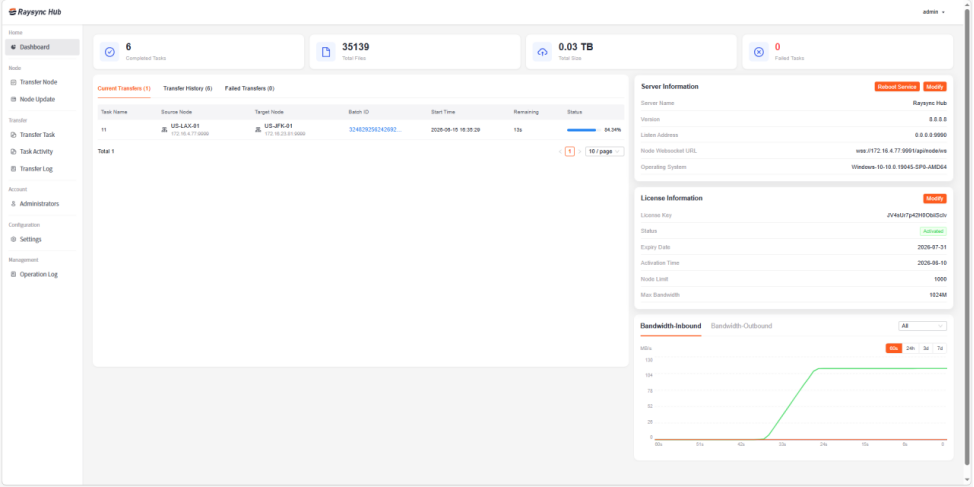
Function purpose: Provides an overview of system data and centrally displays task statistics, transfer monitoring, server configuration, license status, and bandwidth data.
|
Function |
Description |
|
Statistic Cards |
After the page loads, it automatically displays core data: number of completed tasks, total number/total capacity of transferred files, and number of failed tasks, providing intuitive statistics of the system transfer overview. |
|
Task Monitoring |
Divided into three tabs: In Progress, Recently Completed, and Exception, with data counts. Supports paginated query. Click a batch ID to directly jump to the task batch detail page. |
|
Server Information |
Visually view basic information such as Server name, System version, Listening address, Node WebSocket URL. |
|
Server Modification |
Click Modify to edit the server name, listening address/port, and Node WebSocket URL. If the listening address or Node WebSocket URL changes after saving, the service must be restarted for the change to take effect. |
|
Restart Service |
Click Restart Service and confirm. The system service restarts after a brief interruption. This is used to apply core configuration changes. |
|
License Management |
View license activation status, expiration time, and node quota limit. Supports activating/replacing the license. The system automatically displays a pop-up warning 30 days before expiration. |
|
Bandwidth Chart |
Supports switching between 60 seconds, 24 hours, 3 days, and 7 days, and displays real-time curves of sending and receiving bandwidth for transfer tasks by online node. |
|
Important note: If the console Node WebSocket URL is changed, deployed nodes must rerun the Deploy script and update the node.key file. Otherwise, the Agent will keep connecting to the old address, causing the node to be offline and unavailable. |
2.2 Transfer Node
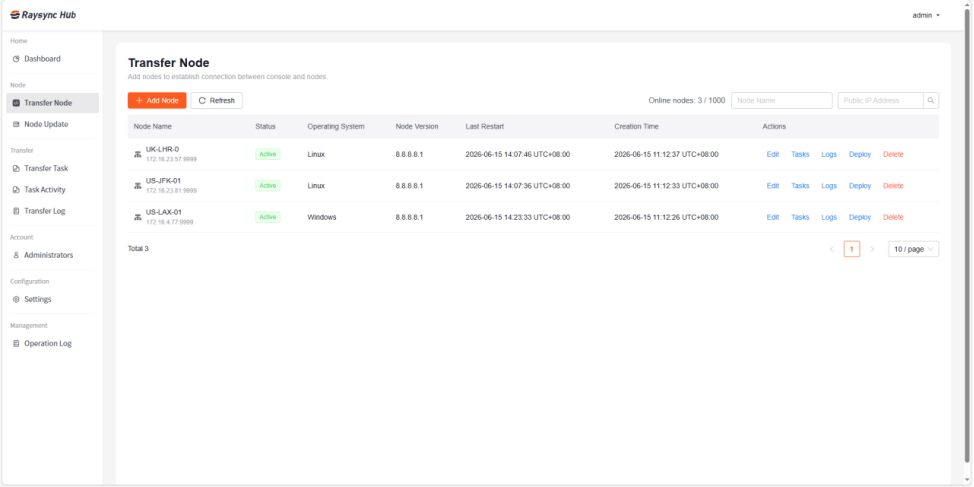
Function purpose: Used for transfer node deployment and onboarding, node status monitoring, associated tasks, and log O&M.
2.2.1 Pre-deployment Checks
1. The Dashboard has been configured with an externally reachable Node WebSocket URL instead of a local loopback address.
2. The number of online licensed nodes has not reached the upper limit, and new nodes can be added normally.
2.2.2 Create a Transfer Node
1. Click Add Node on the page. A configuration drawer appears on the right.
2. Enter basic node information:
○ Node name (required): Custom node identifier name.
○ Public IP Address + port (optional): If left blank, the system automatically detects the IP address. If entered manually, the entered content prevails. The default port is 9994, and the port range is 1025–65535.
○ Bandwidth limit (optional): Limits the upload/download bandwidth of the node. Supported units are Mbps and Kbps.
○ Remarks (optional): Enter information such as the node purpose and deployment location.
3. Click Save. A new record is generated in the node list, and its initial status is Unauthorized.
2.2.3 Deploy, Authorize, and Start the Node
1. In the corresponding row of the node list, click Deploy.
2. Select the Windows or Linux tab according to the target machine operating system.
3. Custom deployment directory (optional): If left blank, Windows deploys to %LOCALAPPDATA% by default, and Linux deploys to /opt by default.
4. Before You Deploy, Make sure the target host can reach this server, then run the generated command on Linux or Windows's PowerShell as Administrator or root.
5. After the command finishes, refresh the node list and confirm the node is online.
2.2.4 Confirm That the Node Is Online
After the script is executed successfully, refresh the node list. If the node status changes to Active, the node is online. Only nodes in Active status can be used to create transfer tasks. Unauthorized or offline nodes cannot be used.
2.2.5 Routine Node O&M Operations
|
Function |
Description |
|
Edit |
Modify the node name, connection address, port, bandwidth limit, and remarks. Note: If the node connection address is changed to the IP address of another device, stop the old node first after modification, and then redeploy the node on the new node. |
|
Associated Tasks |
Quickly query all transfer tasks that call this node. |
|
Associated Logs |
View all transfer and operation logs related to this node. |
|
Deploy |
Generate a deployment script for scenarios such as new node deployment, reinstallation, server WebSocket IP replacement, or node device replacement. |
|
Delete |
After confirmation, delete the node registration record. Ensure that the node has no running tasks. |
|
Filter Search |
Supports filtering and querying by node name and node IP. |
|
Manual Refresh |
Refresh the node list status and online node count statistics in real time. |
|
View Details |
Click a row in the node list to open the detail drawer and view complete node information. |
|
Status restriction description: Only nodes in Active status can be used to create transfer tasks. Unauthorized or offline nodes cannot be selected for use. |
2.2.6 Open Node Ports
The node requires two inbound ports to be opened. These ports are the ones you configured for the node in section 2.1. The default ports are TCP 9994 and UDP 9994.
2.3 Node Update
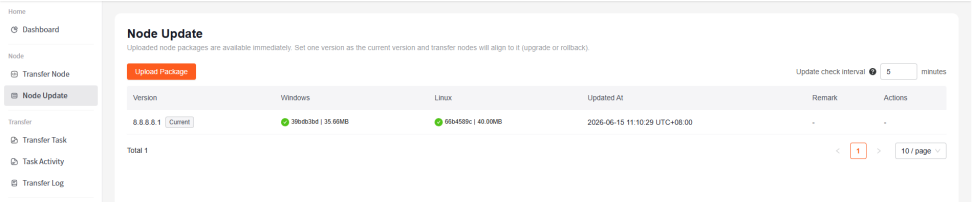
Function purpose: Centrally manages node Agent installation packages for Windows and Linux systems. The service includes node installation packages by default. It supports version upload, update, release, and unrelease, providing package sources for node deployment and automatic upgrade.
Core operations
1. Upload installation package: Click Upload Installation Package, drag and drop or select files in .zip/.tar.gz/.tgz format. Batch upload of multiple systems and multiple files is supported, and version remarks can be added.
2. View versions: The table displays packages grouped by version, clearly distinguishes Windows/Linux package status, and displays the file SHA256 prefix, file size, release status, upload time, and remarks.
3. Release version: For installation packages in Draft status, click Release to make them effective. Newly deployed or updated nodes can automatically pull this Agent version.
4. Unrelease: A released version can be unreleased. After unreleasing, nodes can no longer deploy this version.
5. Delete installation package: Delete unused installation packages. If any node is currently using this version, the system displays a secondary risk confirmation prompt.
2.4 Transfer Task
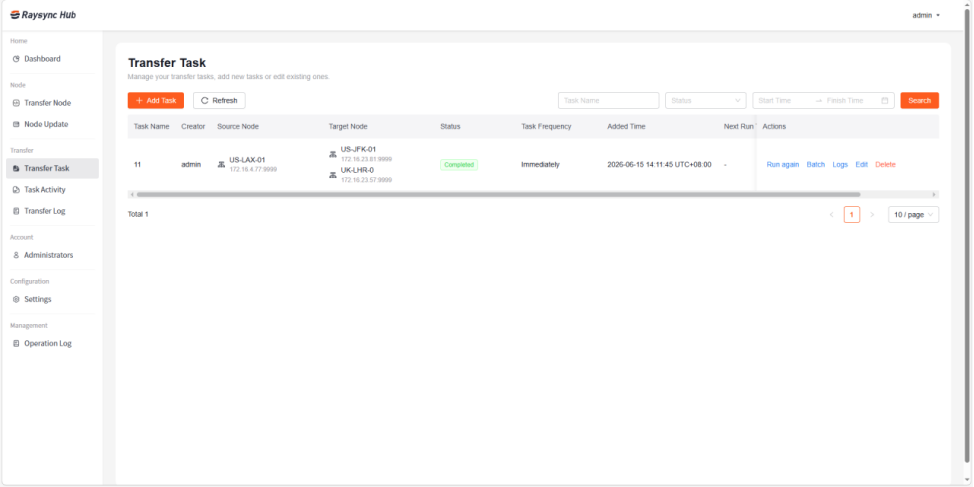
Function purpose: This is the core business module. It supports creating, editing, starting/stopping, and scheduled execution of transfer tasks, and manages all node transfer tasks.
2.4.1 Detailed Task Creation Configuration
Click Add Task. A three-layer collapsible configuration drawer appears on the right. Complete the parameters and click Save Configuration to create the transfer task.
Panel 1: Basic Settings (required)
• General information: Customize the task name and enter task remarks.
• Transfer direction: Select one-way transfer (source to multiple targets) or two-way transfer (mutual transfer between source and a single target; cannot be changed after editing).
• Path configuration: Select online authorized nodes and configure the source file/folder path and target storage path. Multi-select for files/folders and cross-level multi-select are supported. One-way transfer supports path configuration for multiple target nodes.
• Scheduling frequency: Set immediate execution or various scheduled execution rules.
Panel 2: Advanced Settings (optional)
File Attribute Configuration
|
Default Value |
Description |
|
|
Preserve all attributes |
On |
After selected, the following two options are automatically enabled and cannot be modified separately. |
|
Preserve modification time |
On |
Writes the source file modification time to the target file. This option is forcibly enabled when Overwrite if source is newer is selected. |
|
Preserve ACL |
On |
Preserves access control list permissions. Supported only within the same operating system. |
File Processing Rules
|
Default Value |
Description |
|
|
Transfer only the contents under the source directory |
Off |
Transfers only files/folders inside the source path, excluding the source path itself. It is forcibly enabled and cannot be disabled for two-way transfer. The source path must be a non-root directory folder. |
|
Delete target when source is deleted |
Off |
After a file is deleted on the source side, the corresponding target file is automatically deleted. Mutually exclusive with Transfer only the contents under the source directory. Unavailable when the source/target is a root directory (/ or drive root). |
|
Source file processing |
Off |
Deletes or migrates the source file after a single file is transferred. Disabled for two-way transfer. Mutually exclusive with Delete target when source is deleted. Sub-options are expanded: 1. Automatically delete source files: You can choose to delete all source directories and files or preserve the source directory structure. 2. Automatically move source files: Move source files after a specified duration after transfer completion, and set a delayed automatic deletion duration. Enter 0 to disable automatic deletion. |
Processing Rules for Existing Target Files
|
Description |
|
|
Overwrite target file |
Directly overwrites existing files. |
|
Overwrite if source is newer |
Overwrites only when the source file is newer, and forcibly preserves the file modification time. |
|
Append to target |
Appends data to the file. Not applicable to object storage scenarios. |
|
Rename |
Add a “(version number)” to the end of the file. Available only for Execute Immediately and One-time Scheduled Task. It is grayed out and unavailable for other frequencies. |
File Filtering Rules
|
Description |
|
|
Transfer file/folder filtering |
After selected, blacklist or whitelist filtering mode can be selected. |
|
Filter rules |
Supports wildcards, separated by semicolons (;), with a maximum of 255 characters. |
|
Skip oversized files |
Automatically skips files larger than the specified size. The size range is 1-9999, and supported units are MB/GB/TB. |
Configuration Linkage Restriction Description
• Two-way transfer: Automatically disables Delete target when source is deleted and Source file processing, forcibly enables Transfer only the contents under the source directory, and does not allow manual modification.
• Non-one-time scheduled tasks: If the Rename rule has been selected, the system automatically changes it to Overwrite when the frequency is switched.
• Root directory transfer: When the source or target is the system root directory, Delete target when source is deleted cannot be enabled.
Panel 3: Notification Settings (optional)
Batch completion and task failure email notifications can be enabled/disabled. Multiple recipients can be configured. Before use, the email service must be configured in System Settings.
2.4.2 Task Status Description
|
Task Status |
Description |
|
Idle |
The periodic task is enabled, no batch is currently running, and the task is waiting for the next scheduled execution. |
|
Transferring |
The task currently has a running transfer batch and is transferring files. |
|
Paused |
The task has been manually paused. Scheduling is not executed during the pause. You can manually click Start to resume. |
|
Disabled |
The periodic task has been disabled. The system no longer schedules execution. You can enable it again to resume the task. |
|
Completed |
The one-time task has completed all transfer batches, and the task has ended. |
2.4.3 Task Operations
|
Function |
Description |
|
Edit |
All parameters except the transfer direction can be edited. |
|
Batch |
Supports viewing task execution batches and task-level running logs. |
|
Associated Logs |
View operation and execution logs of this task. |
|
Query |
Supports precise task search by task name, running status, and creation time range. |
|
Delete |
Delete the task. |
|
Disable |
Only periodic transfer tasks can be disabled. One-time tasks cannot be disabled. |
|
Manual Refresh |
Refresh the transfer task list status in real time. |
2.5 Task Activity
Function purpose: Monitors all running transfer batches in real time and dynamically displays transfer progress.
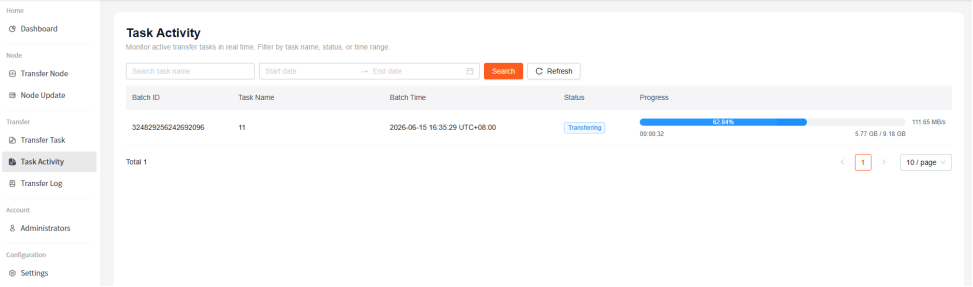
1. The page automatically loads all in-progress transfer batch data without manual refresh.
2. Supports filtering by task name and batch execution time range.
3. Core display fields: batch ID, task name, batch time, running status, transfer progress, real-time speed, remaining transfer time, and transferred/total file size.
2.6 Transfer Log
Function purpose: Provides full historical transfer record query and supports hierarchical tracing of tasks, batches, nodes, and single-file transfer details for troubleshooting and transfer reconciliation.
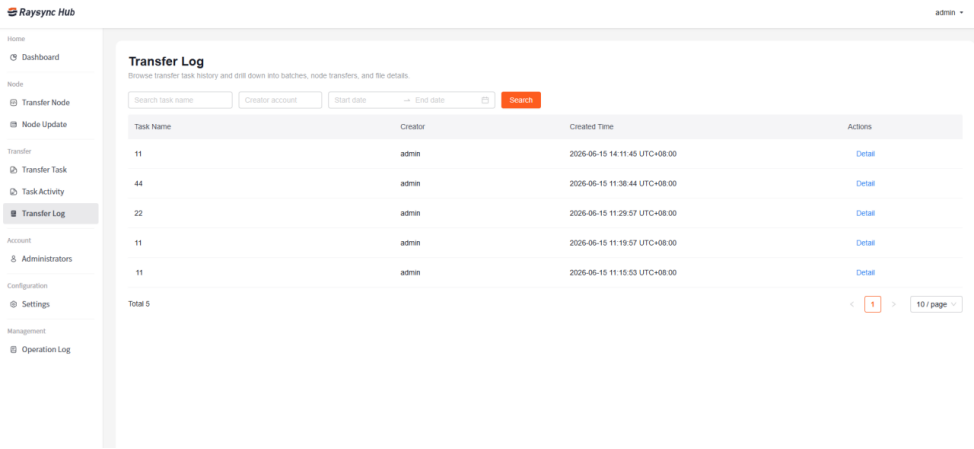
1. Filtering capability: Supports filtering historical records by task name, creator, and transfer time range.
2. Four-level trace details:
○ Task list → Detail: View all execution batches under the task.
○ Batch list → Detail: View all node transfer records under the batch.
○ Node record → Detail: View all file transfer details under a single node and single batch.
2.7 Administrators
Function purpose: Manages console login account permissions and supports multi-account O&M.
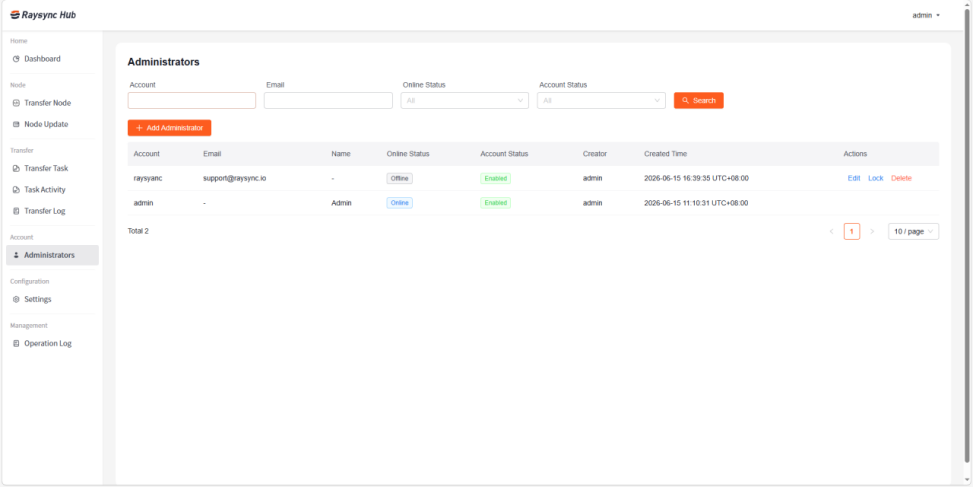
1. Search and filter: Search by account, email, online status, and account enabled/disabled status.
2. Add account: Click Add, enter the account, email, name, password, and other information, and save to generate a new administrator account.
3. Edit account: Supports modifying common administrator information. The built-in system account admin cannot be edited or deleted.
4. Account control: Supports account locking (disable login), unlocking (restore login), and deletion.
|
Additional note: To unlock the system account admin, run AdminUnlockTool.exe in the server directory. |
2.8 Settings
Function purpose: Configures basic system parameters, including three core modules: email notification, SSL certificate, and database configuration.
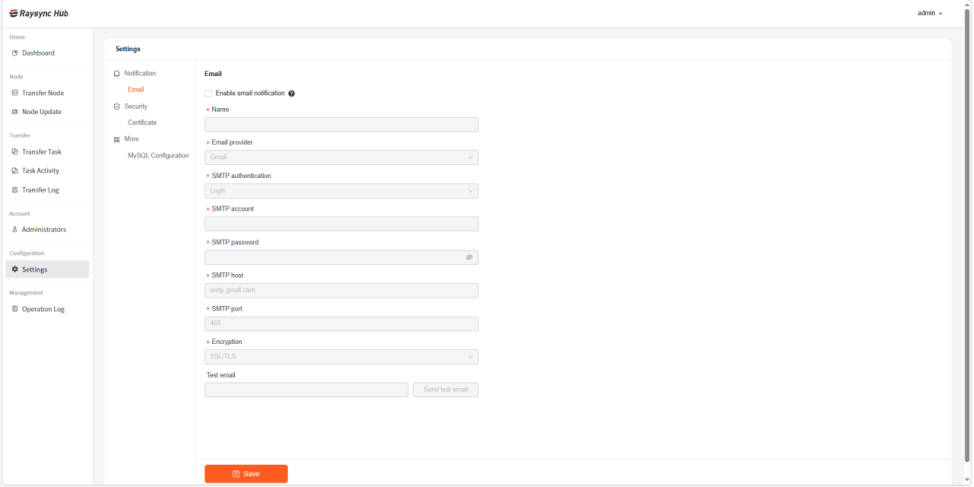
2.8.1 Email
Function purpose: Used to proactively push message notifications to recipients when transfer batches are completed or fail.
1. Select Enable email notification.
2. Configure sender information, SMTP type, host address, port, encryption method, login account, and password.
3. Enter the recipient email address in the test email input box and click Test to verify email service connectivity. Save the configuration after the test succeeds.
2.8.2 Certificate
Function purpose: Enables HTTPS encrypted connections to ensure secure system access.
1. Upload the PEM-format certificate file and KEY private key file.
2. View the certificate domain name and validity period. After the certificate expires, the page automatically displays a red warning.
3. Optionally enable Disable non-SSL access to force the system to support HTTPS access only.
4. Save the configuration for it to take effect.
2.8.3 MySQL
Function purpose: The system uses an SQLite database by default and supports switching to a MySQL database to accommodate large-scale business scenarios.
1. Select the Enable MySQL switch.
2. Configure the database host, port (3306 by default), database name (raysync_db by default), account, and password.
3. Click Test Connection to verify database connectivity.
4. After the test succeeds, save the configuration. After switching the database, you must restart the console and log in to the service again for the change to take effect. For initial database configuration, the default initial account is admin, and the initial password for admin can be viewed in the AdminInitPwd file on the server.
2.9 Operation Log
Function purpose: This is the core module for system O&M auditing. It records all console backend operations for security audit, operation tracing, and fault locating.
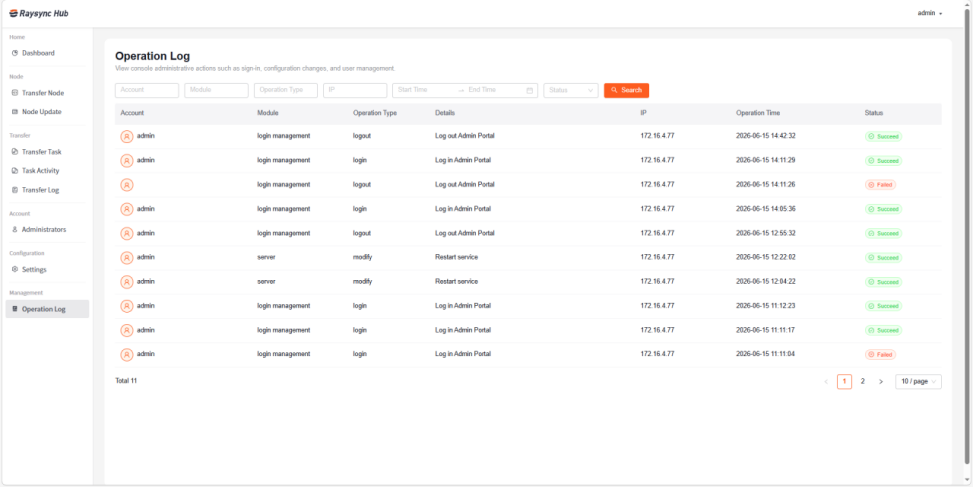
1. Filtering capability: Supports filtering by operation account, function module, operation type, execution status, and operation time range.
2. Log fields: Displays operator, operation module, operation type, operation details, client IP, operation time, and execution status.
3. Detail view: Long operation details support hover display of the full content.
2.10 Personal Profile
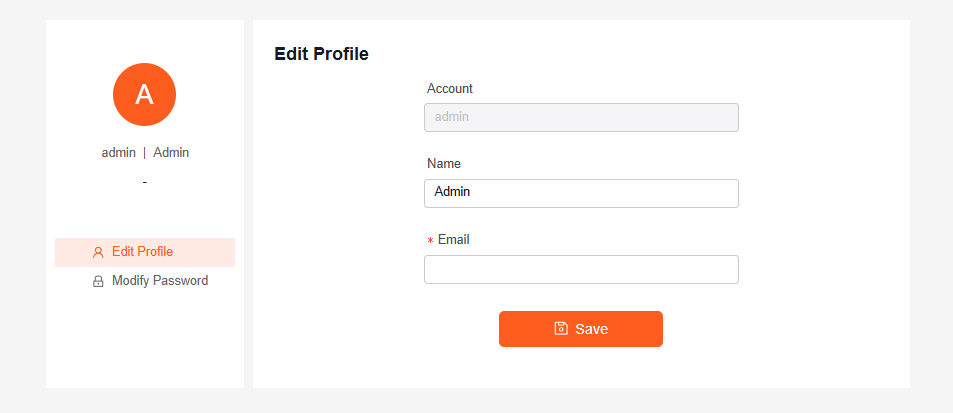
1. After logging in, click your current account name in the upper right corner to expand the drop-down menu.
2. Select "Personal Profile" to enter the /profile page.
3. Click the two tabs on the left:
Edit Profile: You can modify your name and email address; the account field is read-only and cannot be modified.
Modify Password: Enter your current password, new password, confirm the new password, and then save.
2.11 Logout
Click "Logout" in the account dropdown menu in the upper right corner. Click "OK" in the confirmation box. The system will clear your login status and redirect you back to the /signin login page.