Support

1) Release List

Updated: 2023-08-21 11:53:27

V6.7.8.0

Updated: 2023-8-14

1、Preserve file ACL attribute

2、Peer-to-Peer transfer optimization

3、Set the task name when creating a client transmission task

4、When SDK is uploaded, the file regular verification parameter regexexp

5、Dynamic file verification before transfer

5、Select multiple tasks to delete

6、Admin Portal adds Client Rsync, Hash, Encrypted forced opening or forced closing button

7、Transfer email notification Adds task name, location, source path, destination path, and task details

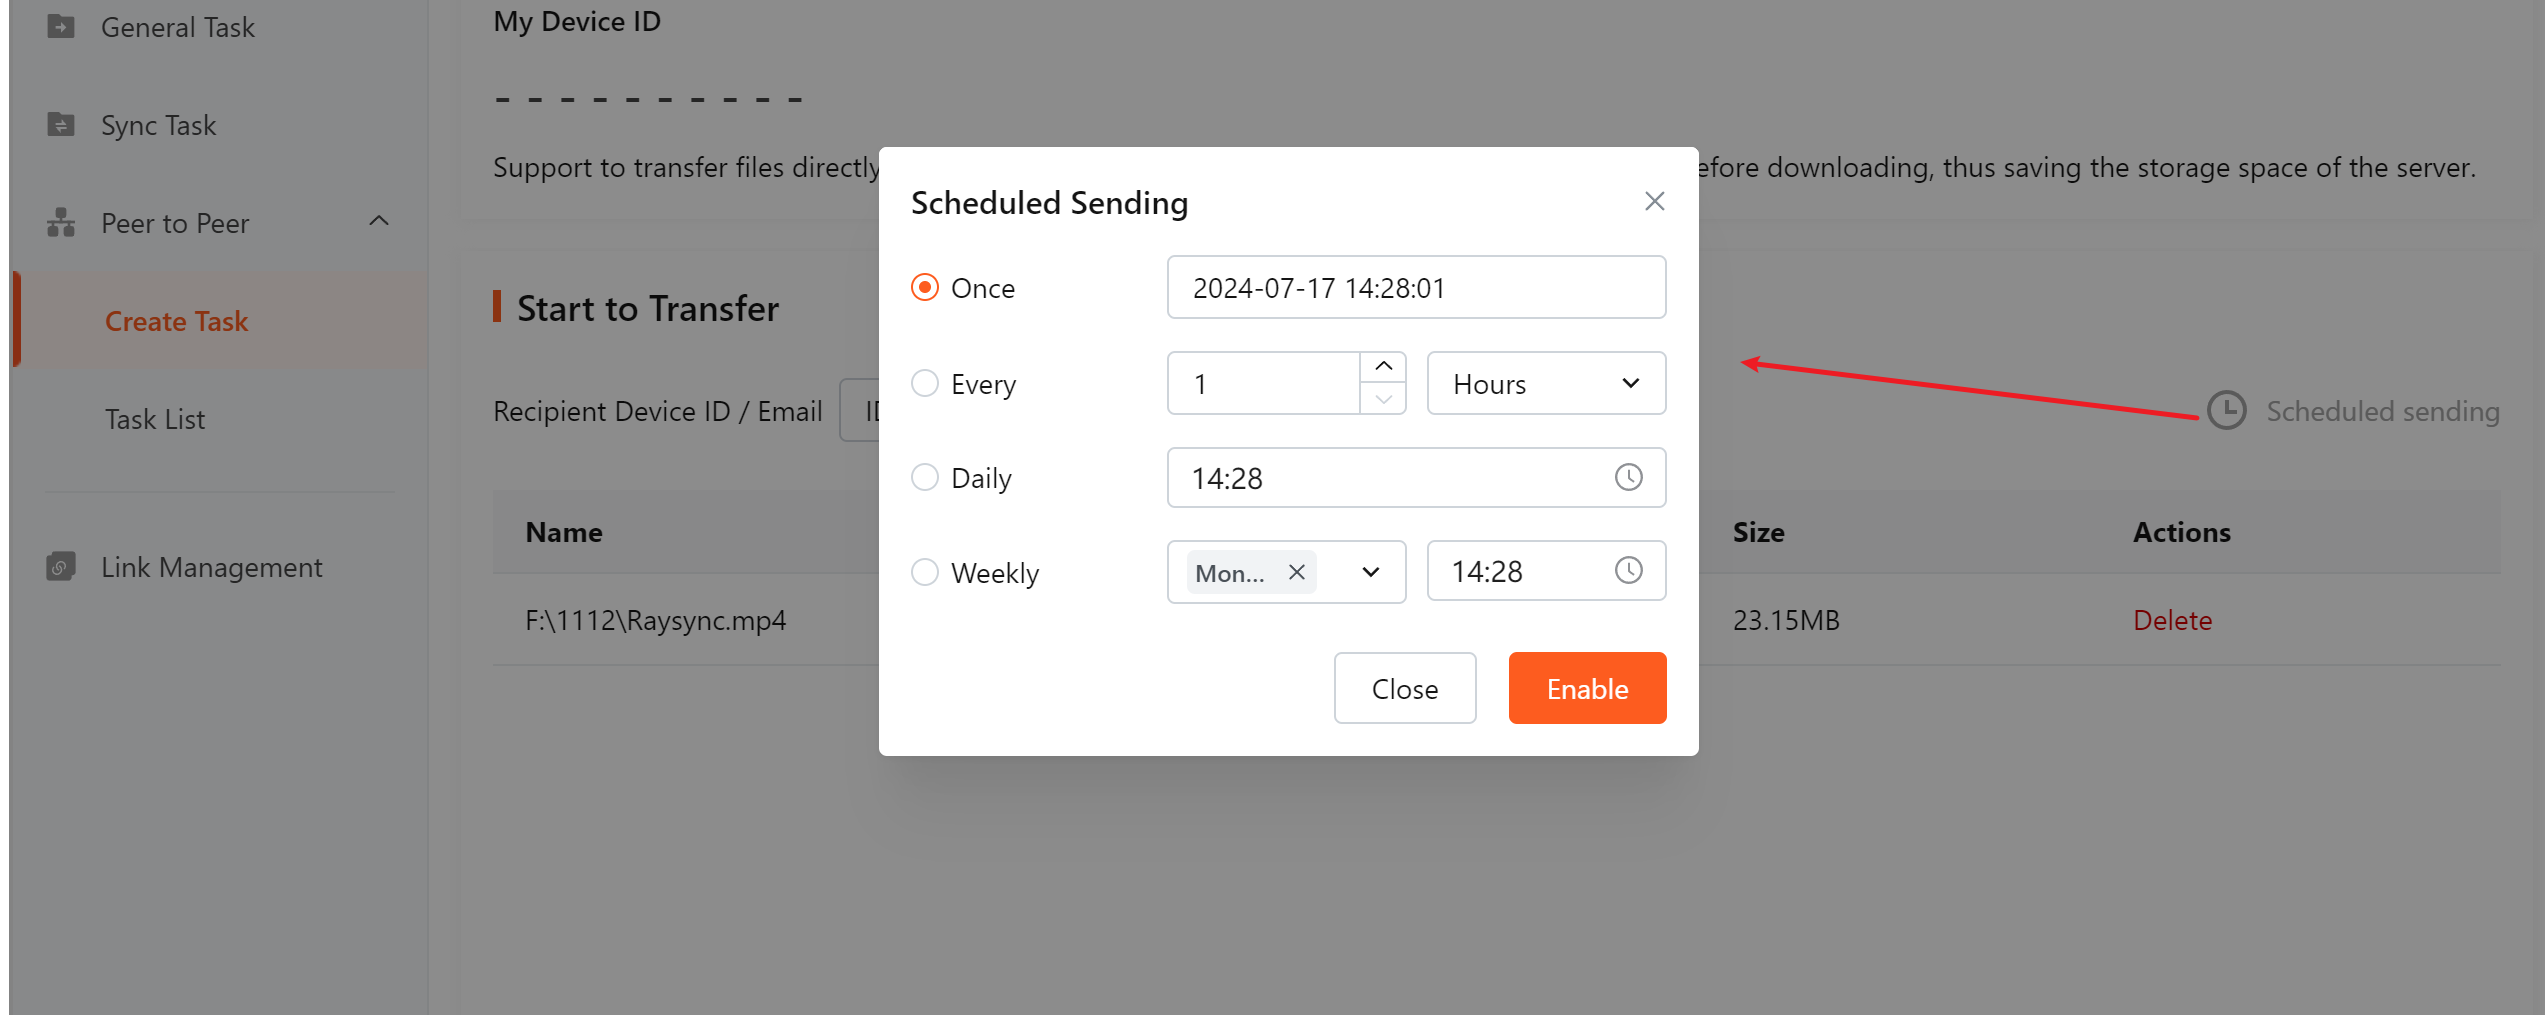
8、Peer-to-Peer transfer supports scheduled tasks

9、Admin Portal Increase allowed access path

10、Fix some bugs


V6.6.8.0

Updated: 2023-3-20

  1. The Server Task support specifying clients
  2. Peer to Peer transfer support sending files by email

  3. Add the average speed, task status, and failure cause to the task log

  4. Added log clearing and log compression on the client
  5. Synchronization task Added file processing mode: Automatically delete source files and retain the source directory structure

      6. Fix some bugs

V6.5.8.4

Updated: 2023-1-13

  1. Control the synchronization frequency at the Admin Portal
  2. Multiple source paths of the same level can be selected for client synchronization tasks

  3. Transfer mail template revision

  4. Fix some bugs

V6.5.8.0

Updated: 2022-11-24

  1. Support sensitive word detection

  2. Support department organization

  3. Import AD domain according to the organization

  4. Improve email notification template

  5. Users support Email free login verification

  6. Share download notification supports batch import mailbox

  7. SSL Certificate is changed to upload method

  8. Transmission task displays IP belonging place in Admin portal

  9. Server Task supports startup and suspension

  10. Server Task supports Two-Way sync

  11. Server Task supports reserve file attributes
  12. Command line supports Two -Way sync

  13. Command line supports direct input object storage path transmission

  14. Fix some bugs

V6.4.8.0

Updated: 2022-08-27

  1. Support Set Up Delivery Task on Admin Portal

  2. Add details on the transfer log

  3. Support two-factor authentication

  4. Added system notifications settings

  5. Support group administrator to manage group permission

  6. Support speed limitation in Kb on the admin portal

  7. Add network topology on the admin portal

  8. Control the function display on the user portal

  9. Add QR code for APP download at the front desk

  10. Fix some bugs

v6.3.8.0

Updated: 2022-06-03

  1. Support webpage http to download (compressed to ZIP format).

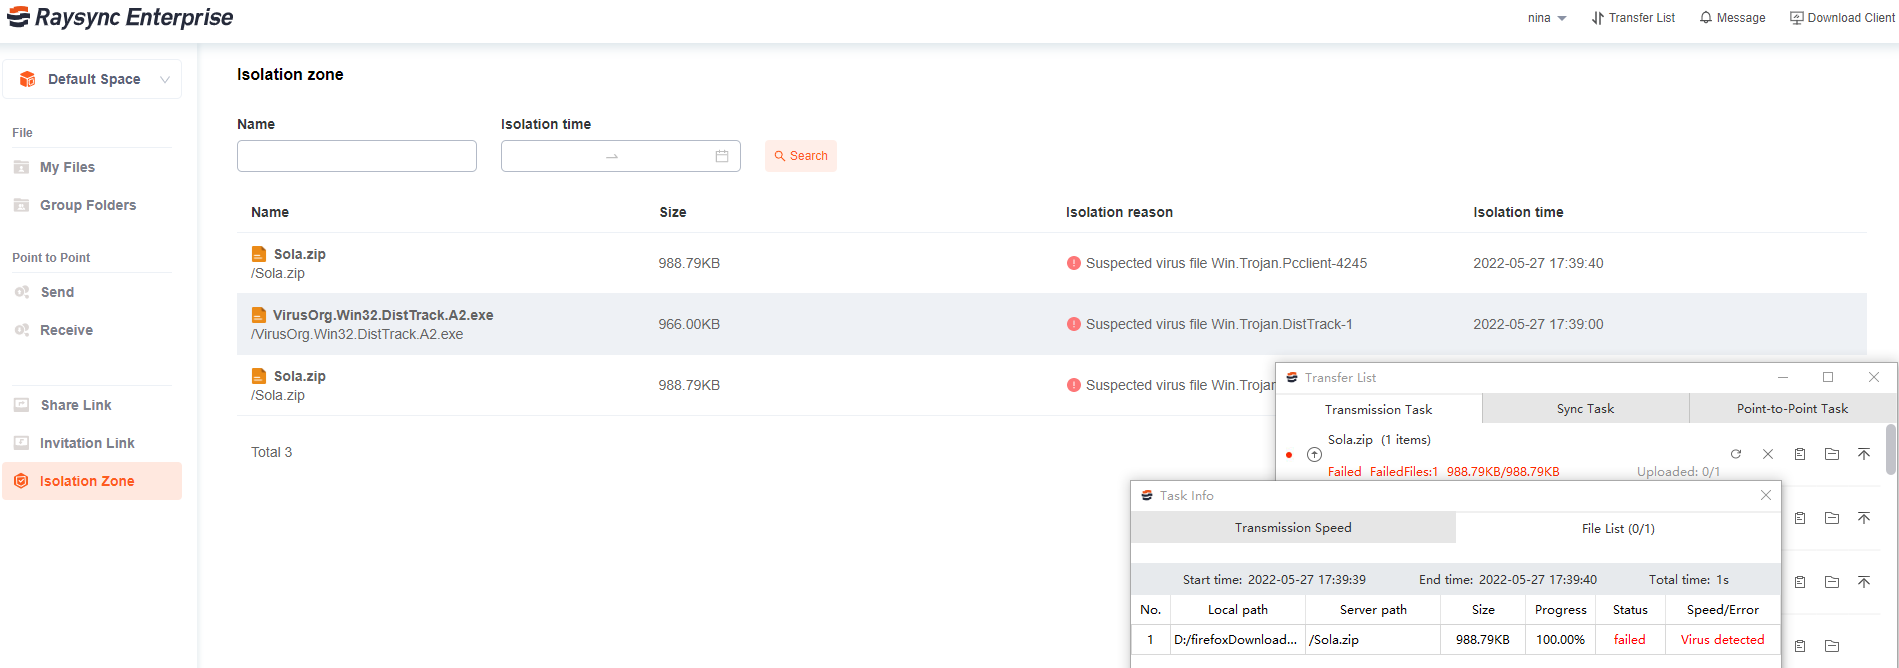
  2. Support anti -virus after file upload.

  3. Increase the function of the file isolation area.

  4. Increase the function of recycling station restoration and deletion.

  5. Raylicense offline activation code integration.

  6. Support according to week synchronization function on Sync Task .

  7. Support Task increase the rename function on Sync Task.

  8. Support overwriting file if source newer on Sync Task.

  9. When selecting files on Mac client, support quickly select the Mount disk.

  10. The links of invite upload supporting the creation folder

  11. Prohibit access path supporting the Mixer method

  12. Support data statistics in the background

  13. Webpage supports uploading folders

  14. Webpage support dragging upload files

  15. Import and export accounts, batch editing accounts

  16. Transfer situation increases progress display

  17. Fix some bugs

v6.2.8.0

Updated: 2022-02-17

1.Support multiple spaces.

2.Support to create multiple administrators and configure administrator permissions.

3.Support copy account.

4.Add synchronous transmission log.

5.Support viewing user and group files in the admin portal.

6.Added IP access black and white list.

7.Invite upload link supports create new folder.

8.The group file library supports sharing and downloading, and invitation to upload.

9.The group file library supports specifying the permissions of each member individually.

10.Client direct transmission supports UDP connection to the pee.

11.Support user to retrieve password.

12.UI layout adjustment.

13.Fix some bugs.

v6.0.0.8

Updated: 2021-09-27

1.Clients are not required to create new folders, rename, move, copy, delete files, view properties, upload files and resume them at breakpoints.

2.Delete source file after the sync task is done.

3.Add a new synchronization frequency that synchronizes only once.

4.Allow centralized management of synchronous transfer tasks.

5.Make backdrop color, button color, and login box position customization available.

6.Optimization on point-to-point transfer.

7.Send link-sharing and password-sharing emails in separate.

8.Command line program supports unified management of App nodes.

9.Support office and cad preview.

10.Fix some bugs.

v5.0.8.8

Updated: 2021-06-09

1.Add automatic cleaning files.

2.The client supports sorting task priority.

3.Support google cloud storage.

4.Add ctime and atime synchronization to remain file time (only support windows).

5.Support upload soft and hard link.

6.Support copy the full path of files.

7.Synchronous command line supports http mode to manage tasks.

8.Add disclaimer when client automatically updates.

9.The sharing link needs to record the number of downloads and IP address, the transmission log of the sharing link needs to be bound to the account.

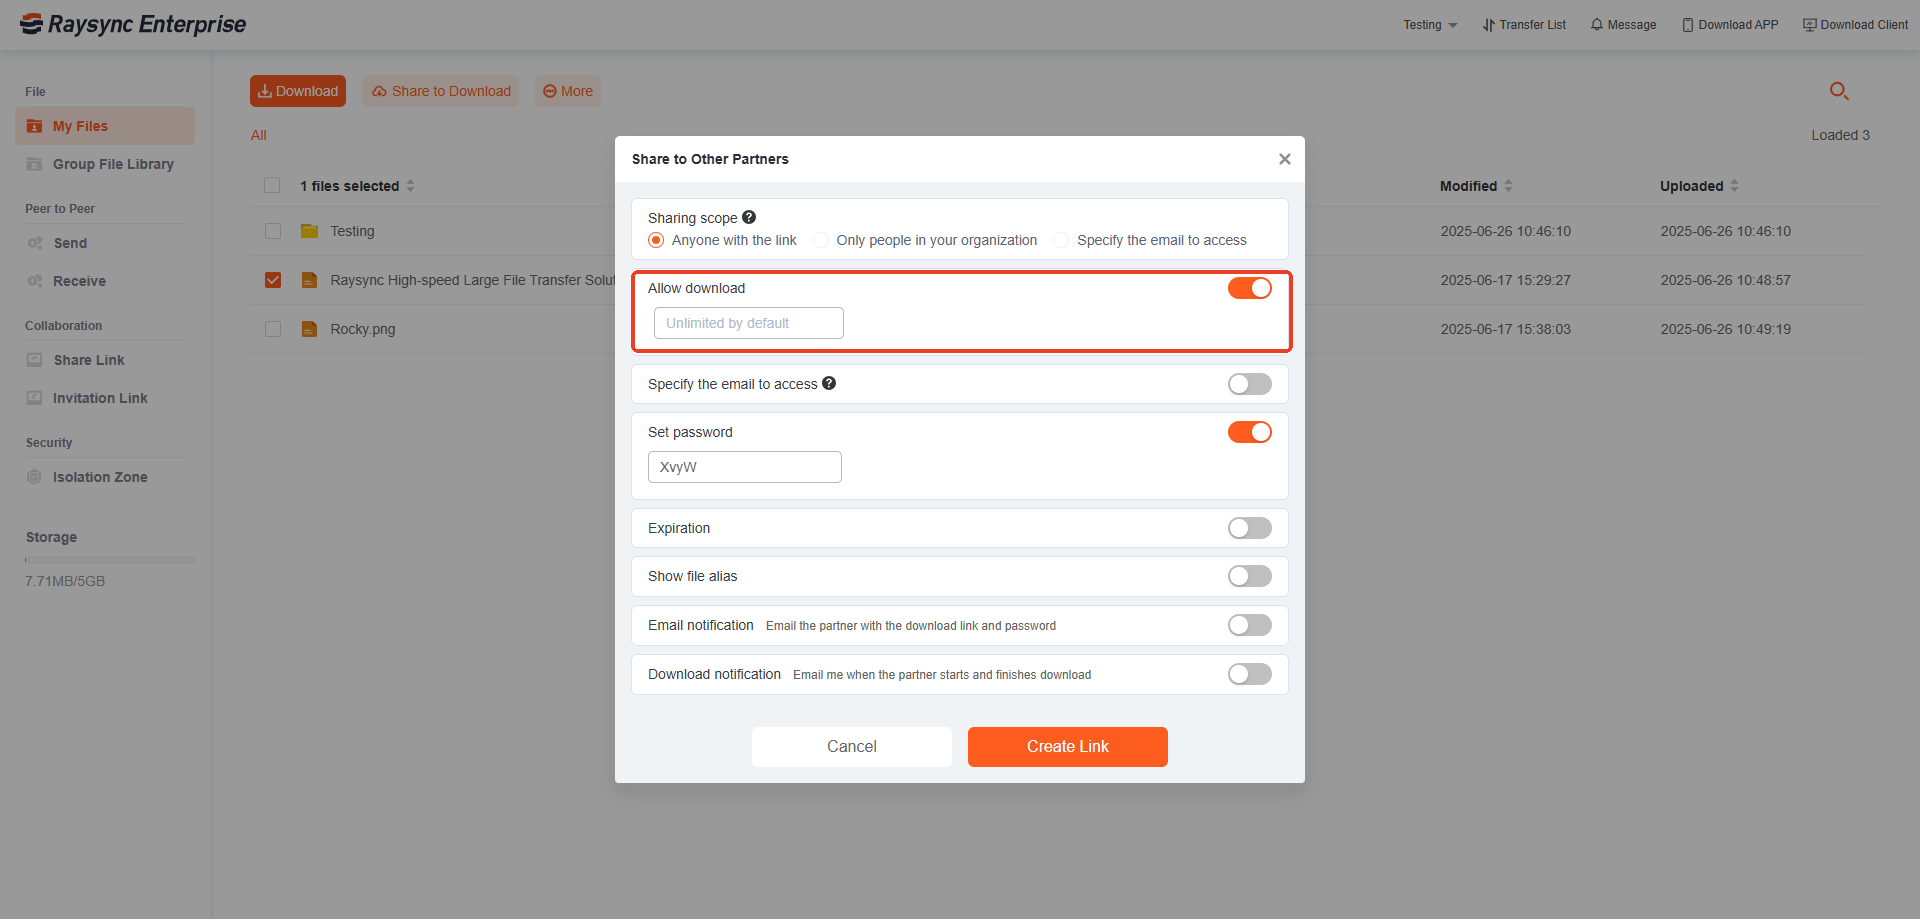
10.Add a password setting switch when sharing files.

11.The client adds the number of files in parallel when transfer.

12.Support select files and folders at the same time.

13.The machine can be identified without configuring the client default server.

14.Sharing links is not limited by login whitelist.

15.Fix some bugs.

v5.0.7.8

Updated: 2021-02-07

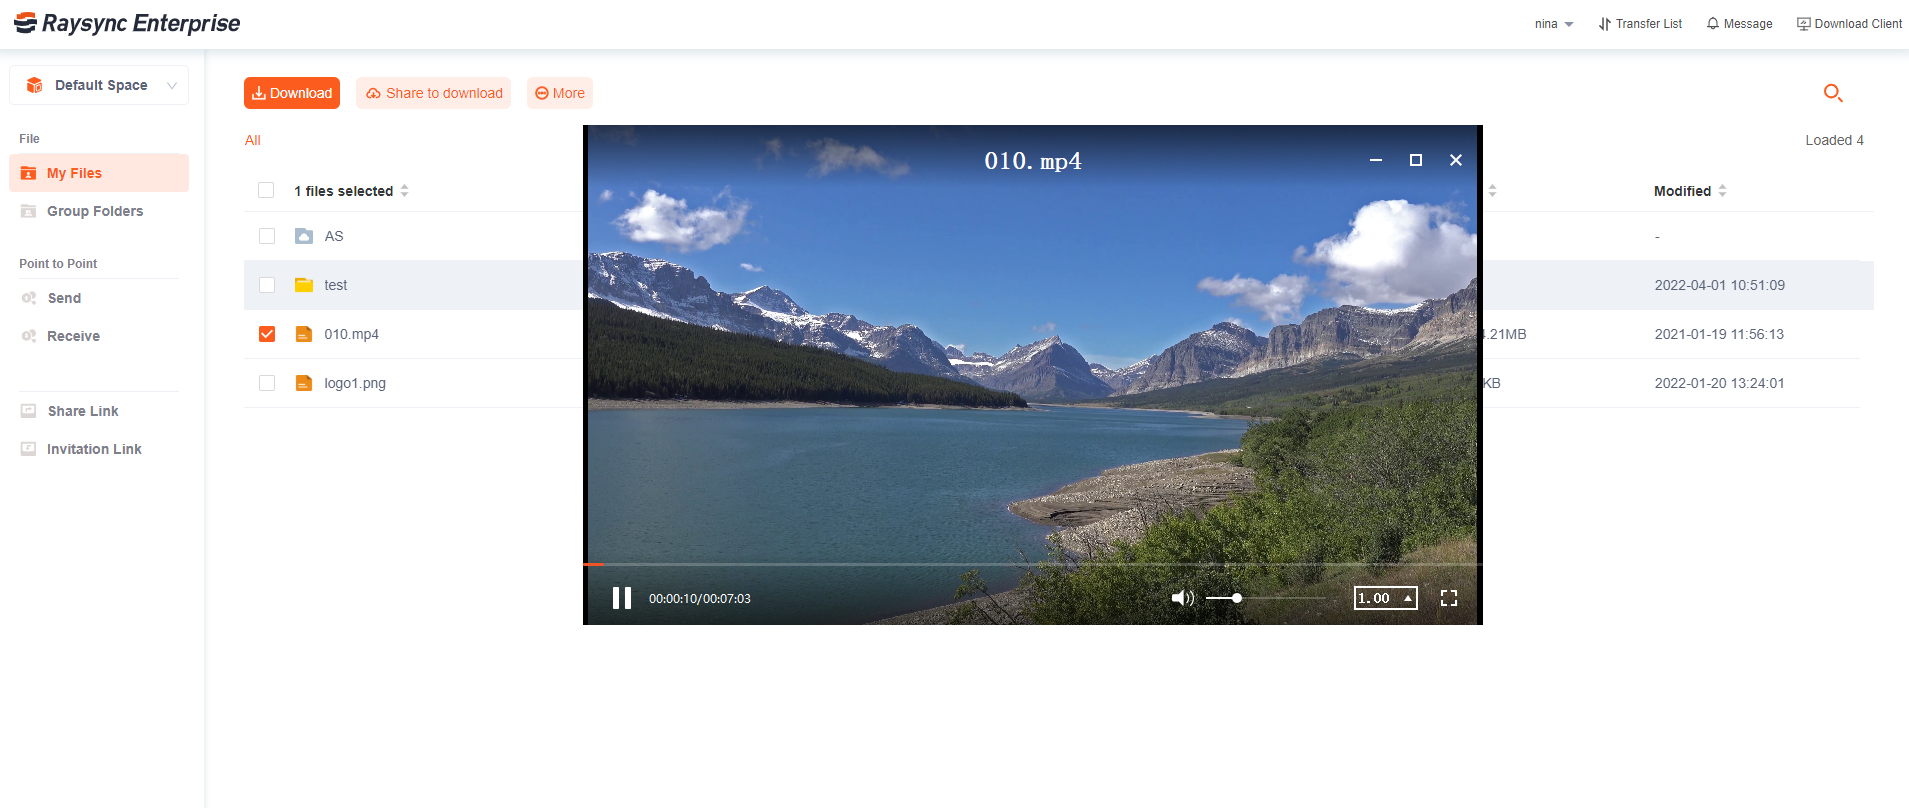
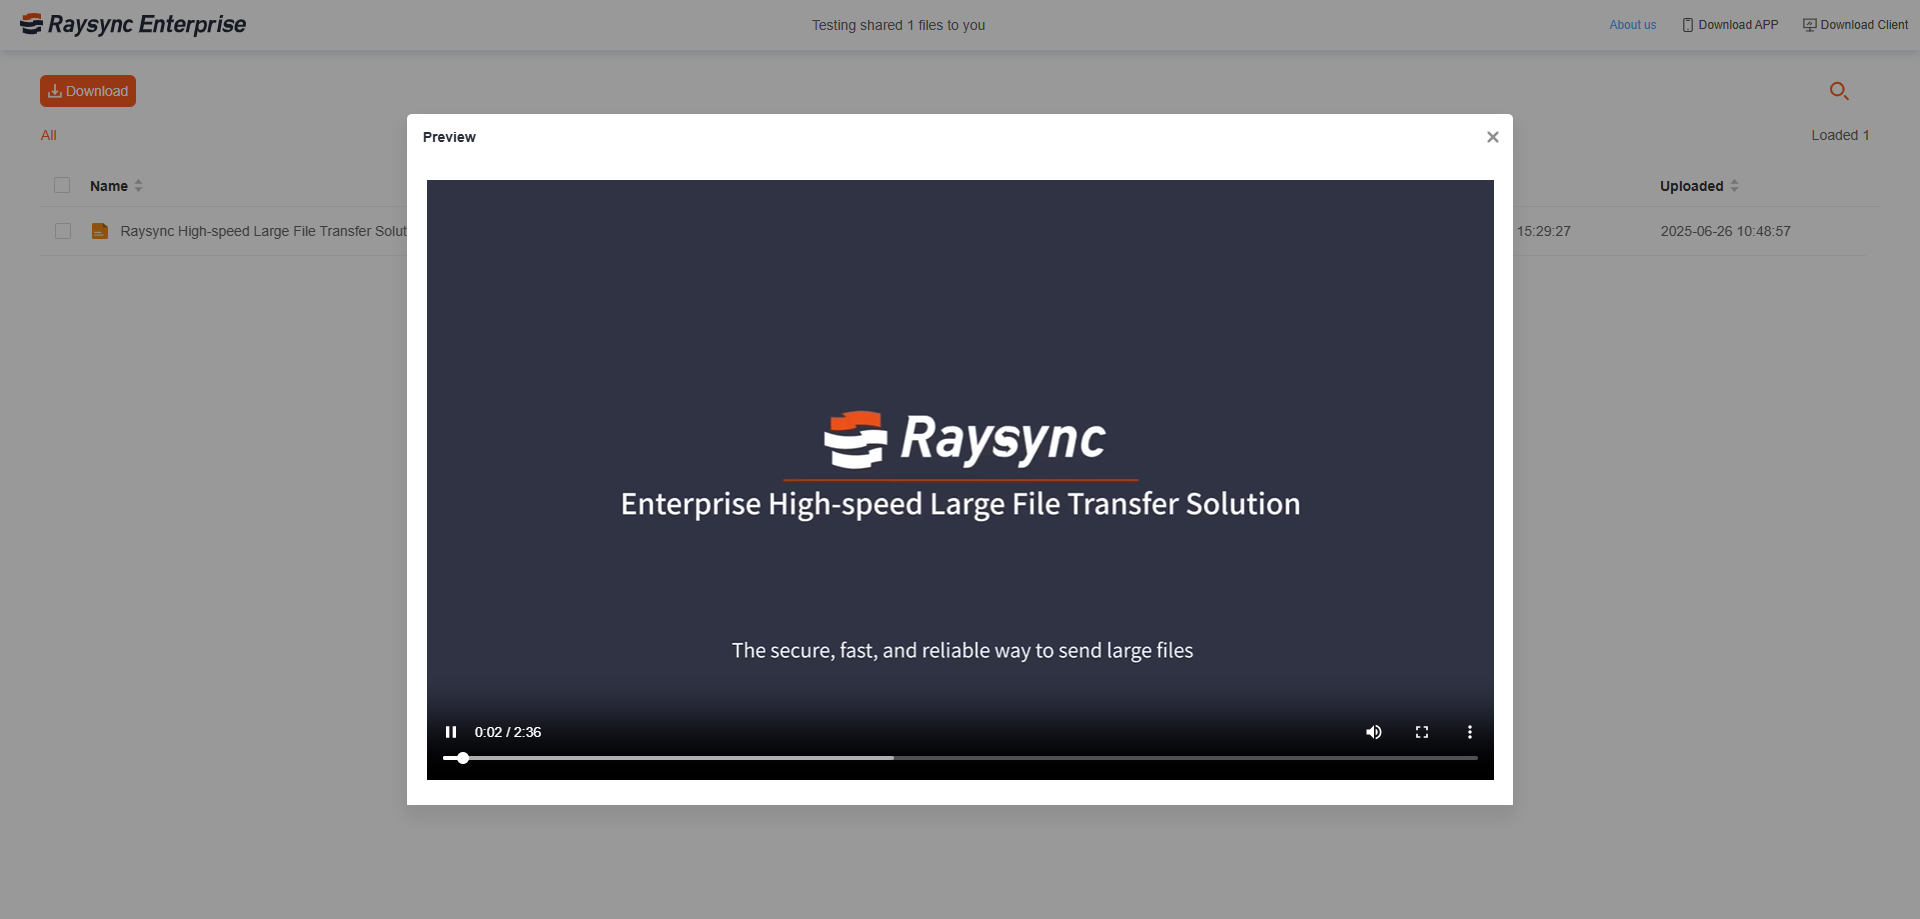
1.Support preview files, pictures and videos online.

2.Add video preview watermark settings.

3.support the identification of different devices in the external network environment on node management.

4.Add the period setting of the maximum speed.

5.Support national encryption standard.

6.RaySSH supports MacOS client.

7.Add speed unit configuration: Bit/Byte.

8.Add importing accounts by AD domain group.

9.Optimize command line.

10.Fix some bugs.

v5.0.6.8

Updated: 2020-12-28

1.Add client node management.

2.Support multiple storage configurations.

3.Supports virtual directories in the user directory.

4.The client supports silent upgrade.

5.Add filter conditions for synchronized files.

6.Add append to the target file for the synchronized files.

7.Add synchronization function in group space.

8.Log-in IP whitelist supports setting continuous IP.

9.Transfer files support blacklist setting.

10.Other bug fixes.

v5.0.5.8

Updated: 2020-11-02

1.Brand new point to point transfer function, files can be transferred between Raysync clients directly without loading on the server, which is only transit data volume.

2.Object storage adding support Google Azure blob.

3.Raysync client UI improvement.

4.Support administrator setting batch set default permissions on side third party authentication user.

5.New feature on the administrator of sending a notification to users, including: A. Send notifications from the website. B. Send notifications from email.

6.Raysync client stays minimize when start-up.

7.The signature of the mail notification in the admin console can be self-defined according to the company name.

8.Add the validity and invalidity option to the TLS certificate page in the admin console.

9.Change password to optional in Raysync client mailbox configuration.

10.Raysync client supports mailbox login.

11.The online and offline status of the sub-account is visible now on the user management page of the admin console.

12.The IP whitelist in the admin console supports continuous segments. For example, IP from 192.168.0.1 to 192.168.0.100, can be written as 192.168.0.1-100.

v5.0.4.8

Updated: 2020-10-30

1.Add the button of upload file or folder when the client is connected with TCP.

2.Add default enable hash check and default enable encrypted transmission on the administrator.

3.Add the option to prohibit non-SSL connections on the administrator.

4.Default Raysync client automatically run at startup.

5.Change the client to priority TCP transmission.

6.The administrator displays the space capacity and used space of all disks on the Raysync server.

7.Add test button on the administrator in mailbox configuration.

8.Add common mailboxes SMTP to administrator mailbox and three-party authentication mailbox configuration.

9.Support administrator mailbox SMTP and STARTTLS encryption docking.

10.The administrator can control whether the client chooses to send the notification with the mailbox configured by the client.

11.Display users number of License control on the administrator.

12.Add IP white list to the user account on the administrator.

13.Optimize email format verification.

14.Transmission client UI optimization.

15.Administrator control the TCP transfer file size limit.

16.Other bug fixes

v5.0.3.8

Updated: 2020-10-30

1.Adapt to the Dark mode display of MacOS.

2.Update the MacOS logo icon.

3.Add third-party Http(s) authentication to the Raysync management console.

4.Support using wildcards to upload and download files under command line mode 5.Support moving files under command line mode.

6.Support specifying the modification of the target file name under command line mode.

7.Support three transmission protocol configurations in Raysync management console: UDP/TCP automatic selection (how many milliseconds to use TCP), Only UDP transmission, Only TCP transmission, Default.

8.Synchronization tasks support two-way synchronization.

9.Optimize UI for sharing downloads and invitations to upload pages.

10.Optimize UI for Software plugin download prompt window.

11.Optimize UI for management console.

12.Support rsync download verification: when downloading files, if the download directory has a file with the same name, it will be compared with the file on the server, the server only sends different data for download.

13.Add "Import Authentication account" button to LDAP authentication. After user configuration completes LDAP information, the account in LDAP can be actively imported to the Raysync server.

14.Support the home directory set some directories invisible to Raysync users.

15.Fix Other bugs.

v5.0.2.8

Updated: 2020-10-30

1.The web supports uploading and downloading files without starting client Raysync/Pro/Enterprise distinguishes the front-end display according to different licenses.

2.Support the librsync algorithm to check file changes.

3.IOS product development.

4.Raysync software supports license based on traffic comsuption.

5.Online and offline licenses support a specified number of accounts.

6.Internationalization of shared mail.

7.Transmission log display by pages.

8.Fix Other bugs.
2) About Raysync

Updated: 2022-11-30 09:01:57

Raysync, launched by Yunyu Technology, is a secure, fast, and reliable way to send large file. Raysync is dedicated to meeting the needs of large data transfer within the enterprise or with external partners and providing efficient and controllable large file transfer acceleration service.

The applications of Raysync include fast transfer of large files, high-speed transfer of massive small files, transnational network data transfer, secure files transfer, file migration, peer-to-peer transfer, file sync, file management, and group authority management. Fully meet the needs of enterprise users and help business development.

Why Raysync?

  • Large file transfer speed is at least 100 times faster than FTP/HTTP
  • Small file transfer can support tens of thousands of concurrent simultaneously
  • At least 100TB files can be transferred across borders every day
  • Minute-level rapid deployment delivery, supporting Windows and Linux servers
  • Raysync client supports Windows, Linux, macOS and other terminals
  • Support SDK integration, Raysync can be integrated into any of your applications
  • Adopt AES-256 bank-grade encryption technology, and use TLS encrypted transfer protocol to ensure data security
  • Supports user local to the server's configured storage, peer-to-peer transfer, sync transfer, and one-to-many data distribution, etc,.

3) How to Buy

Updated: 2023-09-13 02:03:19

Raysync provides different types of customers, SMB version, and Enterprise version.

  SMB Enterprise
UDP Bandwidth 1GB Limited by Licence
Download Traffic Unlimited Unlimited
Limited Users 10 Unlimited
Pricing $699/Annual Please contact sales

For more version function distinction, please consult the business.

4) Deployment

4.1) Server Preparation

Updated: 2022-11-30 09:40:36

Operating systems

1) Windows service: WindowsServer2008-2019 and above, Windows7-11 and above, and other operating systems (64-bit)

2) Linux service: Centos6.5 and above, Ubuntu14 and above, Debian 12 and above

3) CPU:4 Intel Xeon 2.00GHz or better

4) Memory:8G or better

5) Disk Space:40GB or above

6) Network Connection:100M or faster

4.2) Server Deployment

Updated: 2023-08-31 10:57:53

We provide installation packages for Windows and Linux . Please select the correct version for deployment based on your server operating system. After the deployment is complete, you can access the Admin portal and User portal page through a browser.

Basic usage process: Server deployment -> Firewall configuration -> View Admin portal initial password -> Login Admin portal -> License activation -> Storage configuration -> User creation -> Login User portal  -> Download and install client -> High-speed upload and download.

1. Windows Server Deployment

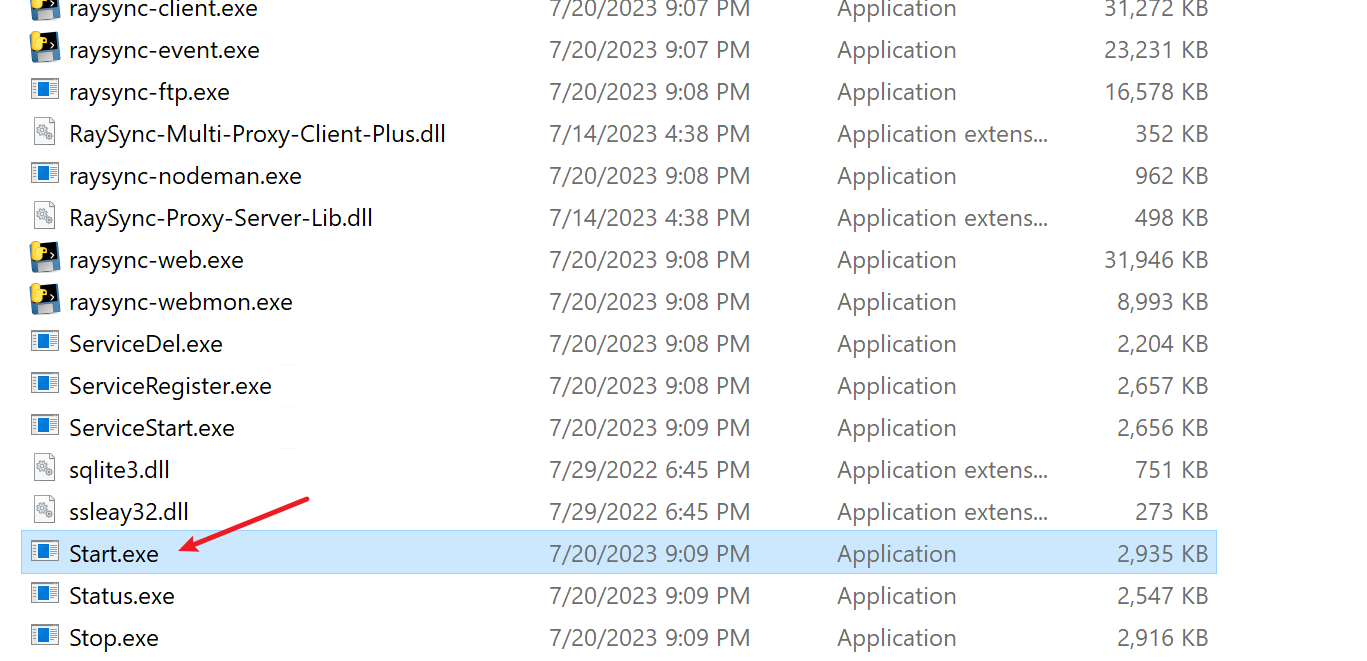
1) Unzip the downloaded Raysync server package into the your server, enter the directory of Raysync , and double-click "Start.exe" to start the Raysync transfer service. During the startup process, just click Confirm according to the system prompts.

If you need to implement automatic startup Raysync service at boot, you can execute "ServiceRegister.exe" to register the Raysync service as a system service.

启动程序截图

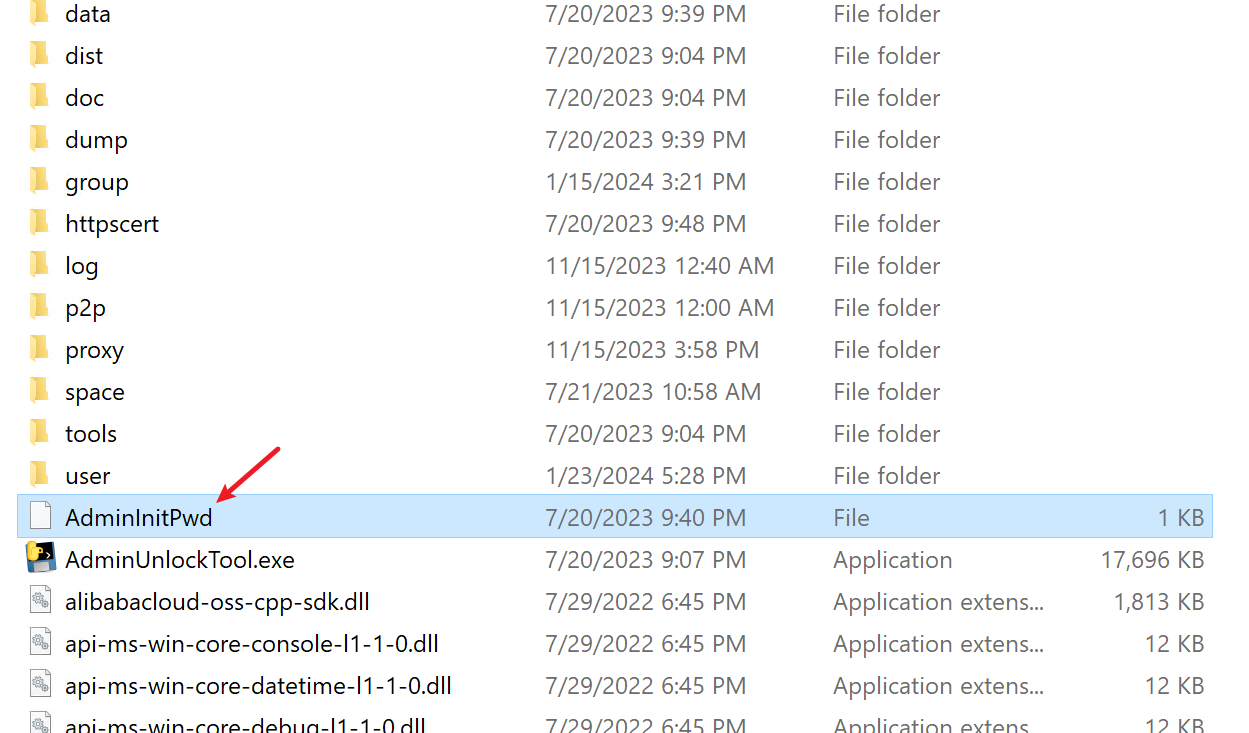
2) After the Raysync service is successfully started, an AdminInitPwd file will be generated in the installation directory, which records the initialization password of the default administrator (Account: admin), which can be opened and viewed with Notepad.

后管初始化密码

2. Linux Server Deployment

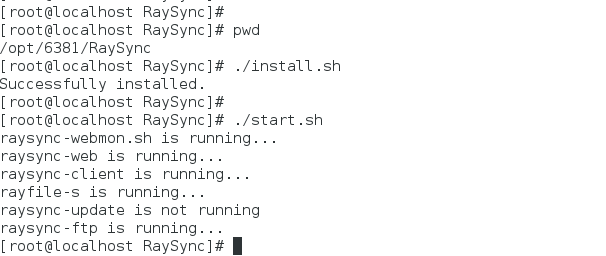
Step1:Unzip the installation package

$ tar -zxvf RaySync-6.2.8.1-Pro.tar.gz

Step2:Installation

$ cd RaySync

$ ./install.sh

The execution result is successfully installed, which means the installation is successfully initialized and the Raysync service is added to the boot-up.

Step3:Start Server

$ ./start.sh

3. Access address

  • Admin portal

If the server IP is 172.16.5.77, then: the server access address is: http://172.16.5.77:9090/admin

Initial administrator account: admin

Initial administrator password:

On the Windows system, after starting the service, unzip the folder AdminInitPwd in the server to check the password

后管密码

On Linux systems, cat AdminInitPwd in the server to view the password

linux密码

  • User portal

For example, if the server IP is 172.16.5.77, then the client access address is: http://172.16.5.77:8090/

If you need to log in, please create a user account in the Admin Portal first.

4.3) Firewall Configuration

Updated: 2023-09-26 10:19:39

1.Local deployment

Raysync server needs to be configured with the machine's firewall to allow the following ports. If the server is deployed in a NAT gateway with only an intranet IP, the following ports also need to be mapped on the router NAT.

Direction Protocol/Port Port Service Description
Inbound TCP/8090 User portal http service
Inbound TCP/8091 User portal https service
Inbound TCP/9090 Admin portal http service
Inbound TCP/9091 Admin portal https service
Inbound TCP/2480 Client Web Direct Service
Inbound TCP/2481 Client Web Encryption Direct Connection Service
Inbound TCP/2442 TCP Transfer Unencrypted Services
Inbound TCP/2443 TCP Transfer TLS Encryption Service
Inbound TCP/32001 Node Management Service
Inbound UDP/32001 UDP Accelerated Transfer Service
Inbound TCP/2482 HTTP download
Inbound TCP/2483 HTTPS download
Inbound TCP/3443 TCP forwarding server monitor port for Peer-to-Peer transfer
Inbound UDP/3478 Raysync STUN Service, used for Peer-to-Peer transfer
Inbound UDP/32003 Peer-to-Peer transfer service

At least the port must be open:

http access: TCP: 8090, 9090, 2480, 2442; UDP: 32001
https access: TCP: 8091, 9091, 2481, 2443; UDP: 32001


2.Cloud deployment

If the Raysync service is deployed on public clouds such as AWS and Azure, in addition to opening access to the above ports in the security group where the server is located, it is also necessary to open the above-mentioned ports in the security group where the server is located. Common cloud vendor security group configurations:

AWS

Azure  

Google Cloud 

4.4) License Activation

Updated: 2023-08-31 12:37:25

There are two ways to activate Raysync License: online activation and offline activation.

1. Online Activation

Please use the online activation method to activate the license when the server can access the external network.

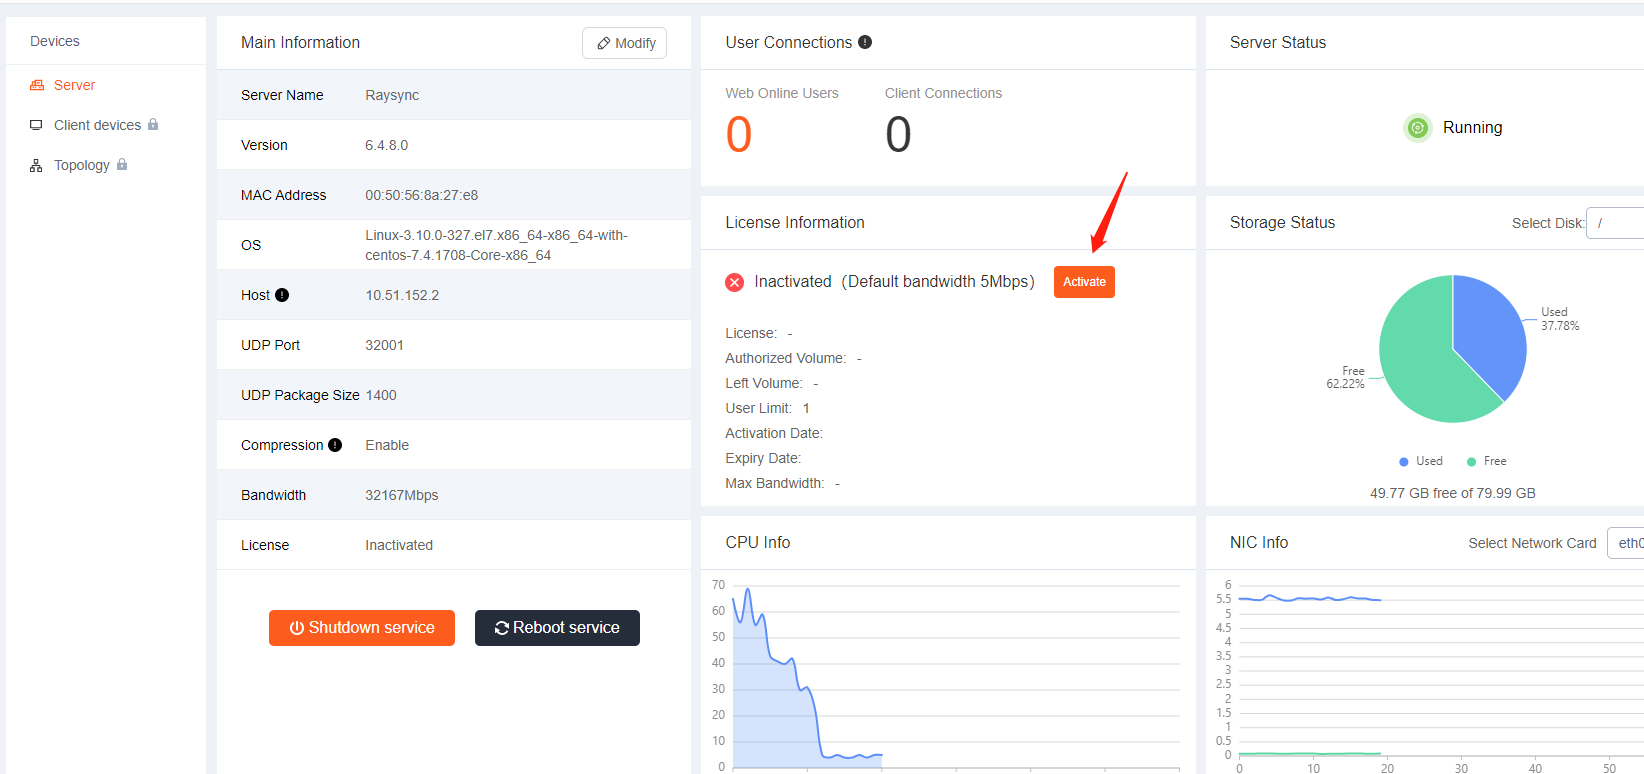
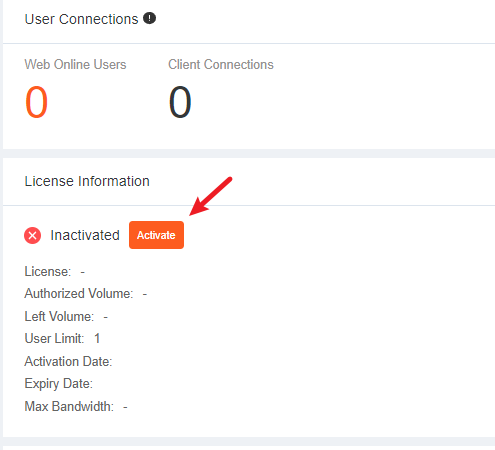
1) Enter Raysync Admin Portal - Server page, click Activate英文-在线激活1

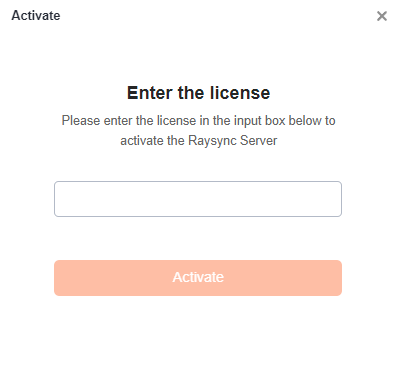
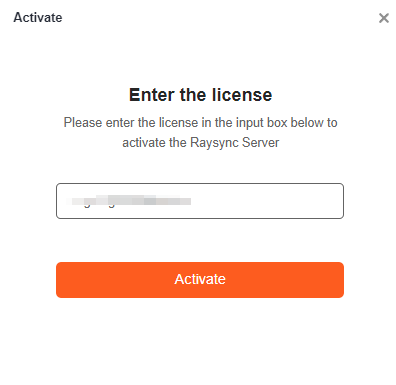
2) Enter the online activation code英文-在线激活2

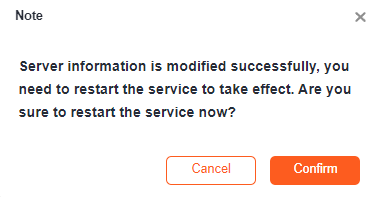
3) Restart the Raysync server英文-在线激活3

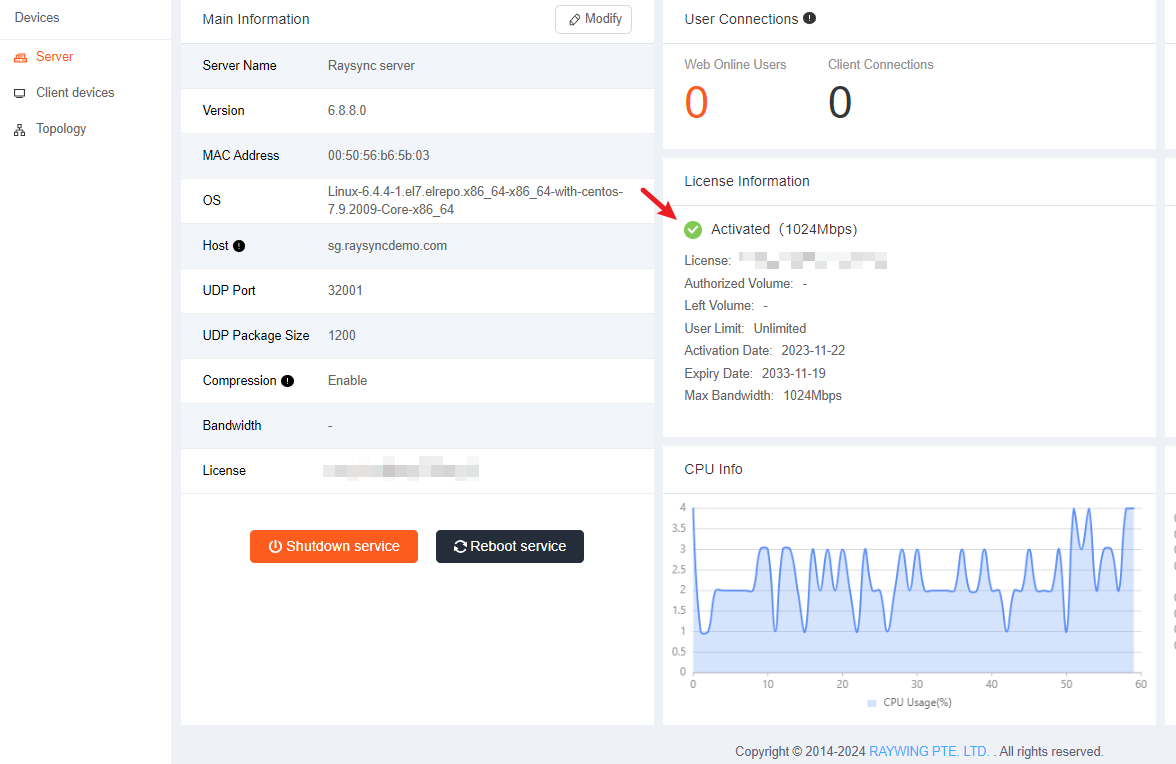
4) Activate successfully英文-在线激活4

2. Offline Activation

Please use the offline activation method to activate the license when the server cannot access the external network.

2.1 Windows offline activation

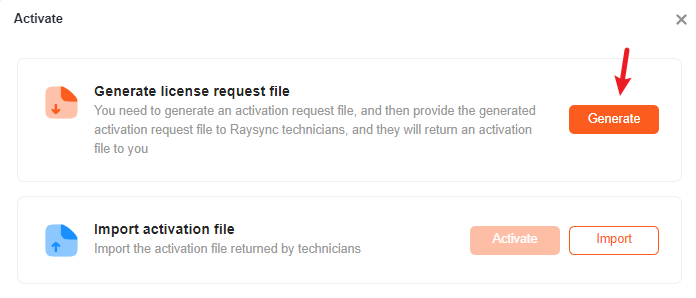
1)Enter the Raysync\proxy path, open cmd and enter createreq.exe -c license. The license is the authorization code you obtained, then press Enter after inputting it. If you don't have the code, please contact support@raysync.io.

offline

offline 1

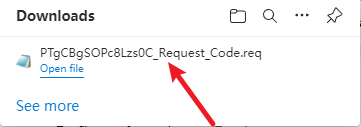
2)After activation is successful, please send XXXXXXXX Request Code.req file to the raysync's staff.

offline 3

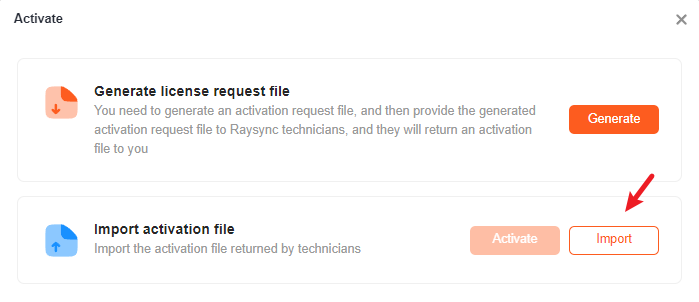
3)You will receive an offline activation file from us, such as "zpqxijpjarhgakxq_update_code. UPD", please copy the file to the path of proxy.

offline 4

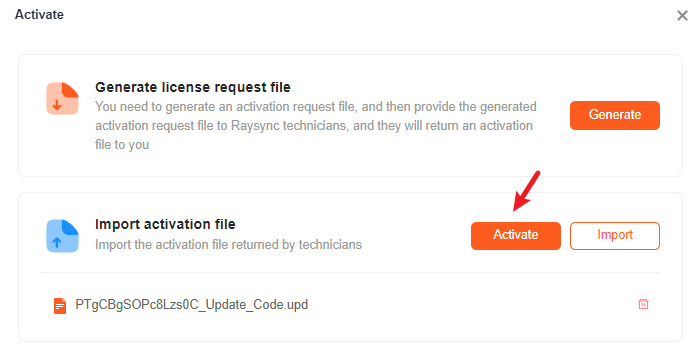
4)Log in to the Raysync Admin Portal - Server page, click Activate, enter the authorization code, and restart the Raysync server to activate it.

activate

2.2 Linux offline activation

1)Enter the directory under the Raysync directory proxy, such as:

linux离线激活

2)Execute ./CreateReq -c license. The license is the authorization code you obtained, then press Enter after inputting it. If you don't have the code, please contact support@raysync.io.

离线激活linux2

3)After activation is successful, please send XXXXXXXX Request Code.req file to the raysync's staff.

linux离线激活3

4)You will receive an offline activation file, such as "zpqxijpjarhgakxq_update_code. UPD", please copy the file to the path of proxy.

linux离线激活4

5) Log in to the Raysync Admin Portal - Server page, click Activate, enter the authorization code, and restart the Raysync server to activate it.

activate

4.5) Server Upgrade

Updated: 2023-08-31 12:39:44

Raysync server has Windows version and Linux version, please check the corresponding upgrade operation steps according to the version type.

Windows Server Upgrade

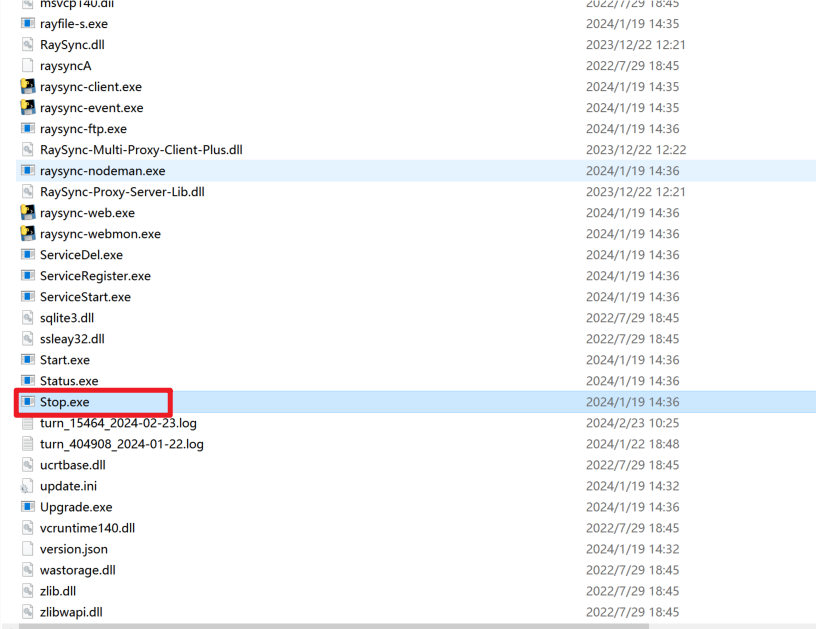
1、 Stop old version 6.2.8.0 server. Click stop.bat from old version software folder

停止服务器

2、 Uncompress new version software 6.3.8.1

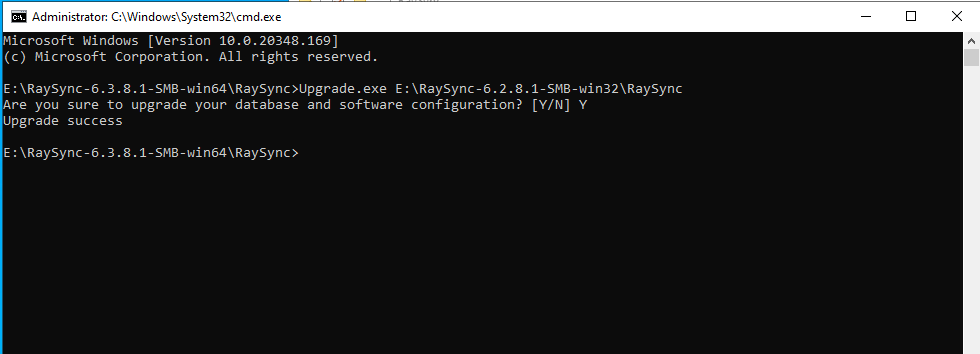
3、 Click Upgrade.exe from new version software 6.3.8.1 folder. Type Upgrade.exe and old version directory path as below step 1 and step 2. Click enter and enter Y as step 3, click enter. You will see upgrade success.

升级的程序

升级成功

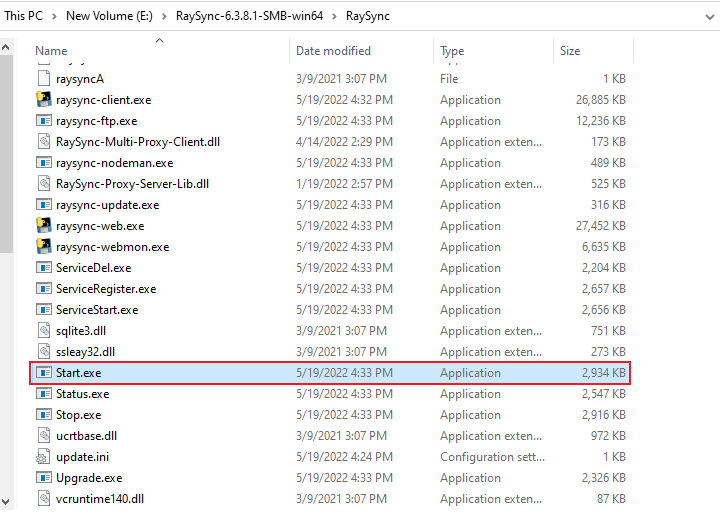
4、 Click Start.exe on new version software folder to run new server.

启动新服务器

Linux Server Upgrade

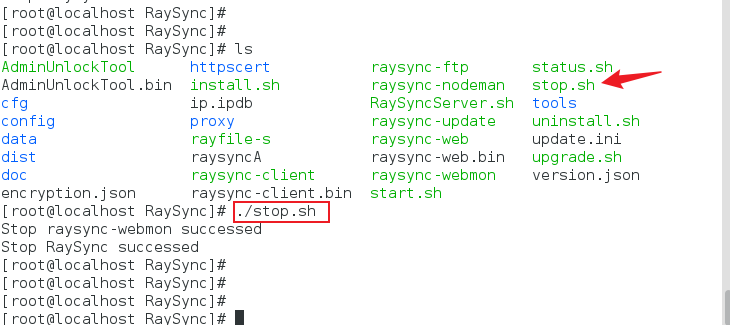
1、 Stop old version 6.2.8.0 server. Click ./stop.sh from old version software folder

stopServer

2、 Uncompress new version software 6.3.8.1

3、 run upgrade.sh from new version software 6.3.8.1 folder. Type upgrade.sh and old version directory path as below step 1 and step 2. Click enter and enter Y as step 3, click enter. You will see upgrade success.

upgradeServer

4、 Click to install.sh and then click to start.sh on new version software folder to run new server.

启动新的服务器

5) Quick Start

5.1) Configure Storage

Updated: 2023-08-24 07:54:33

After the license is activated, you need to configure storage for the space next.

After each server is deployed, there will be a default space, you can also create multiple spaces and configure different storage. Storage Currently supports local storage, Ali Cloud OSS, Amazon S3, Azure Blob, Google cloud storage and other s3 storage types. Please refer to the specific storage configuration in [Spaces] - [Storage Configuration]

76b0173e796ee6a20dd64daaa1f893f

5.2) Create Users

Updated: 2023-08-31 12:44:20

You can log in on the user portal only after a user to be created on the admin portal.

The Raysync management terminal provides a variety of ways to authenticate users. You can manually create users, or you can use a third-party integration method, including LDAP/AD domain, mailbox, System, and external Http authentication mode.

Manually create user

If you create a new user manually, do as follows:

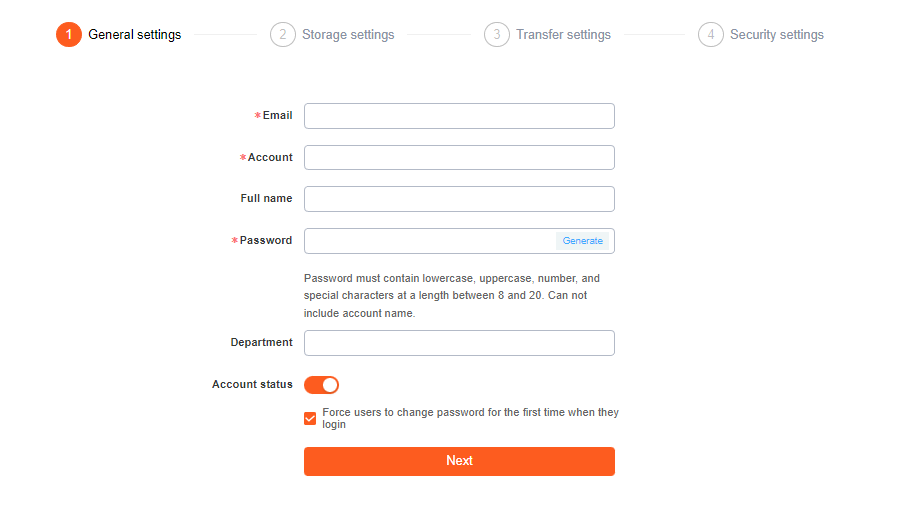
Step 1: Enter basic information

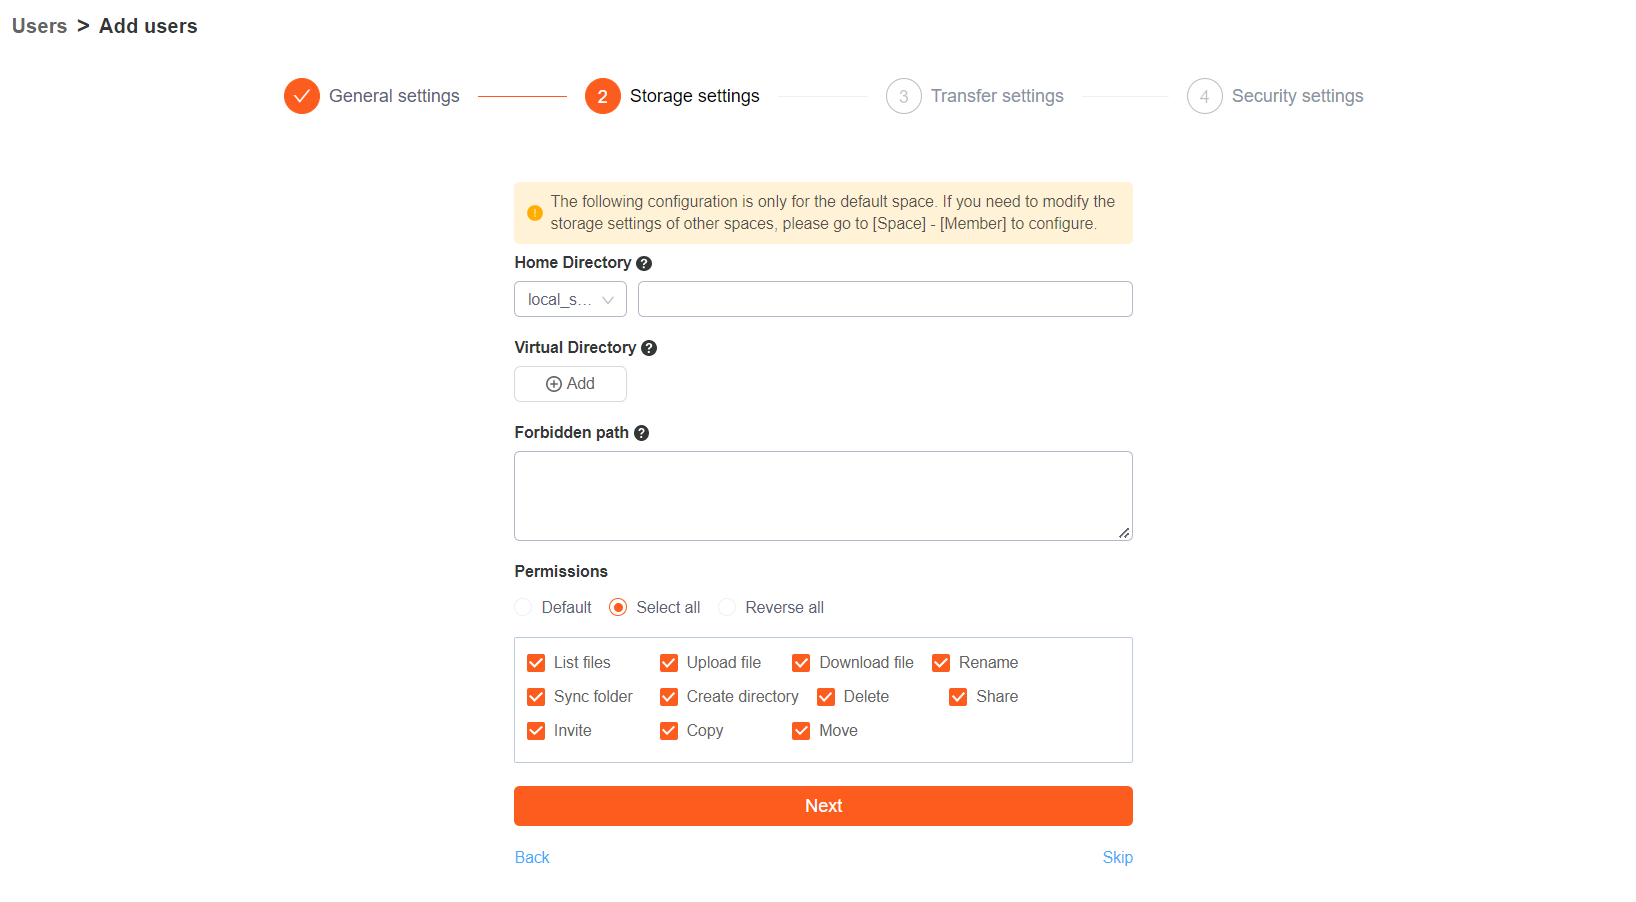
Step 2: Configure the directory创建用户第二步-英文

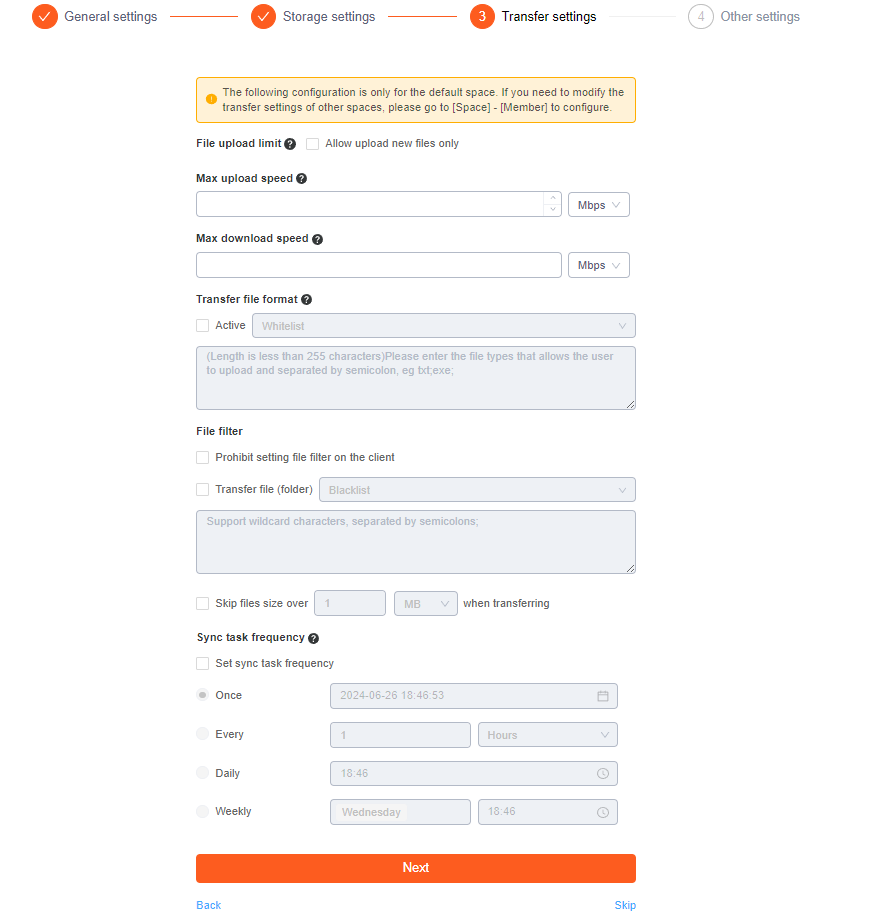
Step 3: Configure transfer settings创建用户第三步-英文

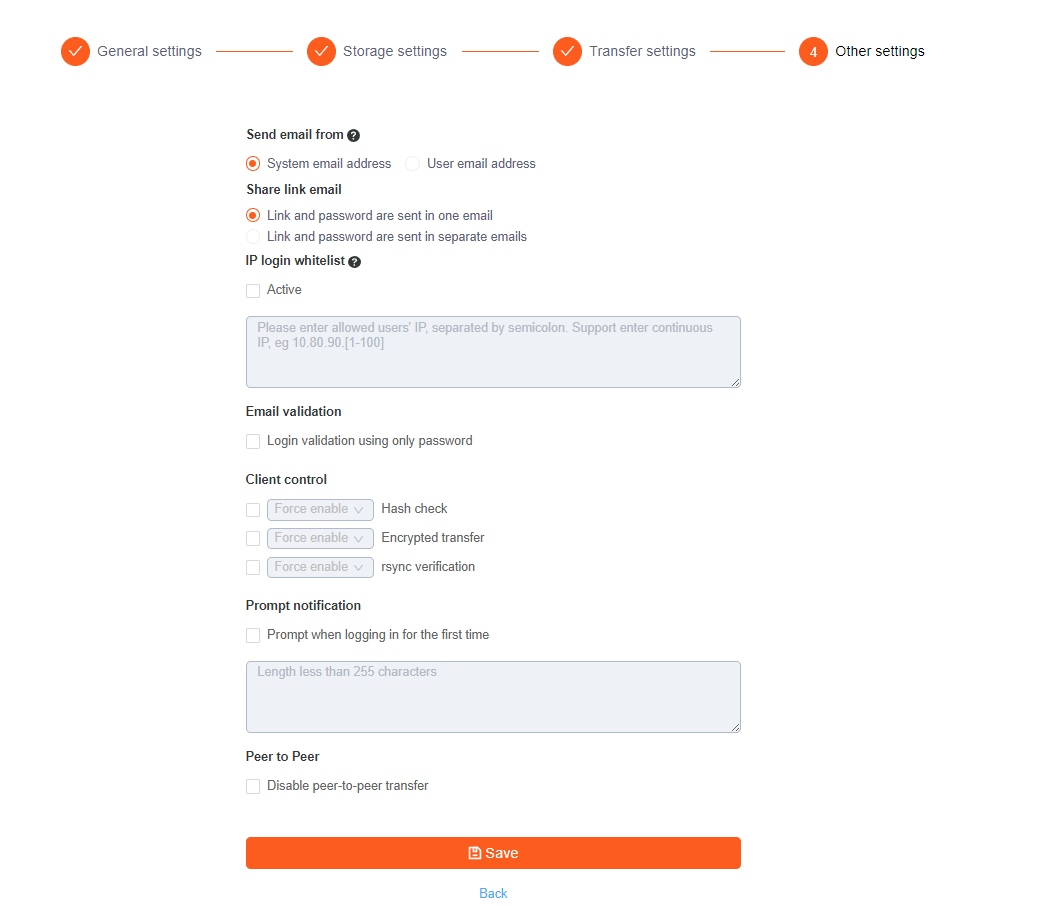
Step 4: Configure security settings创建用户第四步-英文

5.3) TLS Certificate

Updated: 2022-11-30 09:05:11

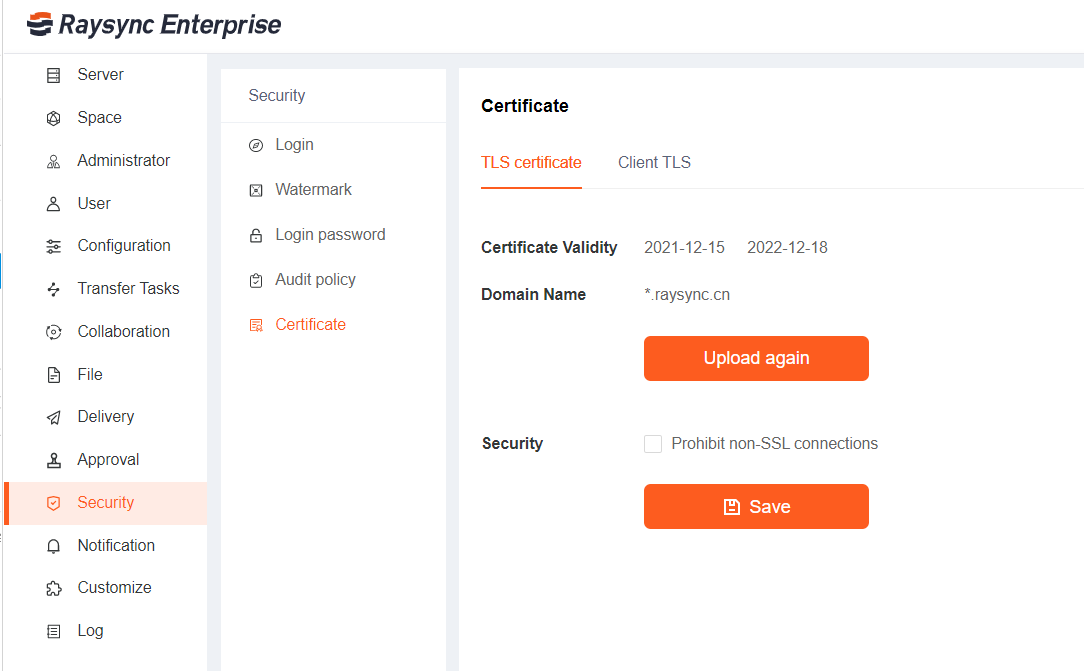
Raysync provides encrypted certificate services, which can be used both for https secure access to the web and for file transfer encryption. The default certificate provided by Raysync is only used for transfer encryption, so you can also use your own certificate for both secure access and file transfer encryption.TLS证书-英文

Admin access address is: https: //172.16.5.77: 9091/admin

User access address is: https: //172.16.5.77: 8091/

5.4) Create High Speed Transfer Task

Updated: 2023-08-31 11:01:27

1. Login the user portal

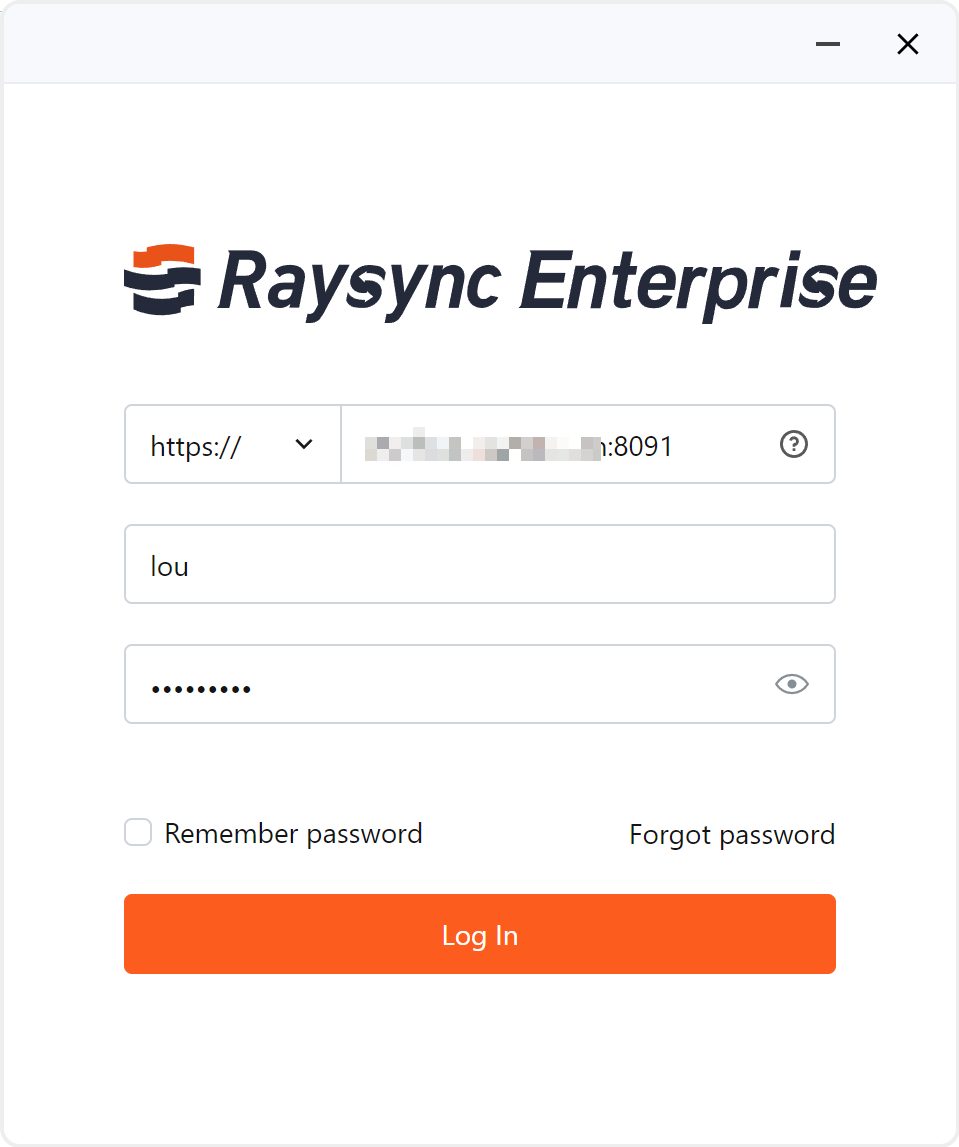
Enter the user name and password to log in.前台登录-英文

2. Download the client

Download the Raysync client and install it.下载客户端-英文

3. Start transfer

Enter My Files or Group Files, select files or folders to start high-speed upload and download.

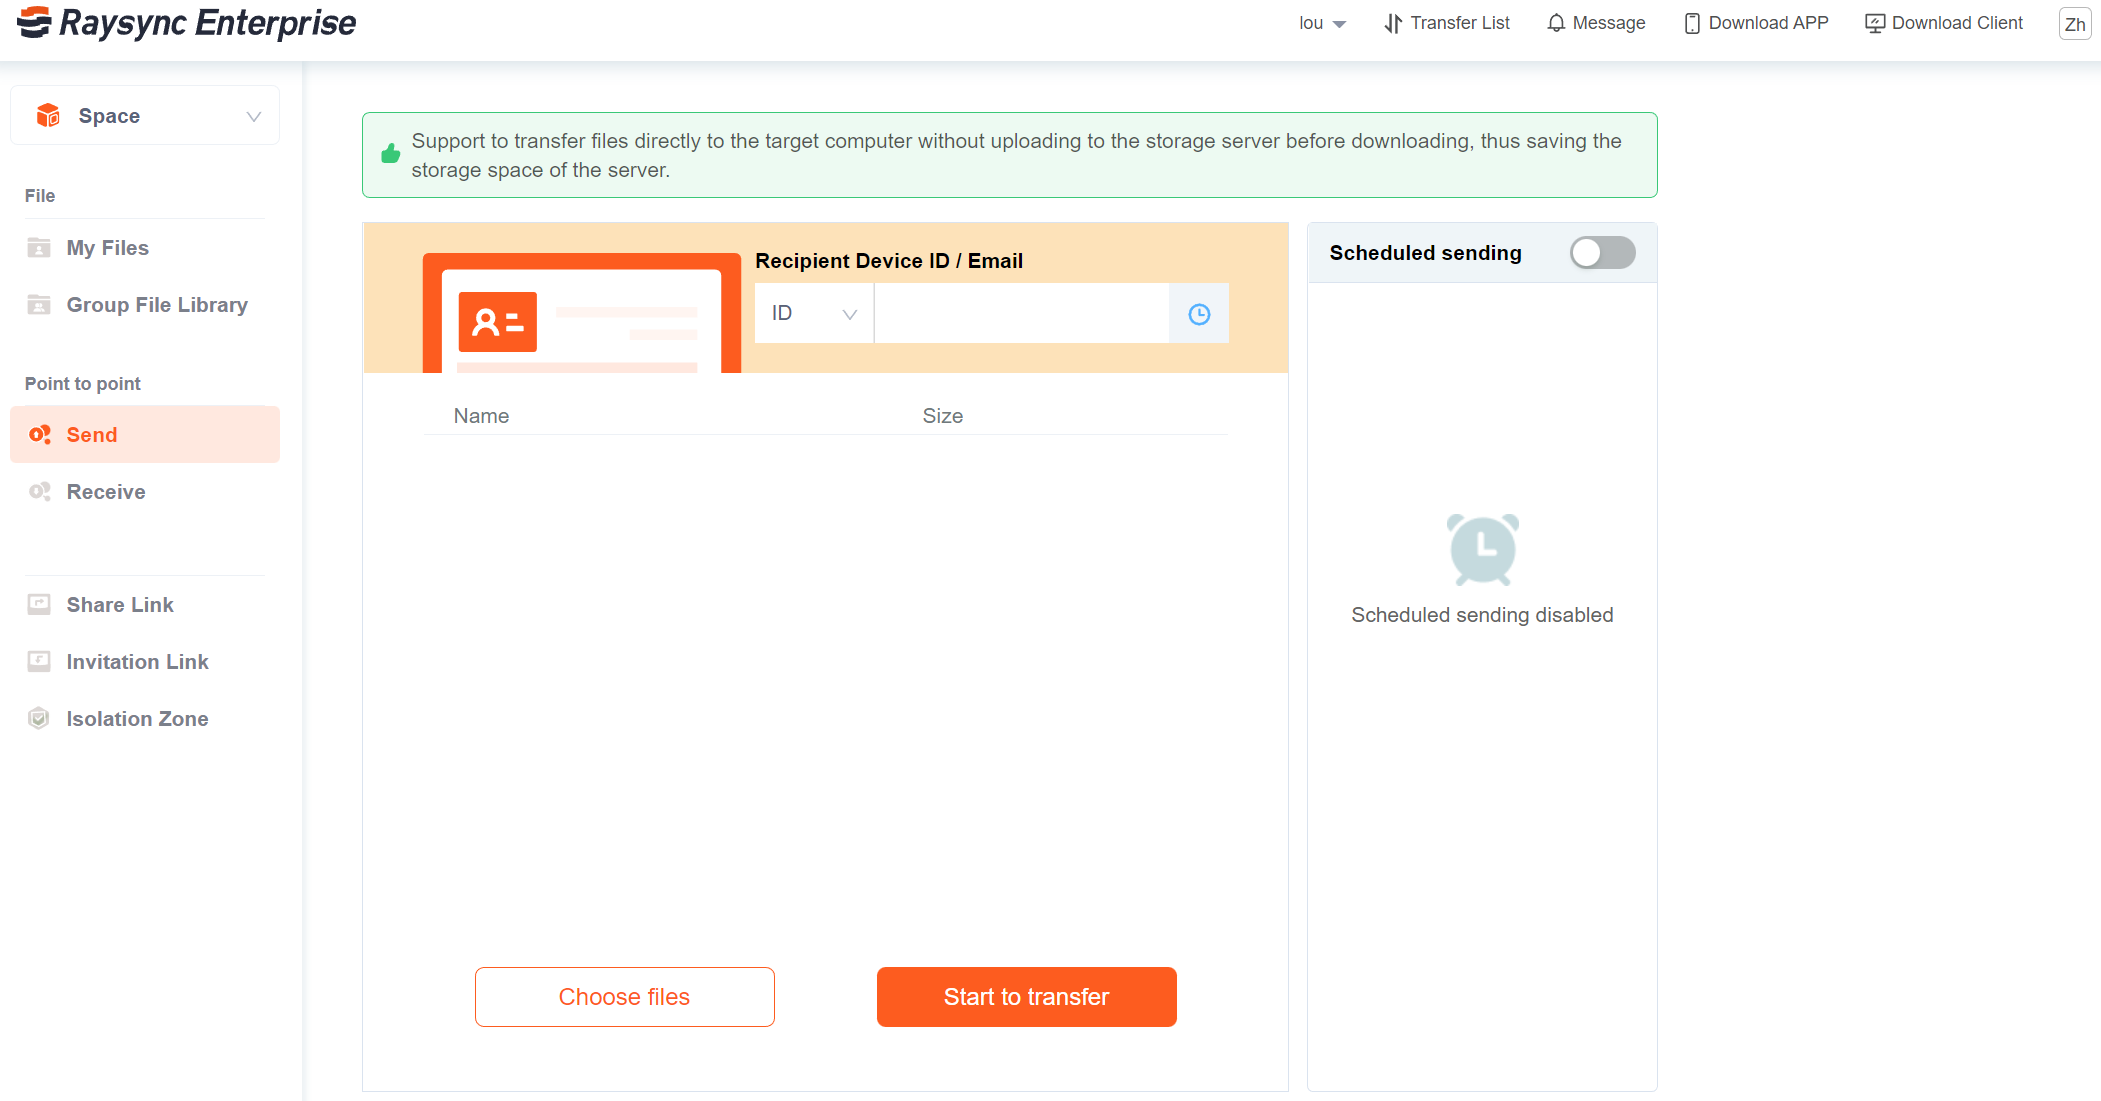
5.5) Create Point-to-Point Task

Updated: 2022-11-30 09:10:15

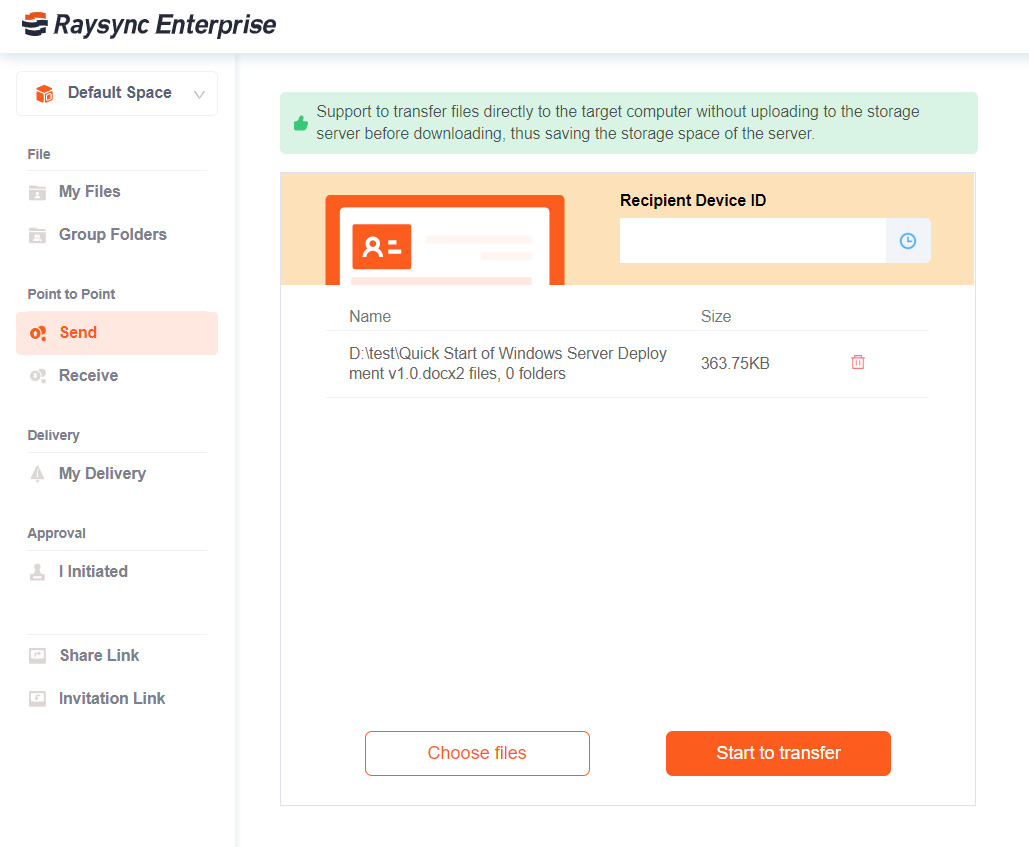
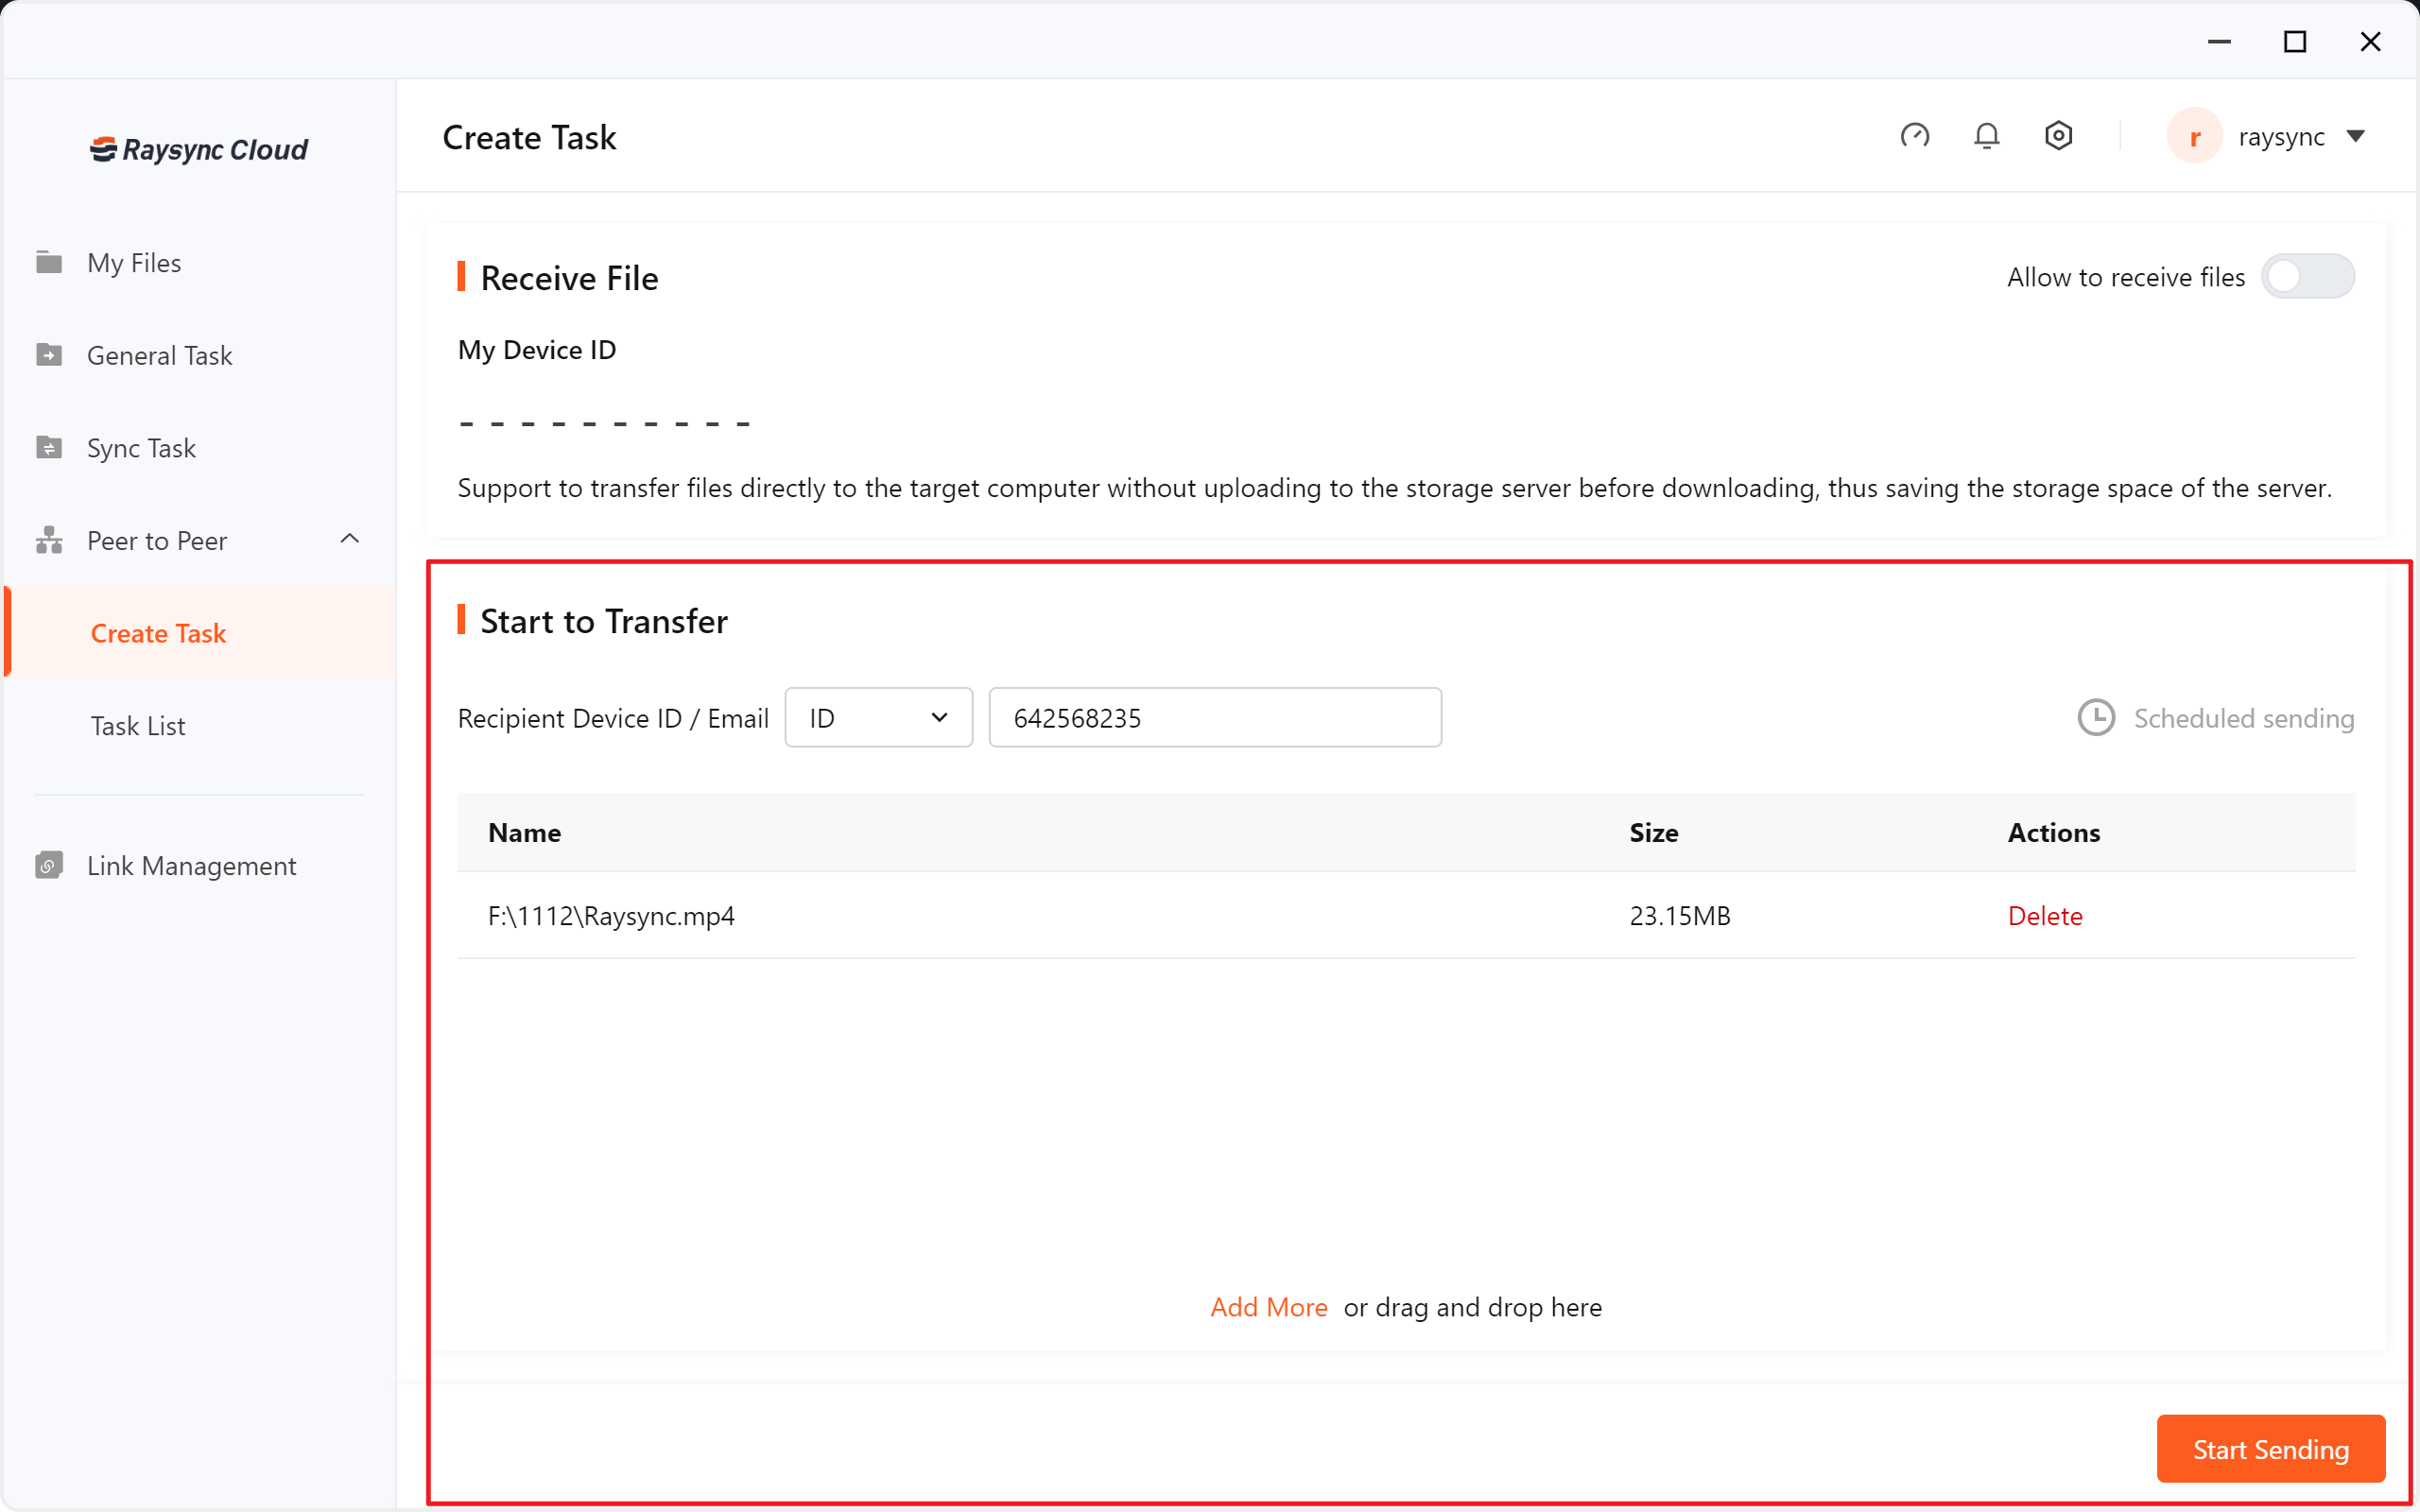
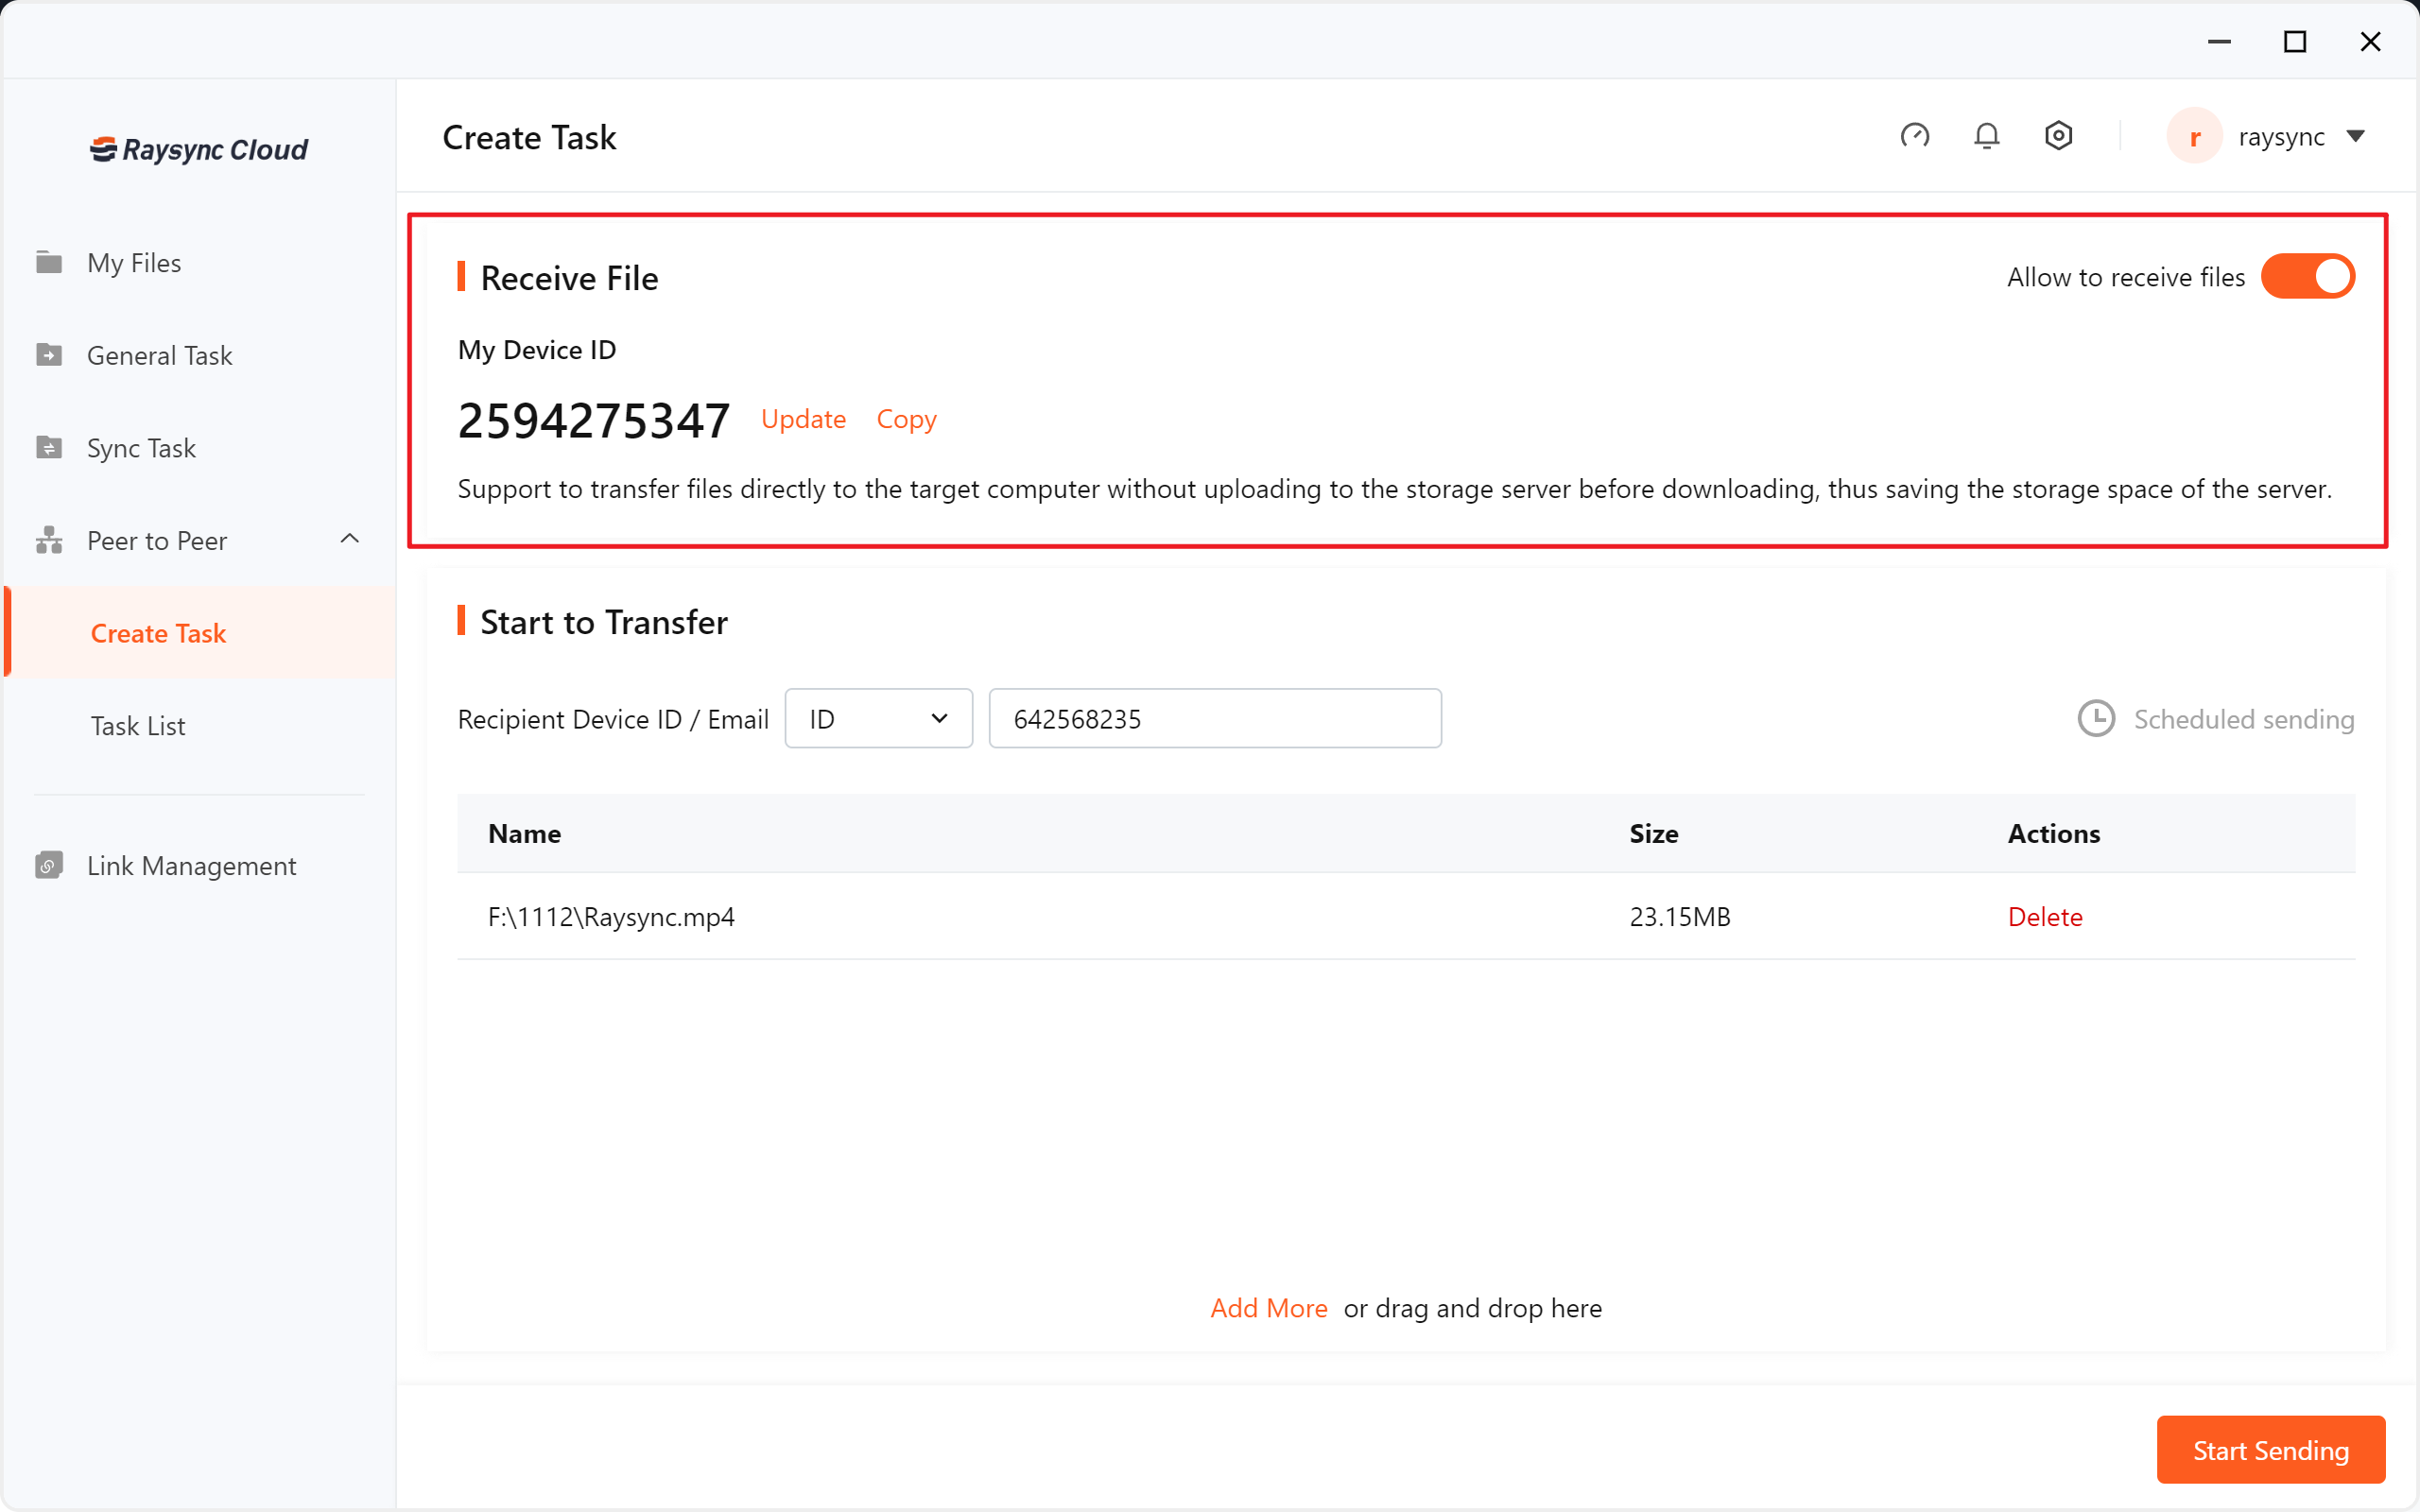
Send point-to-point files

  1. Login user portal
  2. Download and install the client
  3. Click left menu Send
  4. Enter the receiver's device ID
  5. Select file
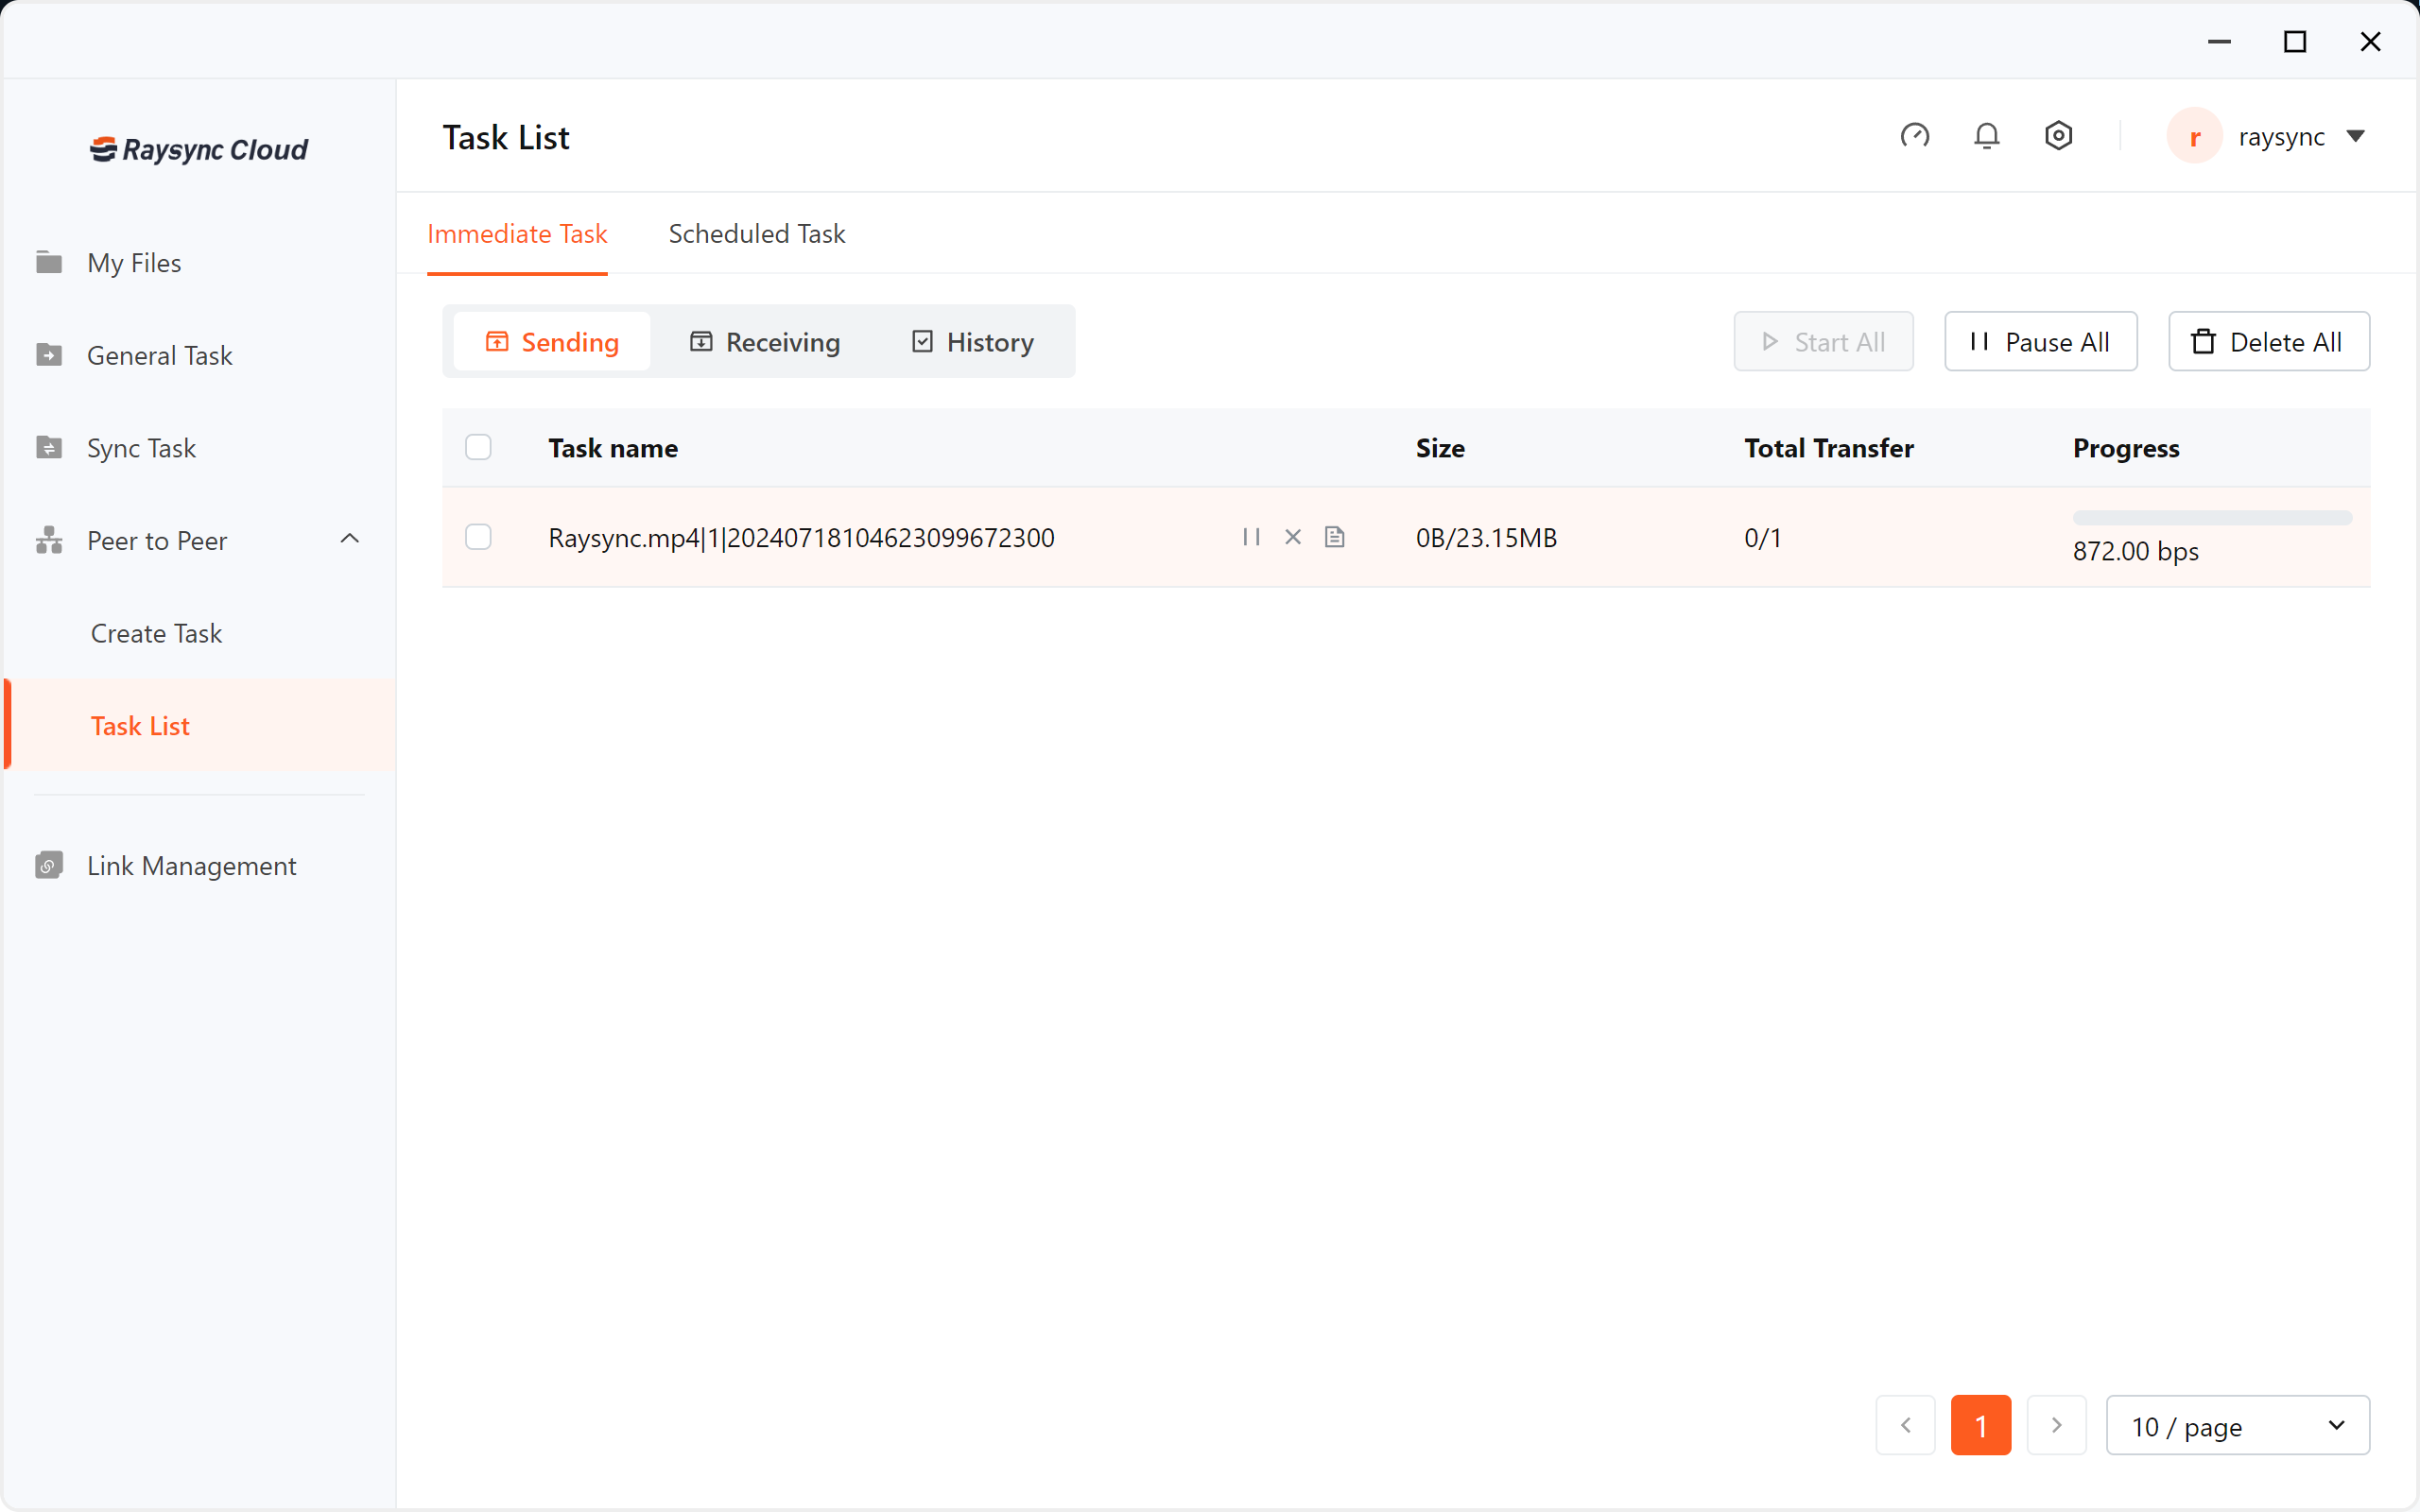
  6. Click Start to transfer点对点发送-英文

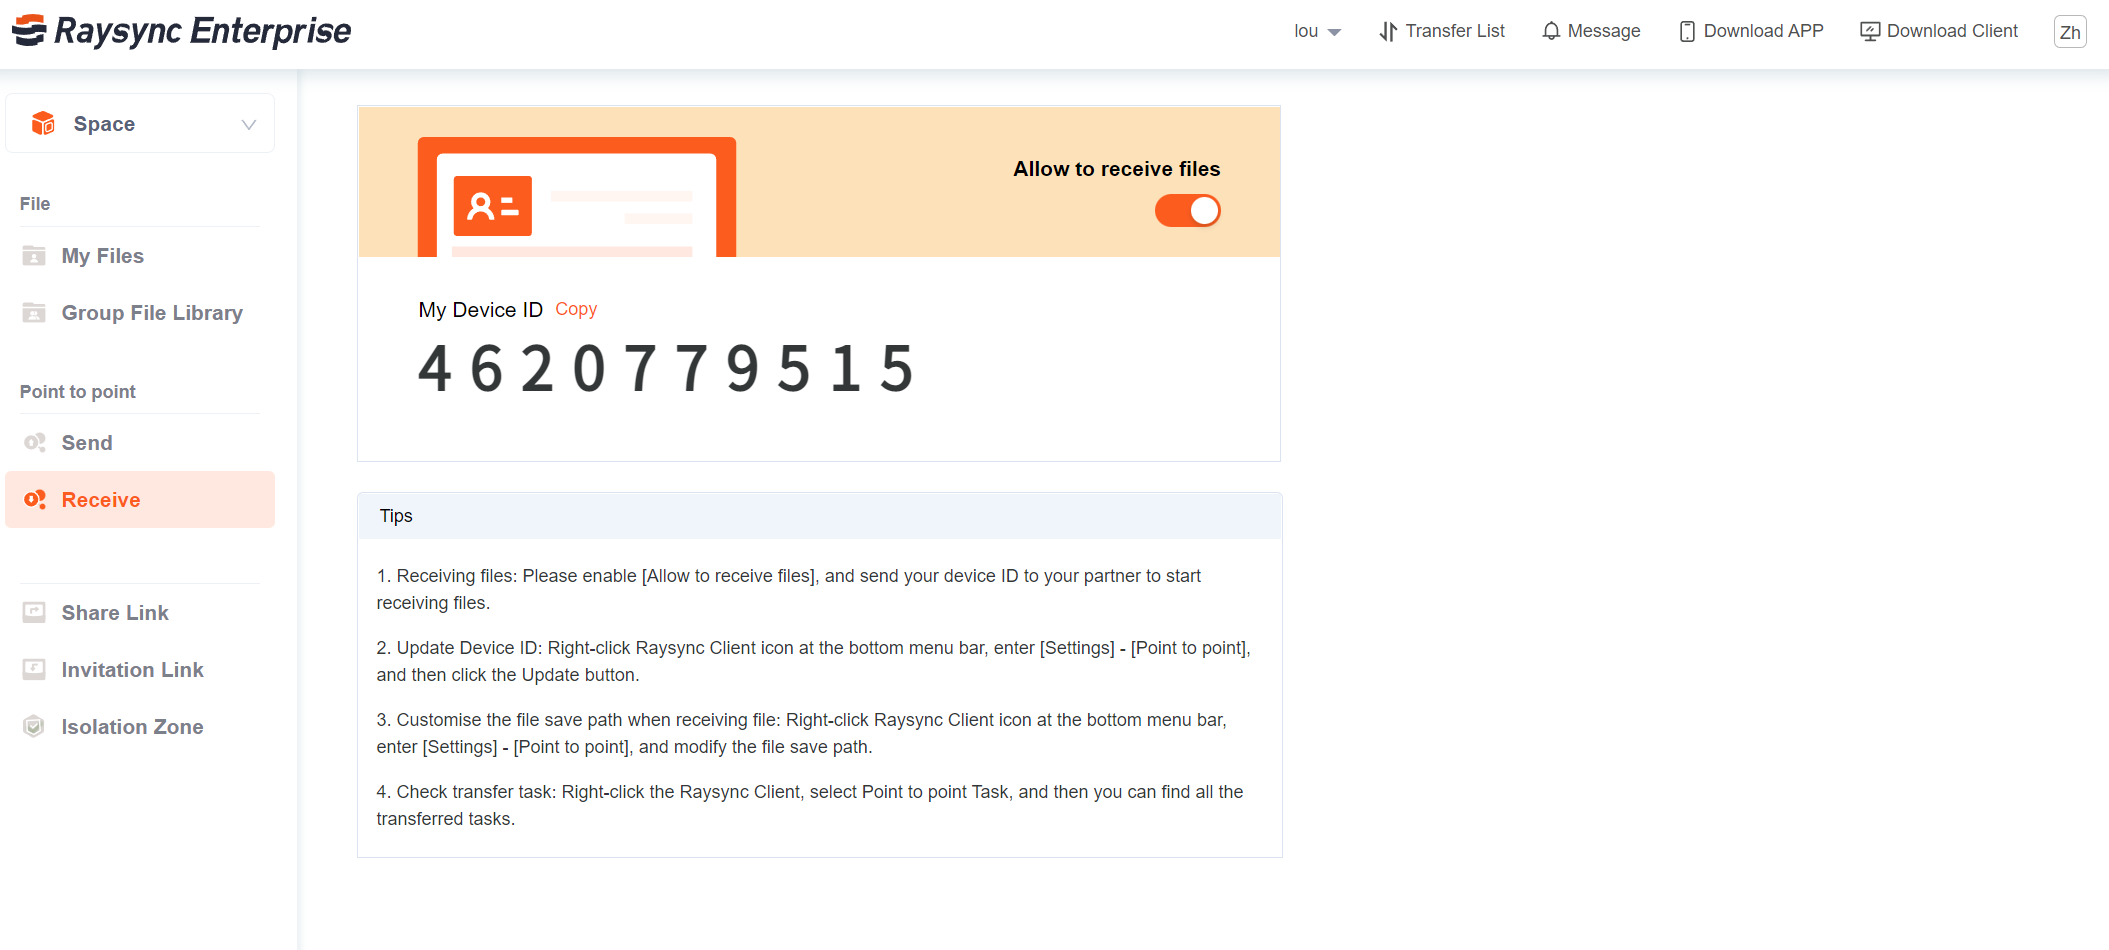
Receive point-to-point files

  1. Login user-end portal
  2. Download and install the client
  3. Click left menu Receive
  4. Enable the Allow to receive files
  5. Copy the device ID and send it to the sender
  6. Prepare to receive files点对点接收-英文

5.6) Create sync Task

Updated: 2022-11-30 09:07:32
  1. Login user portal
  2. Download and Start the client
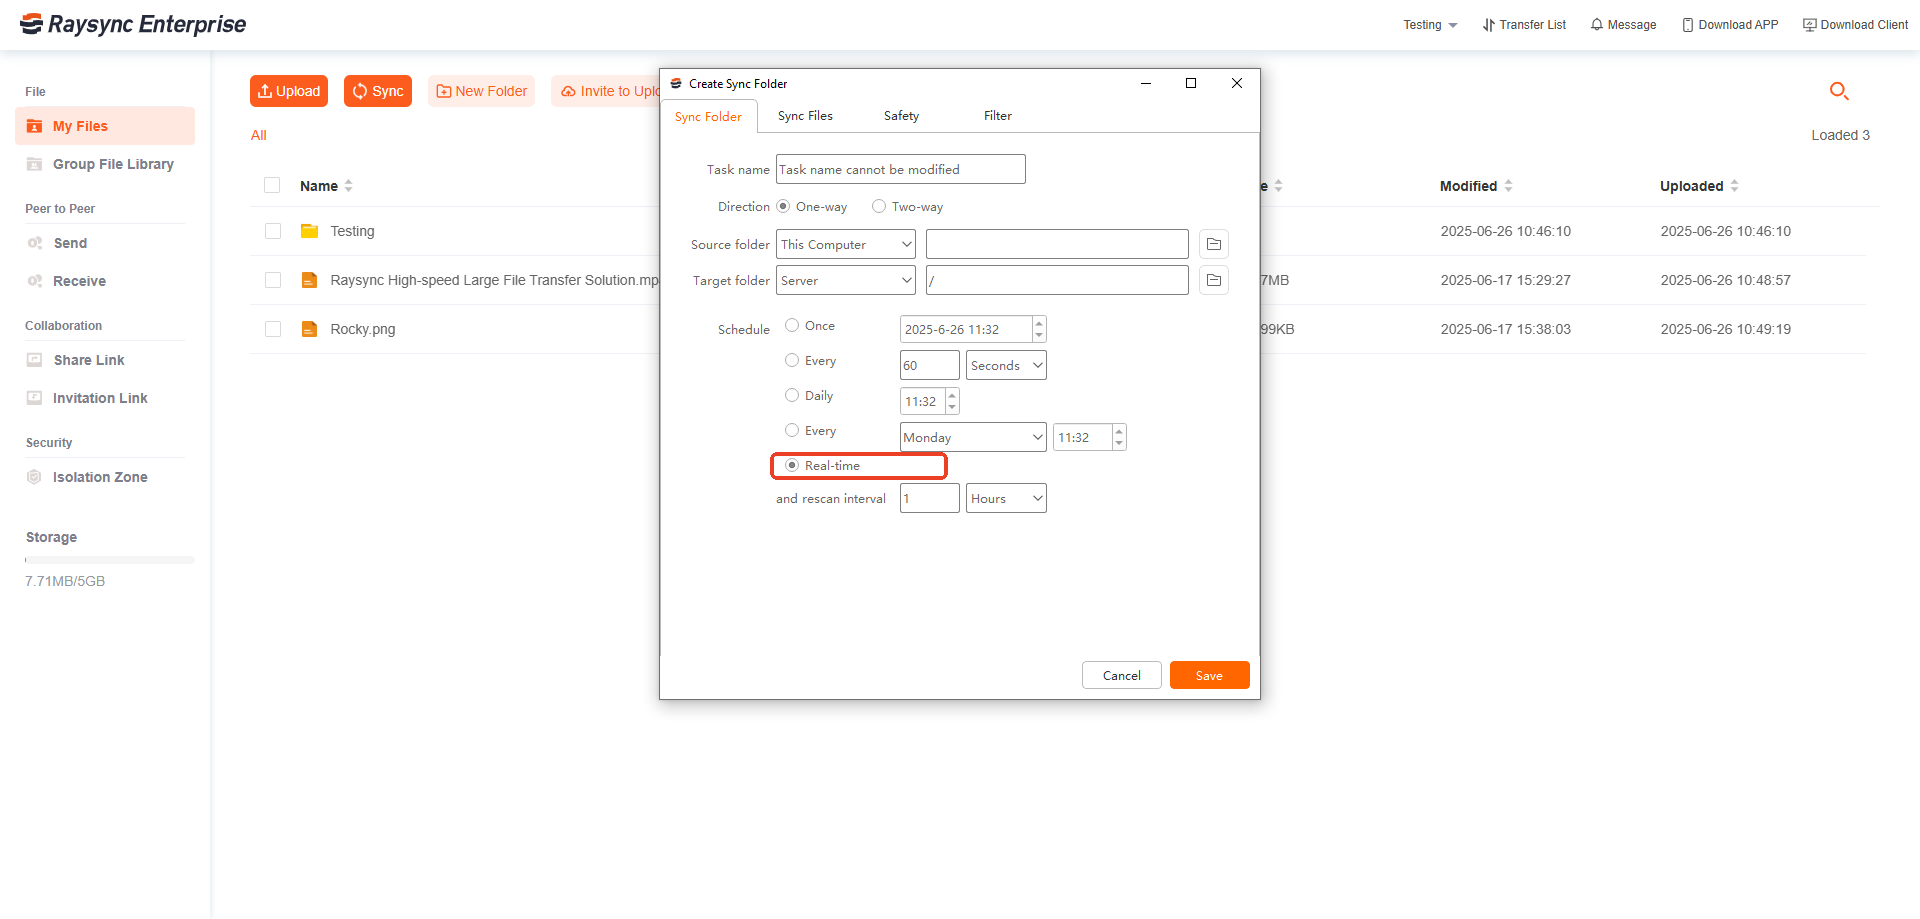
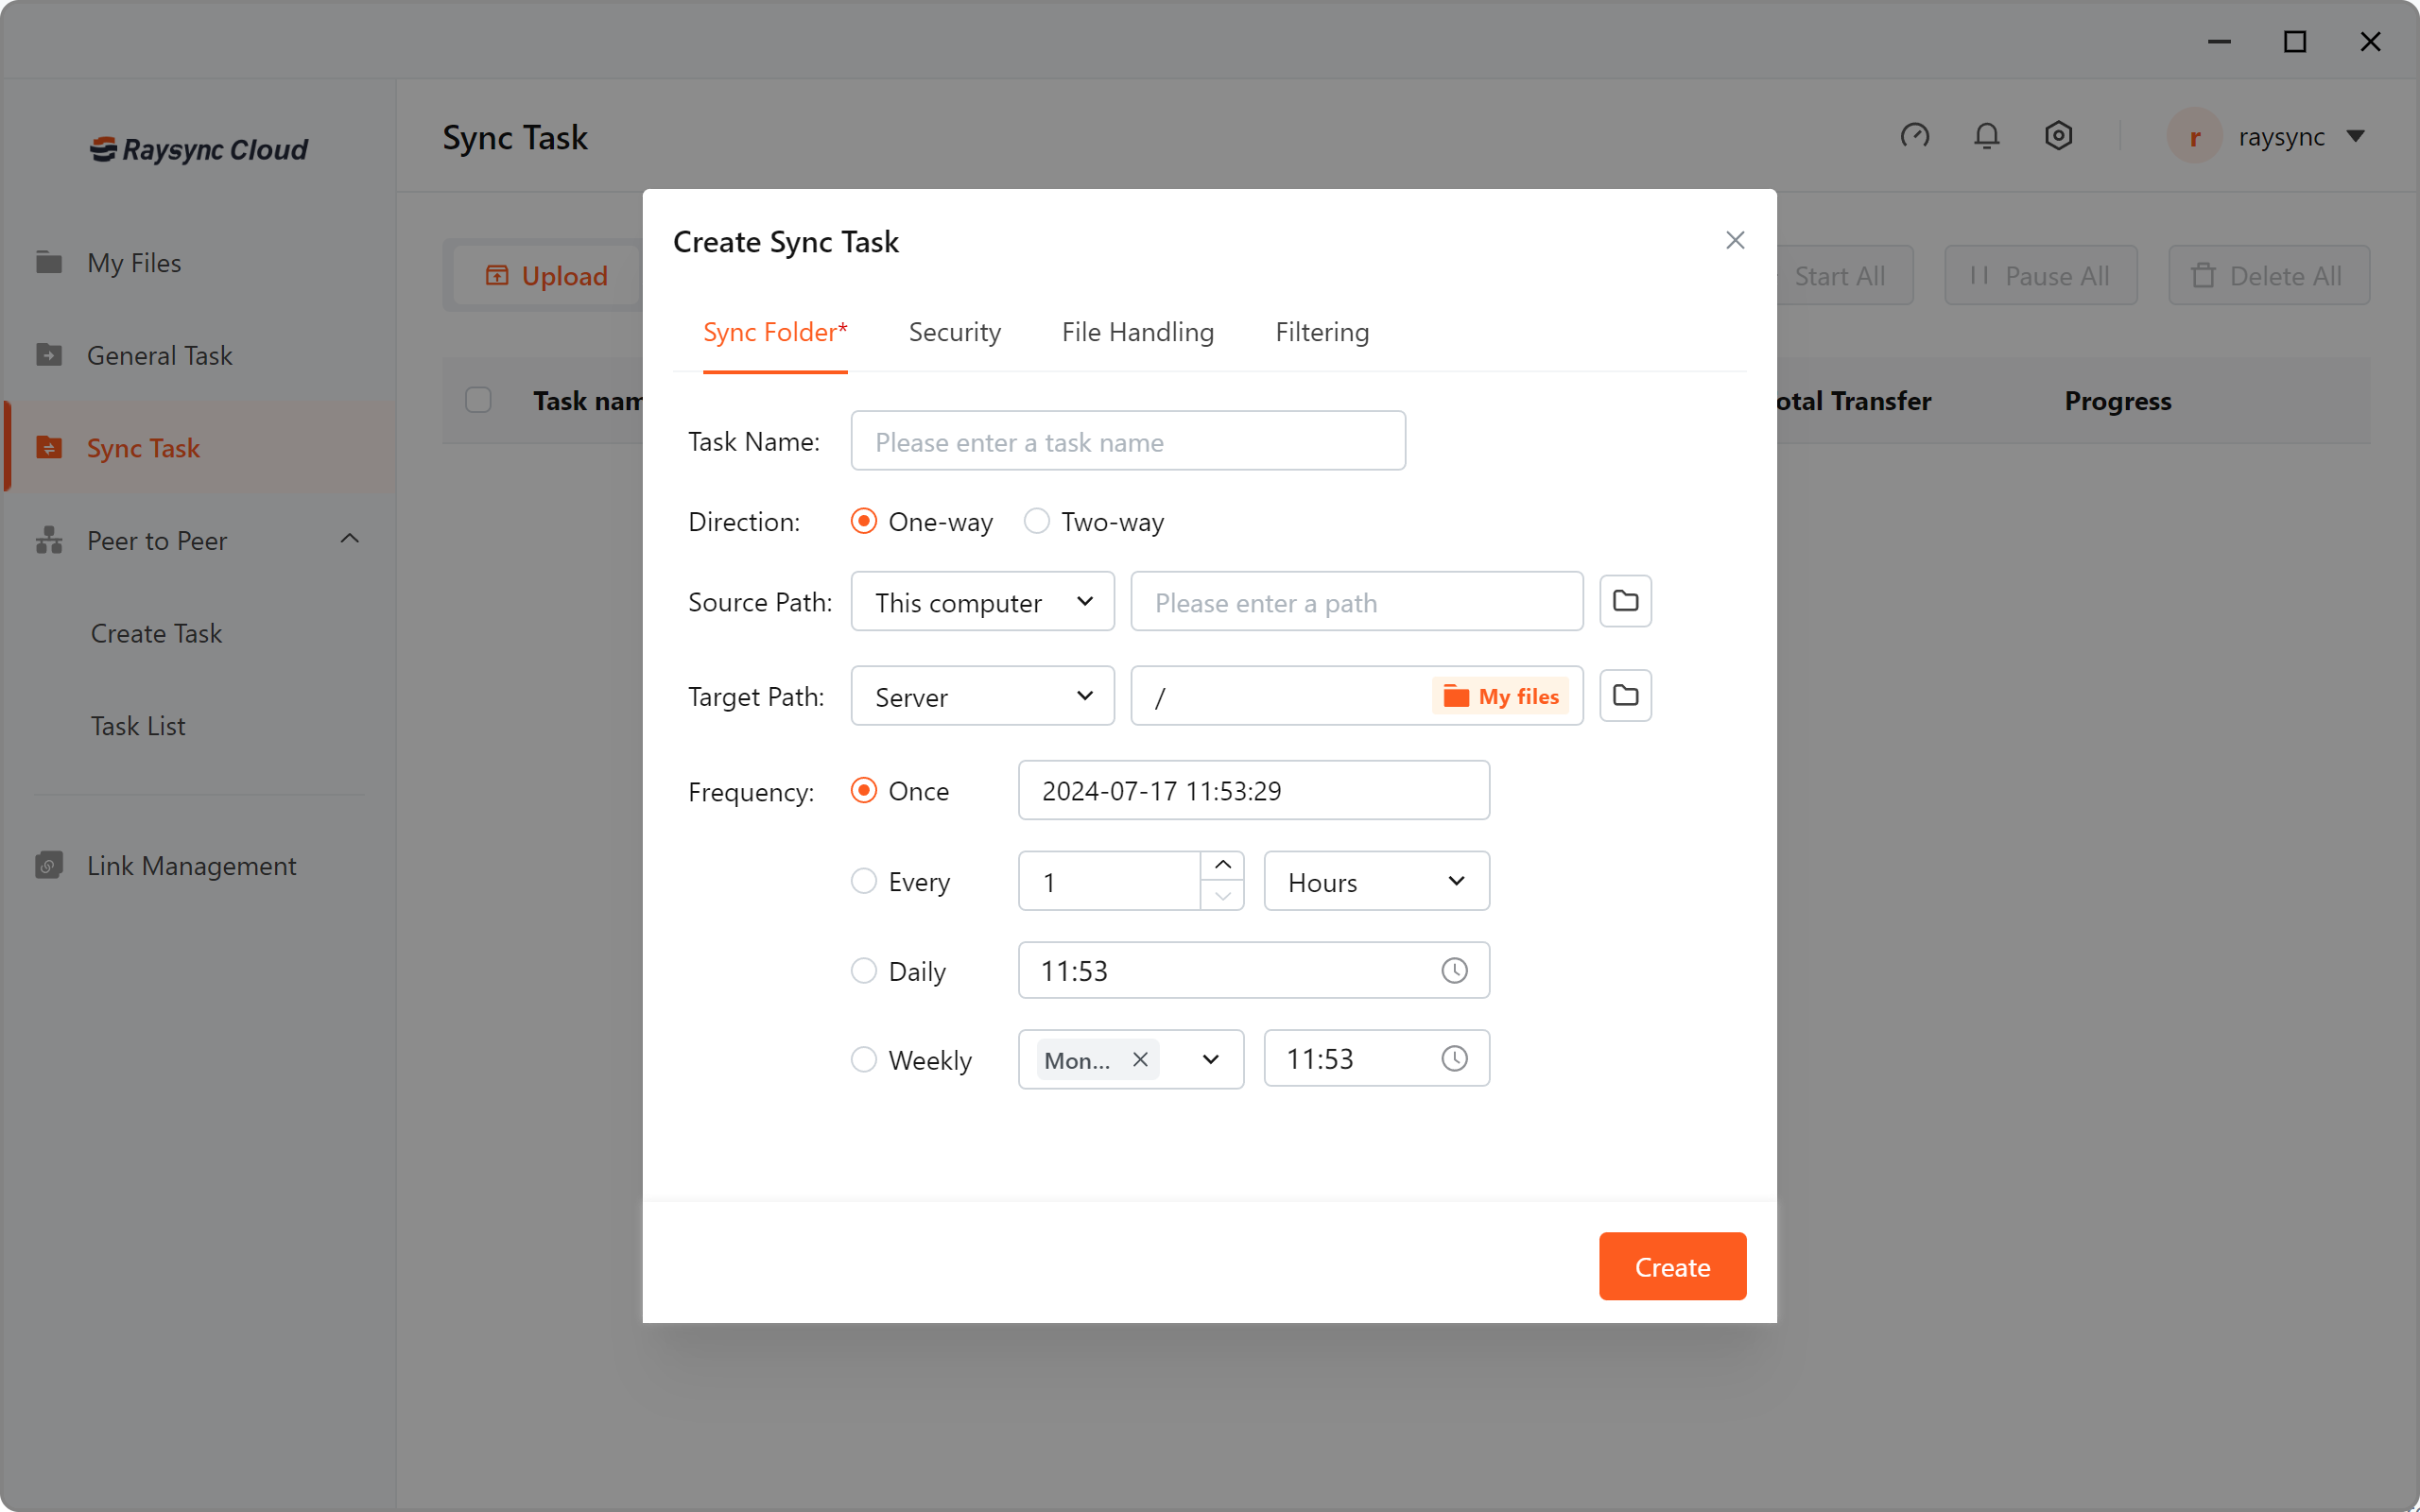
  3. Click left menu Sync Select folders and create synchronous tasks.

    创建同步任务 --英文

5.7) Create server task

Updated: 2023-08-30 10:42:12

The administrator can actively create transmission tasks in the Raysync admin portal, create upload tasks synchronously uploaded from the client node machine to the server, or download tasks synchronously downloaded from the server to each client, and view the task transmission details and transmission logs issued by the server. Node data in each area can be transferred to uniform transmission and dispatch.

1. The client configures the default server

Before creating a server to issue tasks, all client devices need to start the client and log in to the default server.

Step 1. Start the Raysync client

On the client side, download and install, and start the Raysync client.

Step 2. Configure the default server

Right click the client icon in the client to be transmitted, click [Settings] - [Default server], and enter the default server IP address (the server address to create the task), login account and password.

配置客户端-英文

Step 3. Check the client connection status

Log in to the Admin portal, enter the administrator account and password, and log in to the system.

登录后管-英文

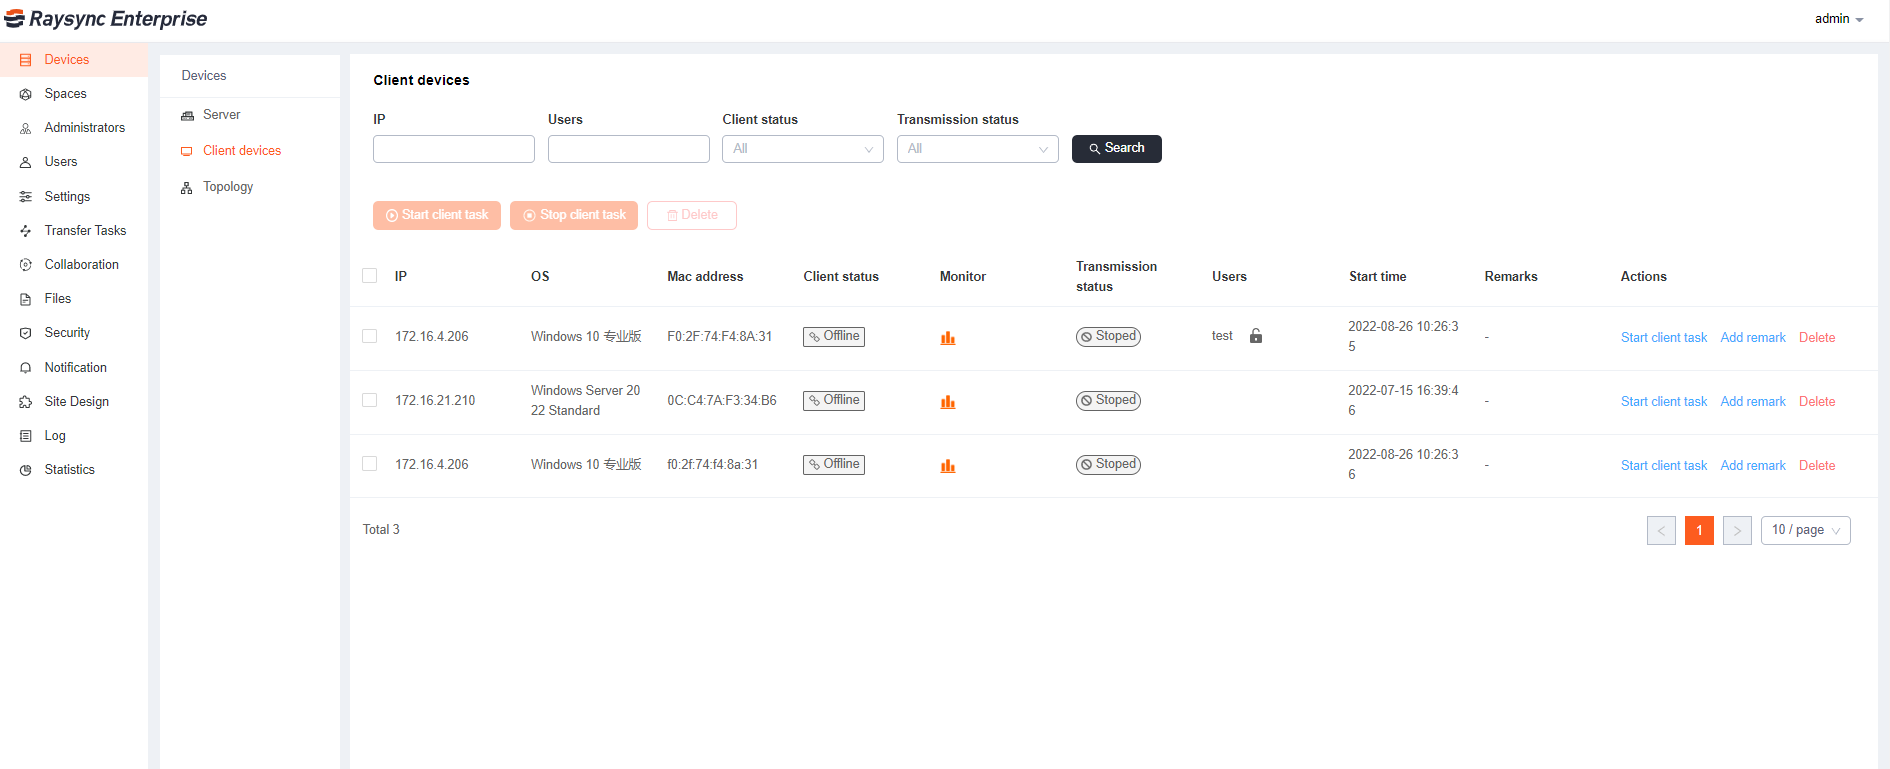
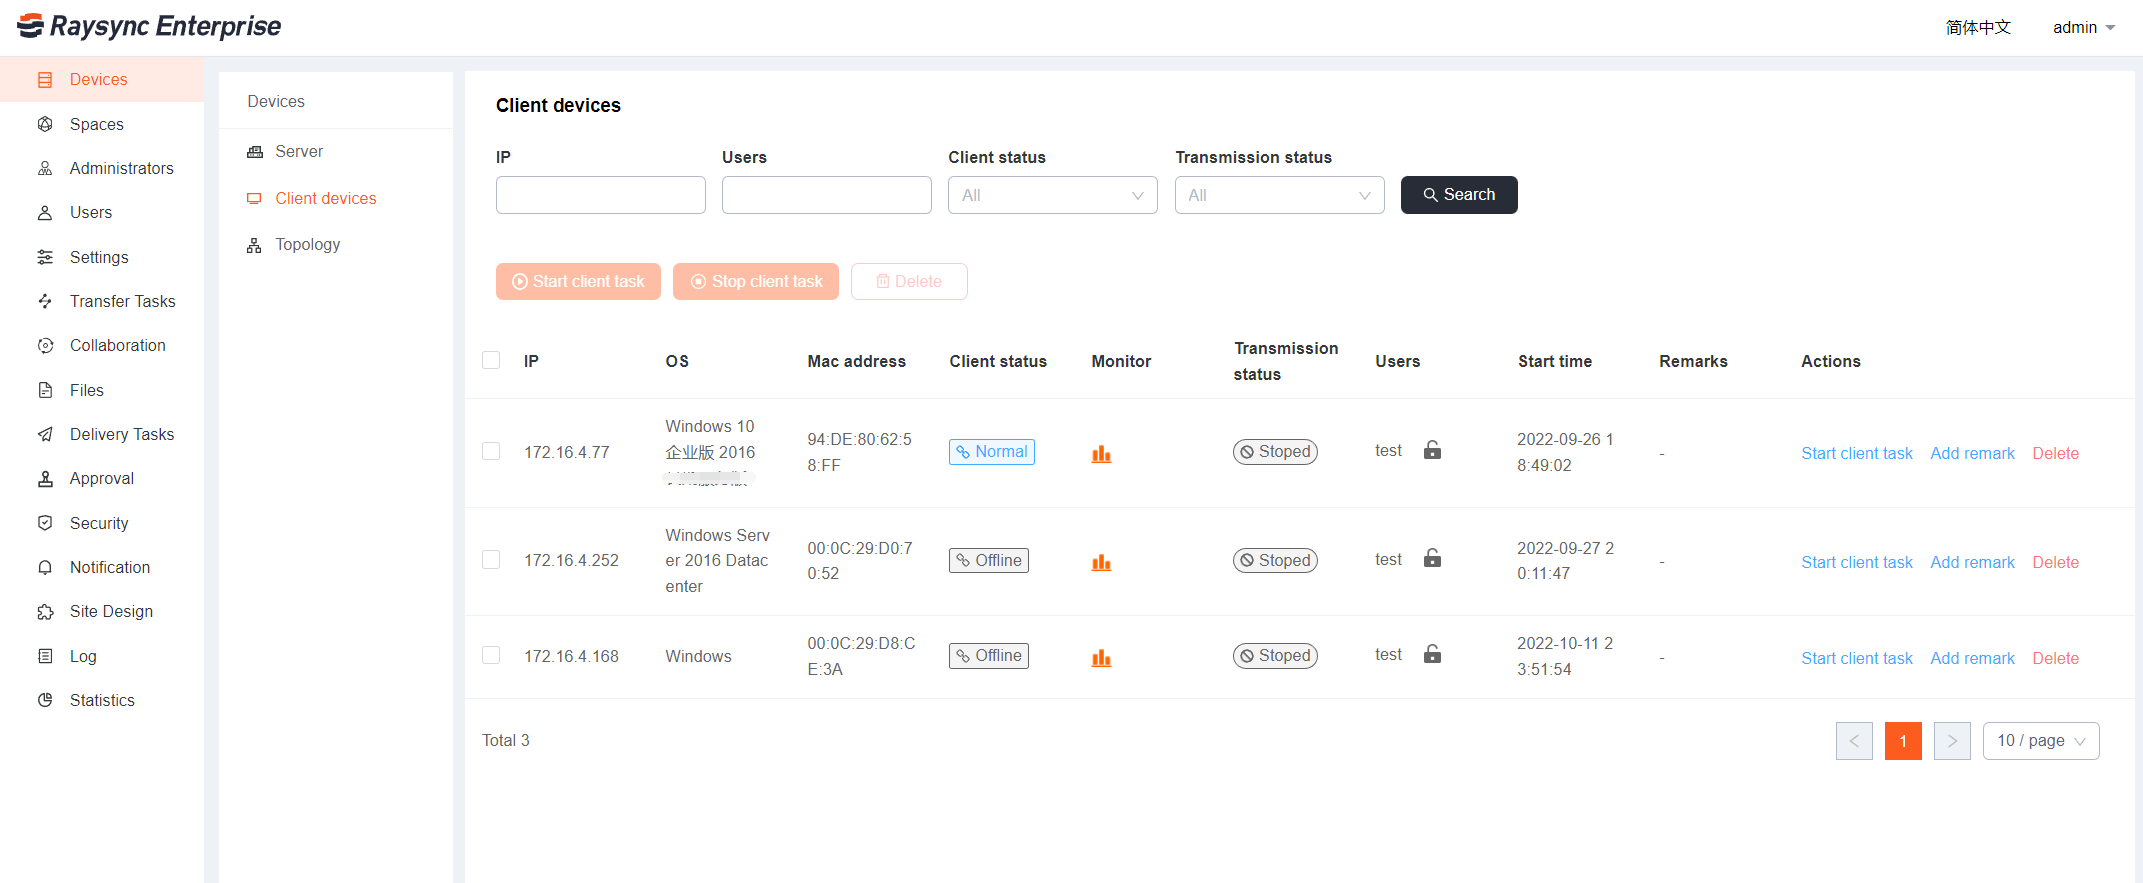
Check whether the client connects to the service successfully. Click [Devices] - [Client devices] to check whether the node machine status is normal. Only the client node machine status is [Normal], the transmission task issued by the server can be executed normally.

设备-英文

2. Create server task

Step 1. Create a server task

Click [Transfer Tasks]-Server[Task list]-[Add] on the Admin portal,and fill in the task name, source path, and target path, select the synchronization frequency, and click Save to create it successfully.

Parameter Description
Task name Server task name
Source path

When the source path is the client, it is uploaded from the client of each node machine to the server; When the source path is the server, it is downloaded from the server to each client node locally. You can specify an online client node. If no online client node is specified, all online client nodes are default.

Path supports using variables.

  • ${system.currentDate}
  • ${system.currentTime}
  • ${system.task.name}
  • ${system.os.name}
  • ${system.os.version}
  • ${system.user.email}
  • ${system.user.name}

For example: if the source path is set as the Client " C:\${system.currentDate} ", after the task is created, the system will transfer all folders named  with the current client's system date in the C drive of the selected client .

Target path If the target path is the client, then it is downloaded from the server to each client node locally; When the target path is the server, it is uploaded from each node client to the server. Path supports using variables
Task frequency

Transfer Only Once: the transfer task will not be executed after it is executed once; Execute transmission once every xx seconds/minutes/hour;

Execute the transmission at xx: xx every day;

Execute the transfer at xx: xx every week

1) Create Server Upload Task

Click [Add] Fill in the task name;

The source path is the client. Enter the path, that is, the file or directory path to be uploaded by the client;

The target path is the server. Select the space and storage, that is, the server space to upload the file to. Enter the path (the path is the path corresponding to the Storage of the Space in [Spaces]). For example, in [Spaces], the Default storage path of the Default Space is /opt/Raysync. If the server path in the task issued by the server is: the Default storage path of the Default space is /, then the actual upload path to the server is /opt/Raysync; If the path is /test, the actual upload path to the server is /opt/Raysync/test.

Other parameters are optional, click [Save].

2) Create Server Download Task

Click [Add] Fill in the task name;

The source path is the server. Enter the path, that is, the file or directory path to download from the server; (The path is the path corresponding to the Storage of the Space in [Spaces]). For example, in [Spaces], the Default storage path of the Default space is /opt/Raysync. If the server path in the task issued by the server is: the Default storage path of the Default space is /, then the actual download path of the server is /opt/Raysync; If the path is /test, the path of the actual downloaded server is /opt/Raysync/test.

The target path is the client. Enter the path, that is, the client path to download the file to.

Other parameters are optional, click [Save].

3. Task monitoring

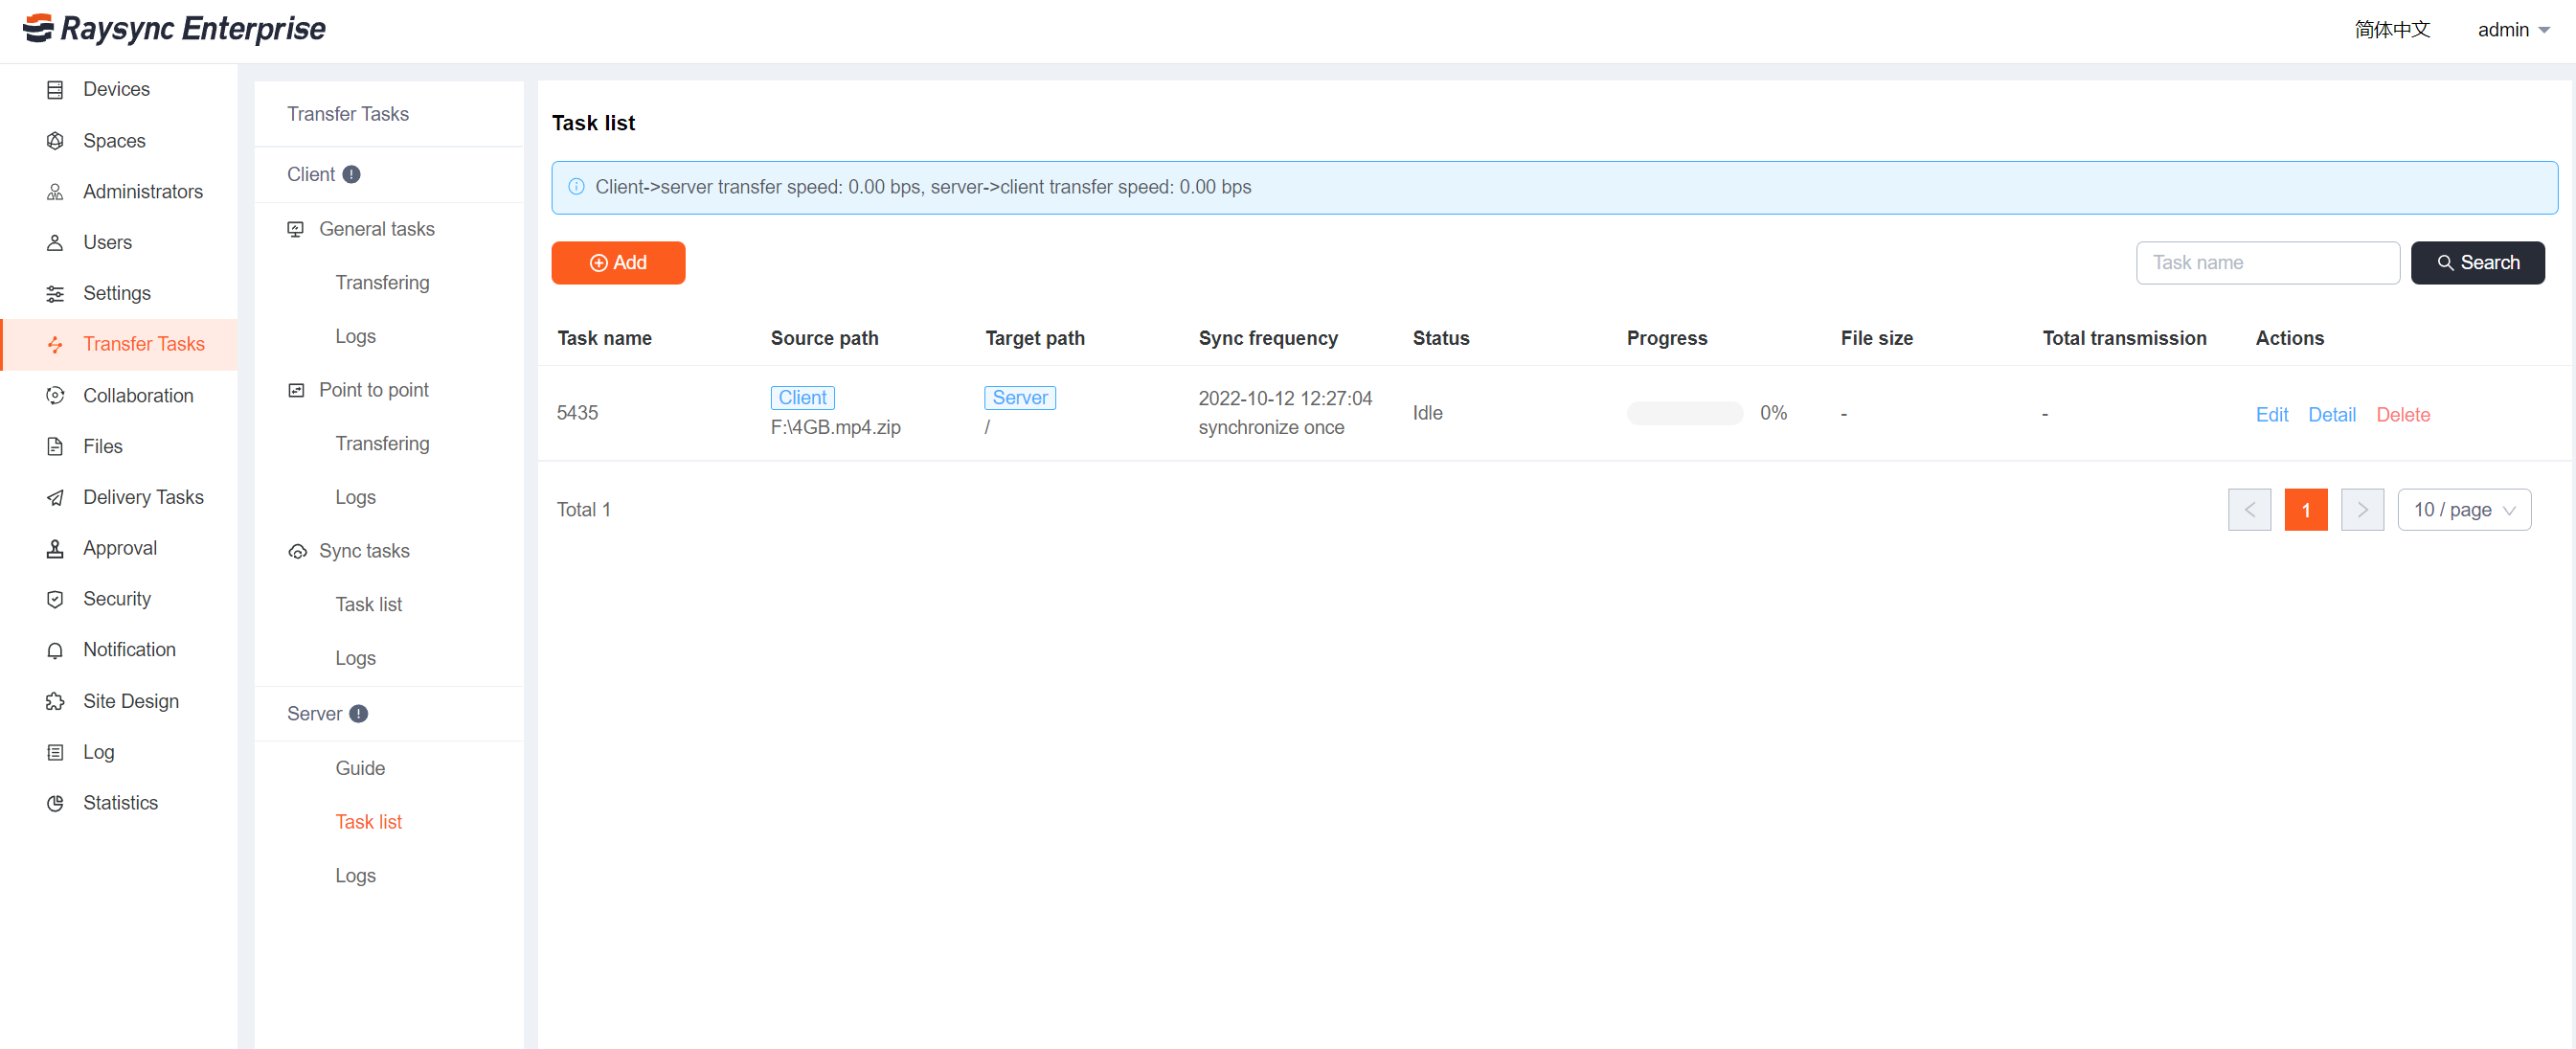
After the task is created successfully, you can monitor the transmission status of the task, edit and delete the task.

服务任务列表-英文

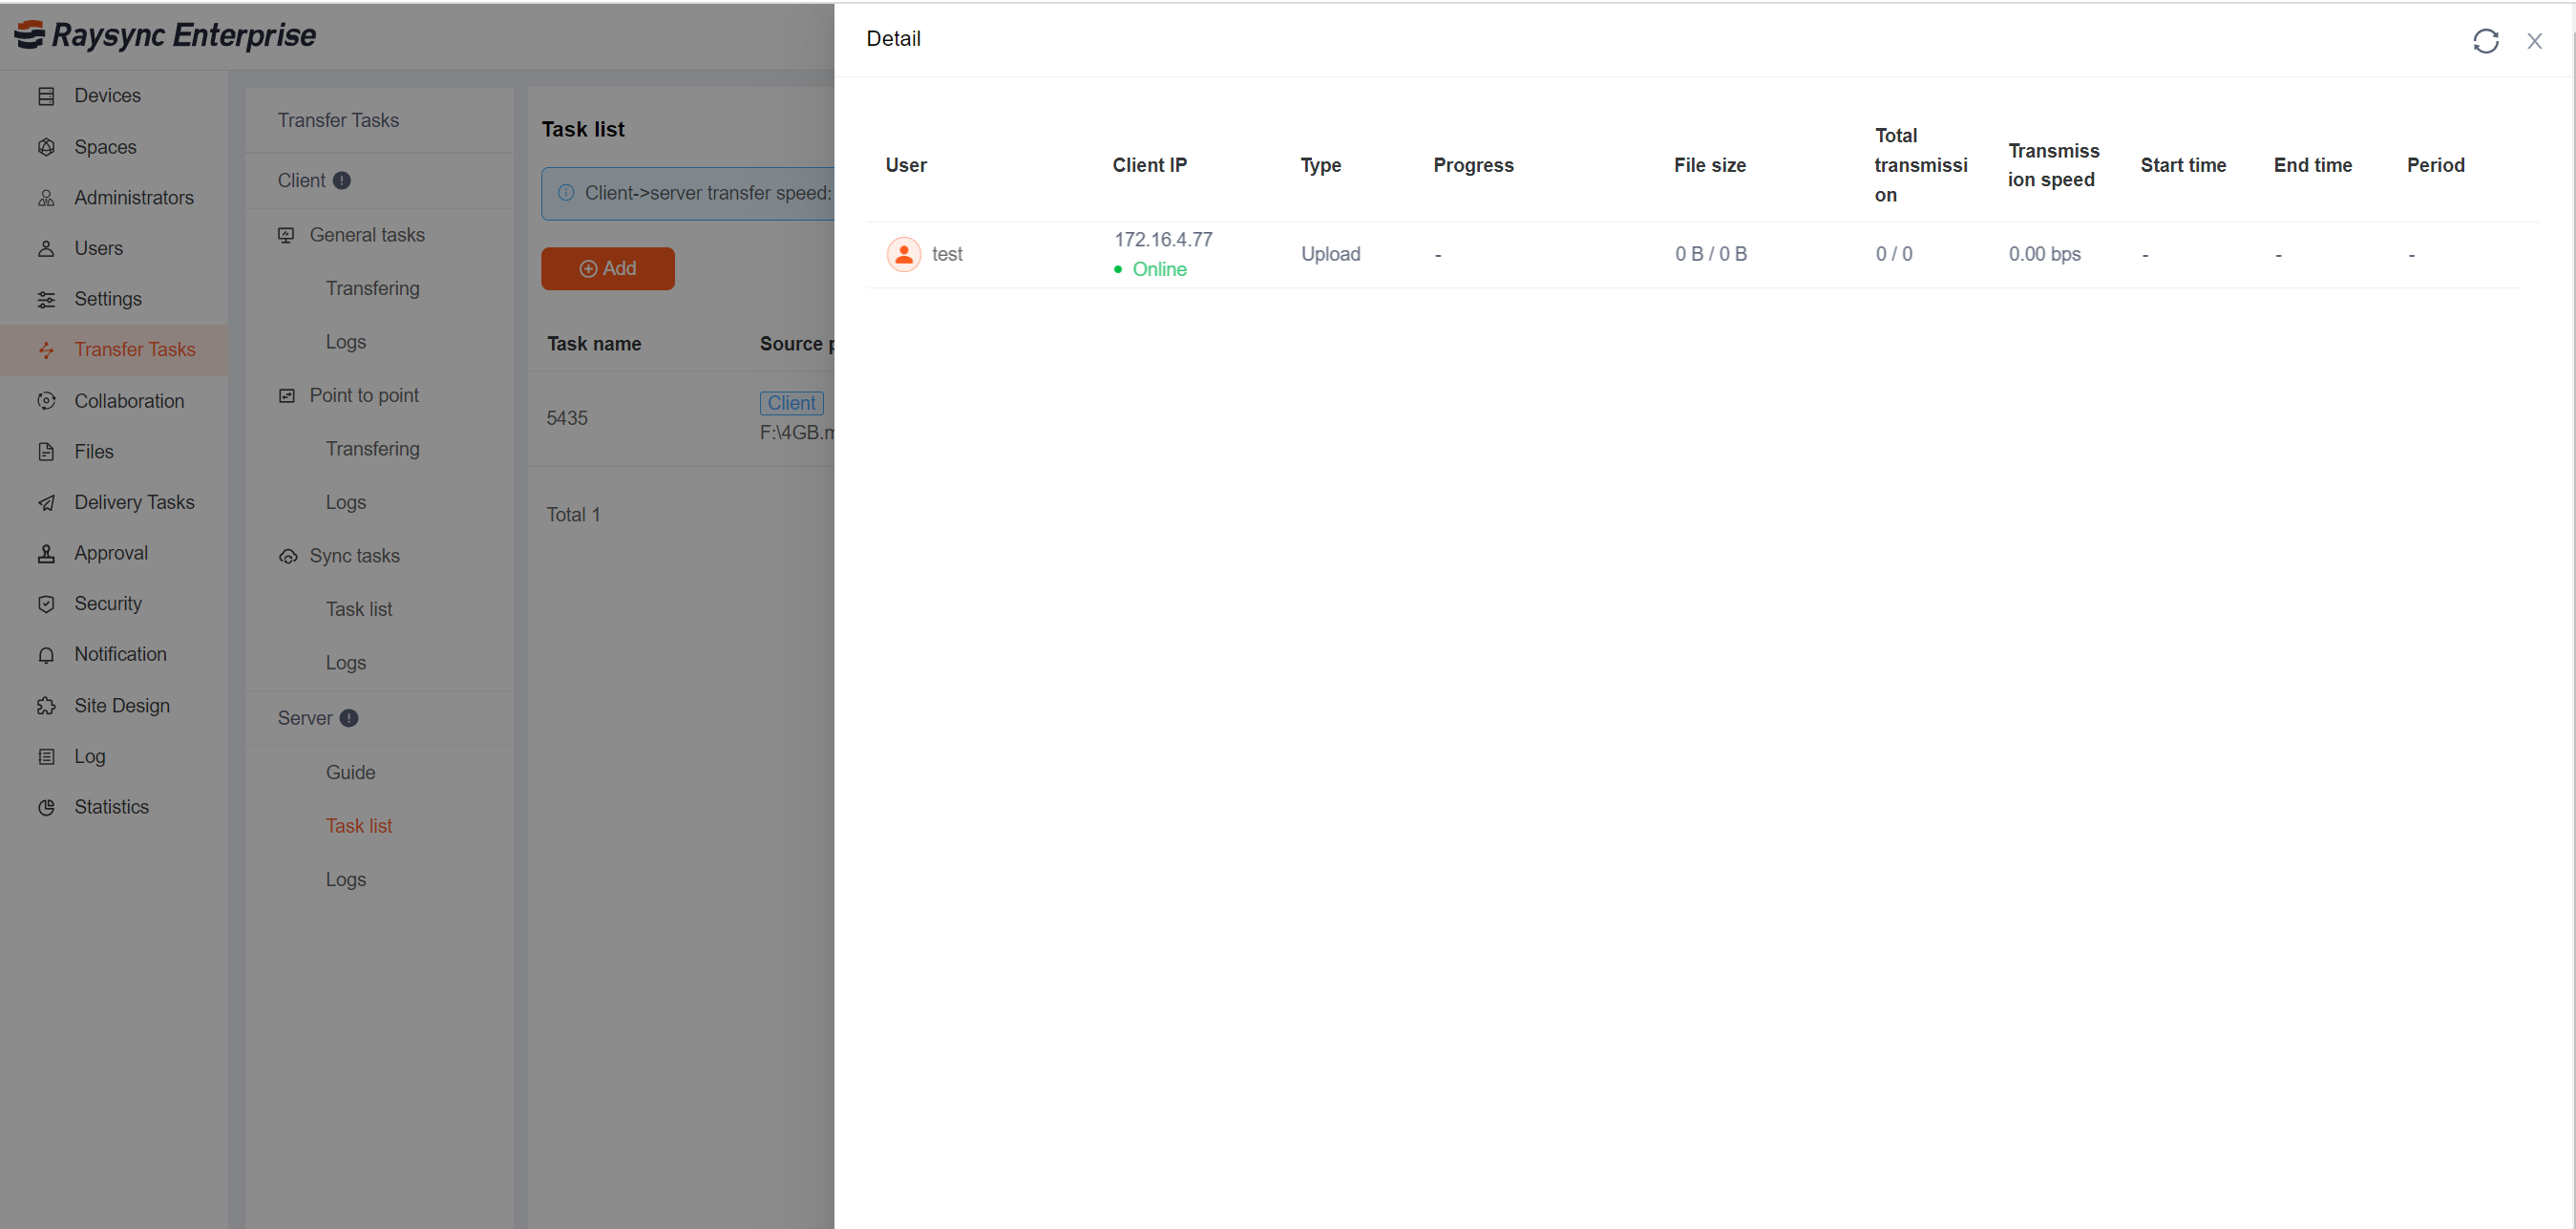
Click View Log to view the task transmission status of each client node.

任务详情-英文

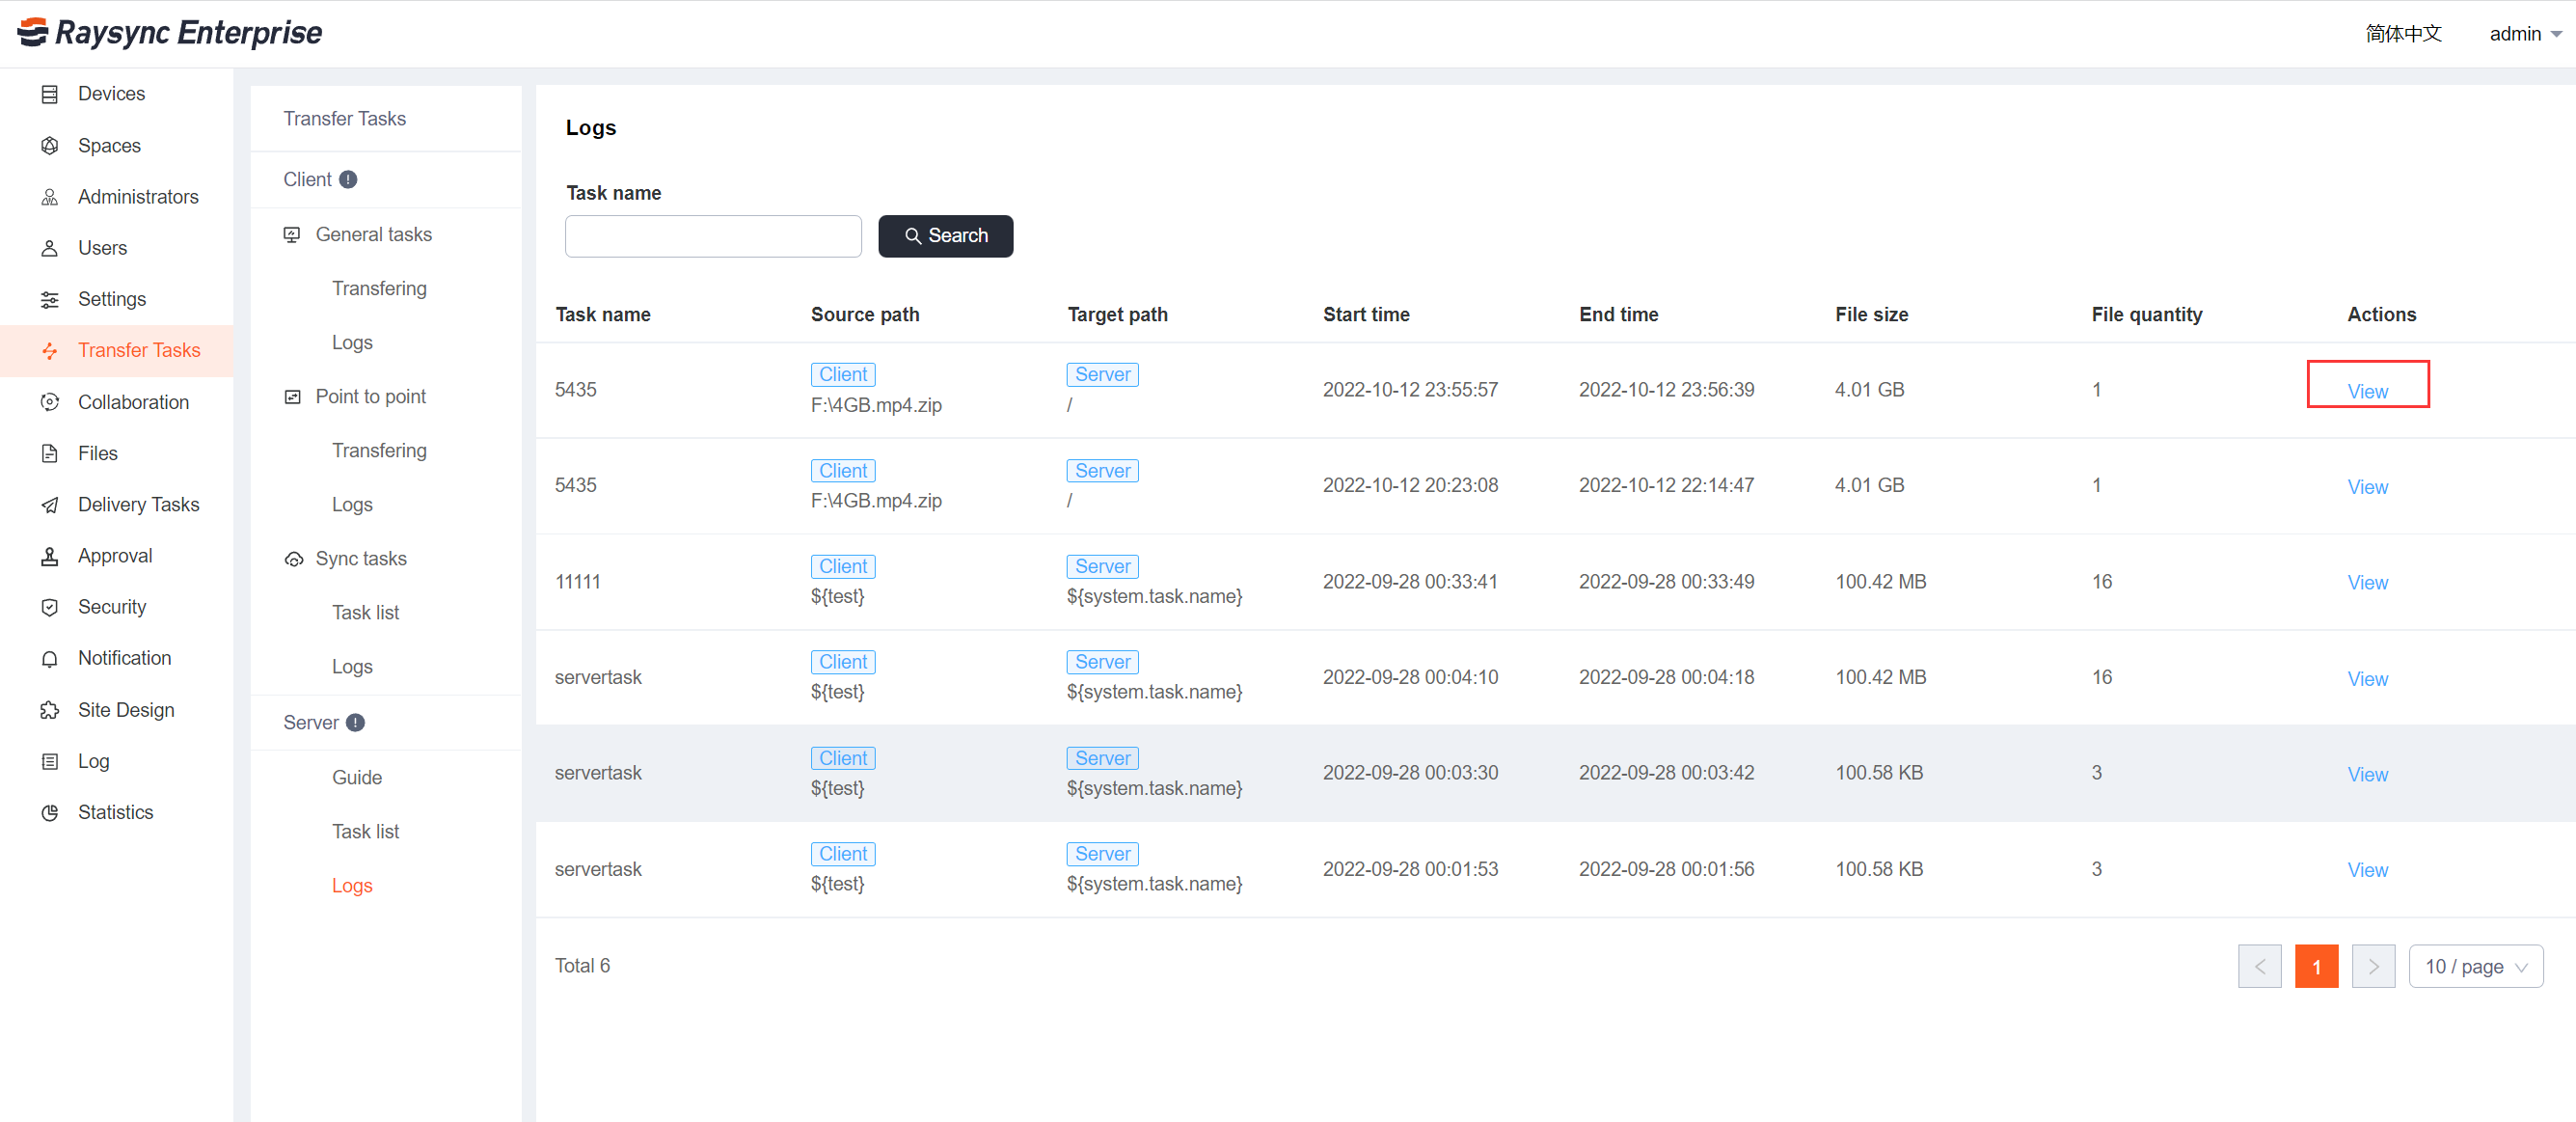
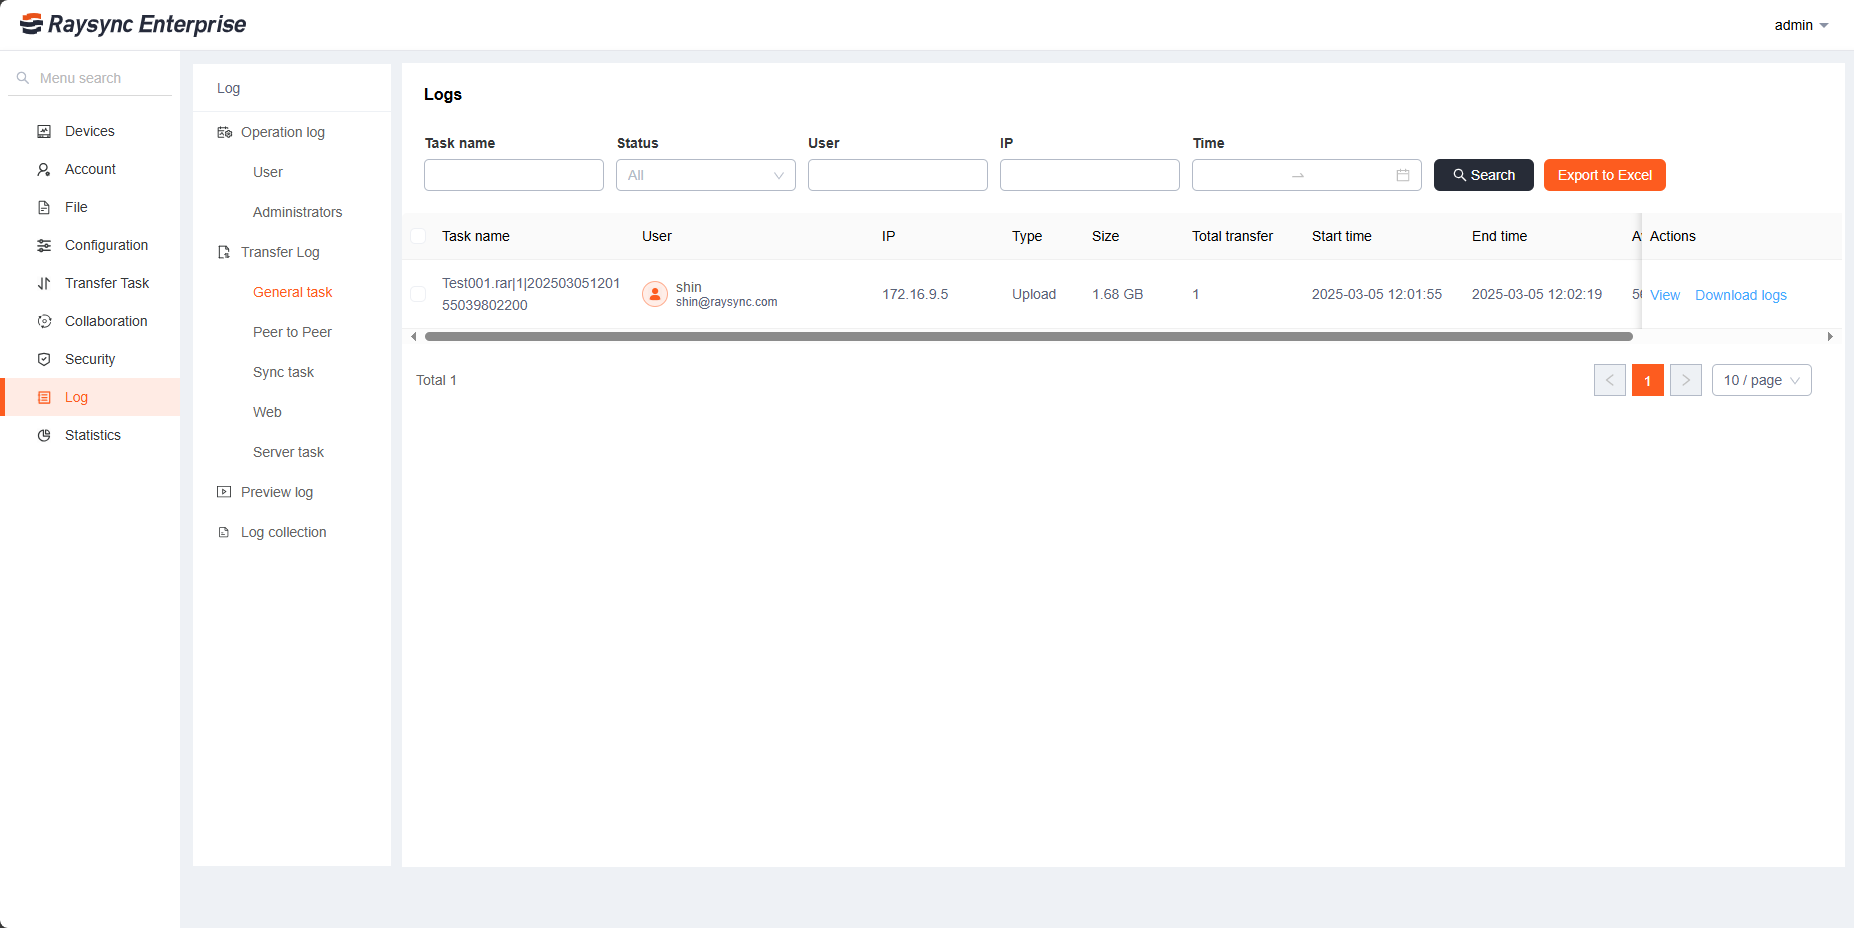
After each transmission, you can view the transmission record in the [Logs]

日志

6) Admin Portal Guide

6.1) Devices

Updated: 2022-11-30 09:17:56

1. Server Settings

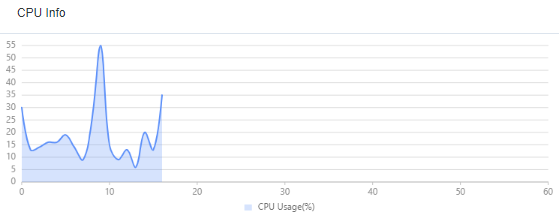
This interface will display the server configuration information, the display status of Raysync, the number of online users, the license activation status and the monitoring information of CPU and the corresponding network card, etc.

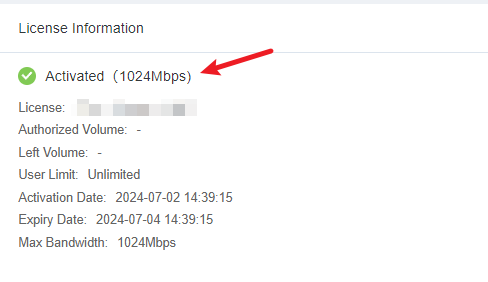
1.1 License activation

Raysync server needs to activate the license to experience the maximum speed. If the license is not activated, the default bandwidth is 5Mbps.

Click Server on the home page and click Activate, enter the correct activation code and restart the service to take effect.激活英文

1.2 View license

Server-license information

查看激活码信息

1.3 View disk space

Server - Disk Space

磁盘英文

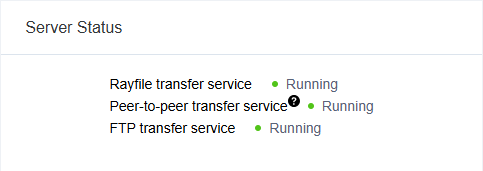
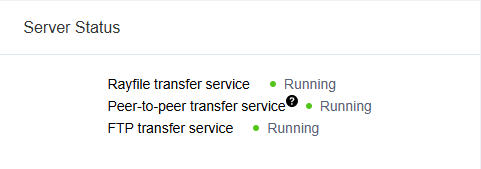
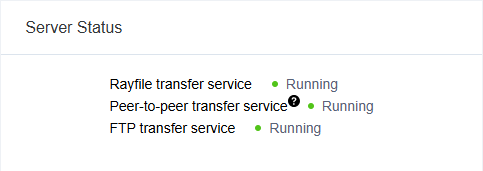
1.4 Service operation status

Server-Server operation status

状态英文

1.5 View server monitoring information

1.5.1 CPU information

Server-cpu information

cpu英文

1.5.2 NIC information

Server-NIC Information

网卡英文

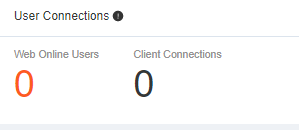
1.6 View online users

Server - Connected Users

查看在线用户数英文

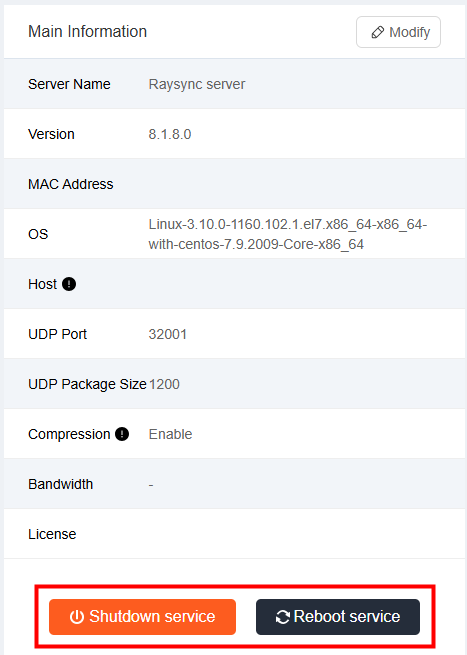
1.7 Shutdown, startup, and reboot Raysync service

Server - Basic Information

重启服务英文

1.8 Edit server information

Server information includes Server Address, UDP Port, UDP Package size, Default Storage Path Bandwidth, Compression, and other functions. Click Server - Modify

Function Description
Server Address The server address can be changed to an IP address or domain name.
UDP Acceleration Port The UDP port can be changed to a port between 1 and 65535. The default is 32001. You need to ensure that the server firewall already has the UDP port. Otherwise, the transfer will fail. After the change, you need to restart the server.
UDP Message Size UDP message size is generally set to the default value. The default is 1200 (the range is 600~1442).
Enable Compression After enabling, files that can be compressed for transfer will be compressed, which can reduce bandwidth usage and improve transfer efficiency.
Outbound Bandwidth The server export bandwidth is not configured by default, and the export bandwidth is not limited. When set to 0 or not filled in, the bandwidth limit will not take effect

2. Client Devices

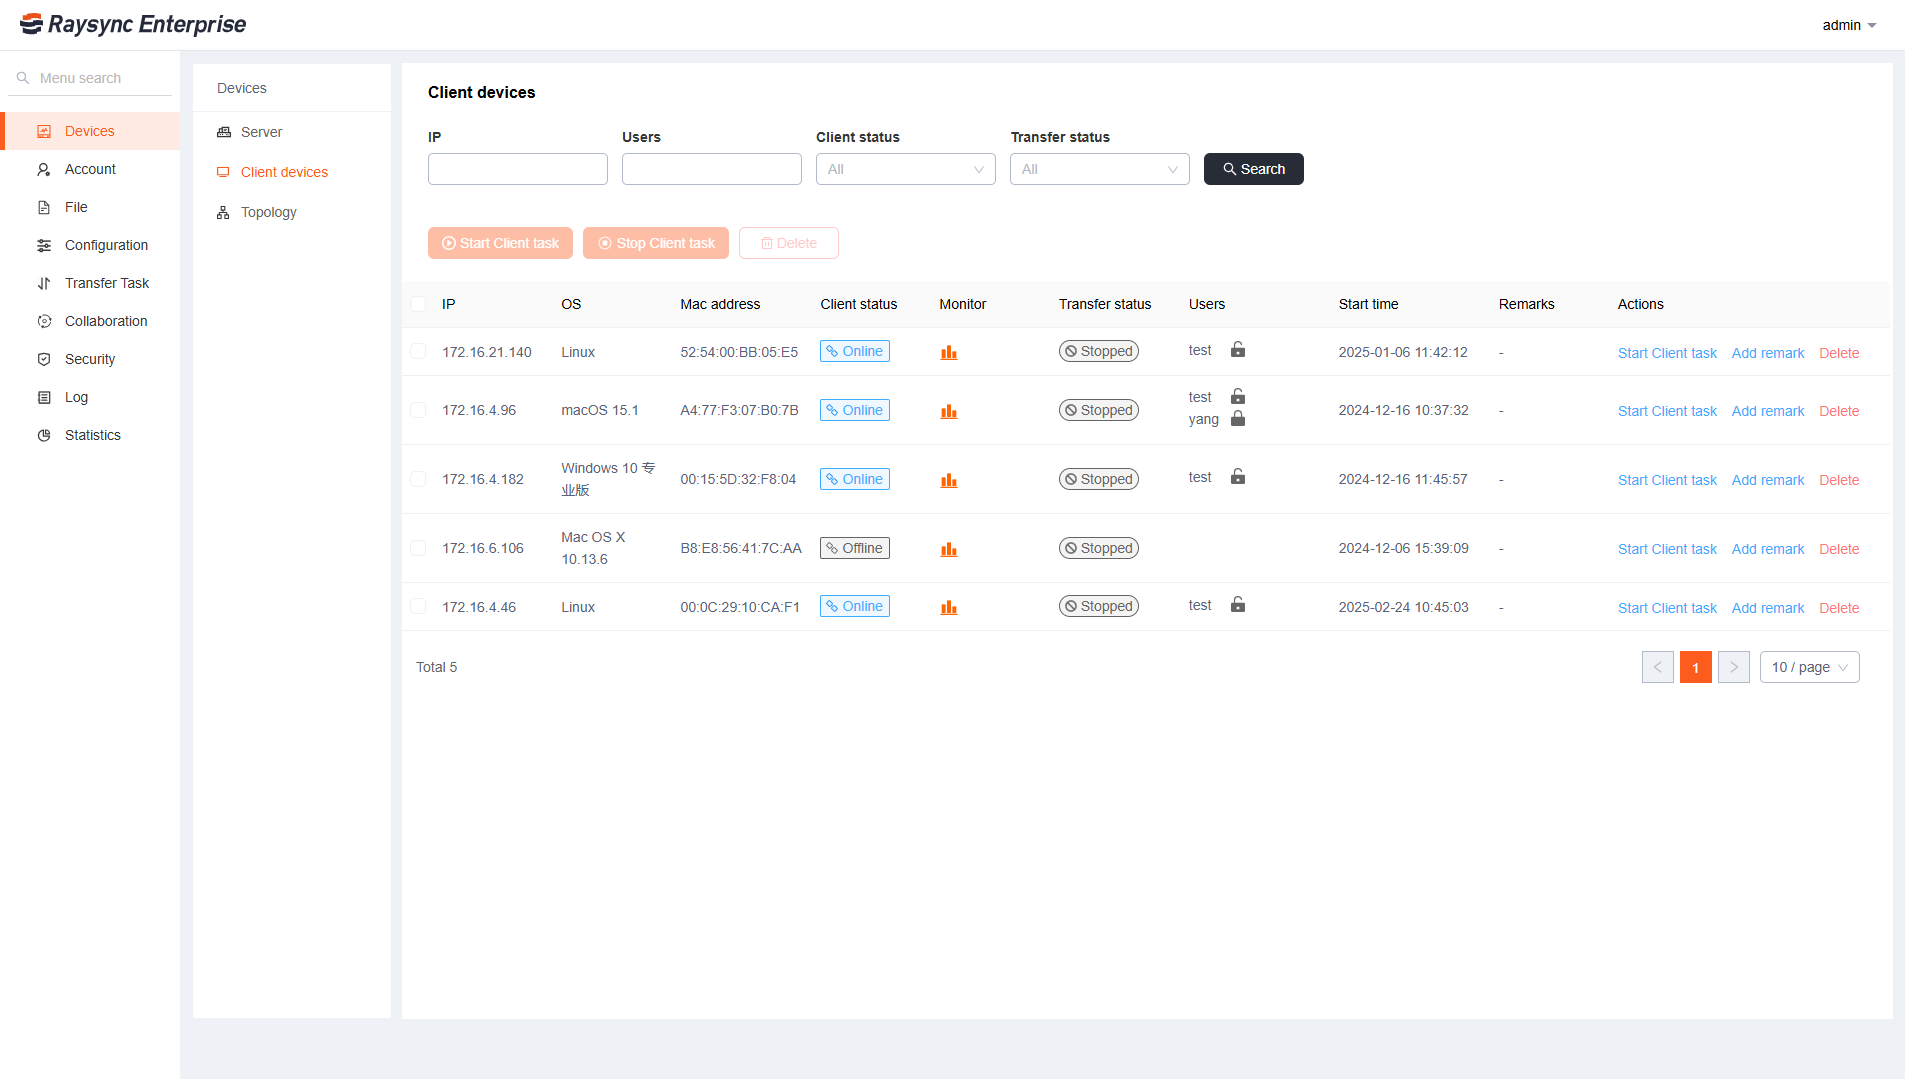
It displays the Client running status and machine status of the connected server, monitors CPU, memory, and disk usage in real-time. In addition, it can stop, start and lock the operation of the Client user with one click for all transfer tasks connected to the node.

Client devices

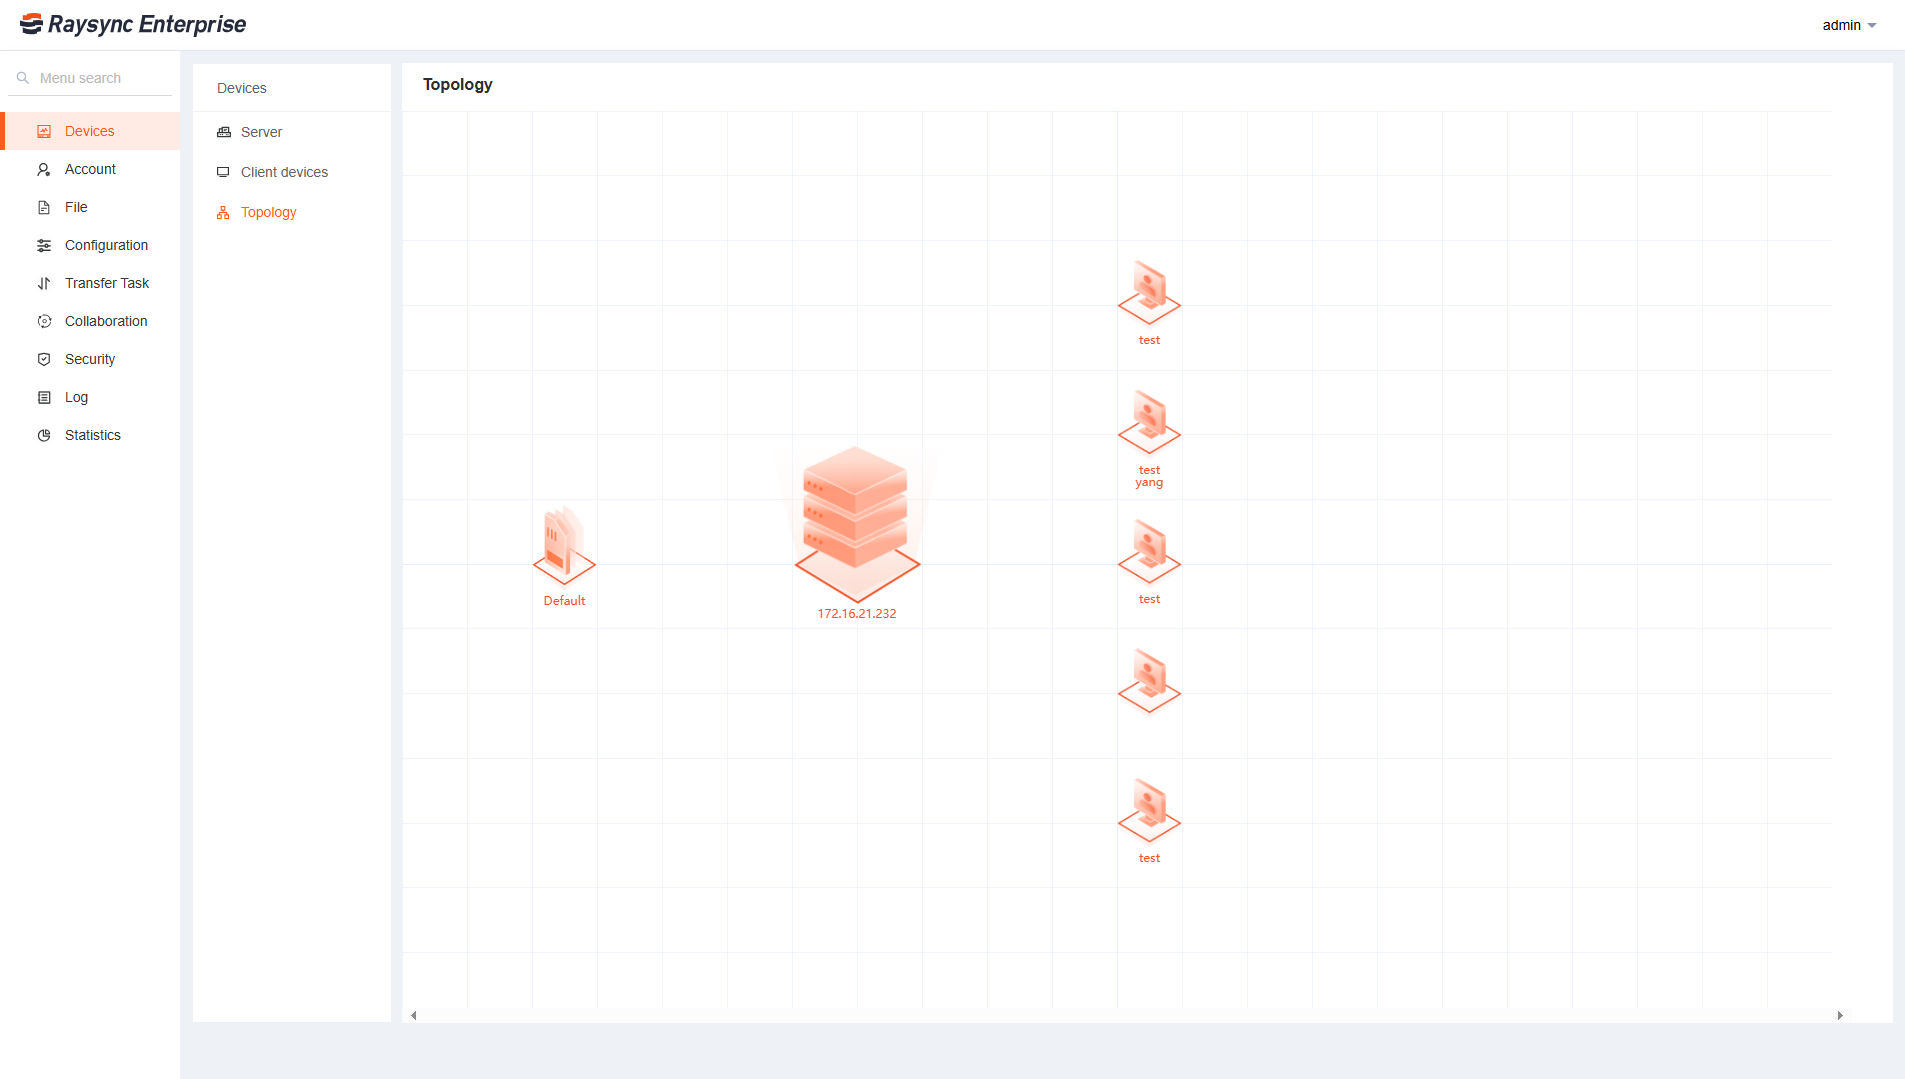
3. Topology

This interface displays the storage of the server, the node Client connecting to the server, as well as the transfer data flow between nodes and between server and nodes.

topology

6.2) Spaces

Updated: 2023-09-01 06:53:40

Admin can assign members in the space, set administrators, configuration storage, group folder, space access restrictions, delivery authorization, etc. The new user is a member of the default space.

1. Space Storage Configuration

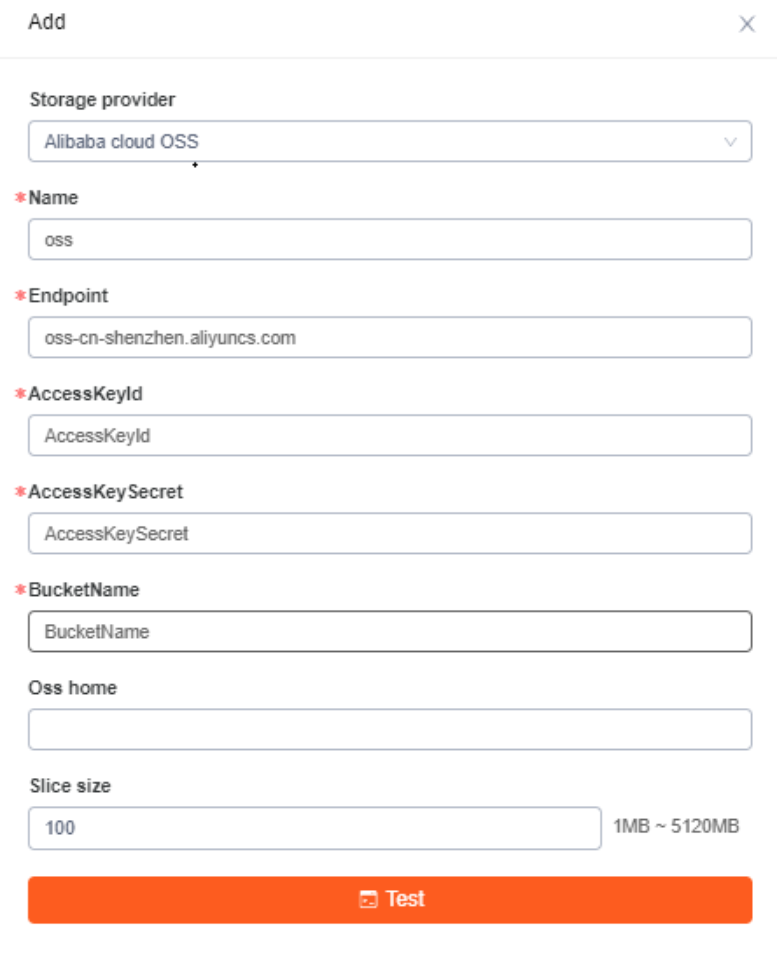
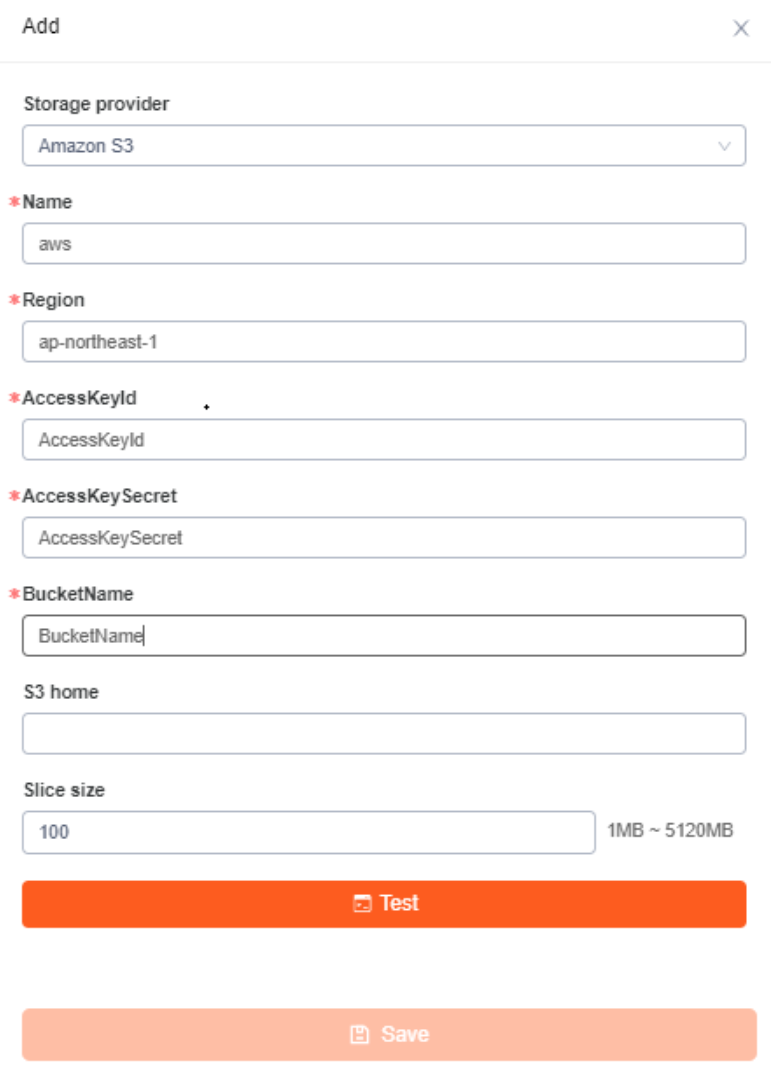
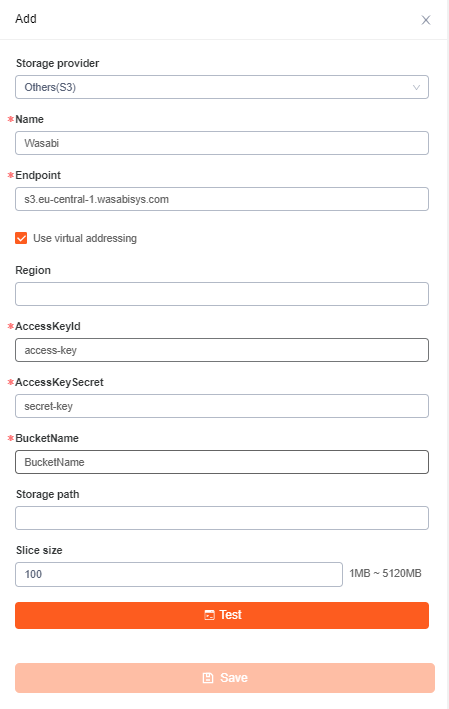
The storage configuration is used to specify the storage home directory and virtual directory of all user and group file libraries in the space, and supports the configuration of multiple storages. Supports adding multiple storage such as Alibaba Cloud OSS storages, Amazon S3 storage, S3 interface compatible storage, Azure Blob, and Google Cloud at the same time.

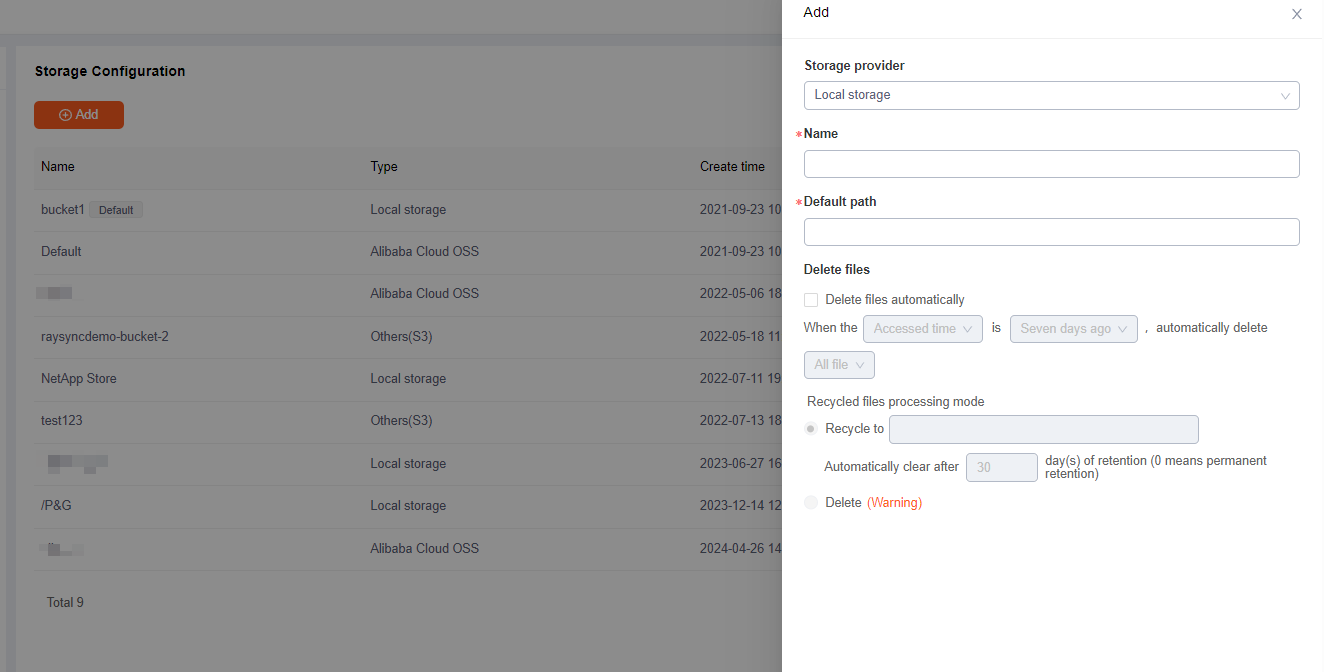
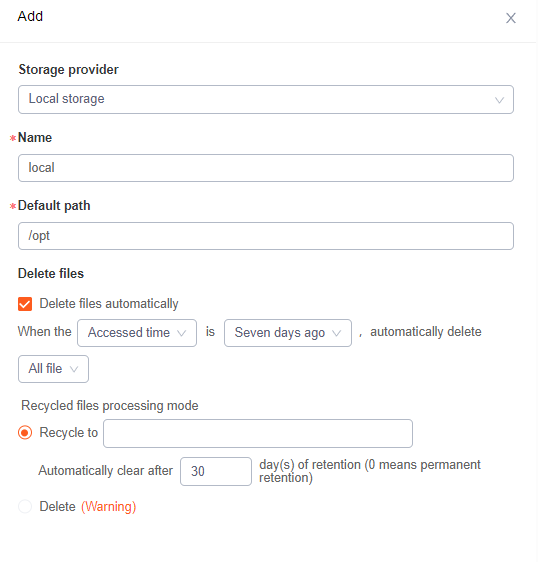
2.1 Add local storage

Select the space and click the storage configuration Add - select the local storage, enter the storage name, enter the storage path, click Save, and the storage will take effect after the service restarts.

本地存储英文

2.2 Add Alibaba Cloud OSS storage

Fill in the correct OSS storage configuration information, specify the OSS storage path (optional, it will be stored in the Bucket root directory by default) and click Test. If the test is passed, it means that the configuration information is correct. Click Save and it will take effect after the server restarts.

oss存储

2.3 Add Amazon S3 storage

Fill in the correct Amazon S3 storage configuration information, specify the storage path (optional, it will be stored in the Bucket root directory by default), click Test, if the test passes, then the configuration information is correct. Click Save and it will take effect after the server restarts.

aws存储英文

2.4 Add S3 interface compatible storage

Currently supported object storage:  Backblaze B2 Cloud Storage , Wasabi, Ceph Object Storage, etc.

Endpoint defaults to https:// protocol. If you use http:// , you need to add http:// in front of the Endpoint


其他S3英文

2.5 Add Azure Blob Storage

Fill in the correct Azure Blob storage configuration information, specify the storage path (optional, it will be stored in the root directory by default), click Test, if the test passes, the configuration information is correct. Click Save and it will take effect after the server restarts.

微软英文

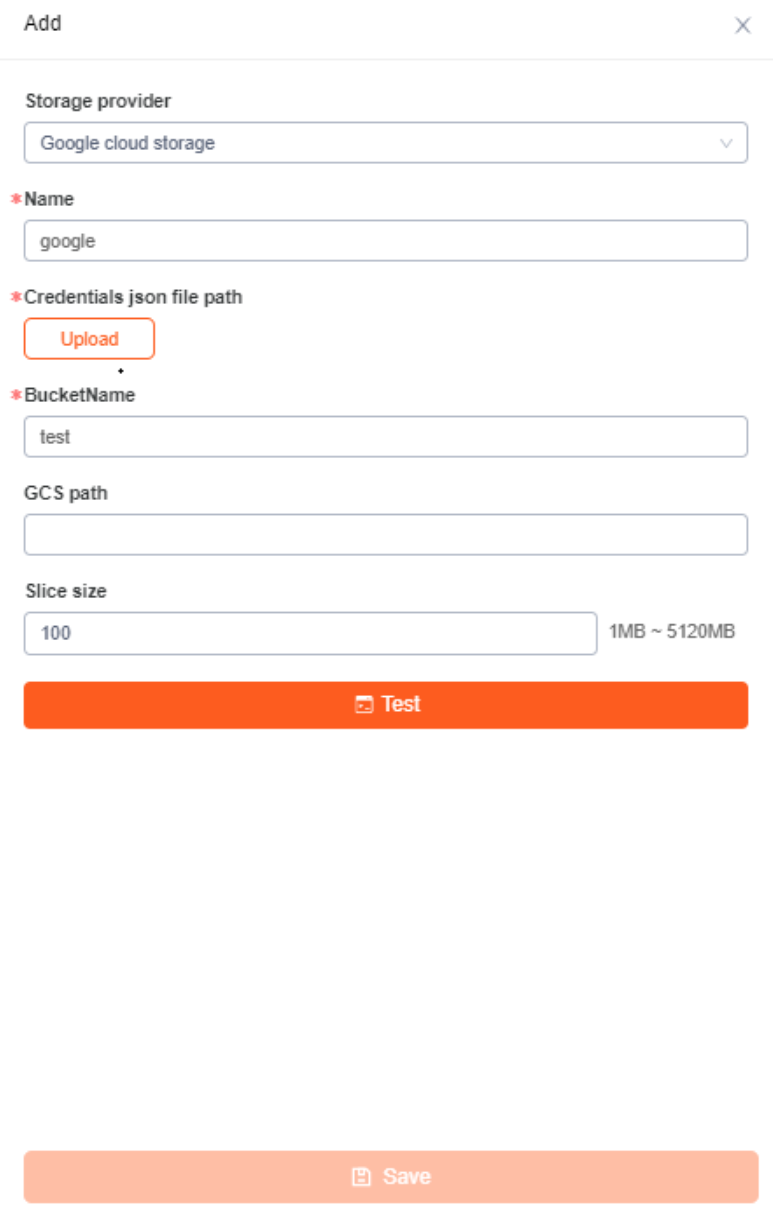
2.6 Add Google Cloud Storage

Select the space and click on the storage configuration New - Google Cloud Storage Enter the storage name, upload the correct Google cloud storage credential file, fill in the correct storage configuration information, specify the storage path (optional, it will be stored in the root directory by default), click Test, if the test passes, the configuration information is correct, click Save, it will take effect after the server restarts.google英文

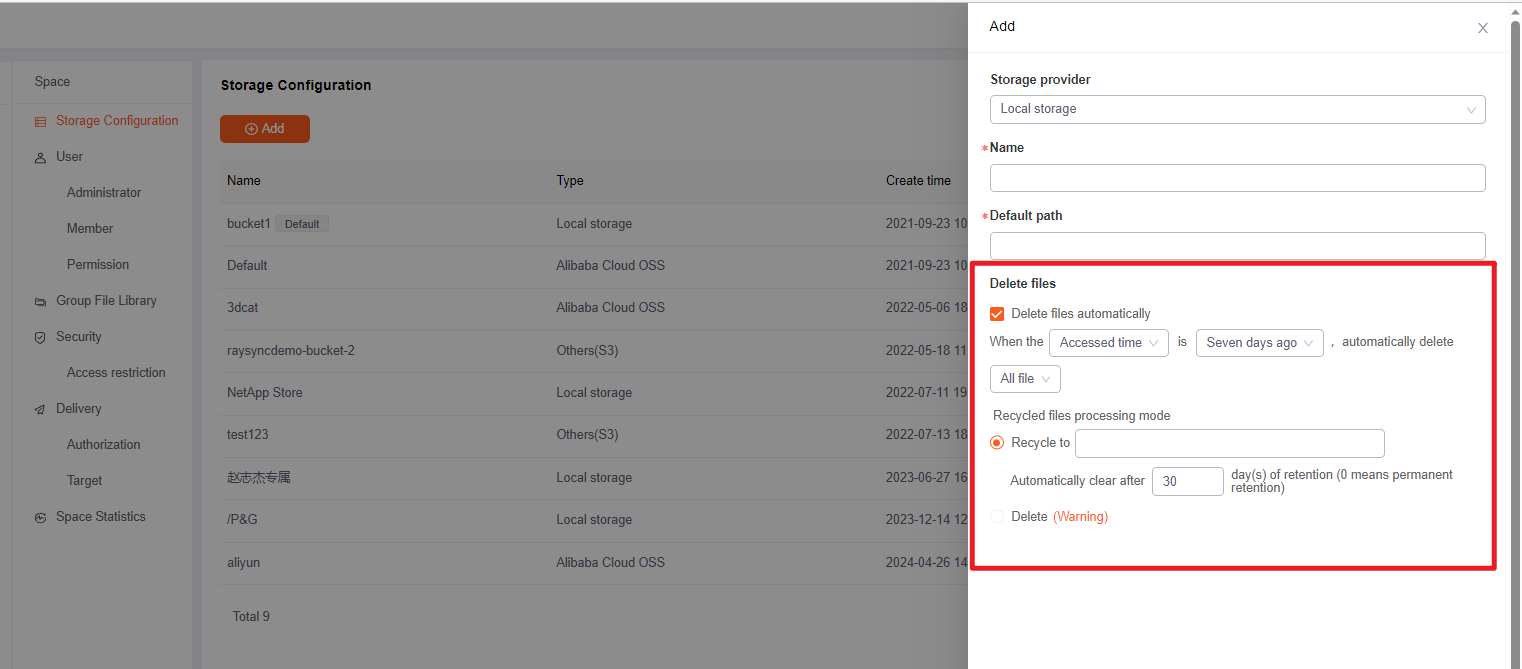
2.7 File cleanup

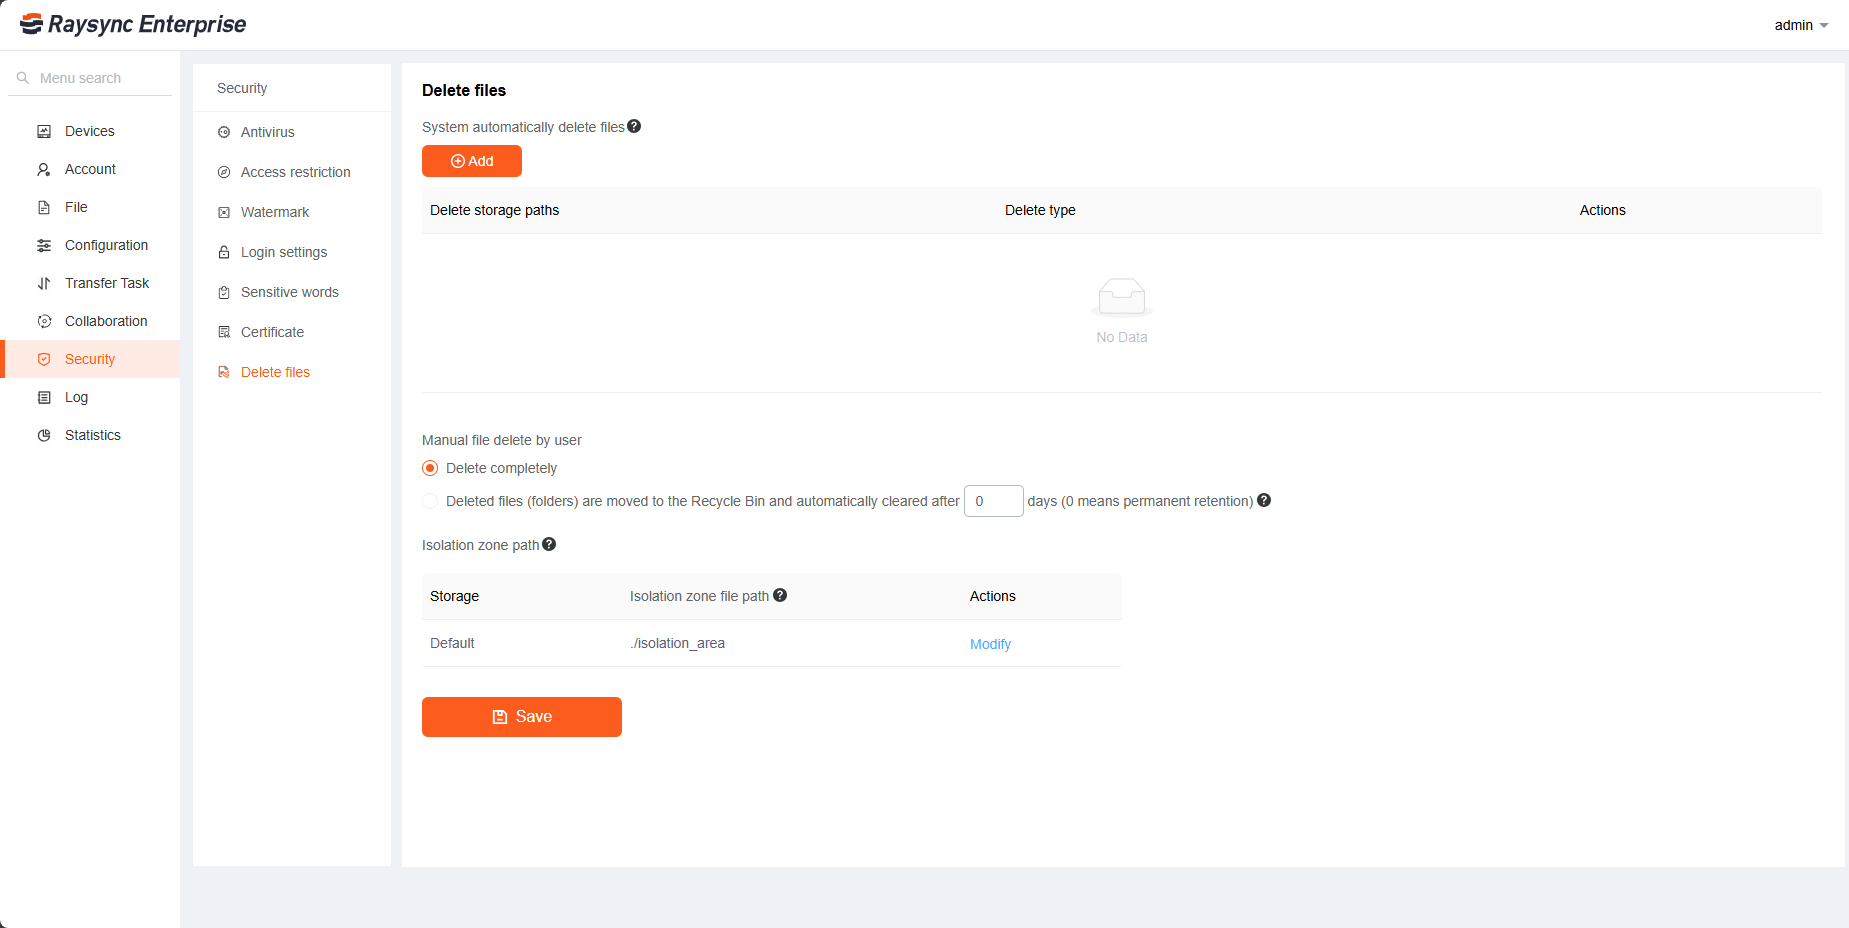
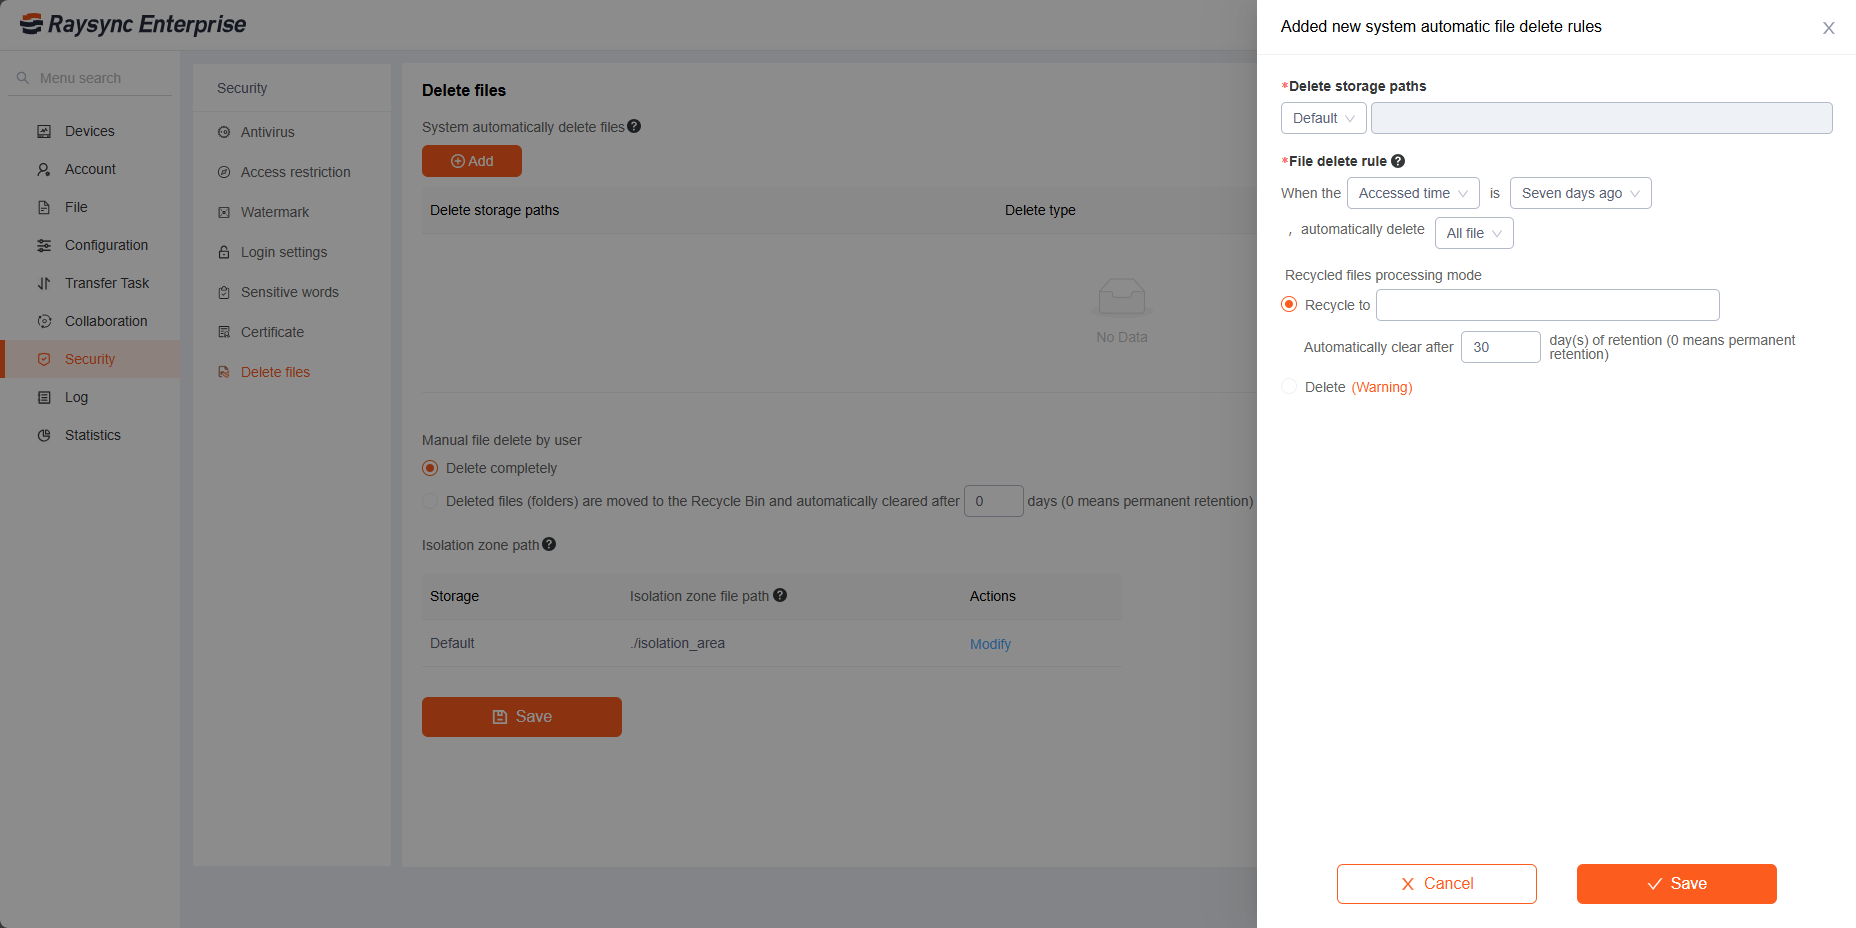
Enable automatic file clearing, the server will automatically migrate the files in the local storage path to the recycling path according to the file cleaning rules. (Only supports cleaning files in the local storage path)

For example, the local storage path is /opt/raysync/, the recycling path is /opt/recycle/, and the cleaning rule is to automatically clean up files whose last access time was one year ago. After saving the configuration and restarting the service, files in /opt/raysync/ whose last access time was one year ago will be automatically migrated to the /opt/recycle/ directory.

Click Add/Edit Local Storage, click to enable automatic file cleanup. Select the file cleaning rule, configure the storage path for file recycling, and click Save.

文件清理

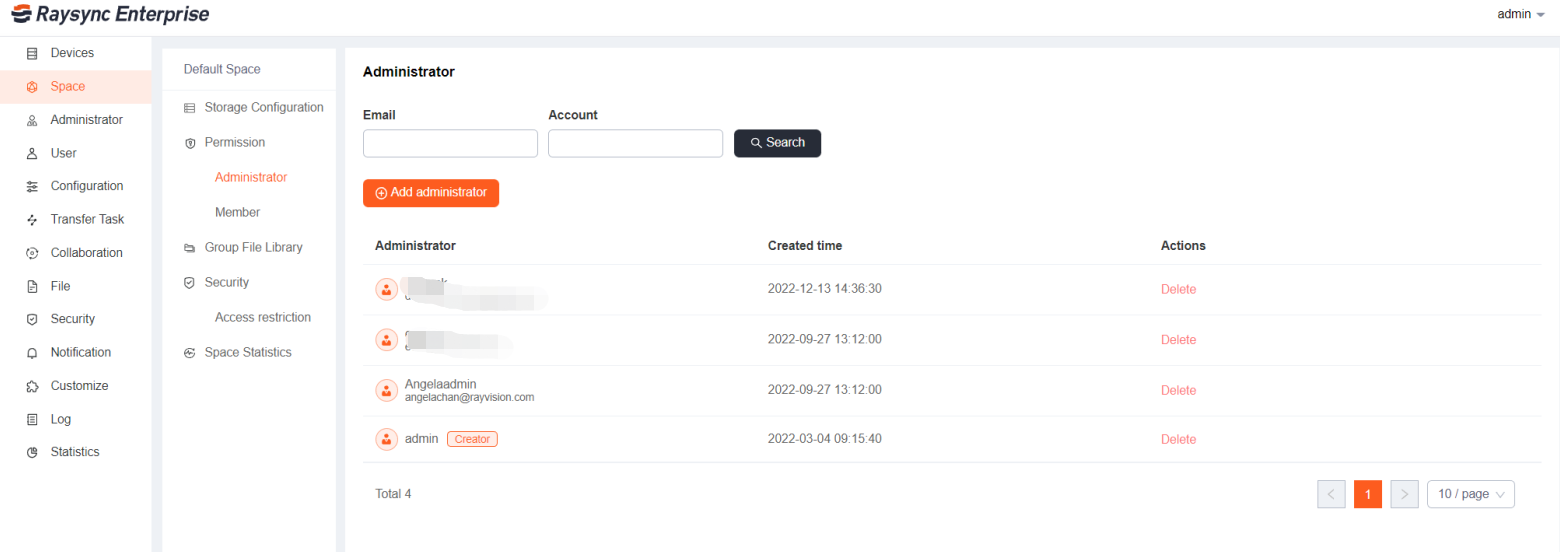
3. Space Administrator

Space administrators can manage space membership, group folders, space access, and file delivery.

3.1 Add/Delete/Search Space administrator

Enter Default Space - administrator, to add, delete, and search for administrators.

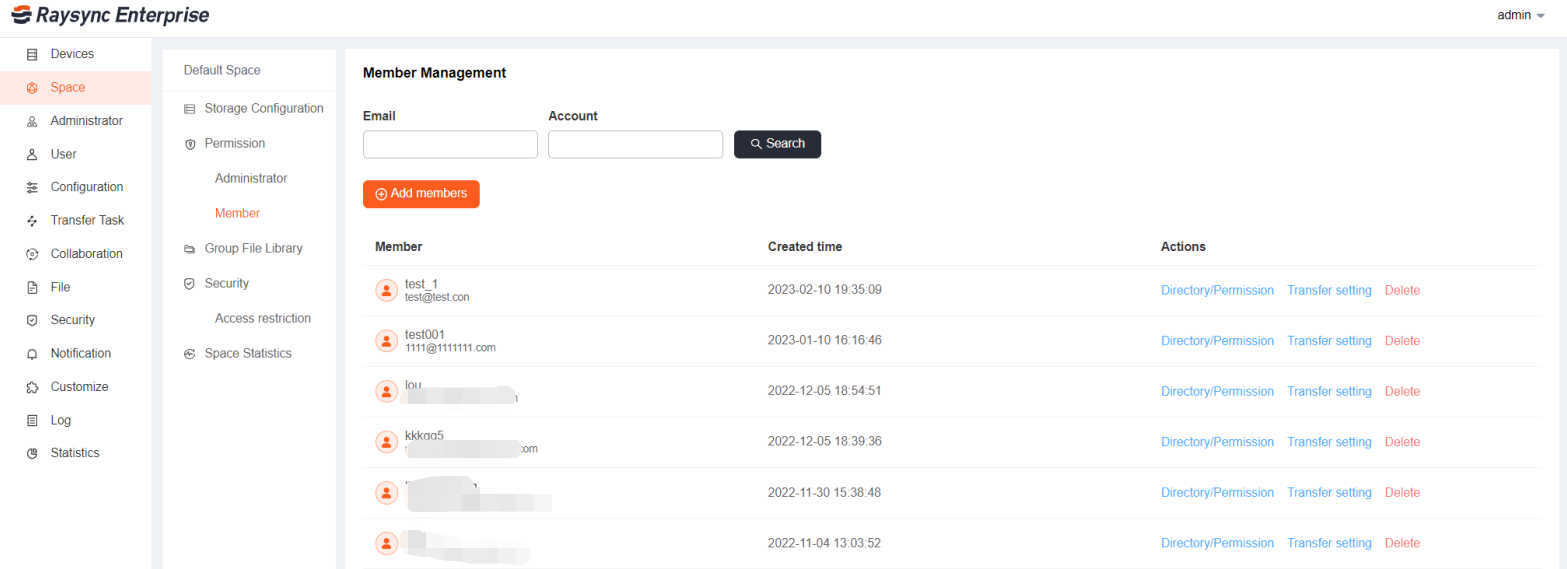
4. Manage Space Members

4.1 Add/Delete/Search space members

Click Members - Add member to add, delete, and search space members.

4.2 Space member permissions and transfer configuration

Enter space management - select Space - Members - Directory/Permission or Transfer setting to configure the permissions and transfer configuration of space members.

Function Description
Home Directory User's personal file storage location
Virtual Directory After adding a virtual directory, the user can view the user's virtual directory in the foreground, and transfer and operate the files in the virtual directory. Support for adding multiple virtual directories. Virtual directory alias: a path based on the user's home directory; virtual directory path: a valid path based on virtual storage
Forbidden access path Set the path that the user is forbidden to access, the front-end user page cannot display the files (folders) of this path, and cannot create, delete, rename, copy, move, upload, download the files (folders) that are forbidden to access
Permissions Configure Personal File List, Download File, Delete, Rename, Create Folder, Upload File, Sync Folder, Move, Copy, Invite to Upload, Share
Upload file options After enabling only upload new files, users can only upload newly added files, and cannot upload files with the same name
Upload and download speed limit Limit the user's upload and download speed, the default speed is unlimited
Transfer File Format Transmission file format is divided into white list and black list. The whitelist is used to configure the file formats that the system allows to upload. The blacklist is used to configure file formats that are not allowed to be uploaded by the system. Multiple formats need to be separated by ";", such as "txt;iso;mp4"
File transfer filter 1) It is supported to prohibit setting file filter conditions on the Raysync client. The sync tasks created by users in the personal space cannot set filter conditions. 2) Support skipping files whose file names meet certain conditions during transfer, and support regular expressions, such as filtering files starting with test during transmission, enter ^test.*. Supports skipping files whose size exceeds the set size during transfer.
File transfer notification Notify administrator when uploading and downloading files

5. Group Folder

The group folder is a shared file directories in the space. You can create a group folder in space, set independent storage spaces for each group folder, set different file operation access for the members in a group folder, and control the transfer speed.

5.1 Add/Edit/Delete/Search group folder

You can create, delete, search, configure and other operations on the main directory, virtual directory, and set transfer file filtering of the group folder. For the function description of the group folder configuration item, please refer to the member settings.
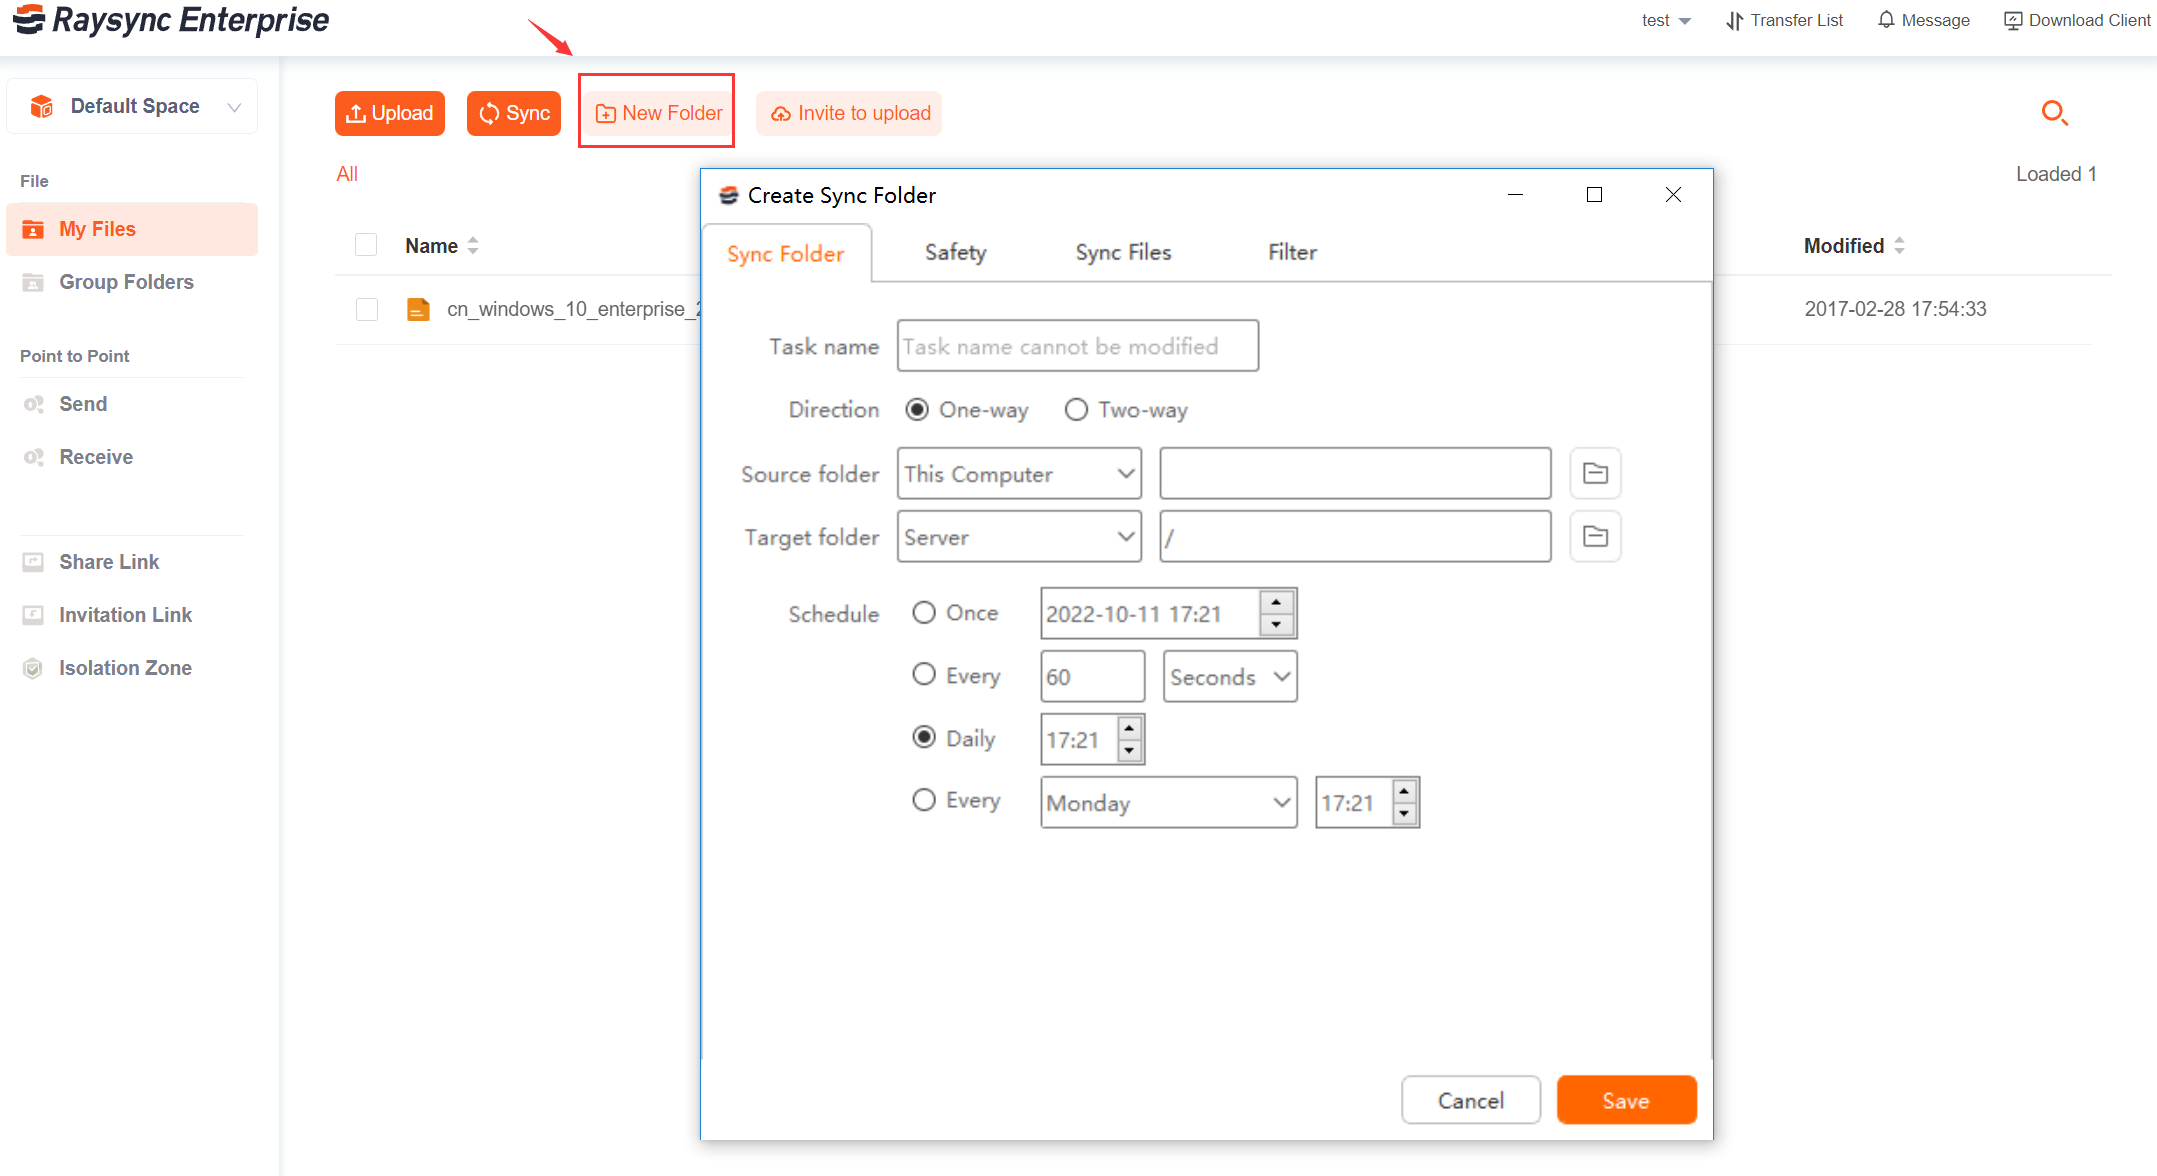
Enter the space management, select the space, and click the group folder to add, delete, search, and set the group folder.

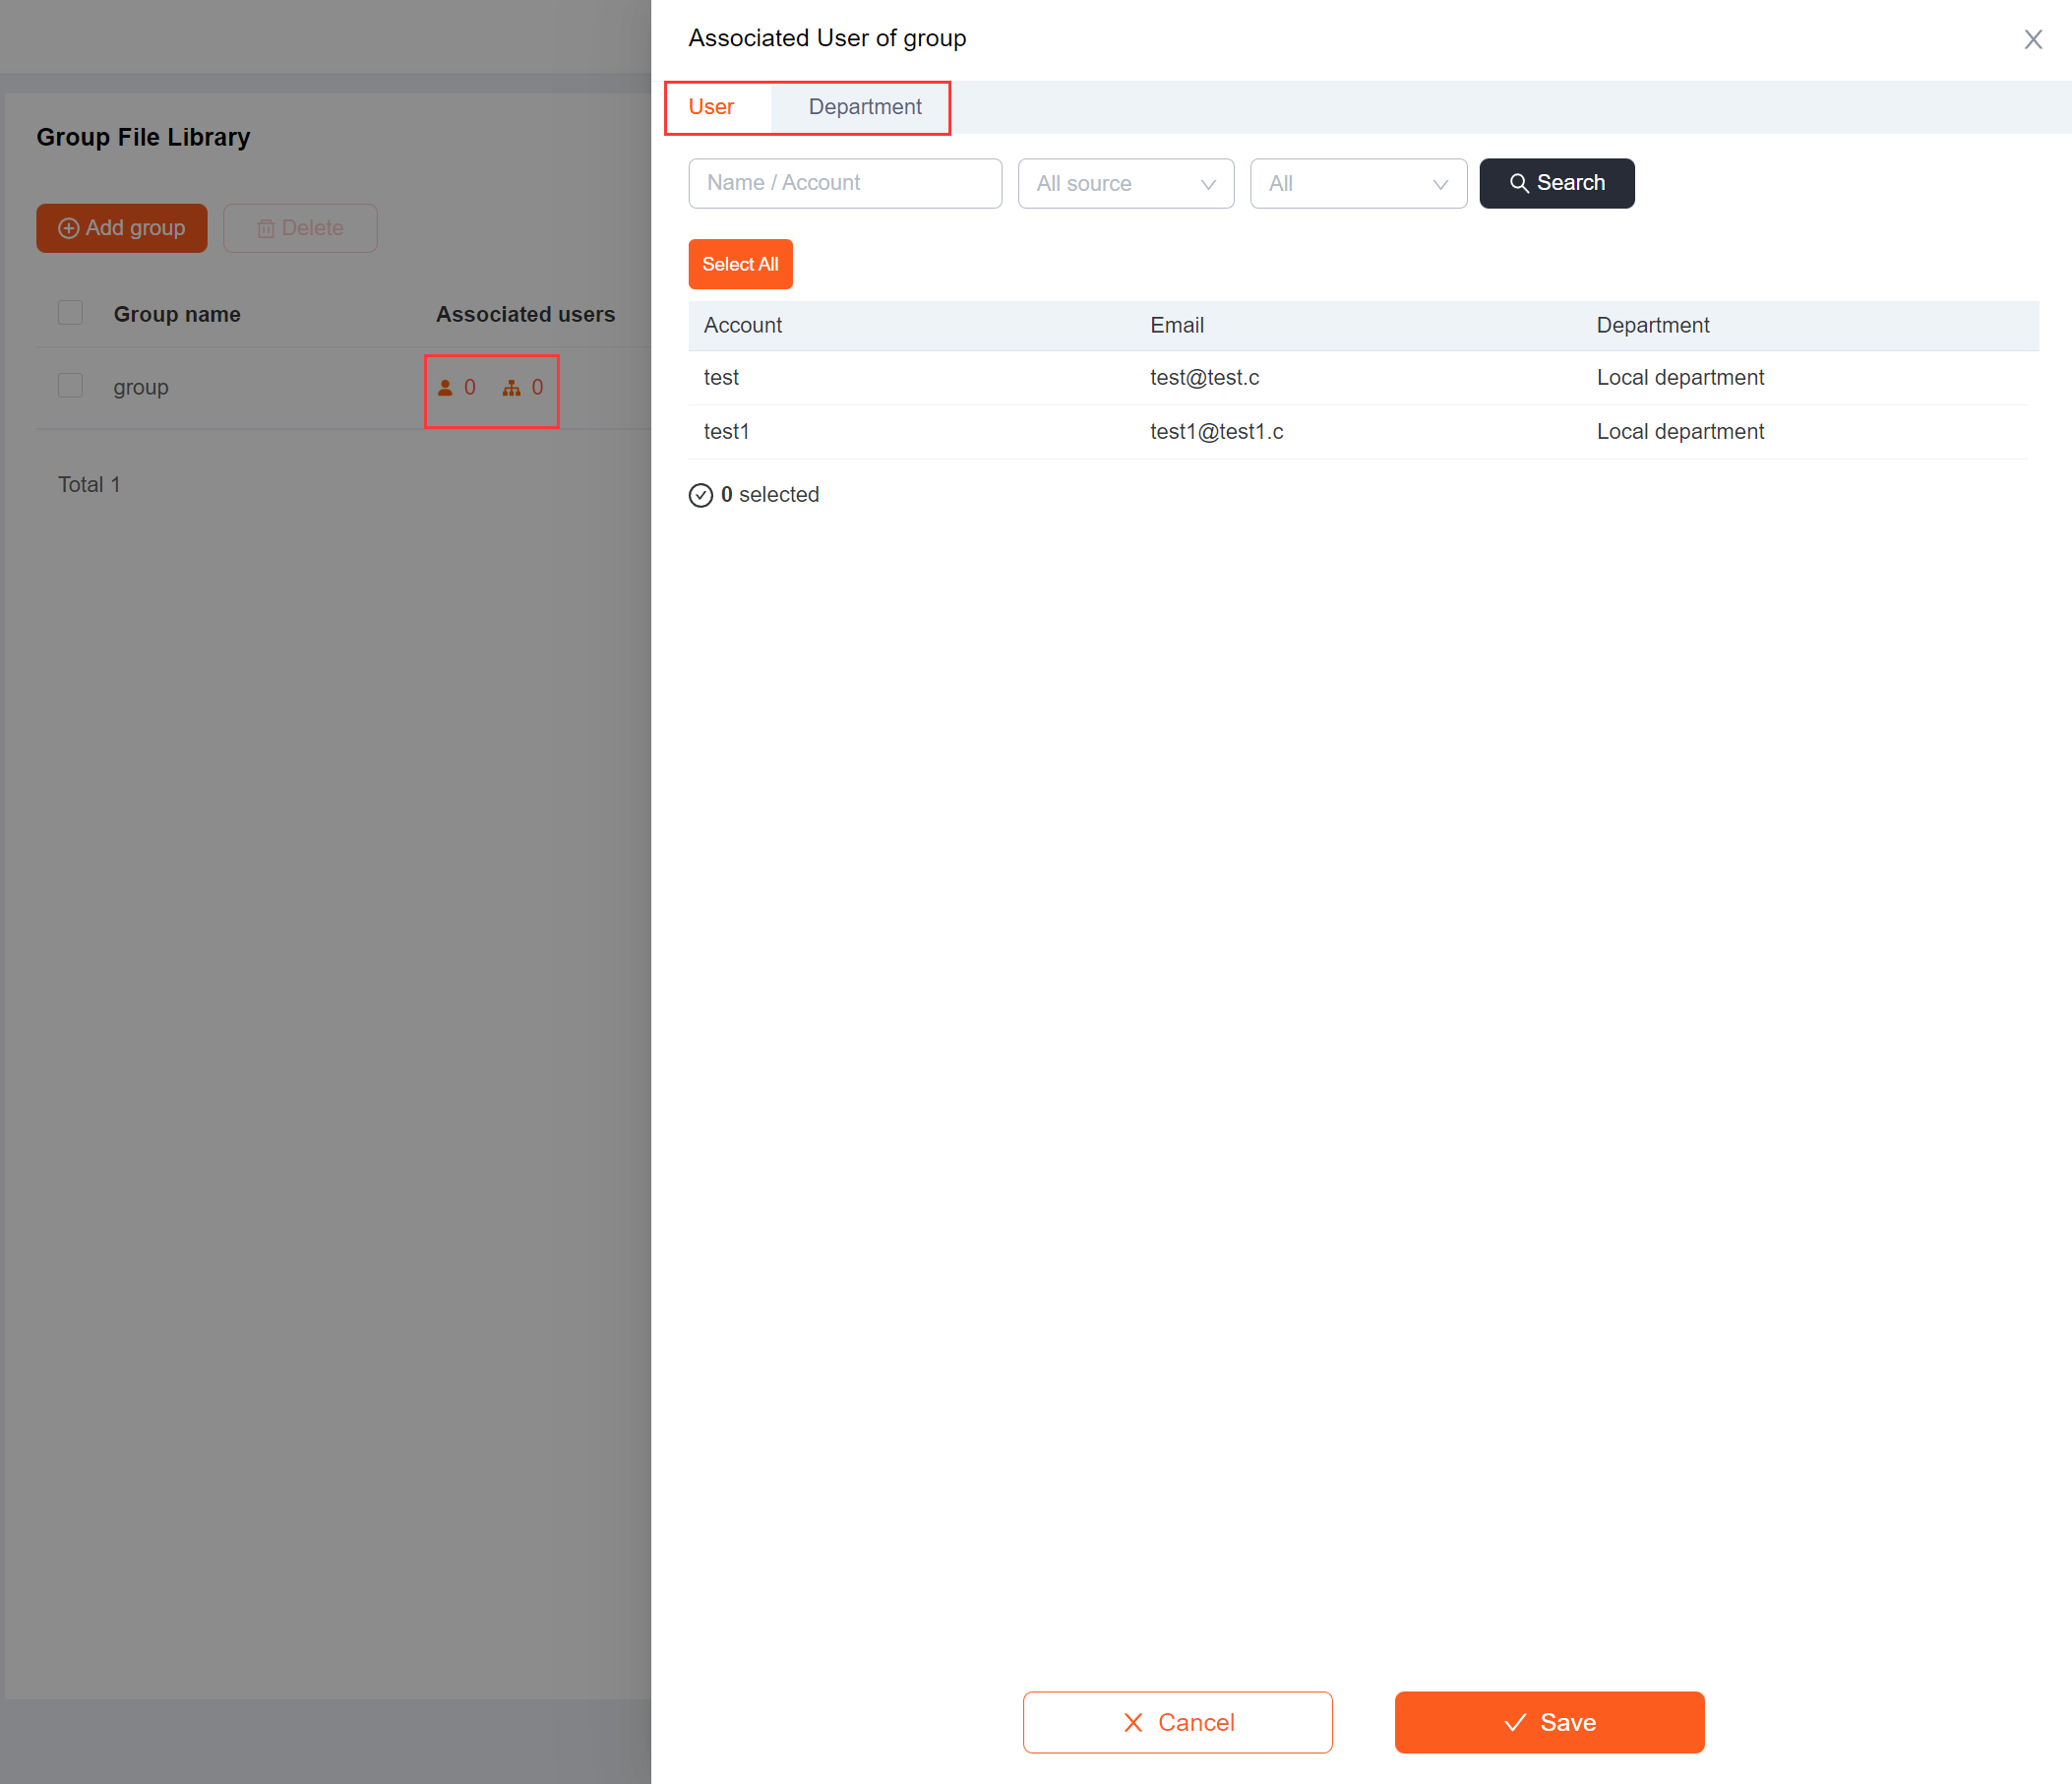
5.2 View/Add/Delete group cault members

You can view, add, and delete members of the group folder, and configure different file permissions for different members. Select a group and click Associate User

5.3 View/Add/Delete group administrator

Add administrators to the group to manage the group.
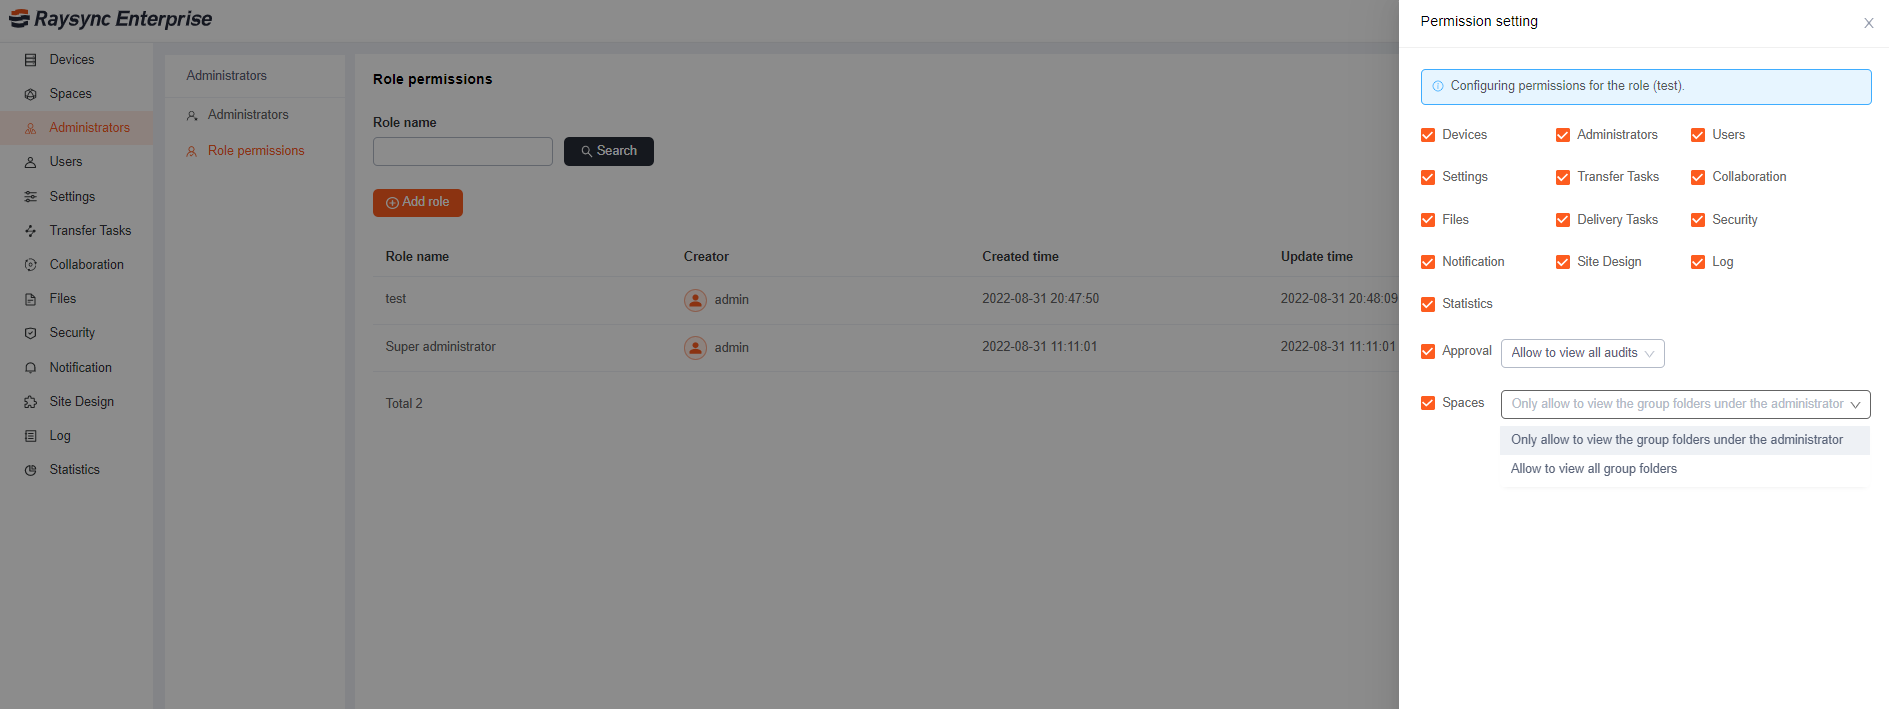
step 1 Configure group admin permissions under Administrators - Permission Setting

role permissions

step 2 Add the administrators you want to add to the space where the group is located

step 2 Click the icon below the group administrator to add or delete group administrators

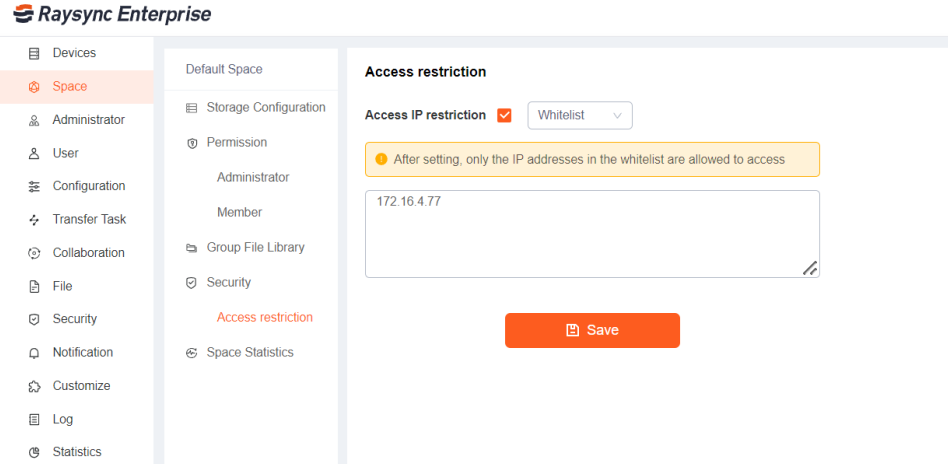
6. Security Access Restrictions

Used for space access restrictions. If a whitelist is set, the IP users in the whitelist can normally access the space in the foreground; if a blacklist is set, the IP users in the blacklist cannot access the space in the foreground. Enter the Space List, select the space, click Access Restriction, configure the IP black and white list, then click Save.

6.3) Administrator

Updated: 2022-11-30 09:18:53

1. Administrators

This function is used for login and management of the server admin portal, you can add, delete, edit permissions, disable, and search for administrators.

管理员英文

2. Role permissions

Role permissions user specifies the permissions of the administrator and can be configured with different permission groups.

角色权限英文

6.4) Users

Updated: 2023-08-31 12:43:22

1. Local User

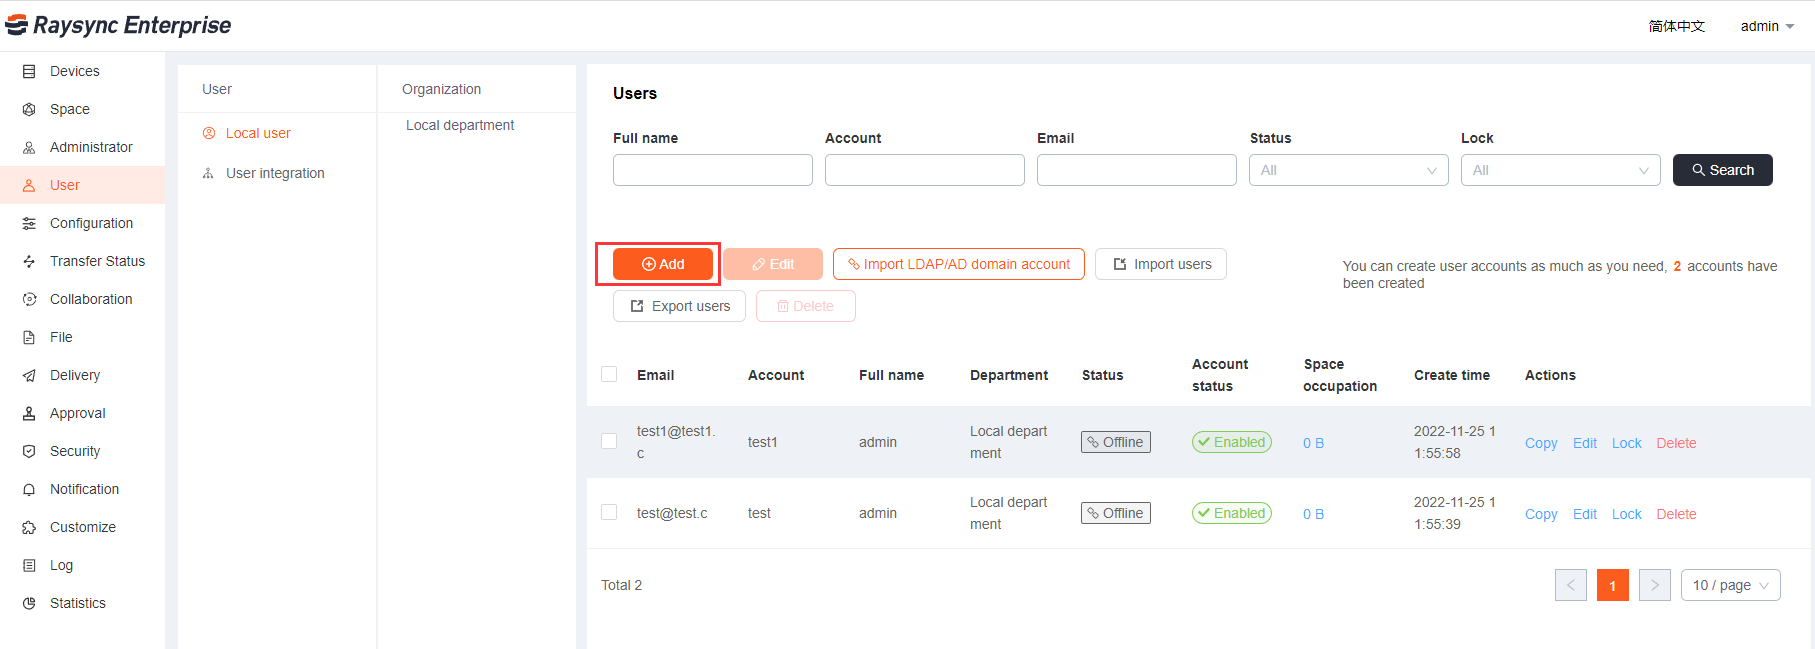
1.1 Add user

Click User-Local user, click Add to add users.

Options Function Description
Name Account real name
Account number Cannot be modified after successful creation
Password Password can be edited manually or generated automatically
Department Establish a department for users
Forced password change on first login When this function is enabled, user must change the initial password upon the first login
Email Support email login
Department Establish a department for users
Home directory User's personal file storage location
Virtual directory After adding a virtual directory, users can view the user's virtual directory in the foreground and transfer and operate the files in the virtual directory. Support adding multiple virtual directories. Virtual directory alias: based on a path under the user's home directory; virtual directory path: based on a valid path to virtual storage.
Disable access paths Set the paths that the user is prohibited from accessing, so that the front-end user page cannot display the files (folders) of this path, and cannot create, delete, rename, copy, move, upload, or download the files (folders) that are prohibited from accessing. Refer to the rules in the prompt to fill in
Allowed access path Set the path that the user is allowed to access. The foreground user can only see the set path and can set files or folders. You cannot create, delete, rename, copy, move, upload, or download the paths other than the allowed access path. Enter the rules according to the tips
Permissions File list, download files, delete, rename, create folders, upload files, sync folders, move, copy, invite, share
Upload file option After enabling only upload new files, users can only upload newly added files, and cannot upload files with the same name.
Upload and download speed limit Limit the upload and download speed of the user, the default speed is unlimited
Transfer file format Transfer file format is divided into white list and black list. The whitelist is used to configure the file formats that the system allows to upload. Blacklist is used to configure the file formats that the system does not allow to upload. Multiple formats should be separated by ";", such as "txt;iso;mp4".
Transfer File Filtering 1) Support to prohibit setting file filtering conditions on the client-side, users cannot set filtering conditions for sync tasks created in their personal space. 2) Support to skip files whose file names meet certain conditions when transferring, support regular expressions, for example, to filter files starting with test when transferring, enter ^test.*. Support skipping files whose file size exceeds the set size when transferring.
File Transfer Notification Notify administrator when uploading and downloading files
Mailbox sender Send with administrator's configured mailbox: After setting, you need to configure the mailbox in the administrator's background mailbox settings before using. Email notifications such as sharing links will be sent to the mailbox configured by the administrator; Sending by user configured mailbox: After setting, users need to configure the mailbox in the account settings before using. Email notifications such as sharing links will be sent to the mailbox configured by users.
Share download email notification 1) Link and password will be sent in one email 2) Link and password will be sent in different emails
IP Login Whitelist After checking Enable, enter the IP address that allows the user to login in the input box. Multiple IP addresses should be separated by ";", such as "127.0.0.1; 172.16.4.55; 192.169.80.12", and the suggested wildcard [] is supported, such as 172.16.0-1000-100
Email validation Login validation using only password
Sync task frequency When enabled, the frequency of all sync tasks will be in compliance with this setting, users cannot set the frequency when creating and editing sync tasks in the User Portal

1.2 Edit user


Can edit user's password/home directory/permissions/speed limit/user group/prohibited path/synchronous directory function/file format transfer restriction/upload file option/file filtering/virtual directory/IP login whitelist/etc. Select any user and click Edit.

1.3 Lock/unlock user

Select any unlocked user and click Lock; for any locked user, click Unlock to unlock.

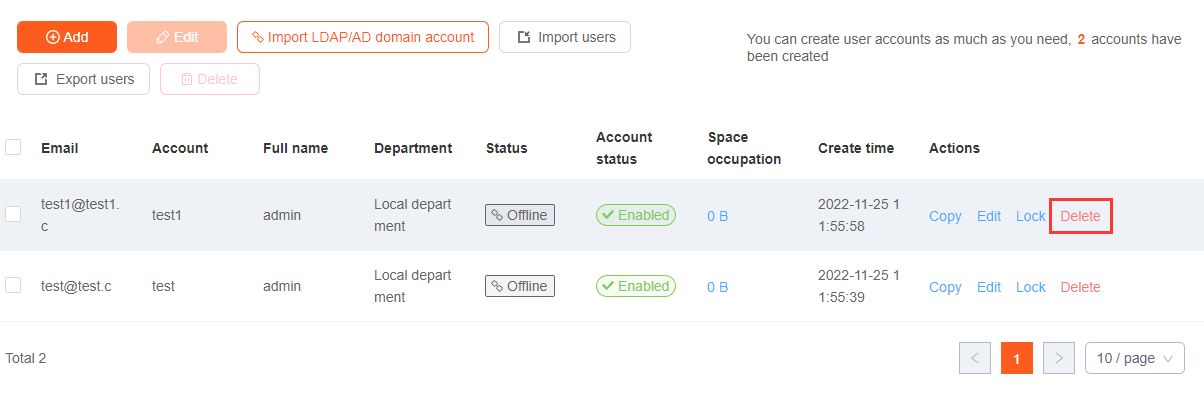
1.4 Delete user account

Check the users you want to delete and click Delete above. Click confirm to delete successfully.

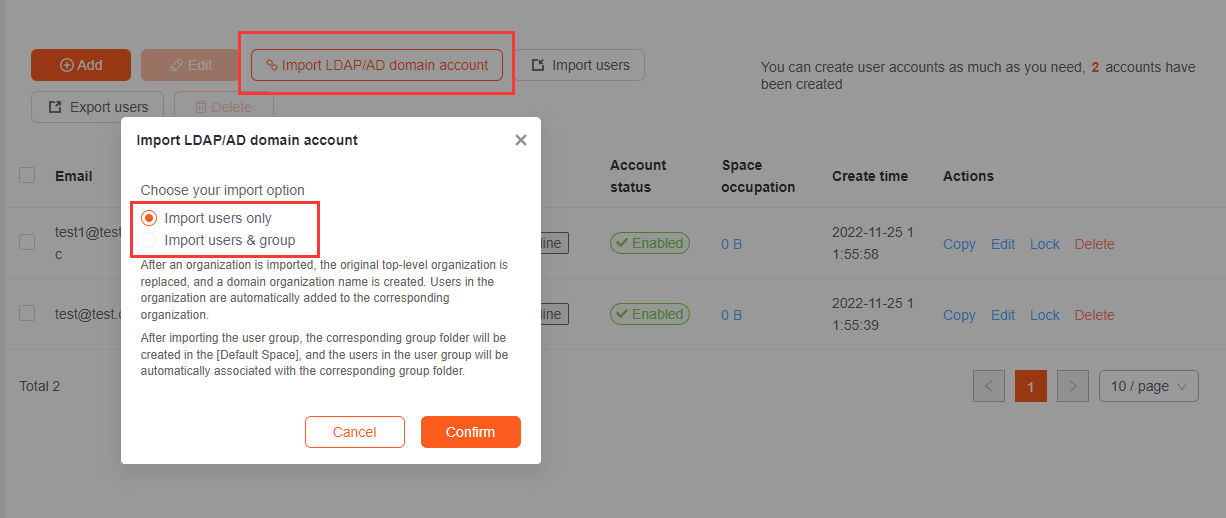
1.5 Import LDAP/AD domain account

Click Import LDAP/AD domain account to actively import all domain user accounts created by the domain server, provided that you need to configure LDAP/AP domain in User Integration - Third-party Authentication to support this feature.

1.6 Import/Export users

Click Import User to fill in the account, mailbox, and password through the specified template. Click Export User to export the mailboxes, accounts, and names of all accounts.

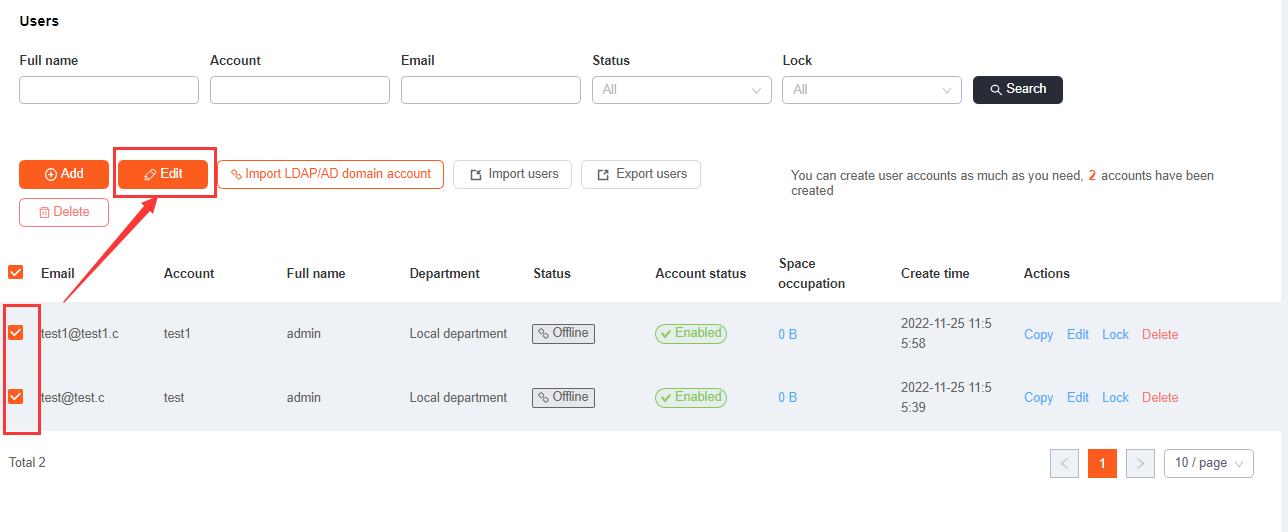
1.7 Batch edit users

Select the account number that needs to be edited, click Edit to edit the status, directory settings, transmission settings, and security settings of the account number in batches

1.8 Copy user

Select the account you need to copy, click Copy to copy an account with the same settings, but the mailbox, account number, password, and name need to be configured separately.

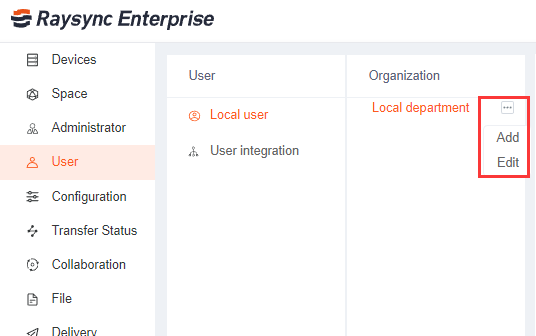
1.9 Organization

Support the creation department and add users to the department. When importing the AD domain account, it can be imported directly according to the user's organization to facilitate the administrator to manage the user. The system defaults to the Local department.


2. User Integration

It supports AD domain user authentication, mailbox user authentication, Linux system user authentication and external http authentication methods, which are interoperable with enterprise internal accounts and easy to operate. Users only need to import an enterprise AD domain account or input email, Linux system account password or external http authentication user account password to log in Raysync system at the front-end.

2.1 LDAP/AD domain authentication

Support Windows Active Directory and OpenLdap 。

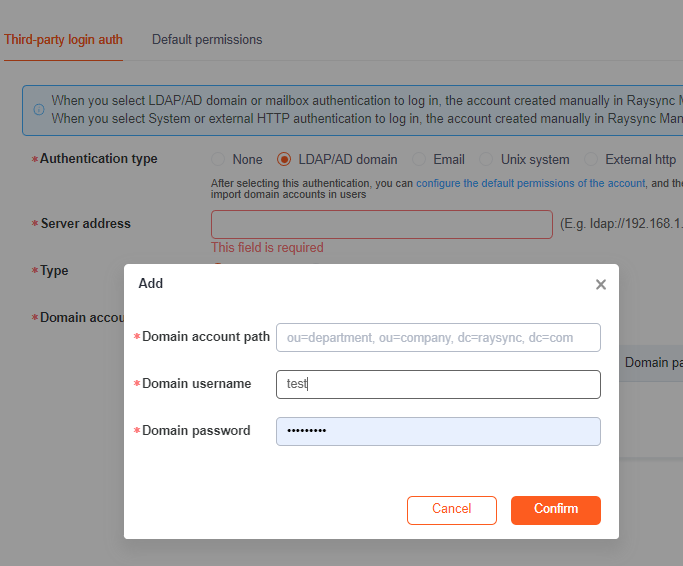
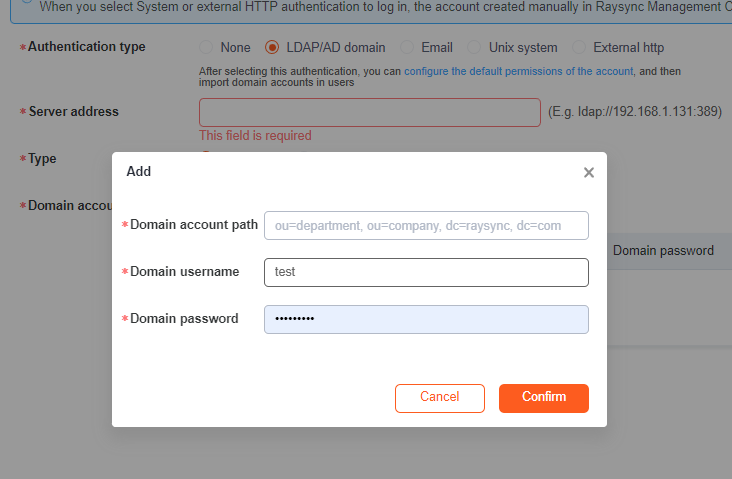
Click User Integration - Third-party login authentication, select LDAP/AD domain.

2.1.1 AD domain

Fill in the correct domain server address, domain name, domain username, domain password, click test, the test passed means the information is filled in correctly. Click Save to take effect.


Configuration instructions:
User 1 and the group is under the RD organization unit, the RD organization unit is under BU organization unit, the BU organization unit is under abc.com domain. user1 Path: abc.com/BU/RD/group/user1,the group path:abc.com/BU/RD/group
1. If only import user 1 into Raysync, then
Domain account path: cn=user1, ou=RD, ou=BU, dc=abc, dc=com
Domain test account and password: should be user1.
2.If need to configure all the accounts under the group, then
Domain account path: cn=group, ou=RD, ou=BU, dc=abc, dc=com
Domain test account and password: should be a user under RD organization unit.
If need to configure users from multiple organization units, please add the corresponding domain paths.
Note: Import group user not supported, the group users will be displaied on user list after login.
3.If need to import all the account under the RD organization unit, then
Domain account path: ou=RD, ou=BU, dc=abc, dc=com
Domain test account and password: should be a user under RD organization unit.
If need to import users from multiple organization units, please add the corresponding domain paths.
4.If need to import all the users from the domain, then
Domain account path: dc=abc, dc=com
Domain test account and password: should be a user account under abc.com

2.1.1 OpenLdap


Configuration instructions:
User 1 and the group is under the RD organization unit, the RD organization unit is under BU organization unit, the BU organization unit is under abc.com domain. user1 Path: abc.com/BU/RD/group/user1,the group path:abc.com/BU/RD/group
then,BindUser: uid=user1,ou=RD,ou=BU,dc=abc,dc=com (Binduser can also be any user in the abc.com domain)
BindPasswd: should be user1
1. If only import user 1 into Raysync, then
Domain account path: uid=user1, ou=RD, ou=BU, dc=abc, dc=com
2.If need to configure all the accounts under the group, then
Domain account path: cn=group, ou=RD, ou=BU, dc=abc, dc=com
If need to configure users from multiple organization units, please add the corresponding domain paths.
Note: Import group user not supported, the group users will be displayed on user list after login.
3.If need to import all the account under the RD organization unit, then
Domain account path: ou=RD, ou=BU, dc=abc, dc=com
If need to import users from multiple organization units, please add the corresponding domain paths.


2.2 Email authentication

Click Third-party login authentication, select Email Fill in the correct SMTP host, SMTP port, encryption, SMTP account and SMTP password, and the test pass means the information is filled in correctly. Click Save to take effect.

邮箱鉴权英文

2.3 Unix System authentication

When using the Linux system root authority or sudo authority to start the Raysync service, it supports configuring the Linux system user authentication. Click User Integration - Third-Party Login Authentication, select System Authentication, and click Save. It prompts that the save is successful and the configuration is successful. (The Raysync service started by ordinary Linux system users does not have permission to perform this configuration.

2.4 External http authentication

Support using external http service for authentication Click User Integration - Third-Party login authentication, check External http authentication, enter the correct authentication service address, and click Save.

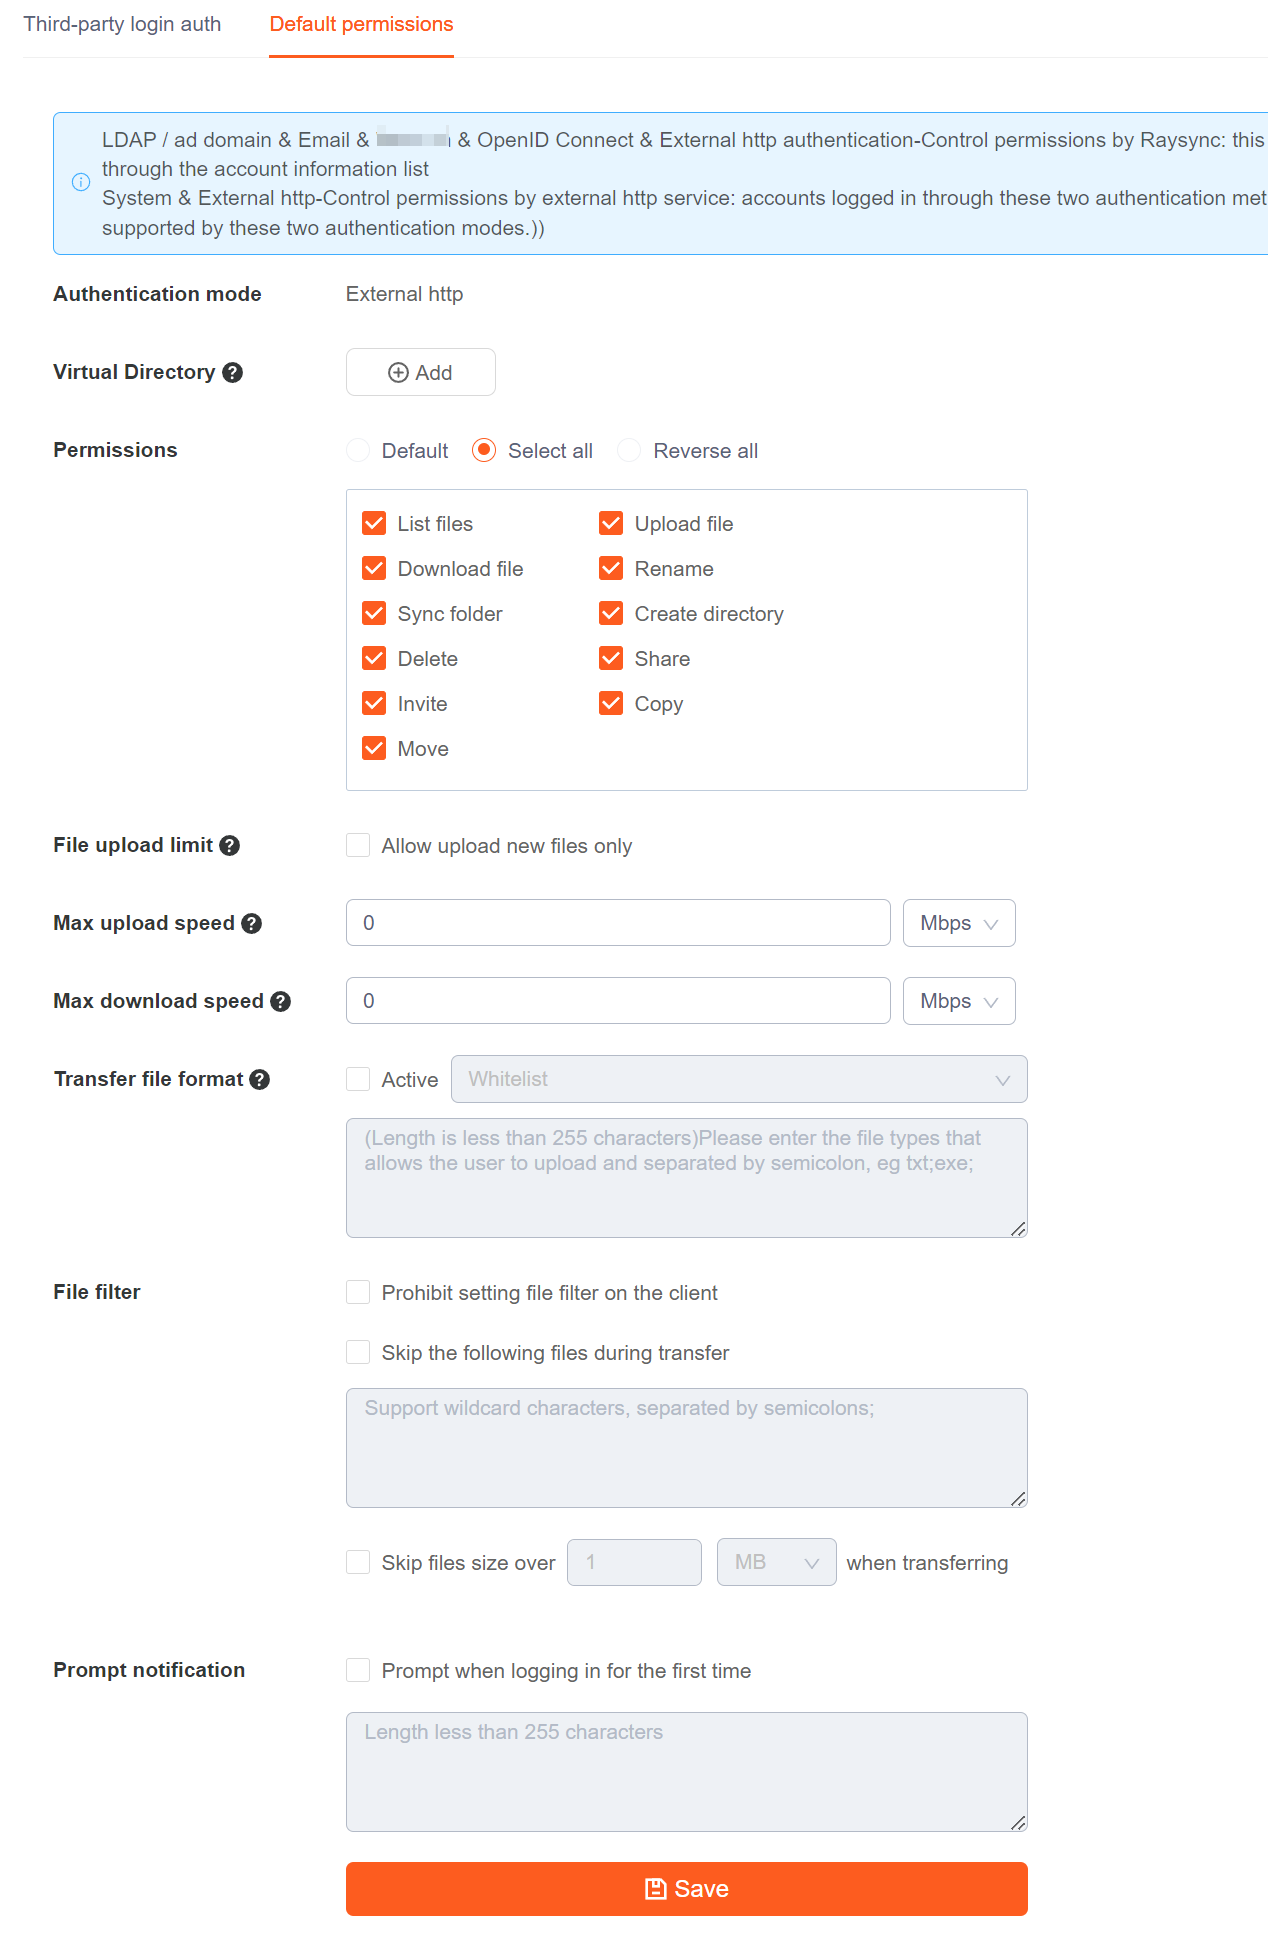
2.5 Default authentication permission configuration

After configuring the login authentication method, you can configure the default permission for the authenticated users. LDAP/AD domain & mailbox authentication: The configuration on this page only takes effect for new login accounts with these two authentication methods, and existing login accounts can modify the configuration through the account information list. System & External http authentication: accounts logged in through these two authentication methods will not generate account list in the account information, so if you need to change the account configuration, please edit this page.

配置鉴权英文

6.5) Settings

Updated: 2023-08-22 04:36:23

1 Basic Settings

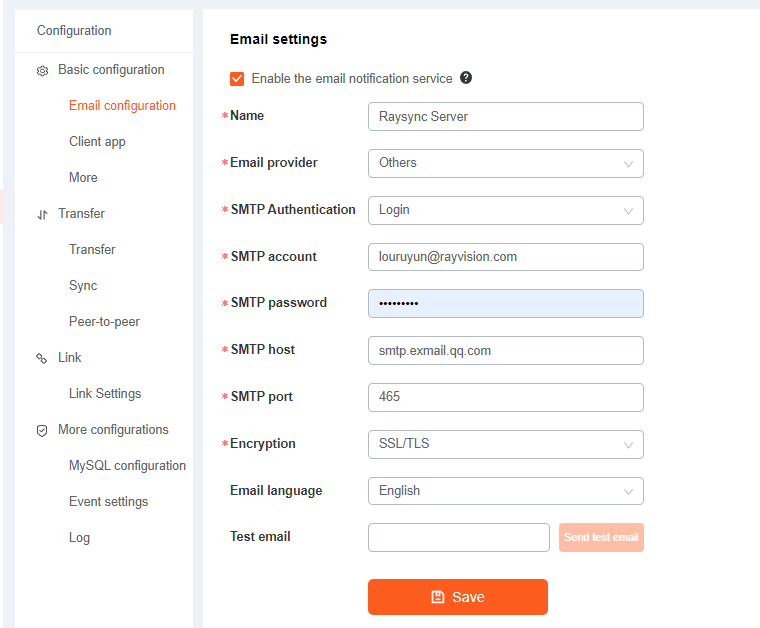
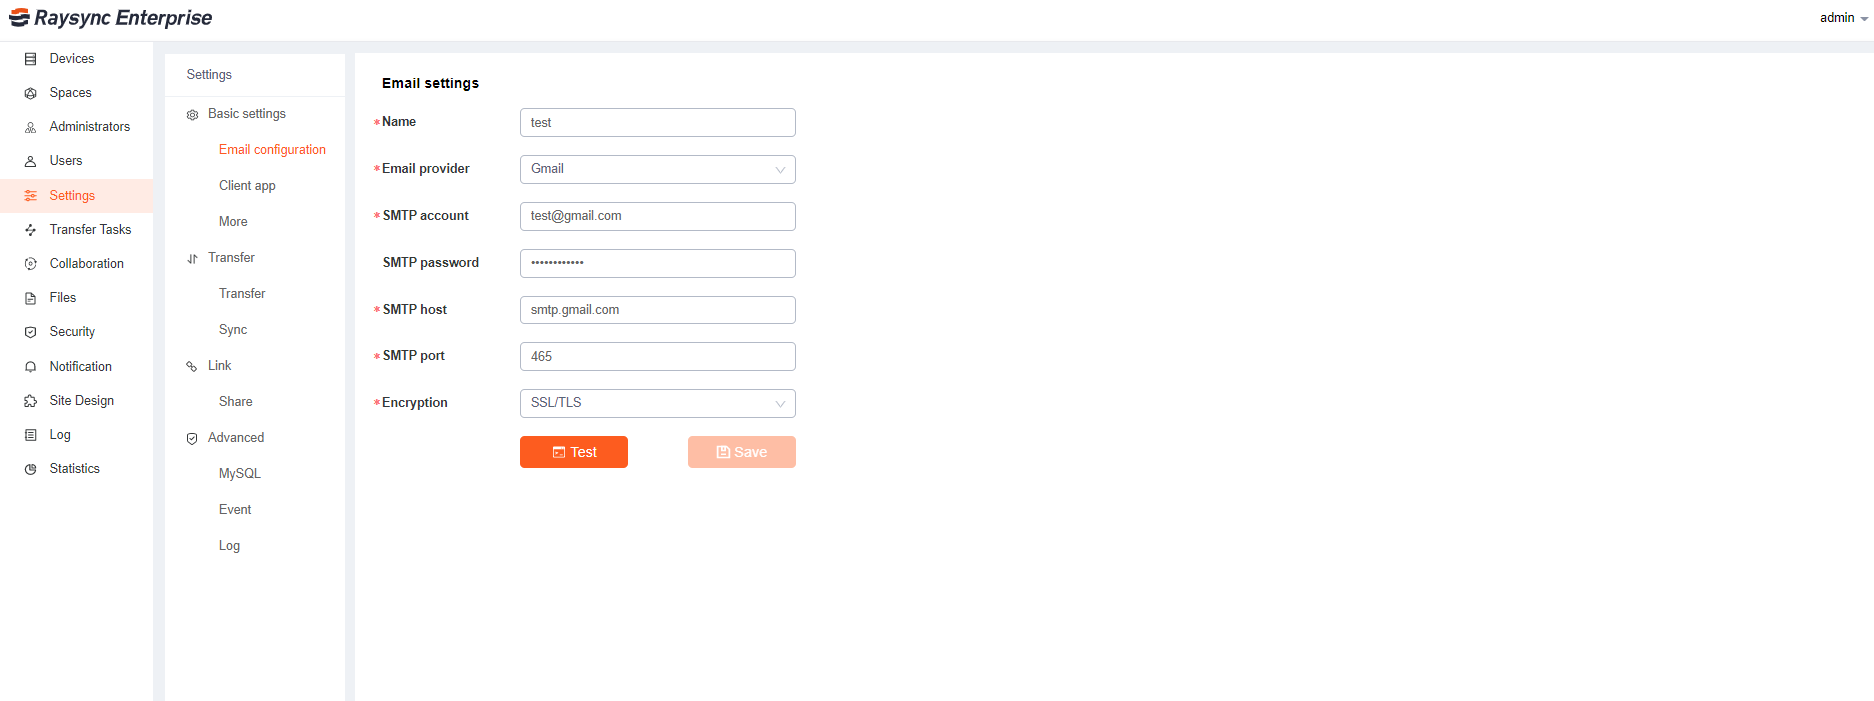
1.1 Email settings

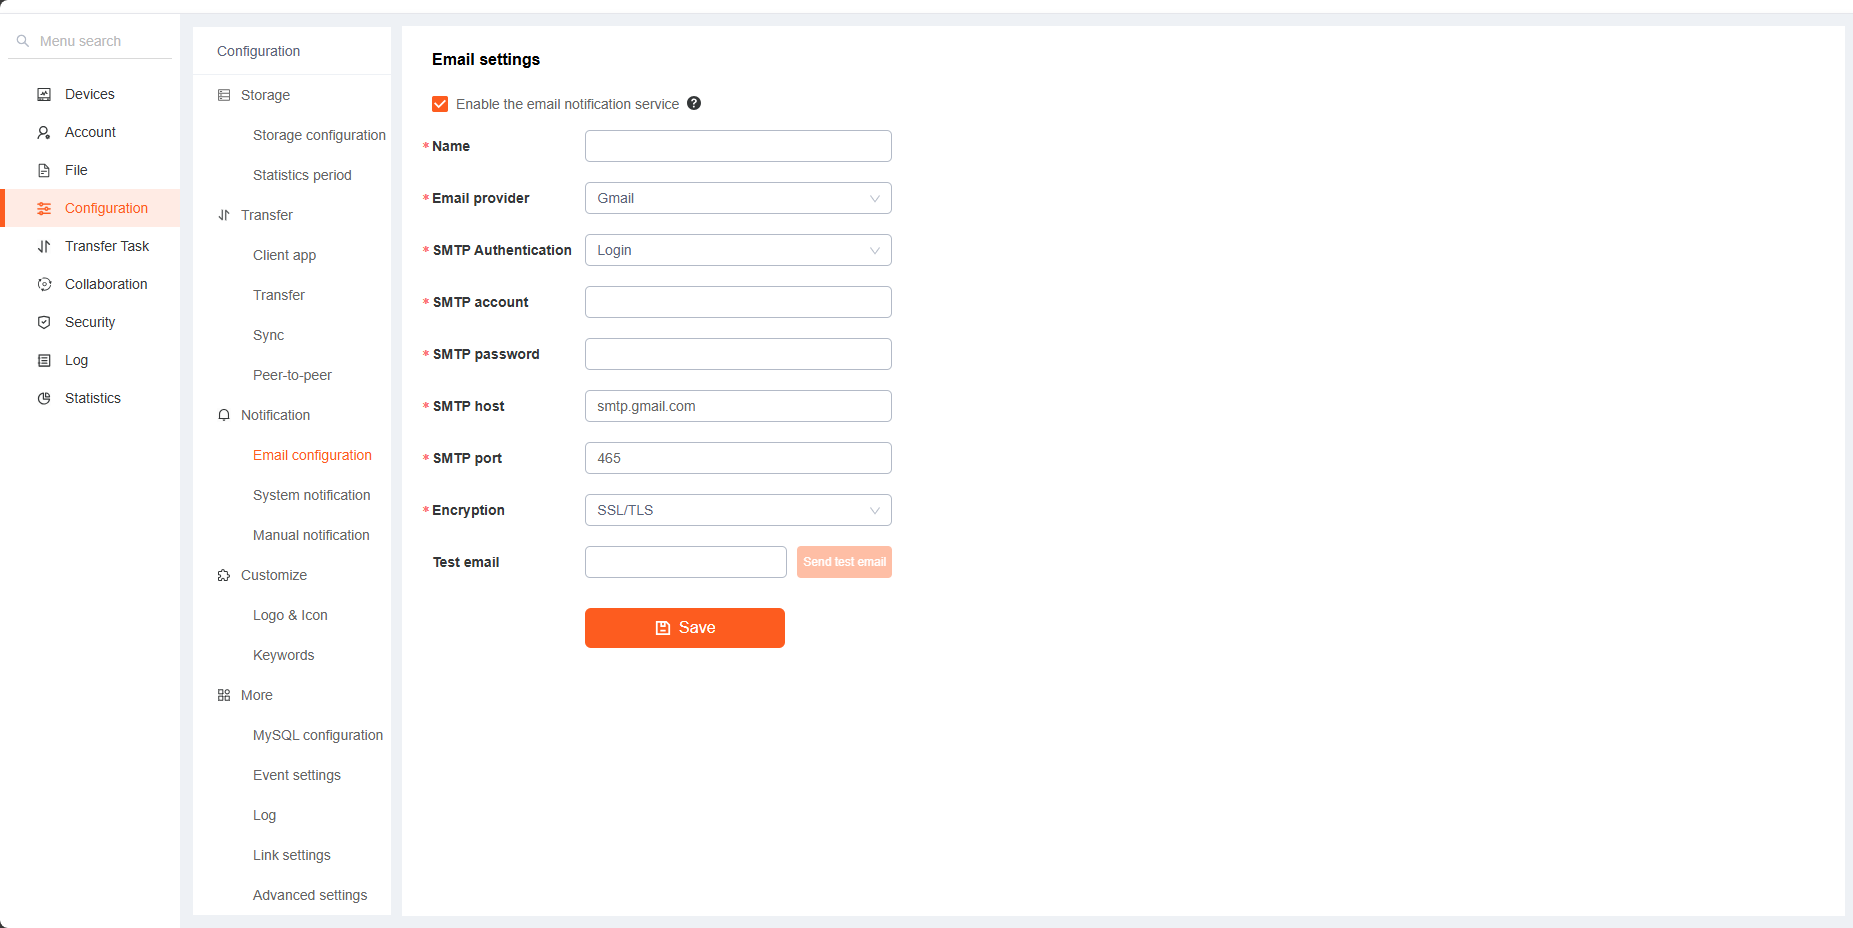
Mail server used to configure email notification when sharing download/invite upload/upload download. Click Setting-Email settings. Set the correct mailbox server as required, click Test and save.

Email setting

1.2 Client settings

Support the server to set the client to force the hash check, encrypted transfer, automatic upgrade, configure client icon

Function Description
Enable hash check Raysync Client will force hash check transfer to be turned on.
Enable encrypted transfer Raysync Client will force encrypted transfer to be turned on.
Enable auto-update When the Client is configured with the correct default server, a silent upgrade will be performed automatically when the server version is higher than the client version.
Configure URL Use to enable the foreground user page to start the Raysync Client. You only need to modify the URL when customizing the Client version, otherwise it may affect normal use. If you need to customize the Client, please contact Raysync staff.

1.3 More settings

Click Settings-More

Function Description
Enable file close When this function is turned on, the file close operation will be executed in the background when the file upload is finished. Check the Enable Delayed Close button and restart the server to take effect
Enable event notifications Support turns off and starts the event notification function. After shutting down, the event notification function will not be executed in the background.
Support multiple IP addresses Support multiple IP addresses. When the server has multiple Ip addresses, you can enable multi-Ip configuration, then users can access through any Ip of the server.
Allow to set process number Support to configure the number of 'raysync-s' processes on the server. The default number of processes is server (CPU cores-2)/2, at least 1.

2. Transfer

2.1 Transfer settings

Support setting server global speed limit, time period speed limit, client transfer unit, transfer file format limit, transfer protocol selection. Click setting-Transfer settings

Function Description
Maximum upload/download speed Controls the maximum speed of the server during global upload/download (You can click Mbps and switch the speed limit unit)
Max speed period setting The maximum upload/download speed of the server at a certain period
Transfer Units Client transfer unit display
Transfer file format limit Transfer file format is divided into white list and black list. The whitelist is used to configure the file formats that the system allows to upload. Blacklist is used to configure the file formats that are not allowed to be uploaded by the system.
Select transfer protocol Auto select UDP/TCP: Set to automatically switch to TCP transfer when the transfer delay is lower than XXms; Use UDP transfer only: the transfer task only uses UDP mode transfer; Use TCP transfer only: the transfer task only uses TCP mode transfer; Give priority to UDP transfer, UDP cannot communicate automatically switch to TCP transfer: the system default configuration, when UDP connection fails, automatically switch to TCP transfer
Transfer type Set the transmission type, you can set to use only clienttransmission or only web transmission or the default(Web and Client)
Task name setting You can customize a transfer task name when creating a client transfer task

2.2 Sync

Global sync function switch, click Setting-Sync.

同步设置英文


2.2 Peer-to-Peer transfer

If you want to use the Peer-to-Peer transfer, You need to :

  1. Open Peer-to-Peer ports for the service. TCP/3443;TCP/3443;UDP/32003
  2. you must configure the public ip address of the Peer-to-Peer service. The configuration takes effect after the restart.
Function Description
Server address Enter the public ip address of the Peer-to-Peer service. Multiple IP addresses are supported
Port Port monitored by the Peer-to-Peer service. The default port is 32003

3. Link

If you select "Bind the first device when open the share link", the shared download link can only be opened on the first device. Click Setting-Share.

首次绑定英文

4. Advanced

4.1 MySQL settings

Raysync supports external MySQL databases, providing administrators with more flexible database configuration methods. Click Configuration-MySQL Fill in the correct external database configuration, such as address/port/ account password, click Test Connection, if the test connection passes, click Save, after reboot, the external database will be enabled successfully, and all the background configuration information will be saved in the database.

数据库配置英文

4.2 Event (File Post Proccessing)

The server will try to excute the program after each file transfer is complete.

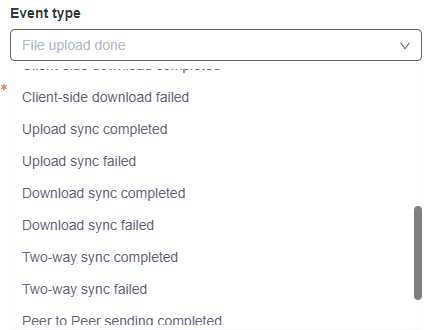
Scenario: When a setting event occurs in the system, the system will automatically trigger the execution program you set. Event notifications can be calls to transmitted files, tasks, transmitted mail notifications, and so on. Event notification enables users to learn about file information and changes in a timely manner, improving user experience and efficiency.

4.2.1 Add/Edit/Delete Event Notifications

Click Configuration - Add Event, select the event, fill in the event name, executable program path, parameters and completion wait time.

Event notification parameter replacement supports special parameters such as $filepath, $filename, $filesize, $userId, $destPath, $clientMac, $clientIp, representing "file path", "file name", "file size", " user ID", "Target path", "Client Mac address", "Client IP"

事件通知英文

Click confirm to save. After saving successfully, click Test to check if the settings are successful.

测试事件英文

Select the event to view event details, edit and delete it

events

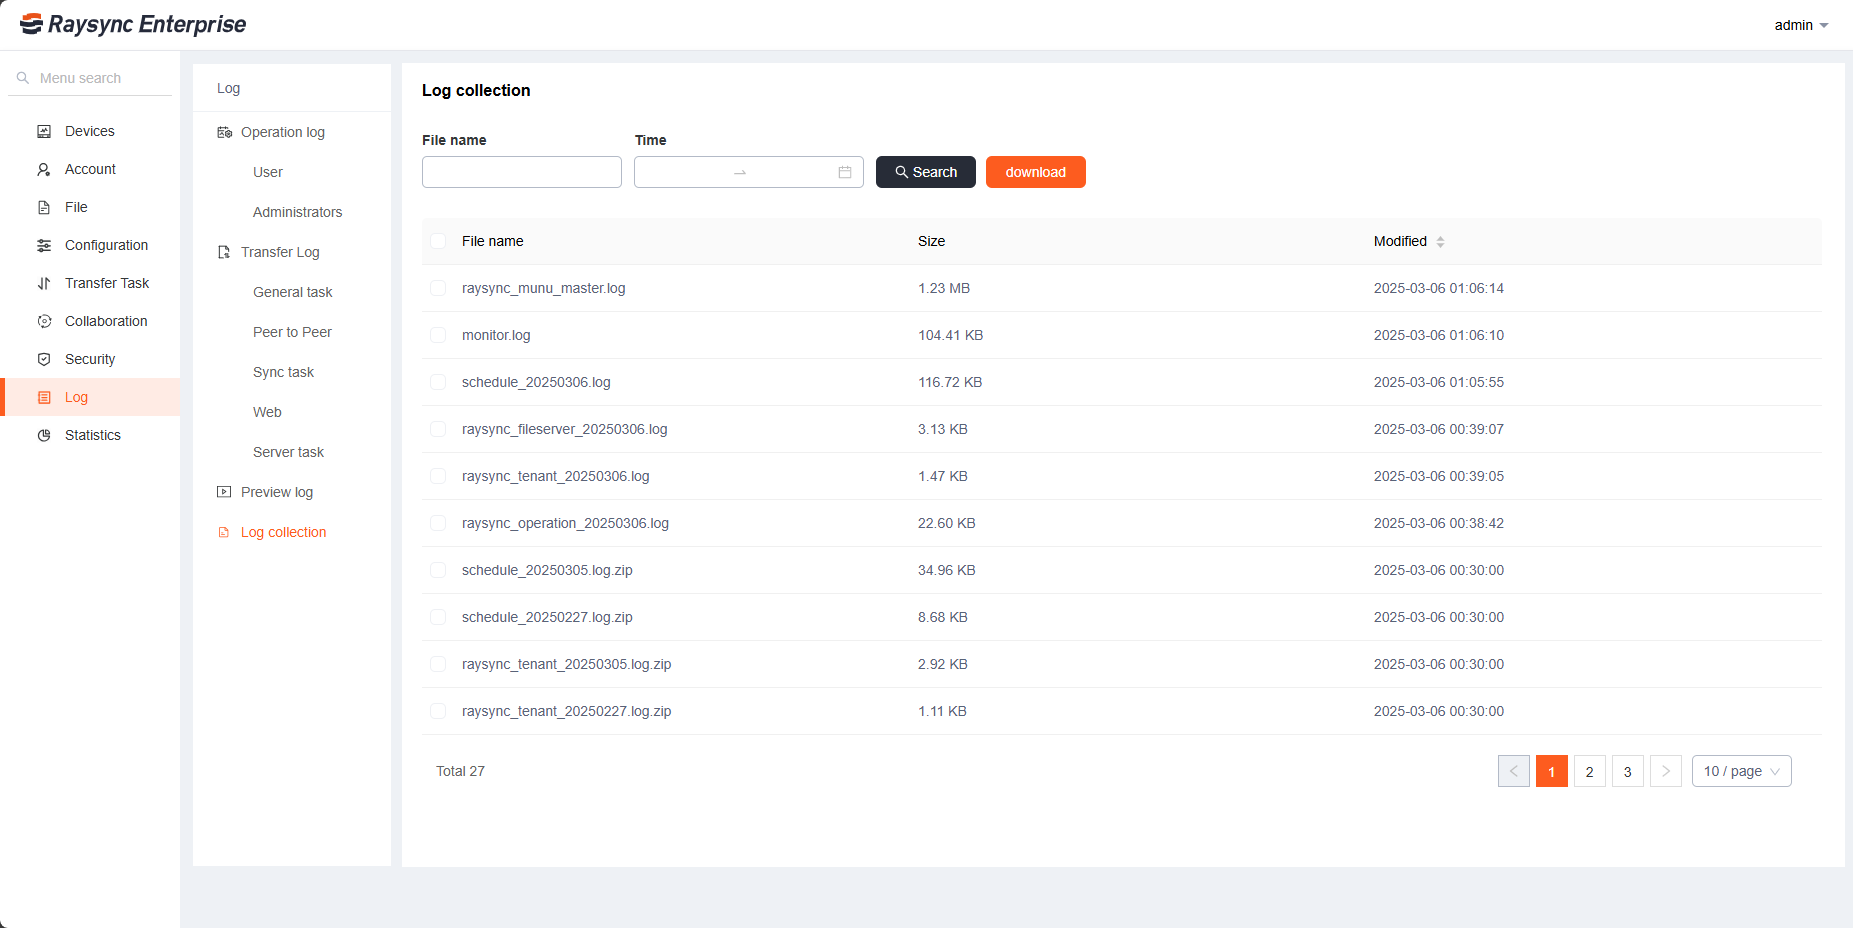
4.3 Log

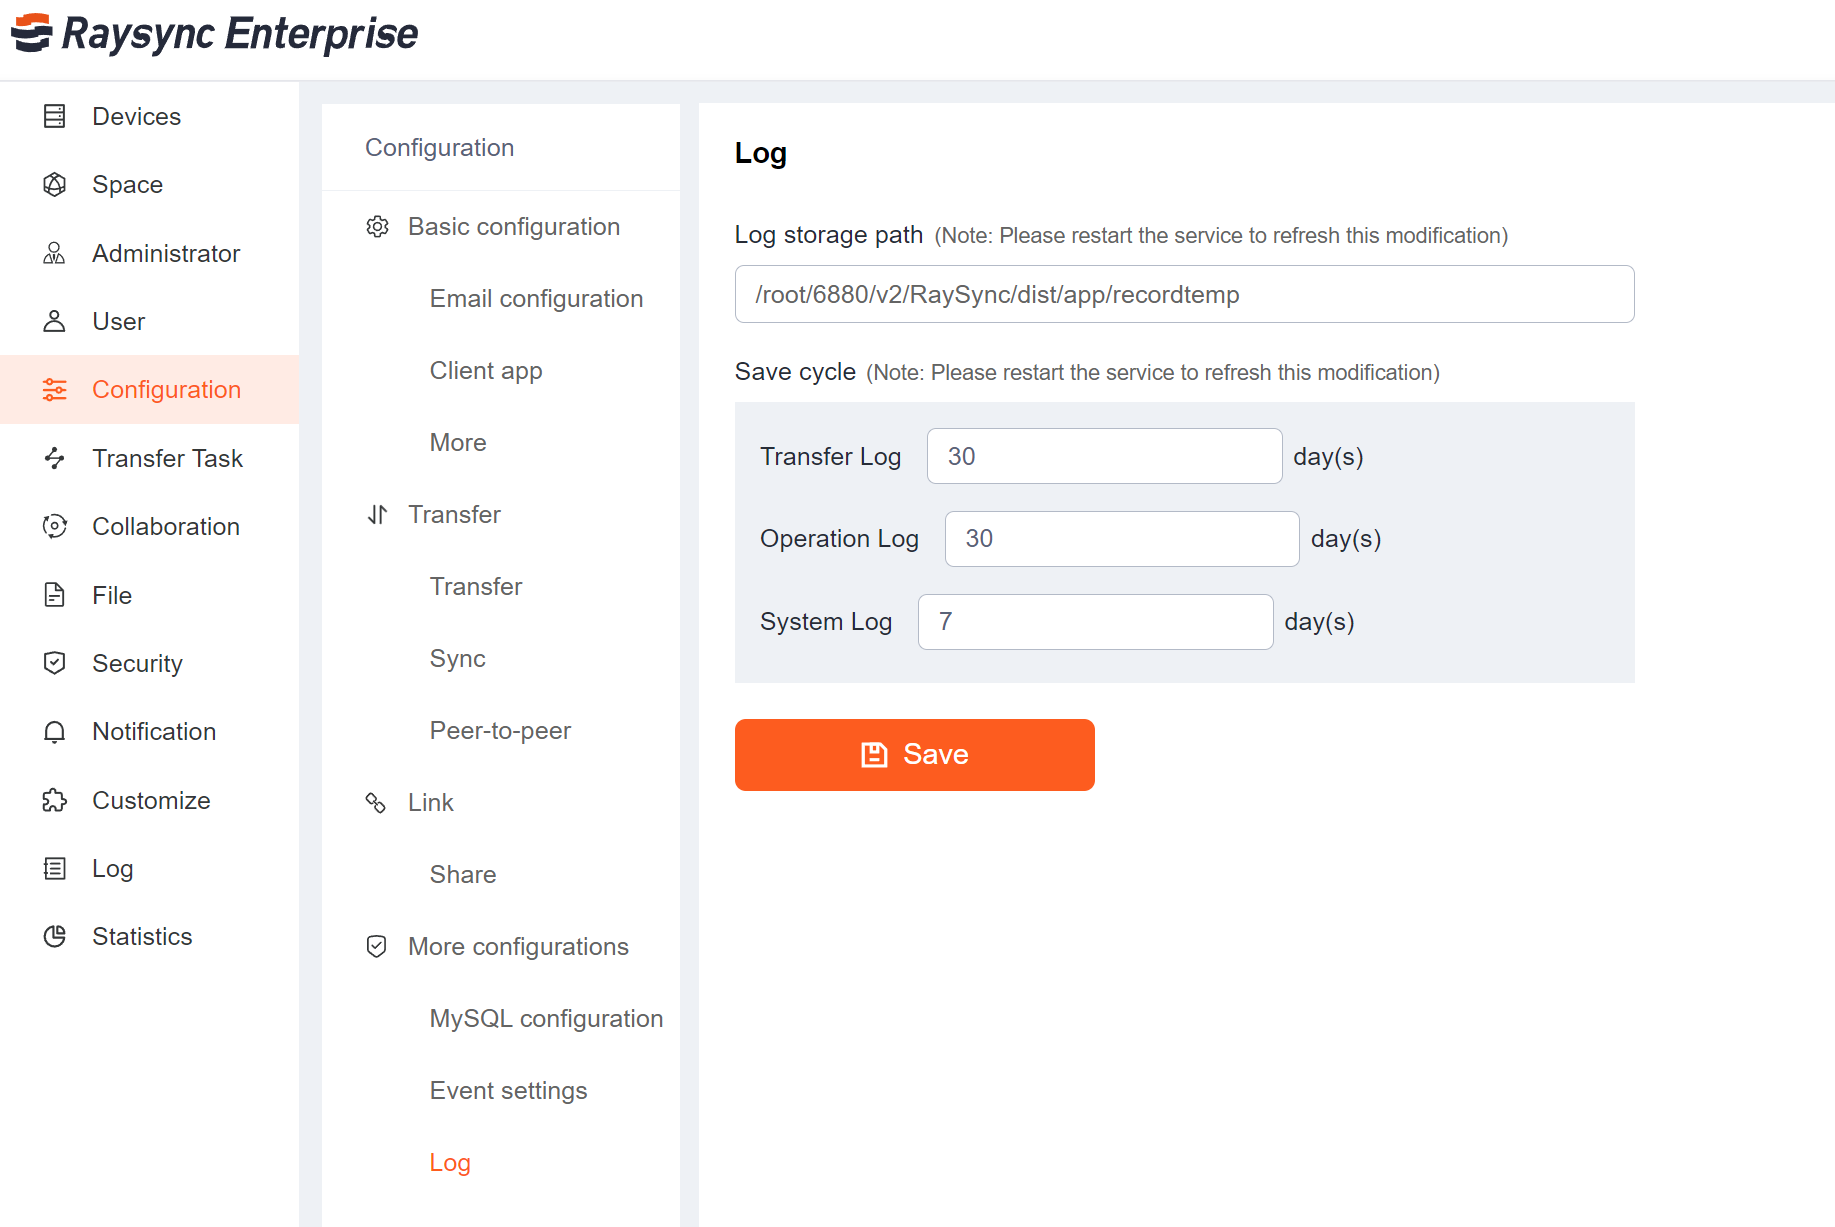
Click Setting-Log to configure the log path and the retention period for transfer logs and user operation logs, the default is 30 days.

日志设置英文

6.6) Transfer Tasks

Updated: 2023-04-17 04:36:37

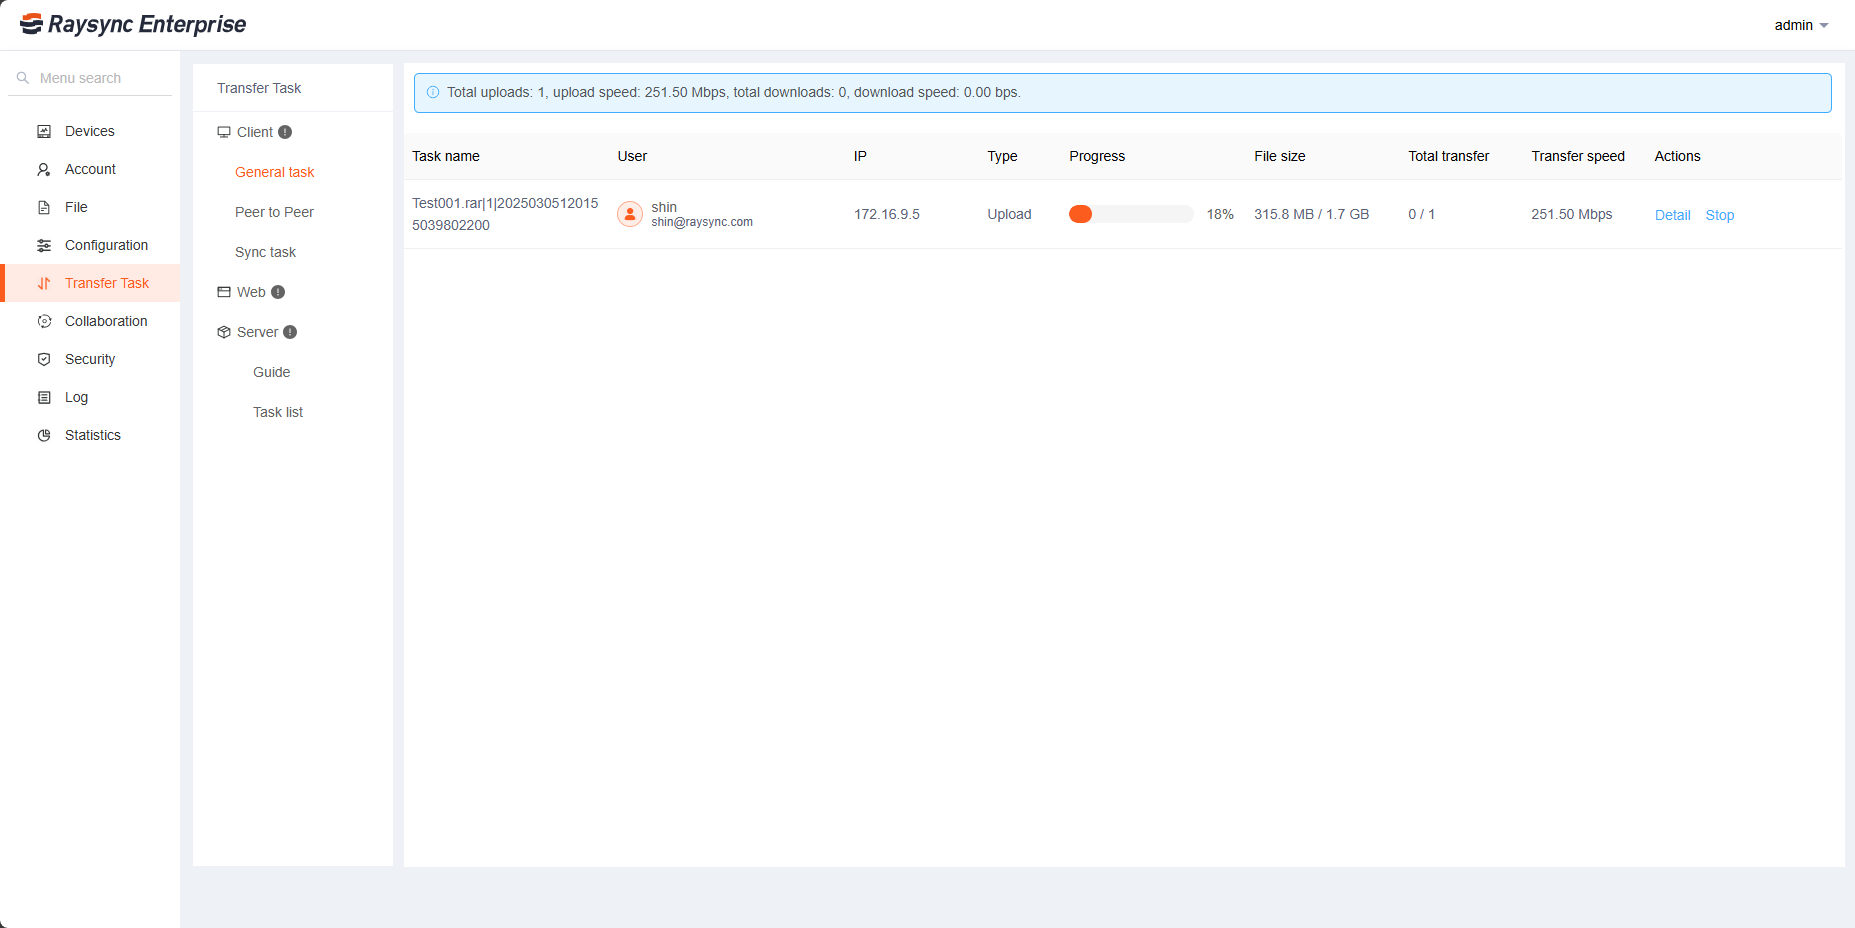
1.1 General tasks

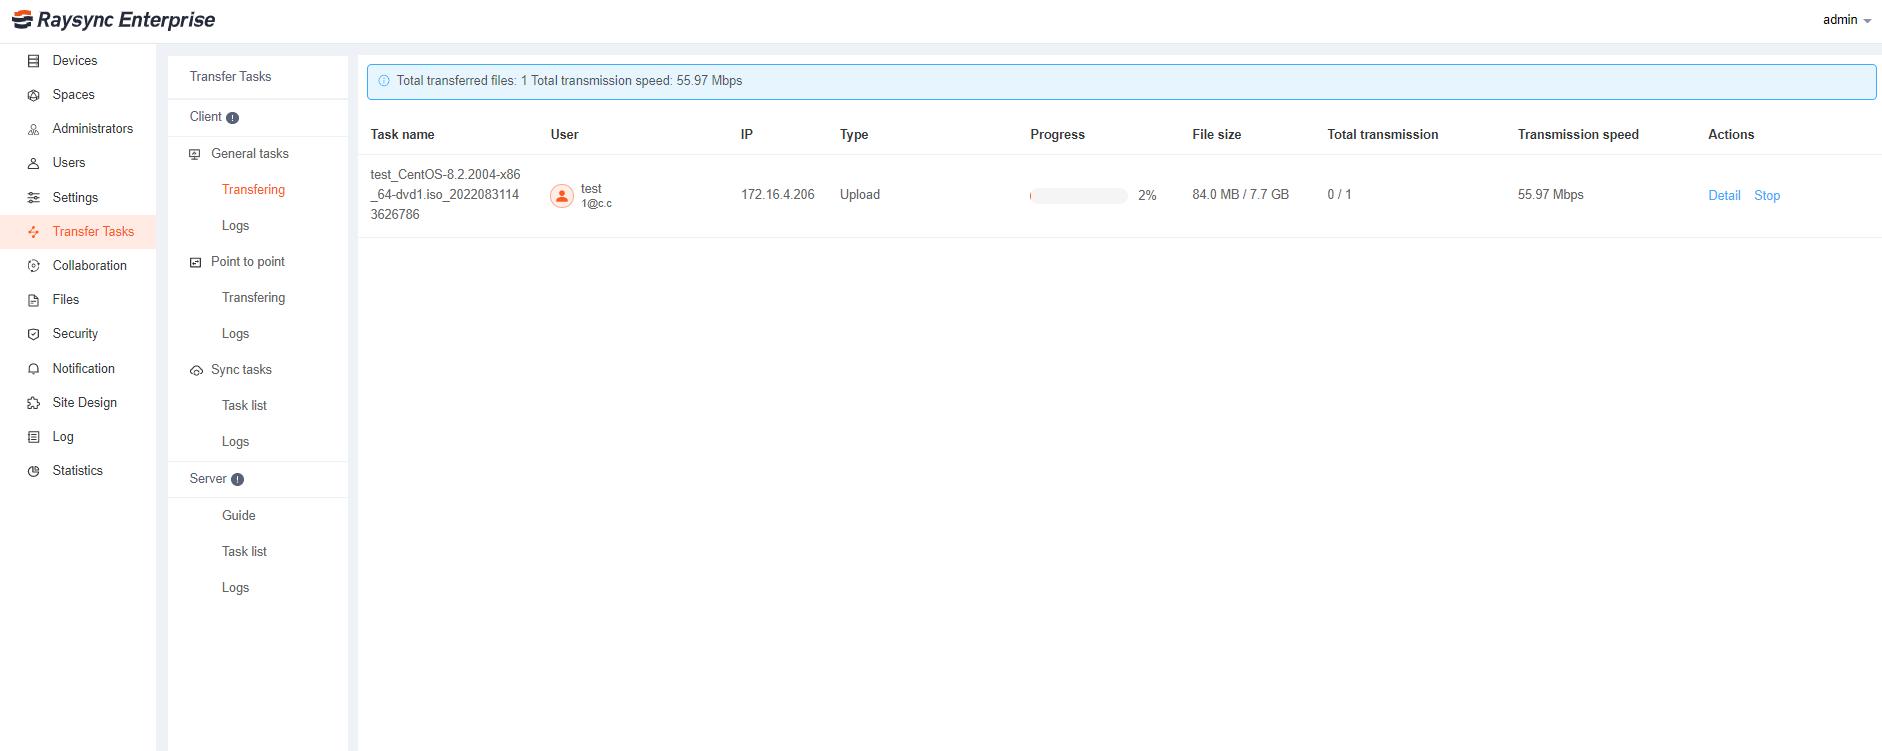
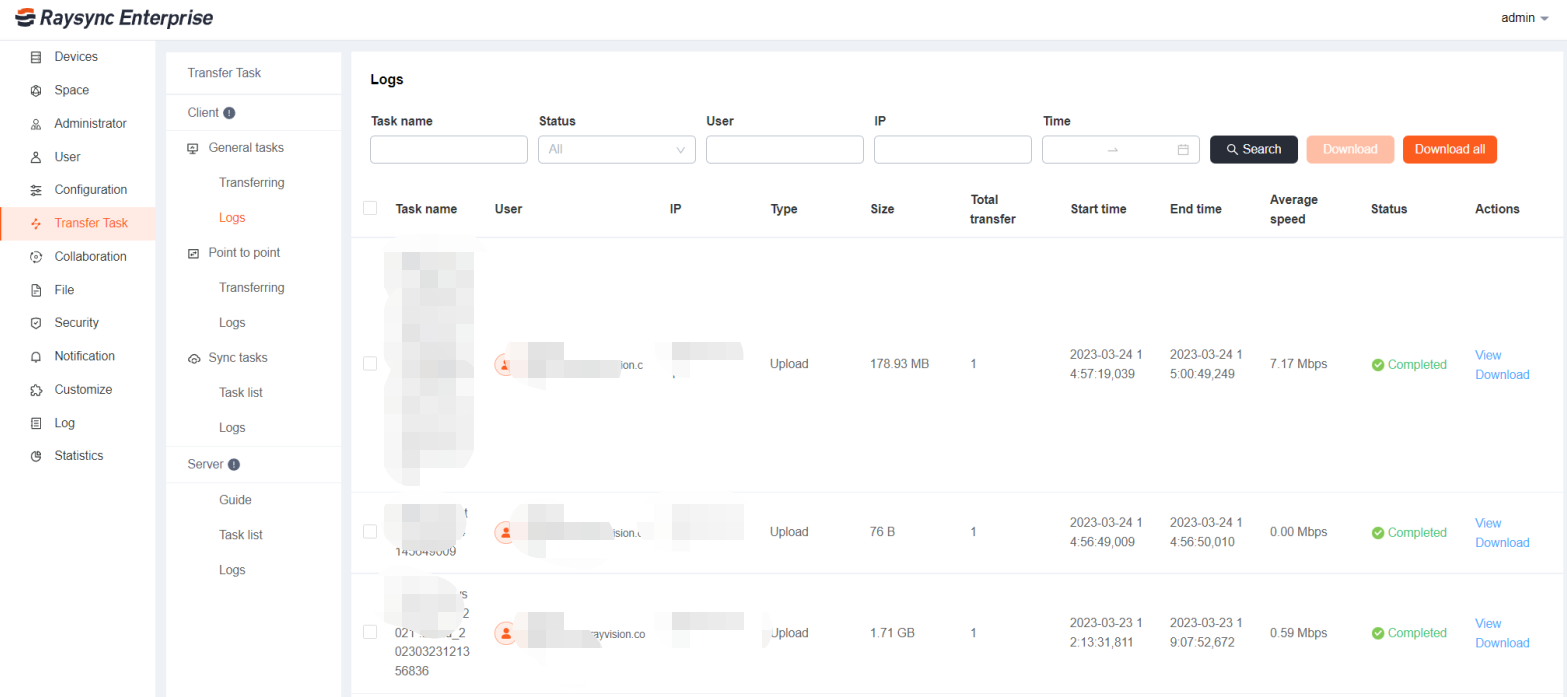
Support to view the transfer details and transfer logs of common upload and download.

Generral tasks

1.2 Peer to peer

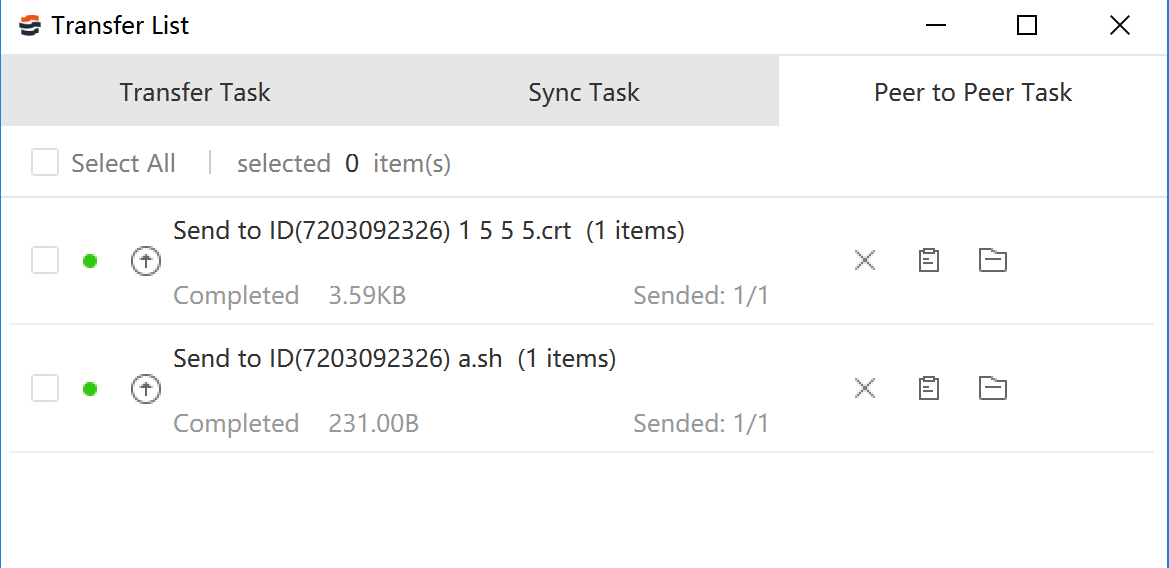
Supports viewing transfer details and transfer logs of peer-to-peer transfers.

Point to point task

1.3 Sync tasks

Supports viewing the task list and transfer logs that are synchronously transferred by Raysync Clients connected to the server.

sync list


2.Server

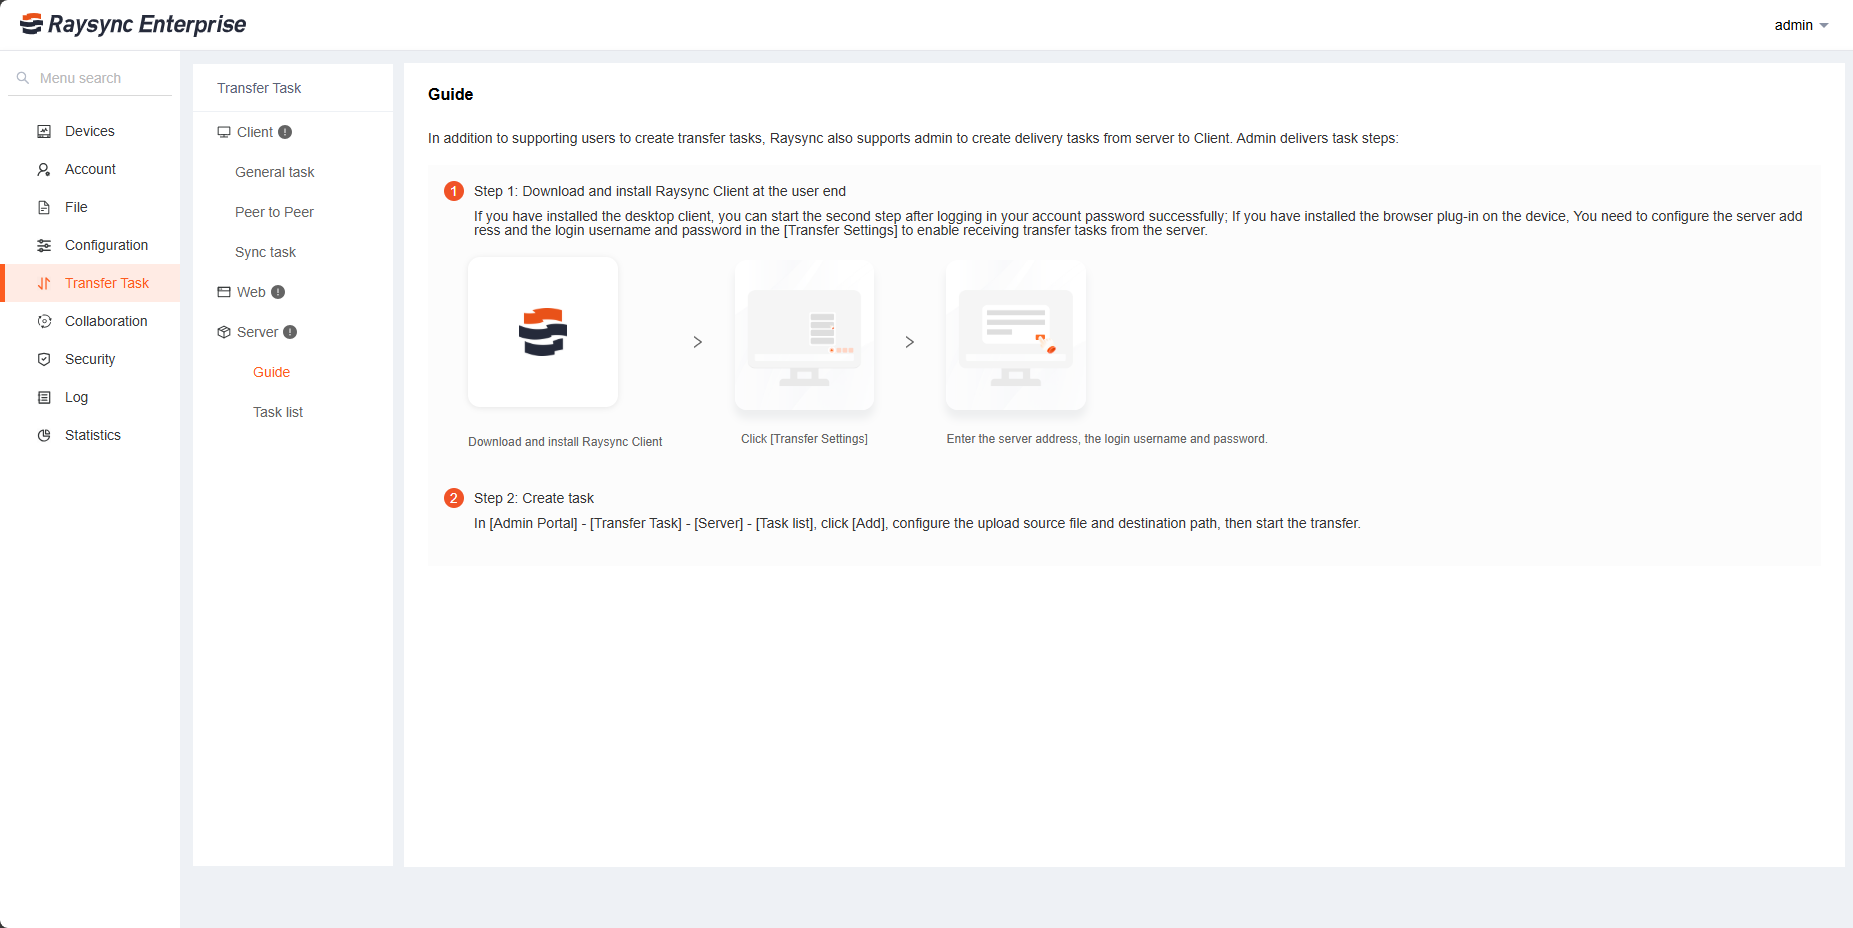
2.1 Guide

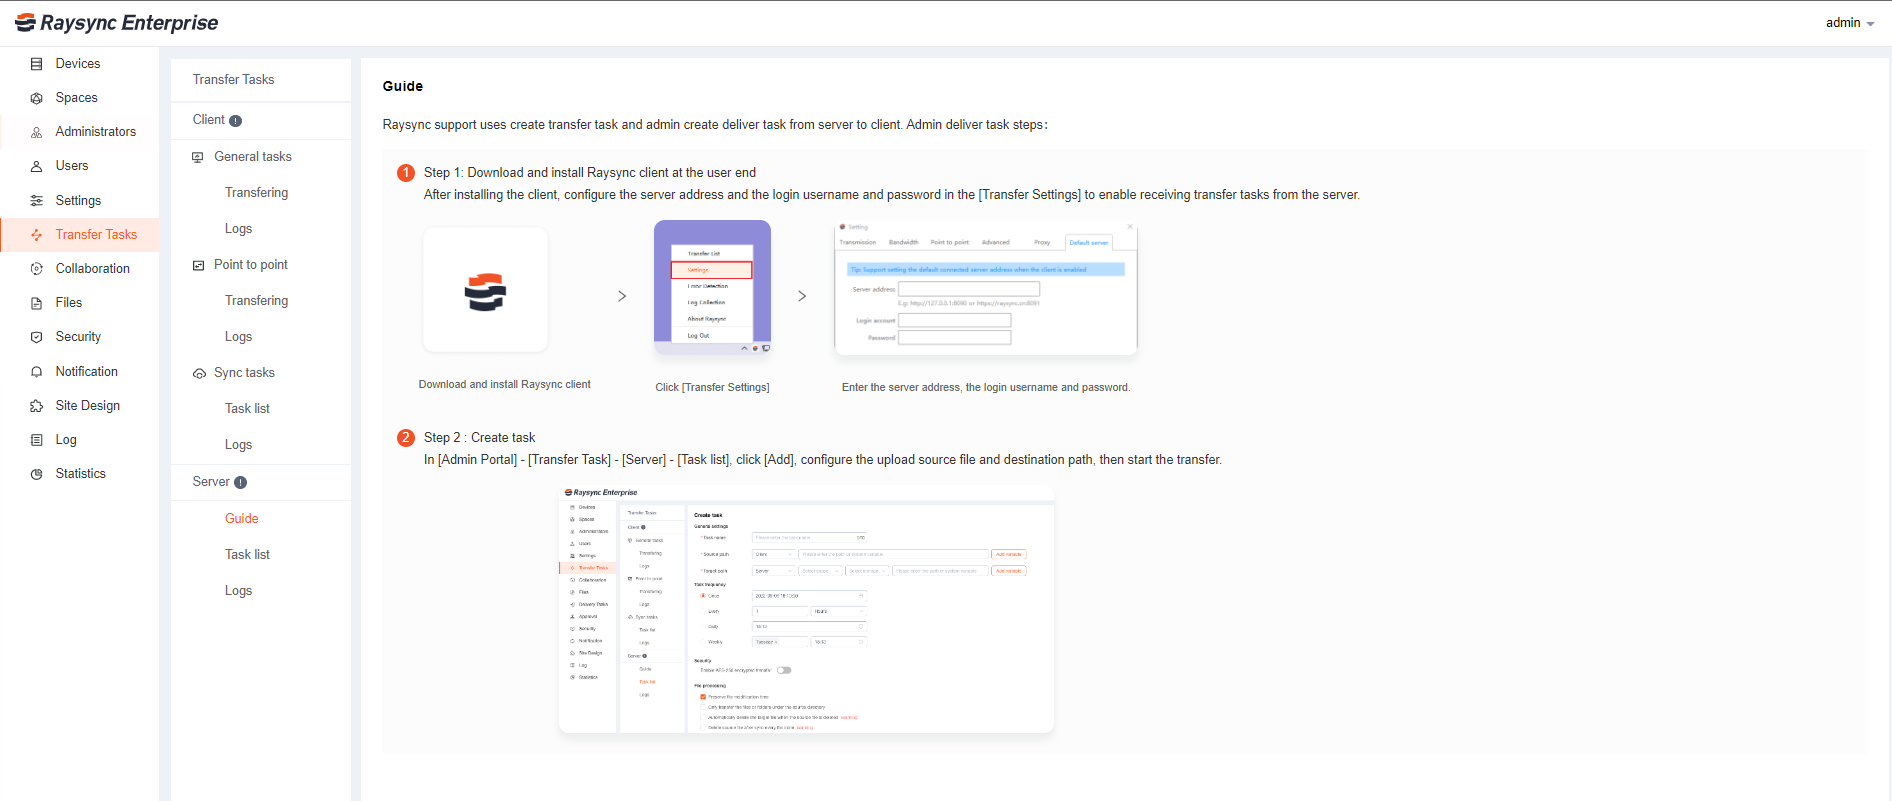
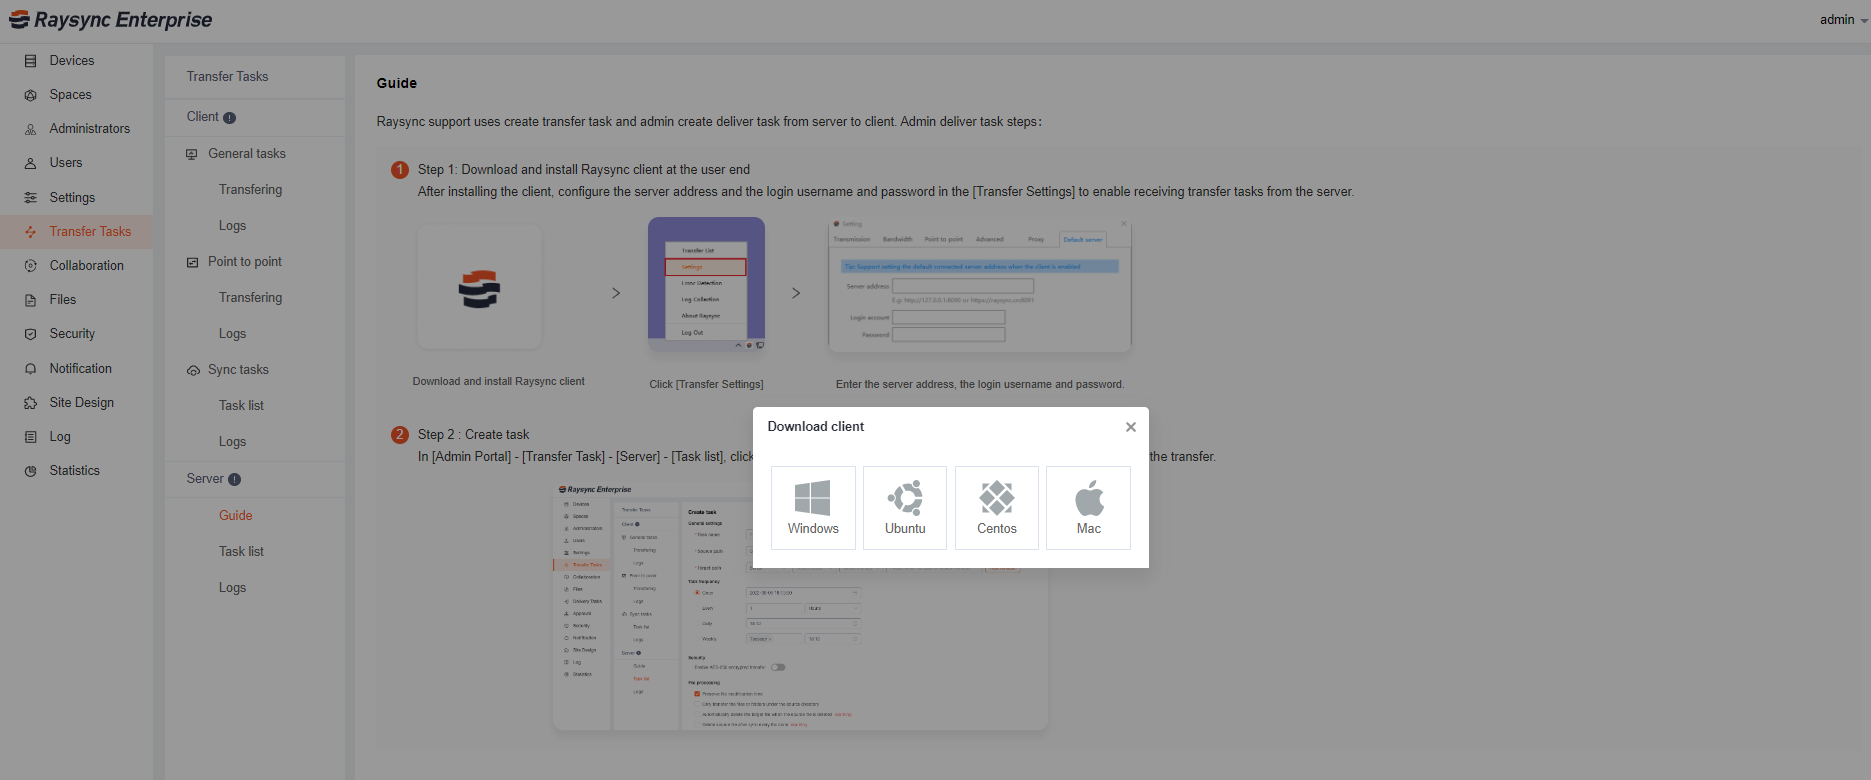
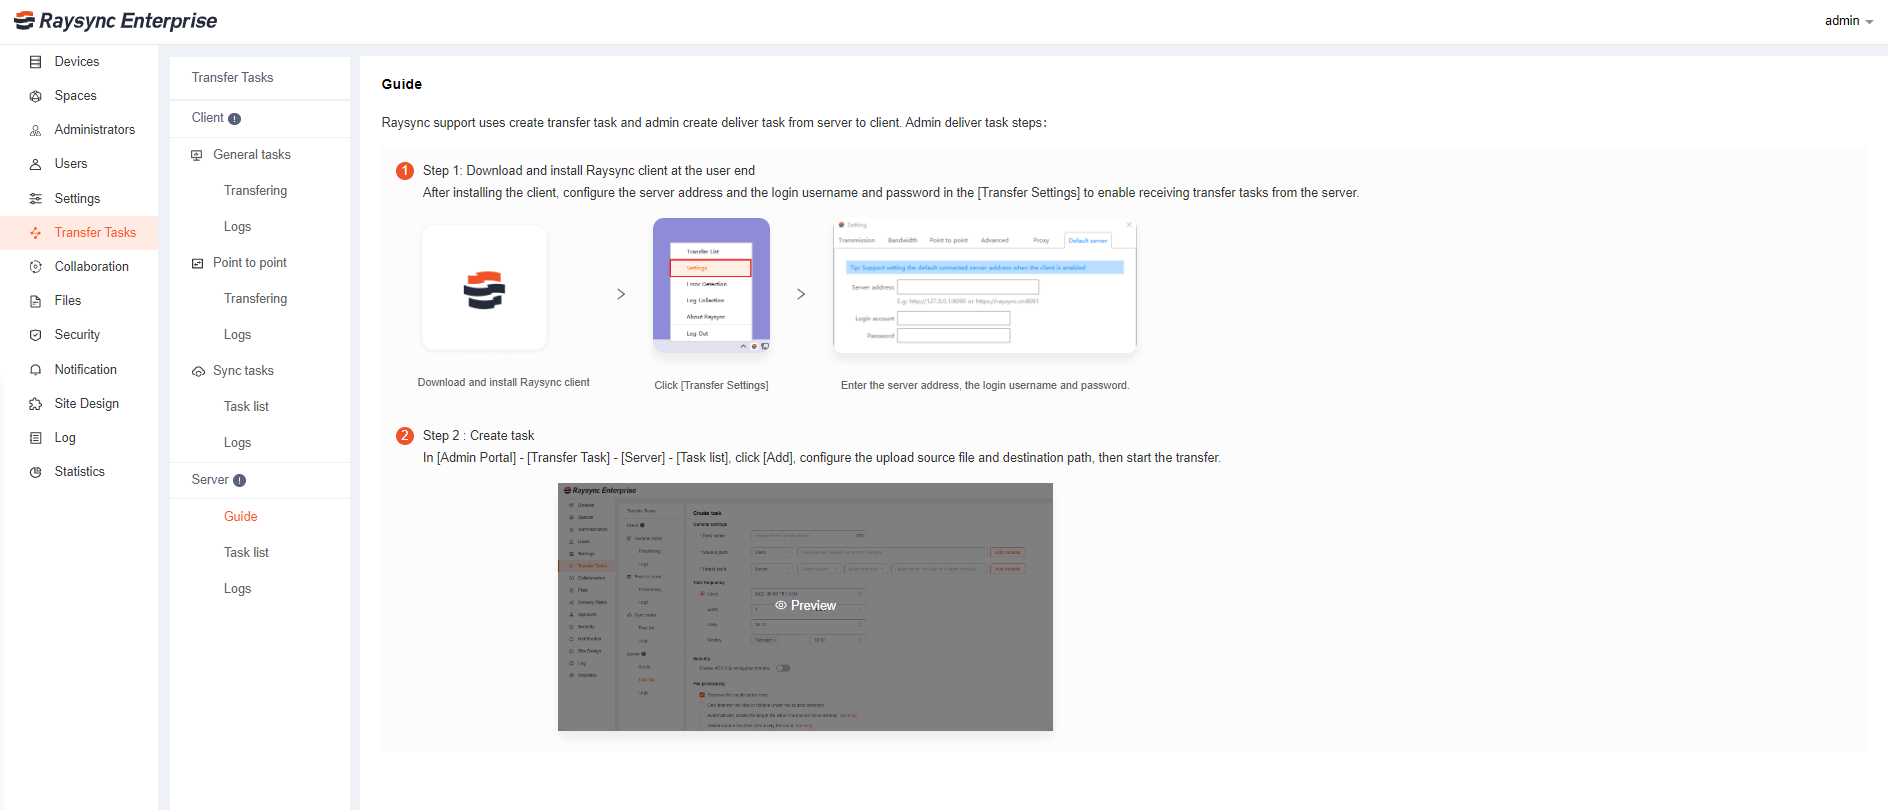
How to create a server-delivered task?

Server Guide

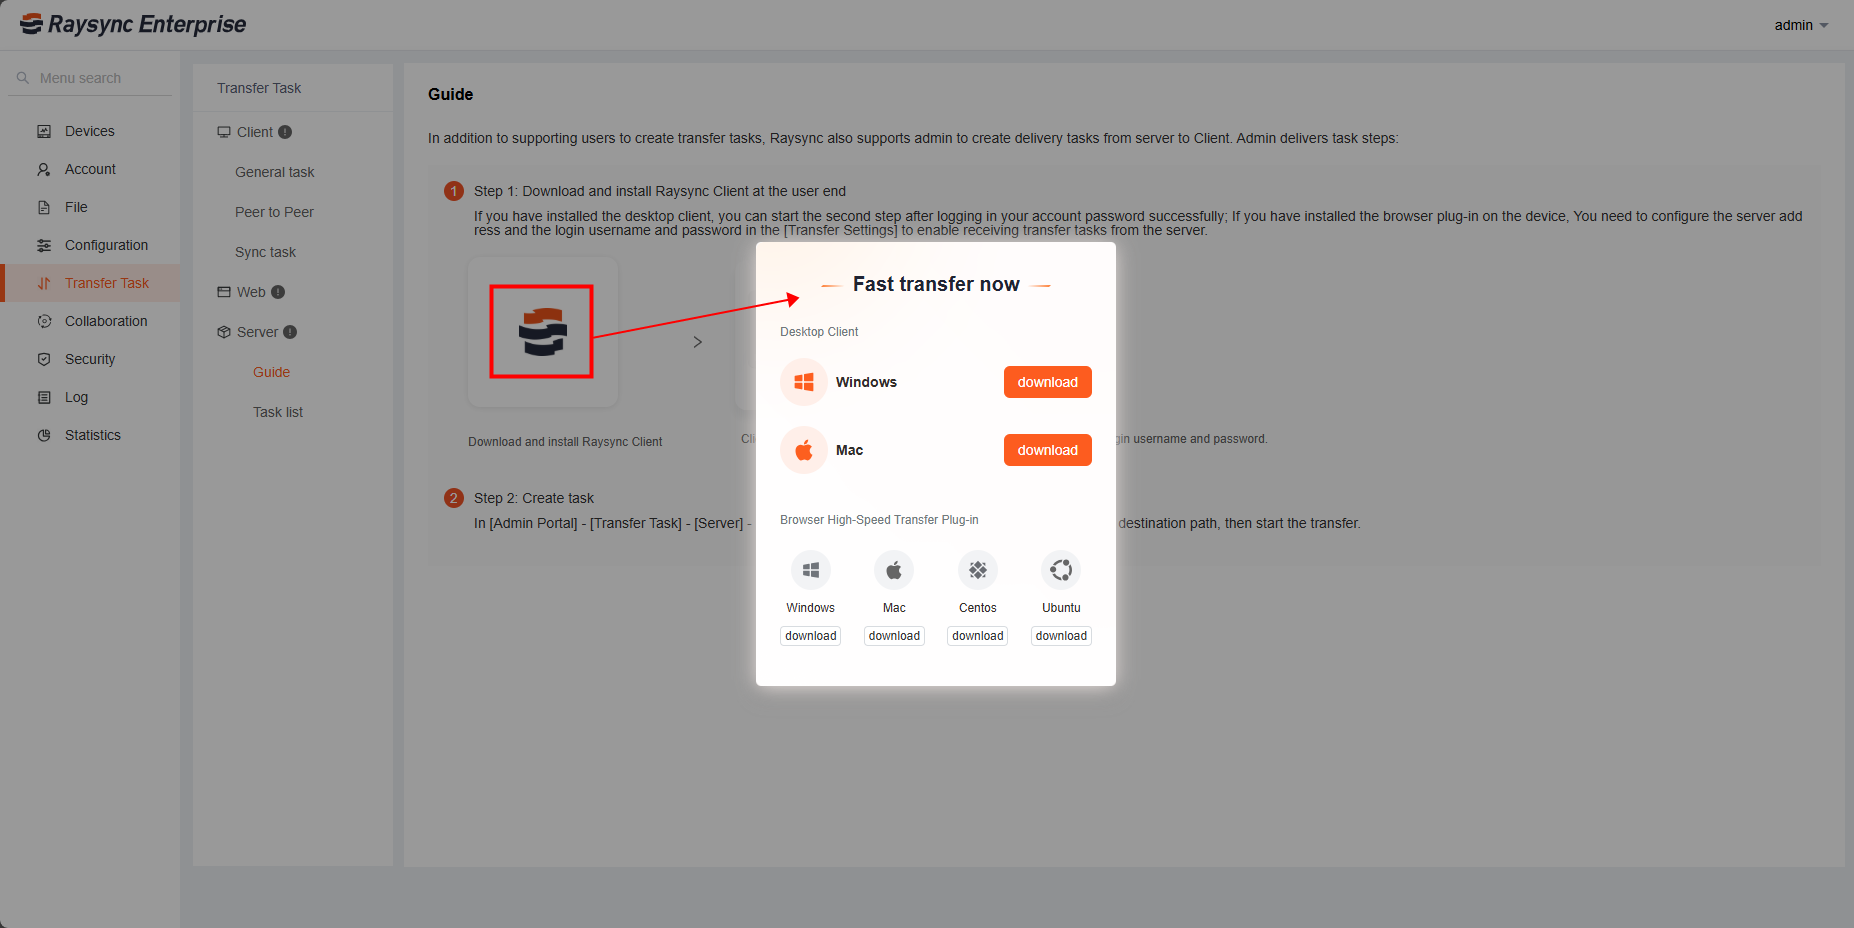
You can download the Raysync Client after clicking the Raysync icon.

download client

You can hover over the image of the task creation and preview the detailed steps.

Preview server task

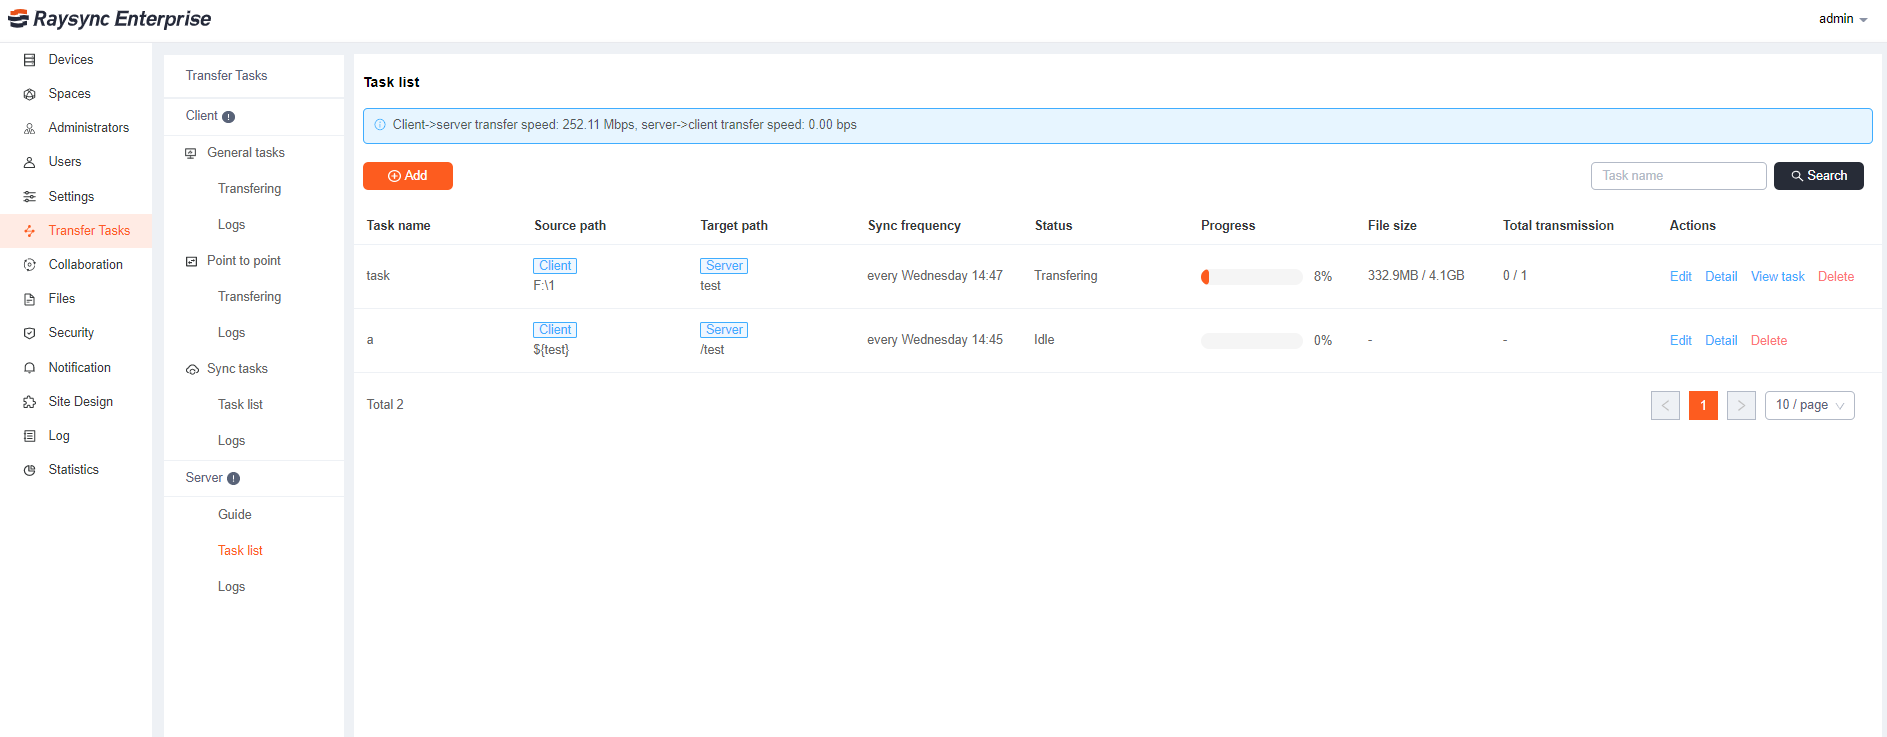
2.2 Task list

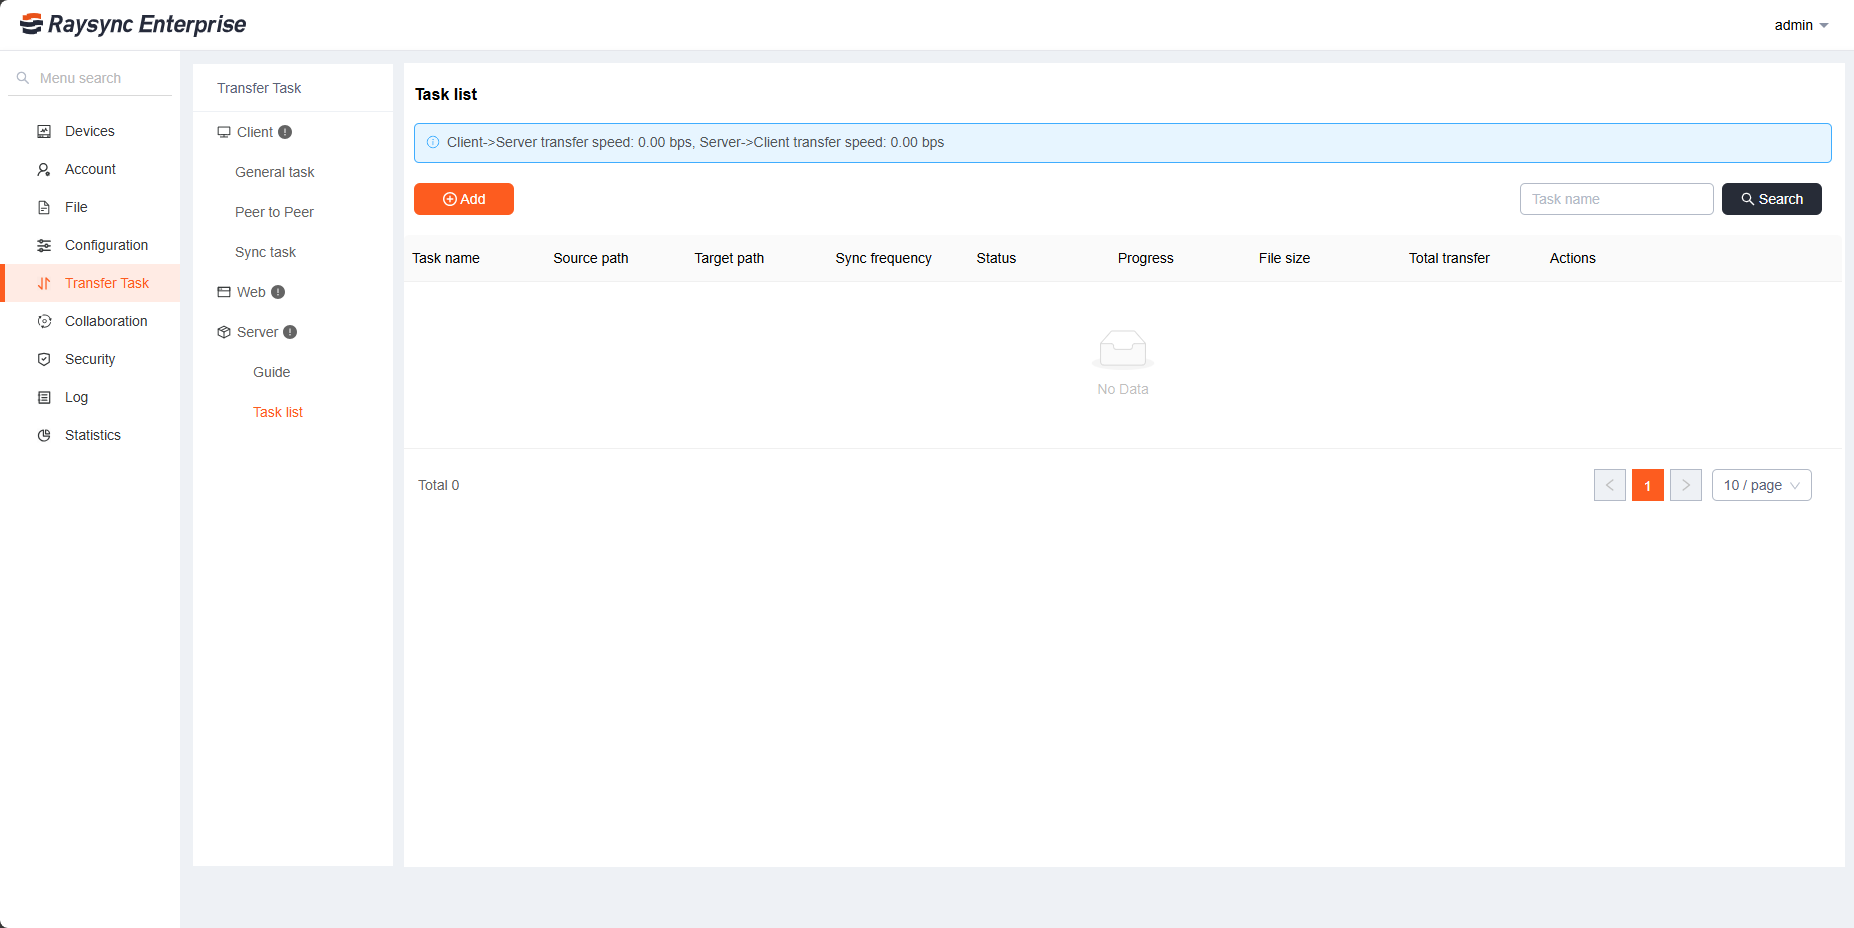
In theTask list module, you can create tasks, view the transfer details of tasks and modify or delete tasks.

Task list

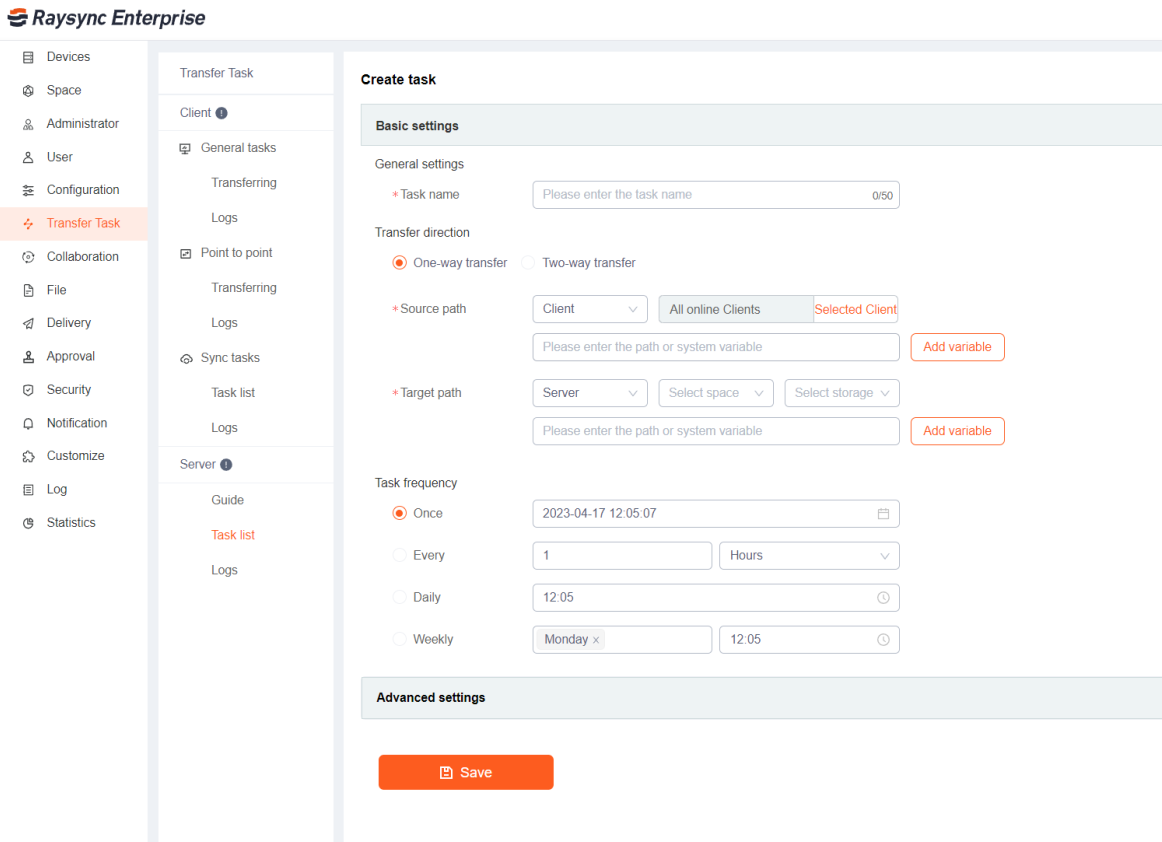
2.2.1 Create task

Function Description
General settings 1、Enter a unique task name
2、Enter the path of the client, you can enter an absolute path or enter a system variable
Enter the path of the server, you can enter a relative path or enter a system variable
Direction

1、One-way transfer 

Synchronous upload or download

2、Two-way transfer

Synchronous upload and download

Task frequency Select the start time of the task, support two synchronization frequency settings
(1) Synchronize once a day at a fixed time. For example , select " Daily 18:22 , the synchronization task will start synchronization at 18:22 every day
(2) Synchronize every time period .For example, select Every 60 seconds, the synchronization task will start synchronization every 60 seconds
(3) Synchronize once only For example , select " Once 12:00 , the synchronization task will start synchronization once at 12:00
(4) Synchronize by weekIf one or more dates are specified in a week , the synchronization will be performed at a certain time of theFor example , if you set 20:14 synchronization on Monday and Wednesday every week, you can synchronize
Security Using AES-256 encrypted transmission to make transmission more secure after enabled
File processing (1) The modification time of the transfer file is reserved, and it can be opened according to the specific needs of the user. (the default is on) turn on the "save modification time" option: after the synchronization task is transferred, the modification time of the file can be consistent with the local modification time. Turn off the "save modification time" option: after the synchronization task is transferred, the modification time of the file is consistent with the time when the current client transfer is completed
(2) When transferring, only the files and folders in the source directory will be transferred
(3) If the files of the source or target path are deleted, the files of the other party will be deleted synchronously. For example, synchronize the local directory to the server. If the test files in directory a are deleted, the test files on the server will be deleted synchronously. Note: synchronous deletion in the root directory is not supported temporarily; Synchronous deletion and transfer only source files cannot be checked at the same time.
(4) After the synchronization task is completed, the source directory will be automatically deleted. For example, synchronize the local directory to the server. After the synchronization task is completed, the local directory will be deleted automatically
Please select the processing way when the target file already exists (1) Overwrite directly overwrites the existing file contents.
(2) If the source file is newer, the last modification time of the uploaded or downloaded file is newer than that of the target file, and the file is overwritten.
(3) Append write to target file (not applicable to object storage) append a new file content to the end of the target file.
(4) Rename (only one-way synchronization is supported) when the source file has the same name as the target file, rename the source file. For example, if there is test in the target path and a test with different content is uploaded, rename the newly uploaded file as test (1).
File filtering (1)Support regular matching and filtering files. If the files ending in txt are transferred and filtered, enter "* txt".
(2) When the synchronization task is transferred, the files ending in txt will not be transferred

When the synchronization task is transferred, files exceeding the set size will not be transferred. |

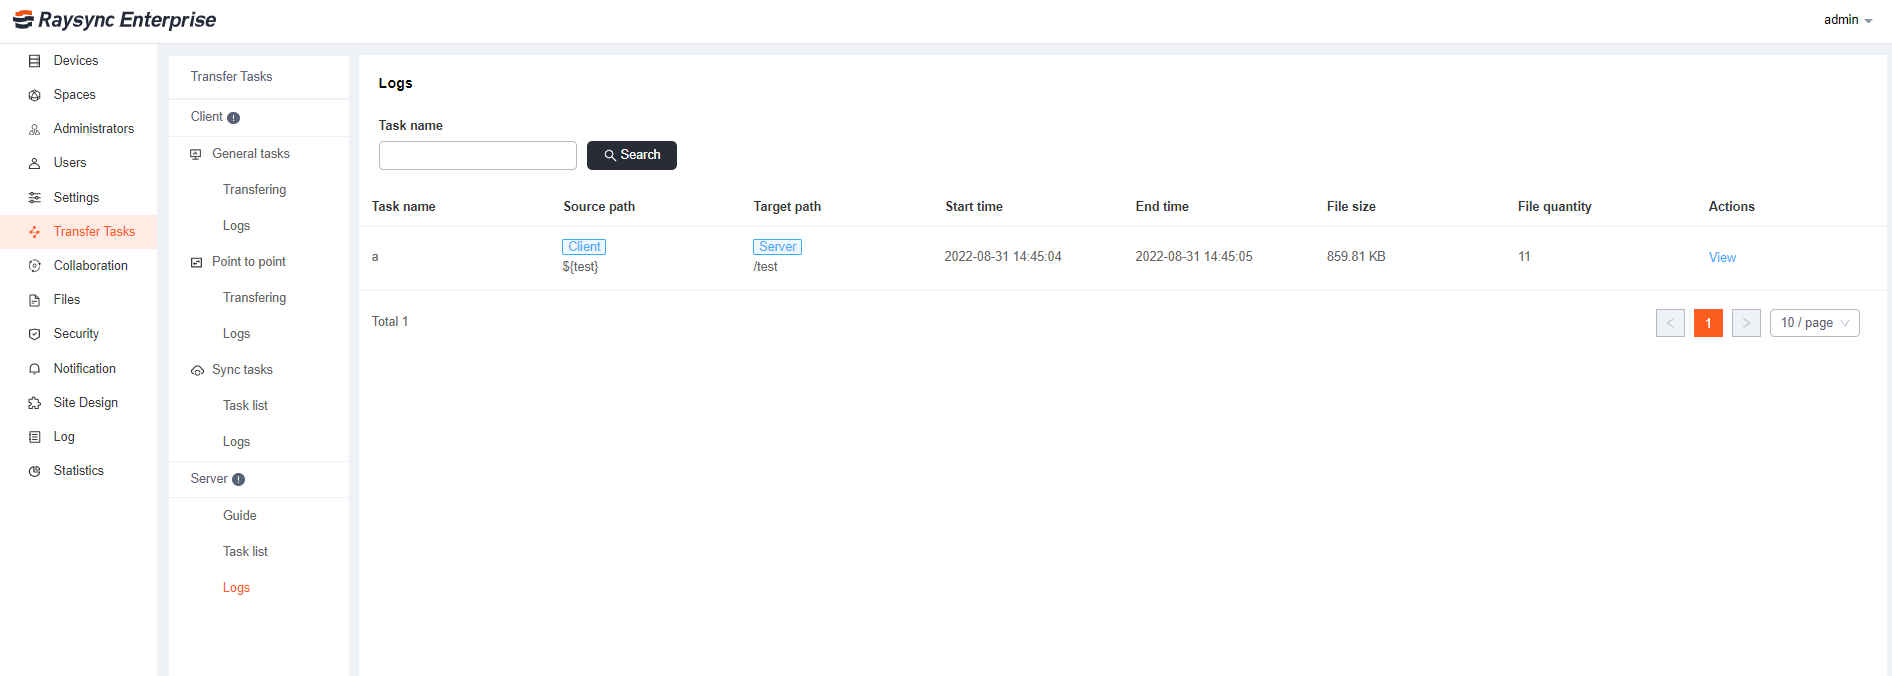
2.3 Logs

You can view the logs of tasks in the Logs module.

server task logs

6.7) Collaboration

Updated: 2022-11-30 09:22:19

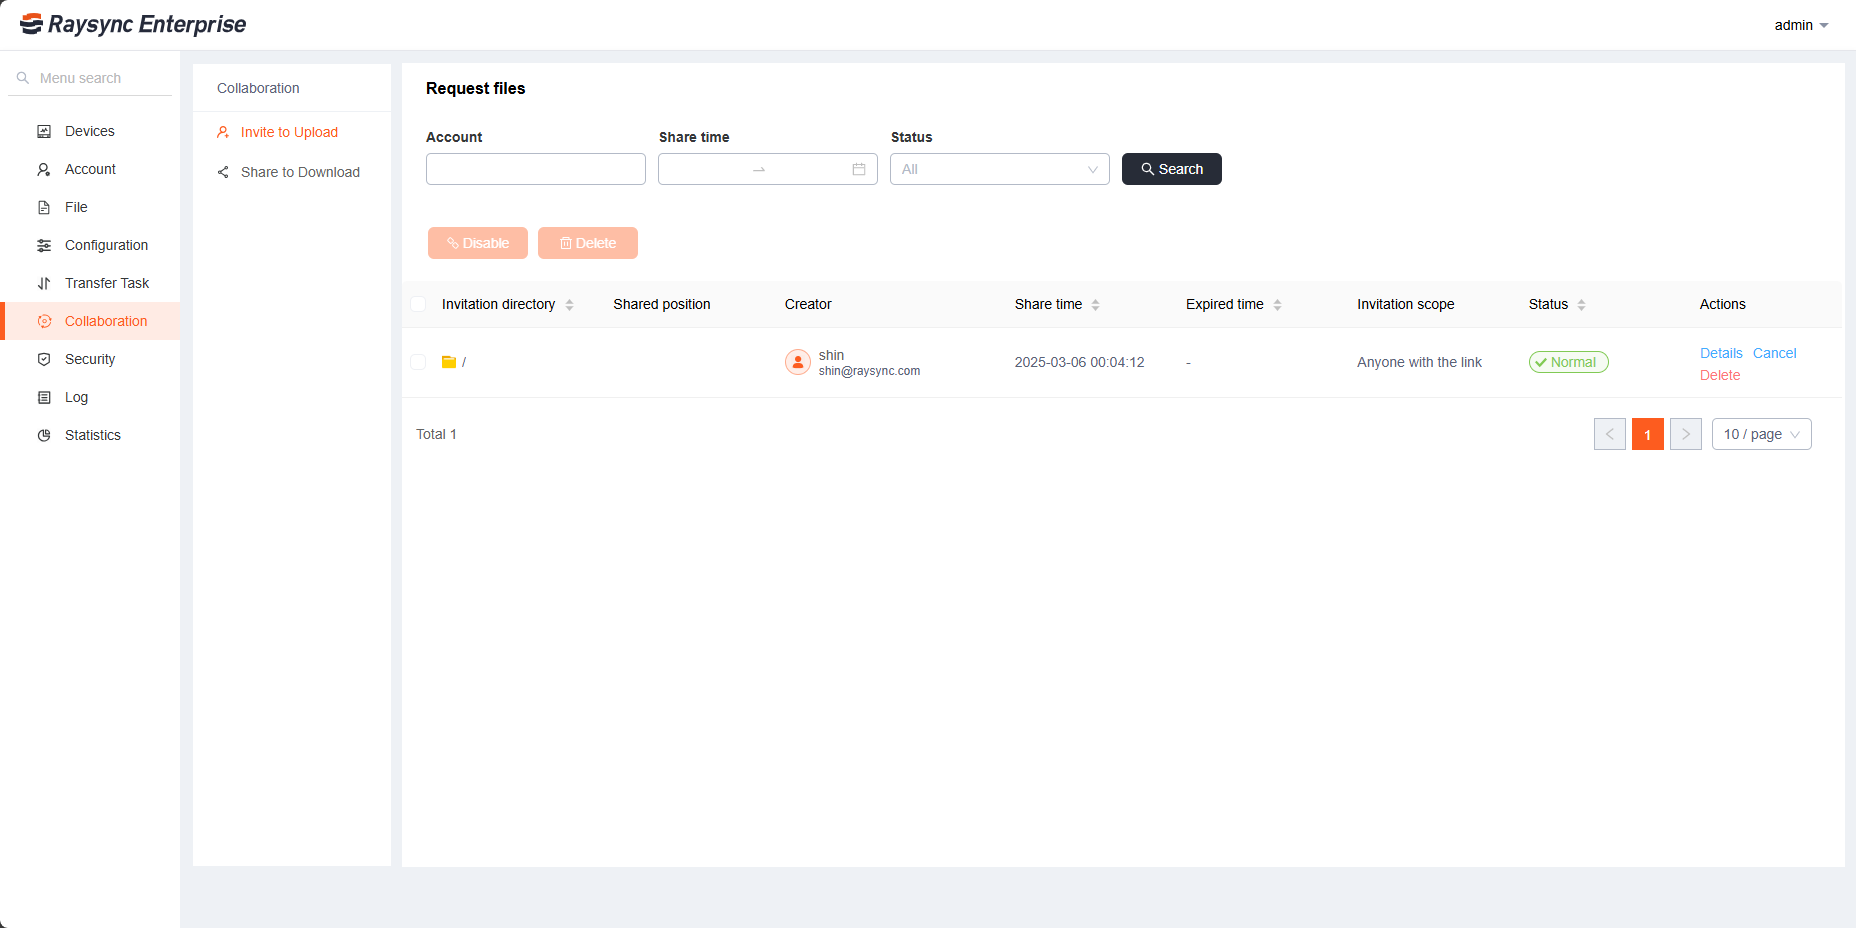
1.1 Invite to upload

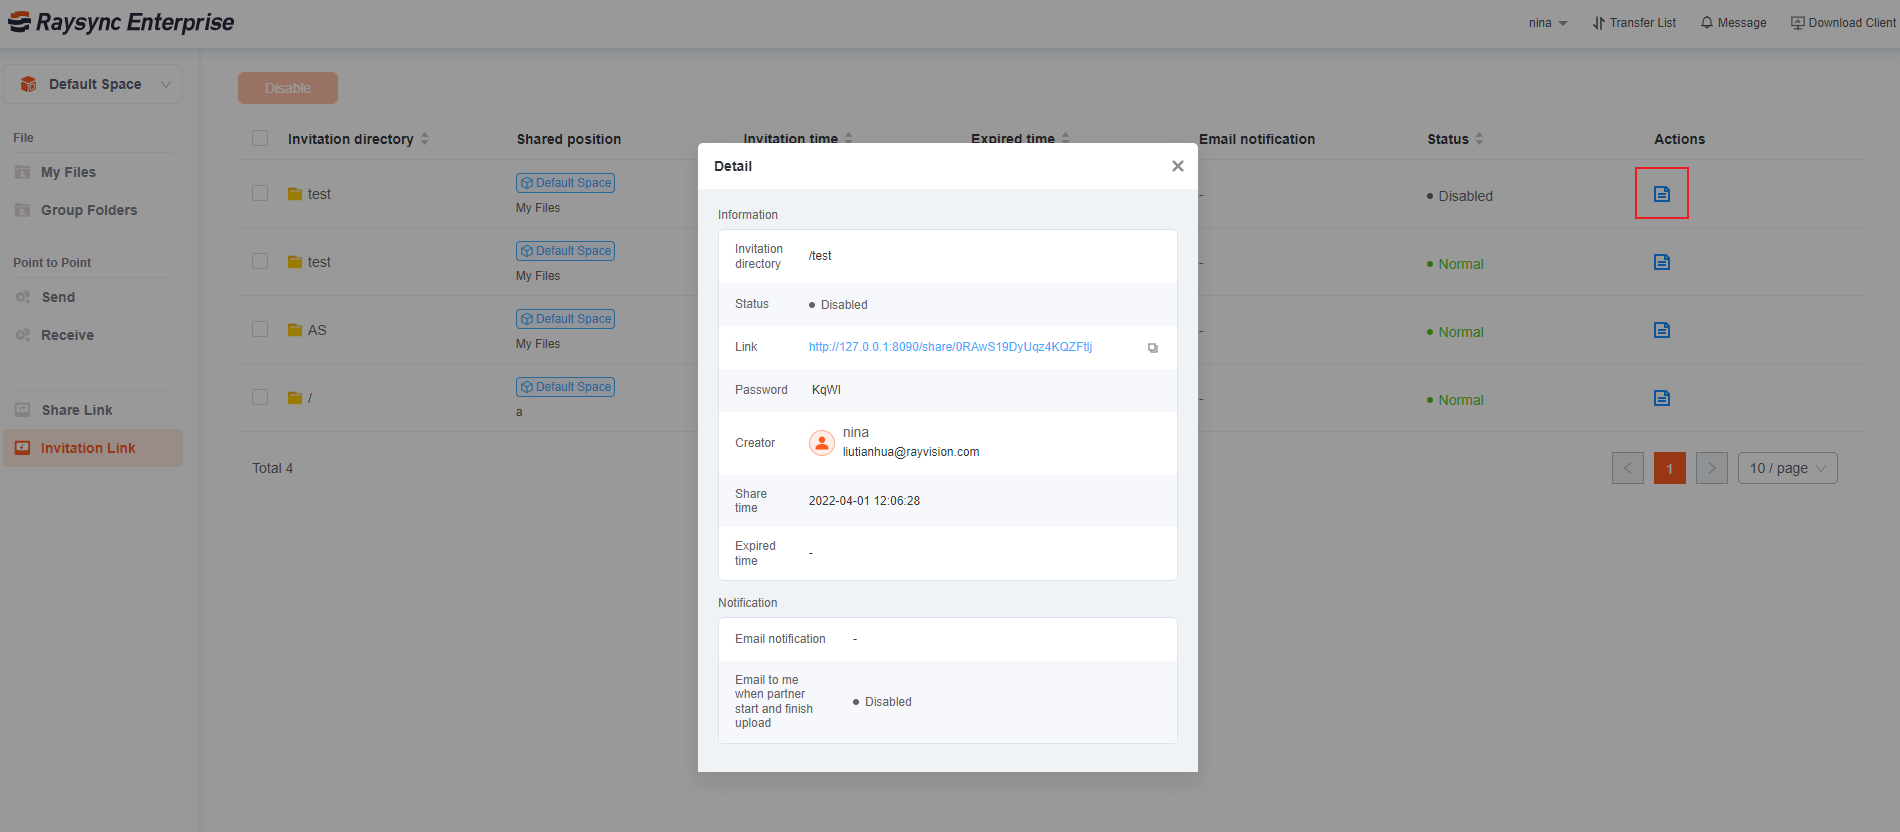
Click Collaboration - Invite to Upload, double-click to select the link of any user you want to view, it will display the link's invitation directory, username, sharing time, expiration time, and link status. Copy, cancel and delete links are supported.

邀请上传英文

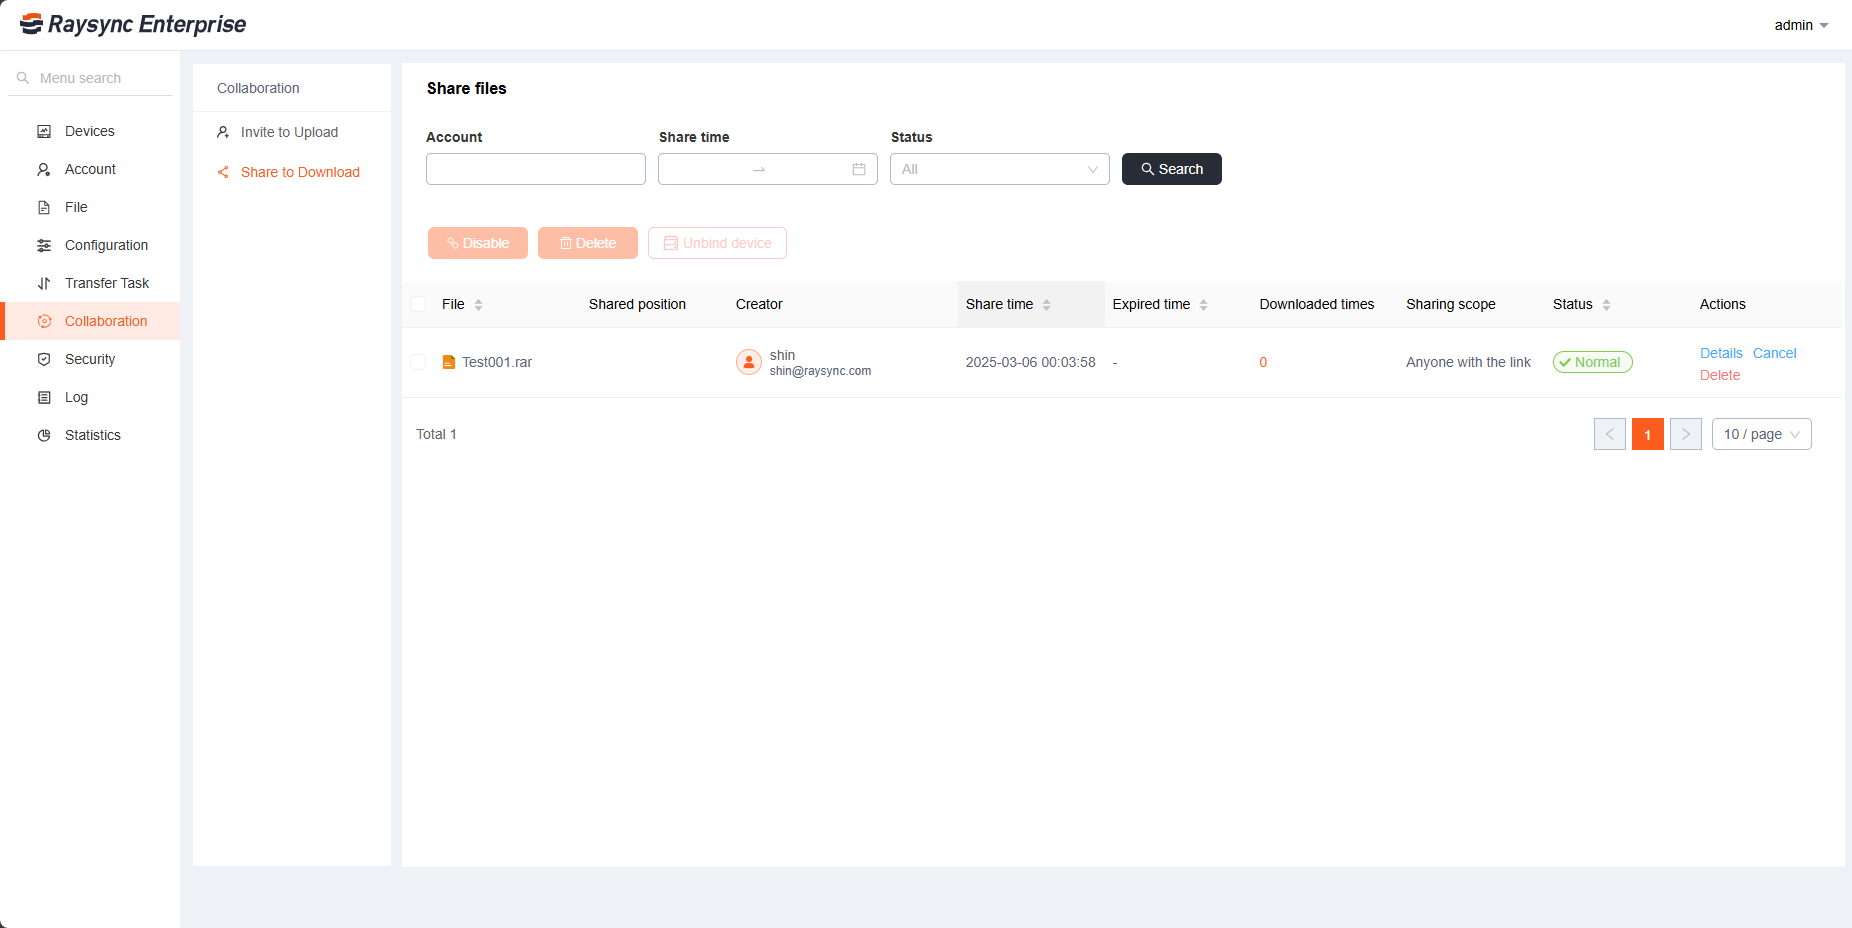
1.2 Share to download

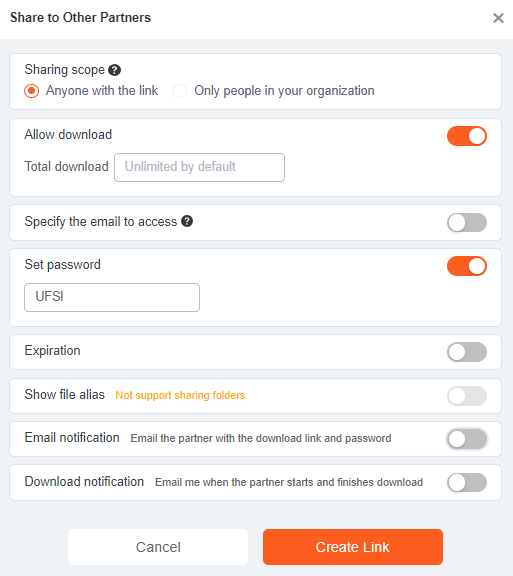
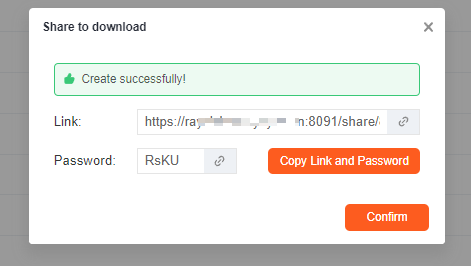
Click Collaboration - Share to download, select any link of the user you want to view. It will display the link's shared file, user name, sharing time, expiration time, download times, link status, whether to bind the first device, and device identification number. Copy, cancel and delete links are supported.

分享下载英文

6.8) Files

Updated: 2022-11-30 09:22:27

Administrator can view the list of files for each space user, Group folder, Recycle bin and Isolation zone Click on File - Select Space to view it.

文件1英文

6.9) Security

Updated: 2022-11-30 09:24:35

1. Antivirus

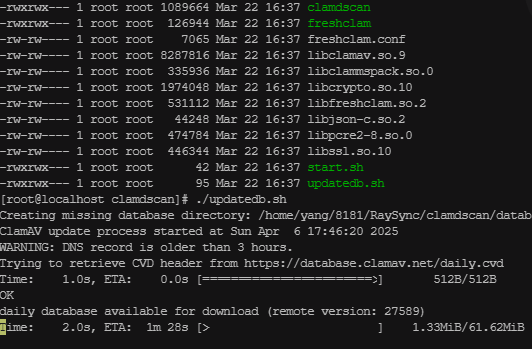
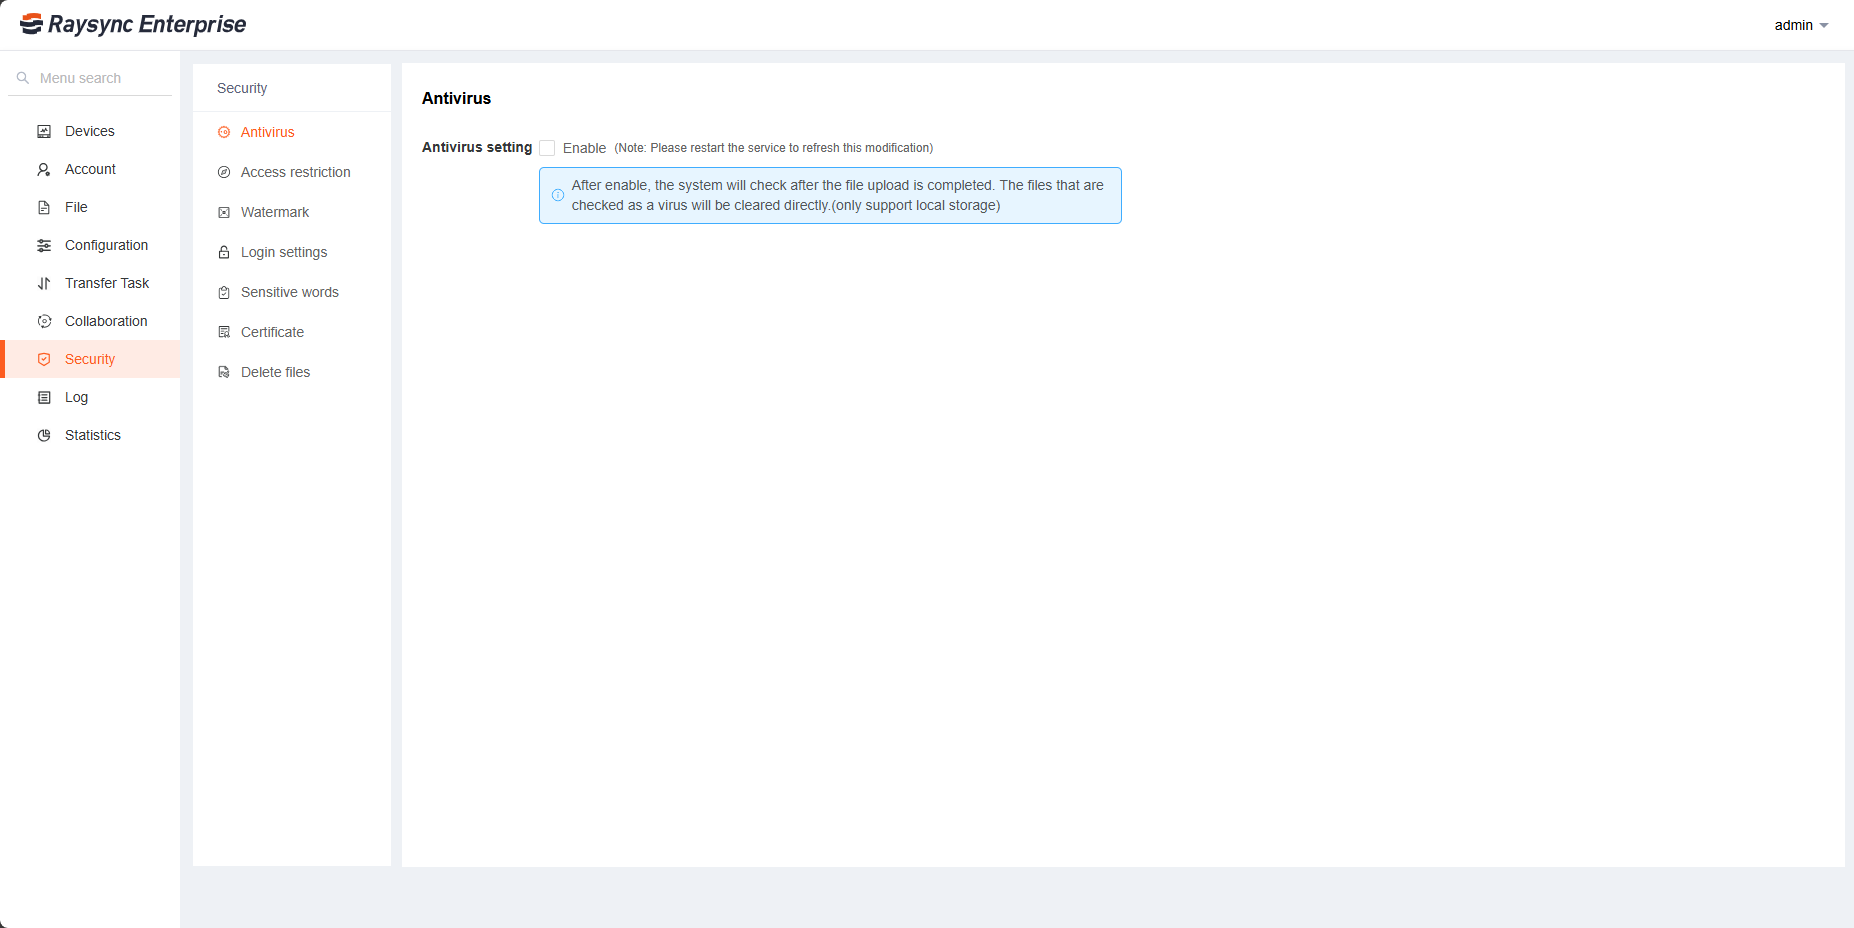
Support antivirus after uploading files. Raysync mainly uses ClamAV (Clam AntiVirus) virus scanning tool to scan the uploaded files and will move the infected files to Isolation Zone.

Enter the directory to the Raysync Server’s clamdscan ,update of the virus library.

./updatedb.sh

更新病毒库


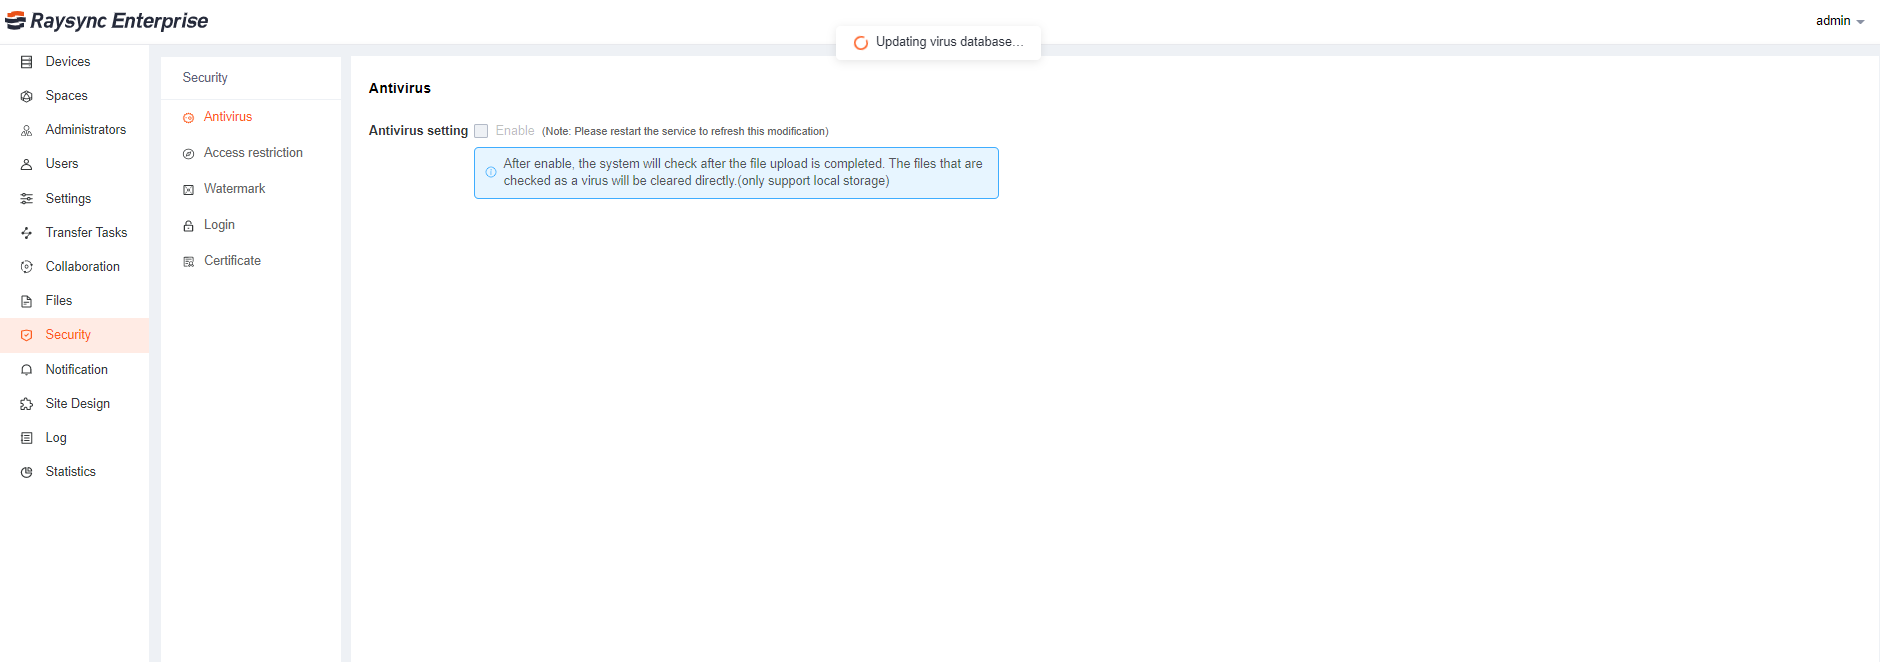
After the upgrade is successful, enter the Admin Portal, clickSecurity - Antivirus to enable the antivirus configuration. Restart the Raysync server for changes to take effect.

Antivirus

When the uploaded files are scanned for viruses, the infected files are moved toFile -Isolation zone.

Isolation zone

2. Access Restrictions

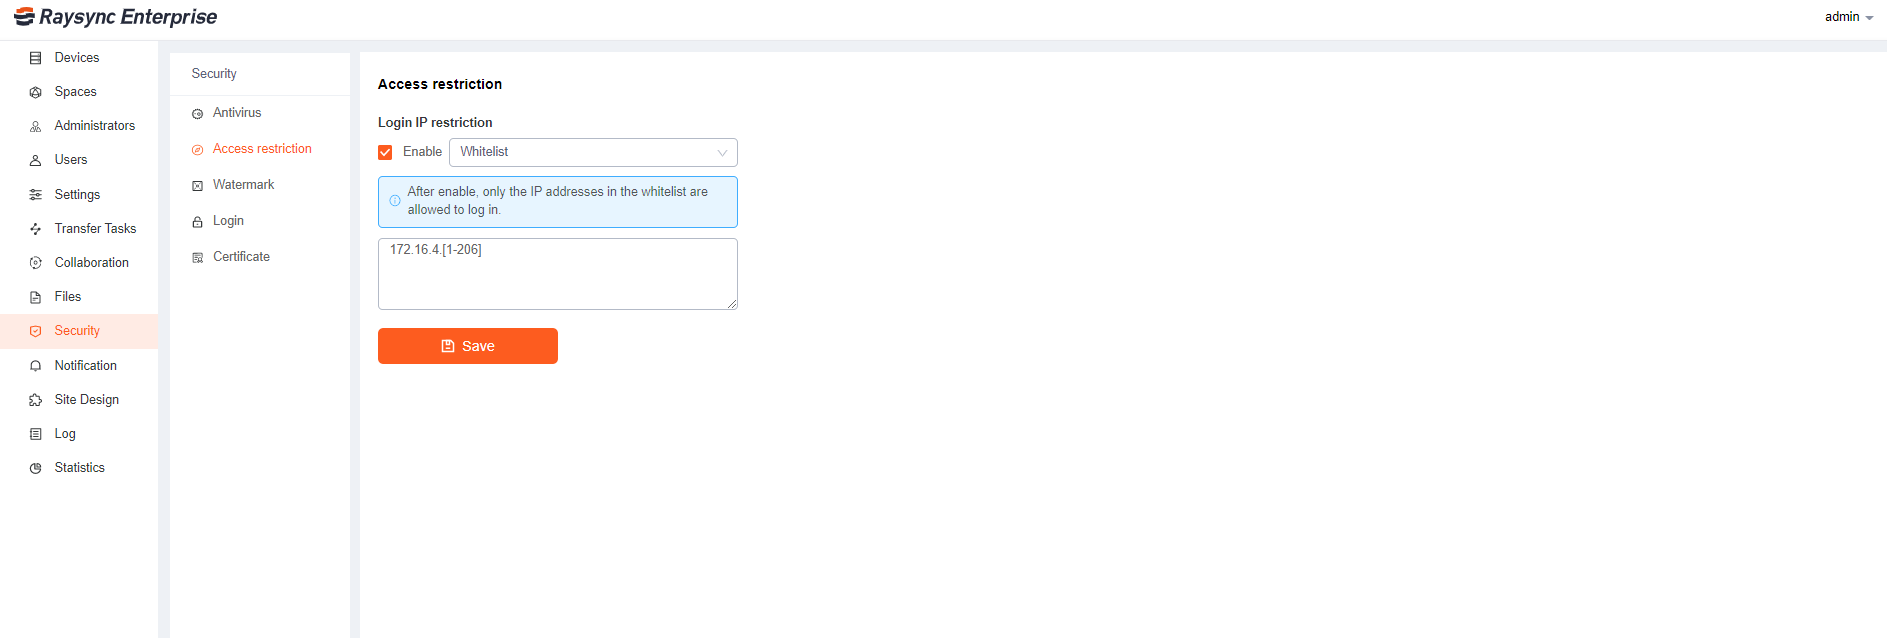
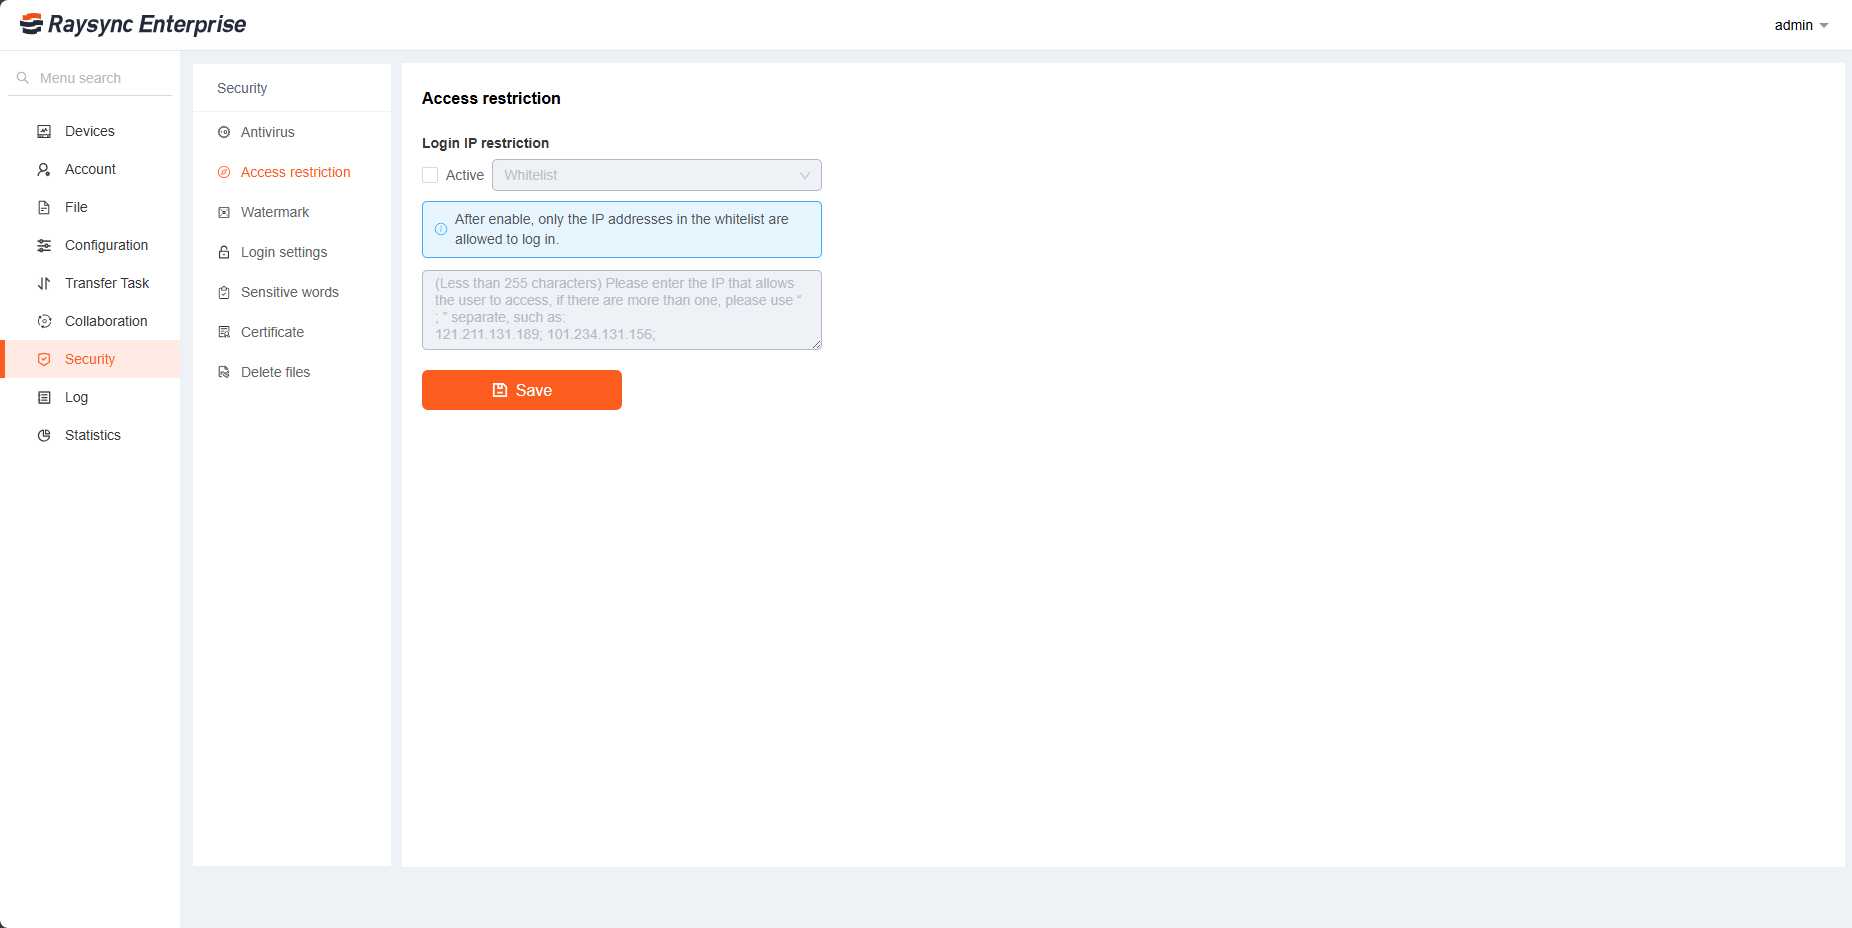
Used for foreground user login restrictions. Set a white list, the IP addresses in the white list are allowed to log in to the front desk; set a black list, the IP addresses in the black list cannot log in to the front desk. Click SecurityAccess Restriction, select whitelist or blacklist, enter ip or ip range (such as 10.80.90.1-100), and click Save to take effect.

Access restriction

3. Watermark Settings

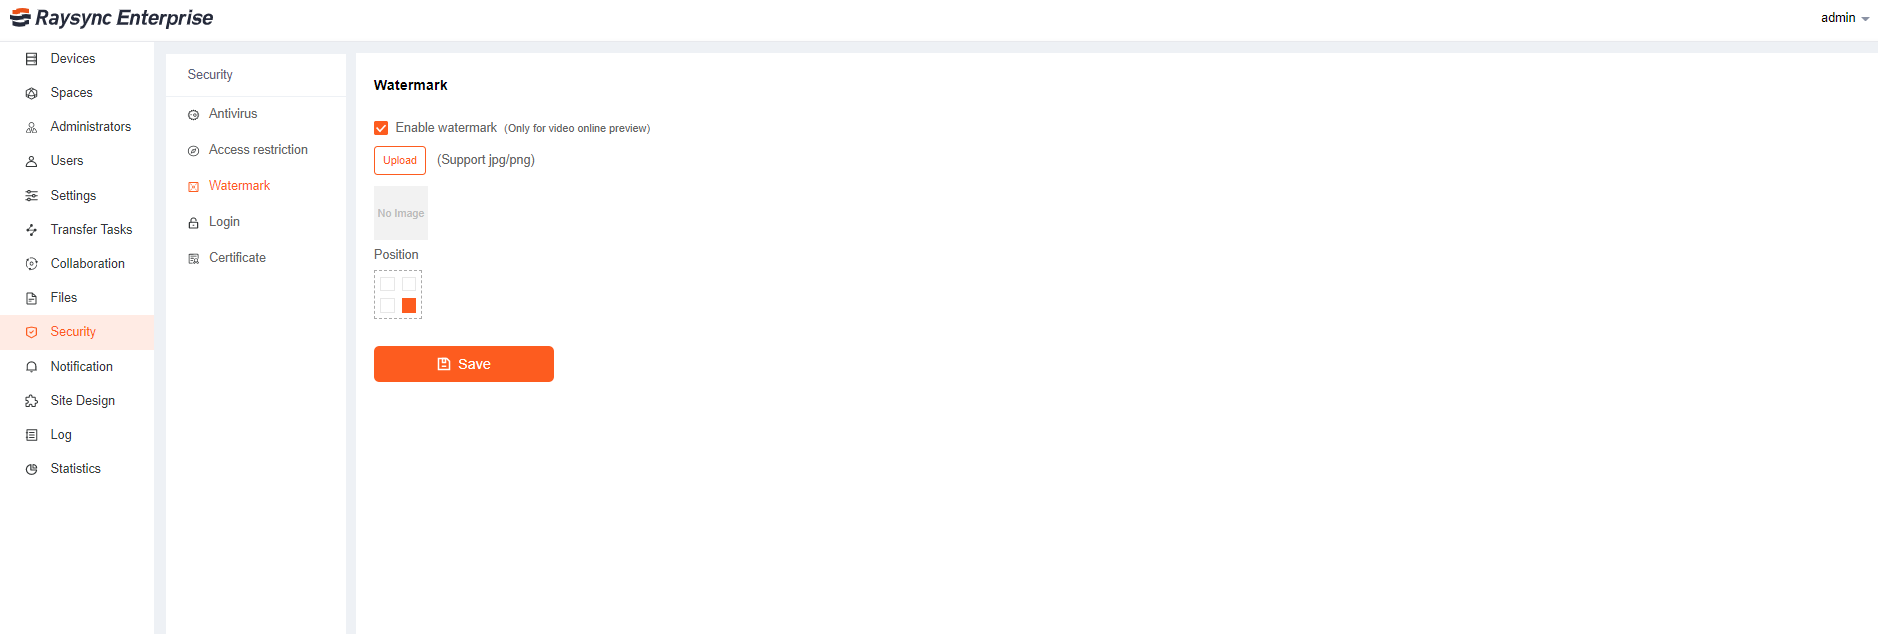
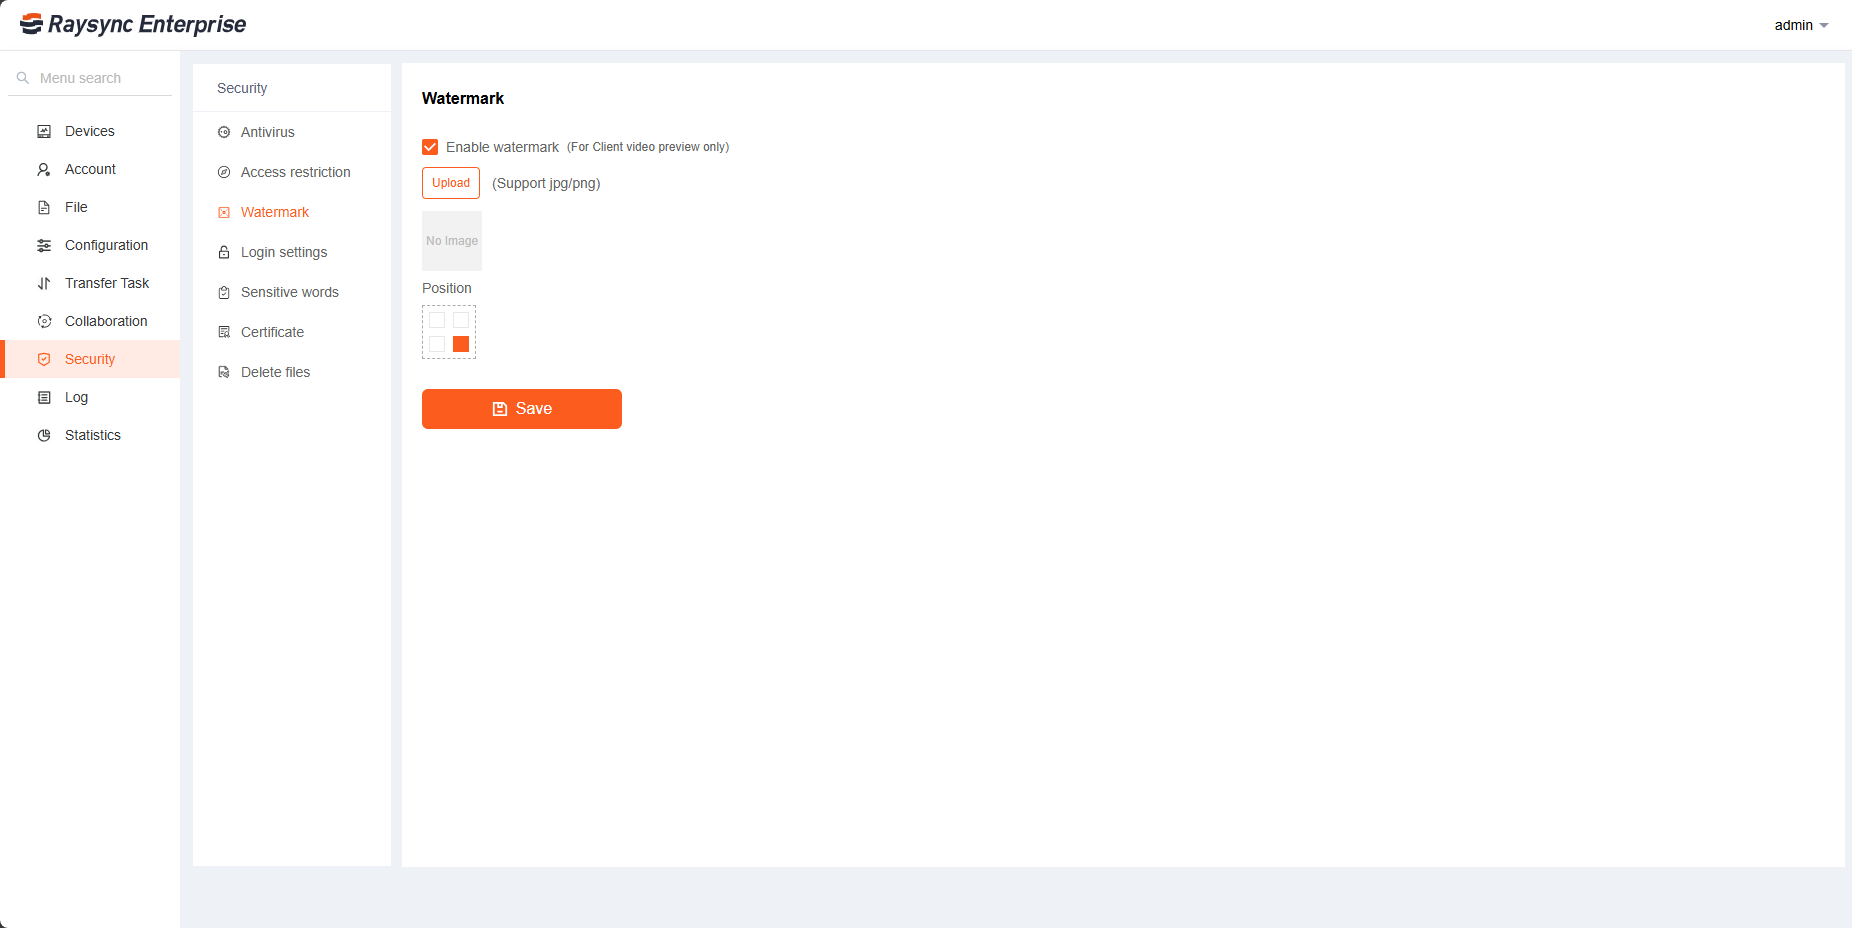
Used to configure video online preview watermark configuration. ClickEnable watermark, upload the watermark image, select the location, and click Save.

Watermark

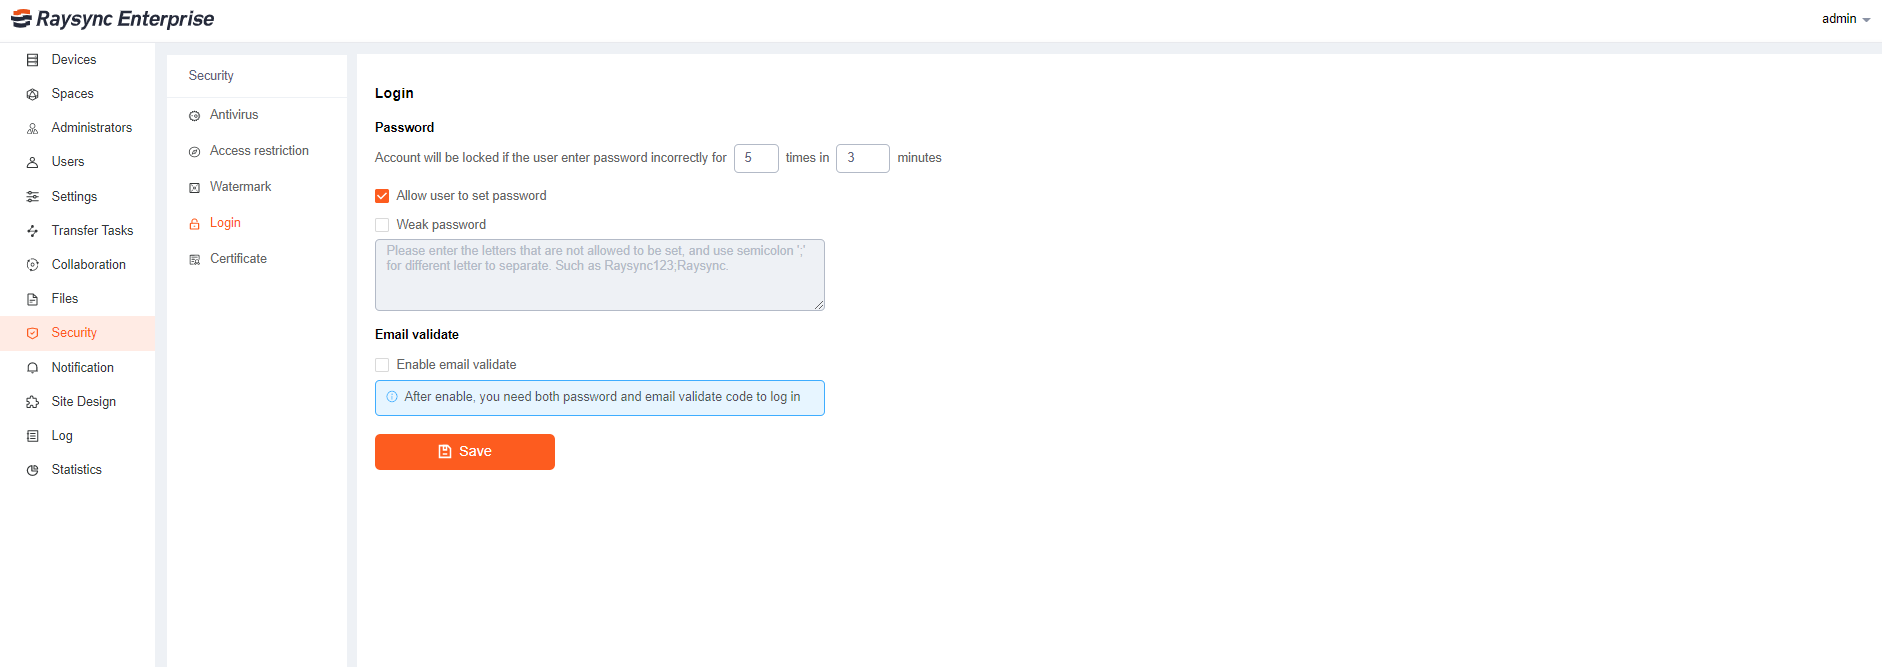
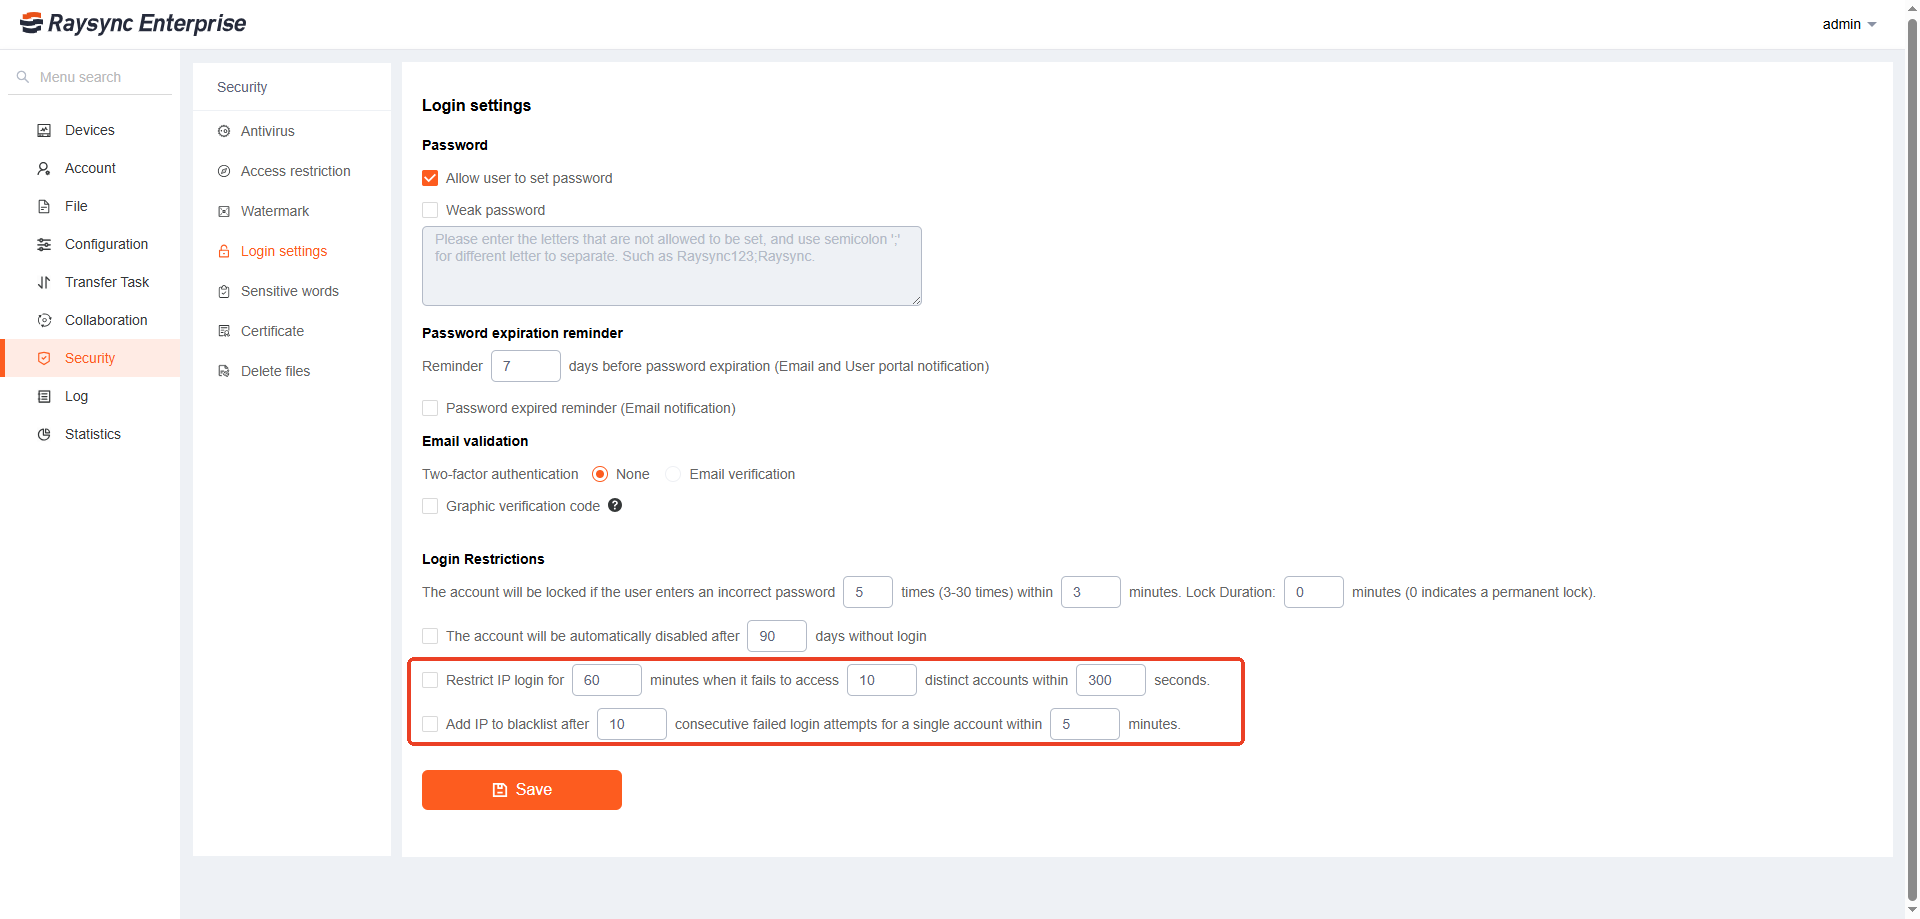
4. Login Settings

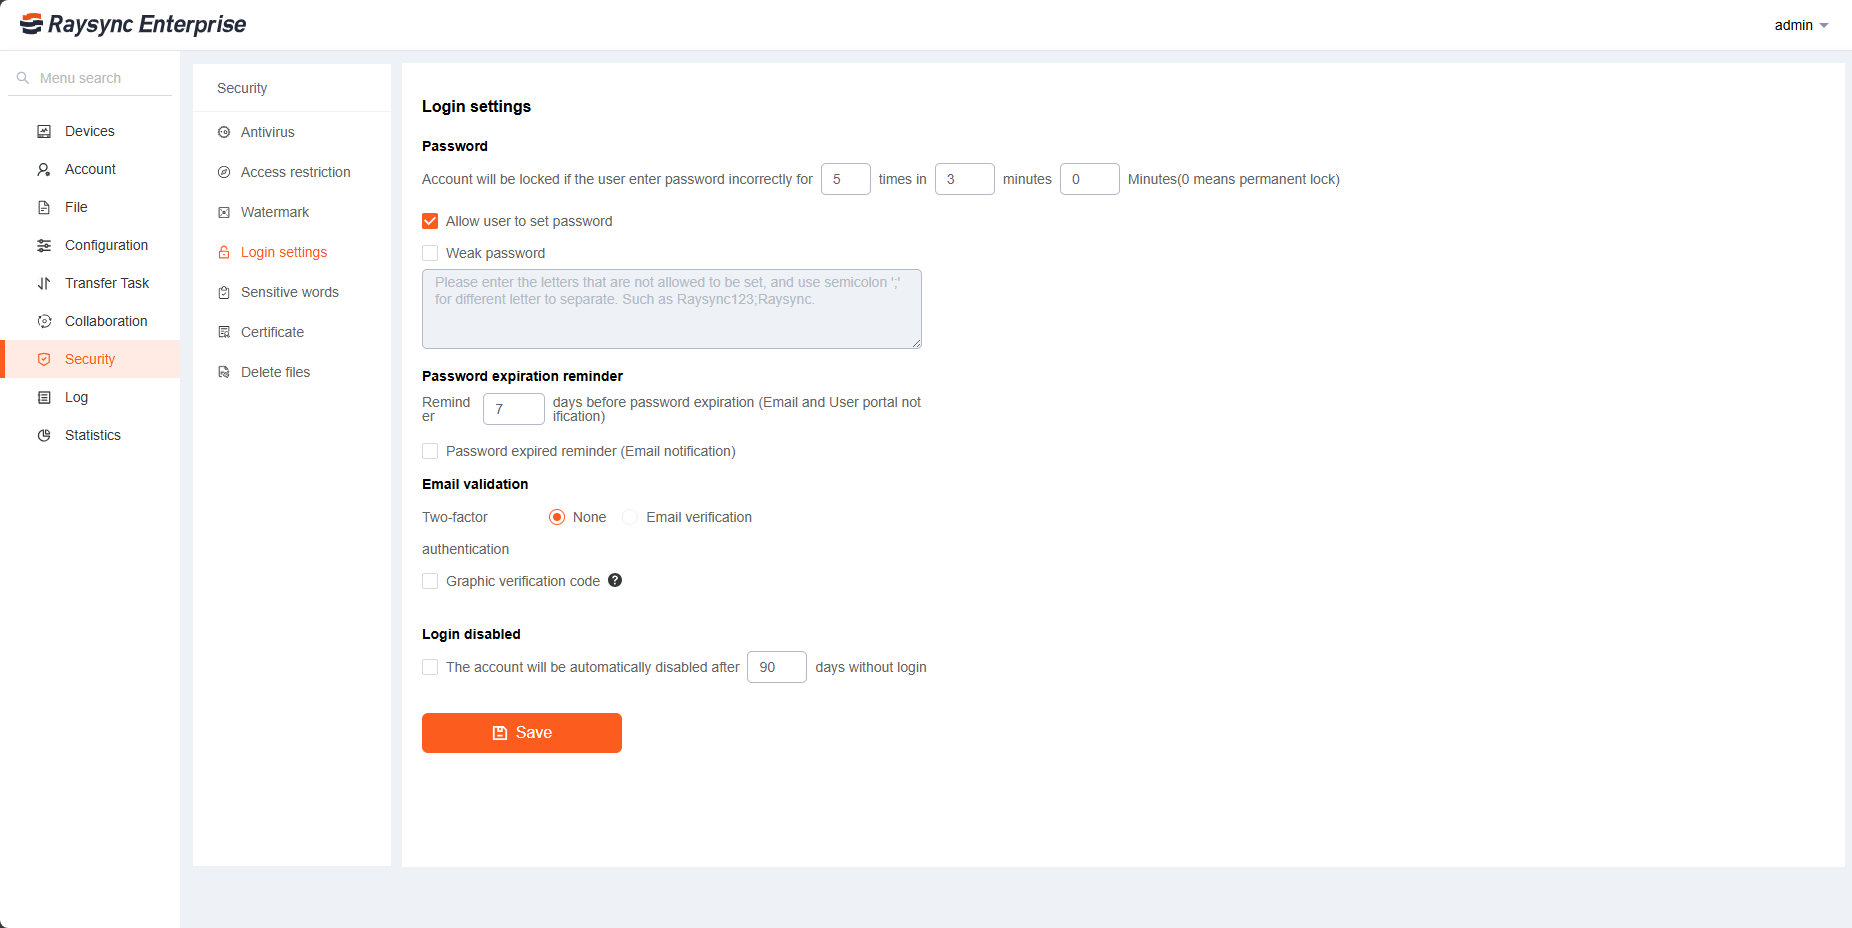
It supports administrators to configure whether to allow users to modify passwords, account lockout rules, and weak password settings.

Login Setting

Functions Description
Anti-brute force attacking You can configure the user password to lock the account after X consecutive wrong input within X minutes, and the number of wrong input is 3~30 times. After the configuration is saved, it will take effect.
Allow users to change their passwords If selected, the front-end users can change their passwords in the front-end, and the button to change the password is displayed in the foreground. If not selected, it will not be displayed.
Weak password settings Passwords that users are not allowed to set, please use“ ; ”to separate multiple passwords, such as Raysync;raysync. After the configuration is saved, it will take effect.
Email validate After enabling, you need both password and email validate code to log in. (only support Local users)

Before enabling email login verification, you need to configure the system mailbox. Configure it under the Settings - Email configuaration

Email setting

5. Certificate Management

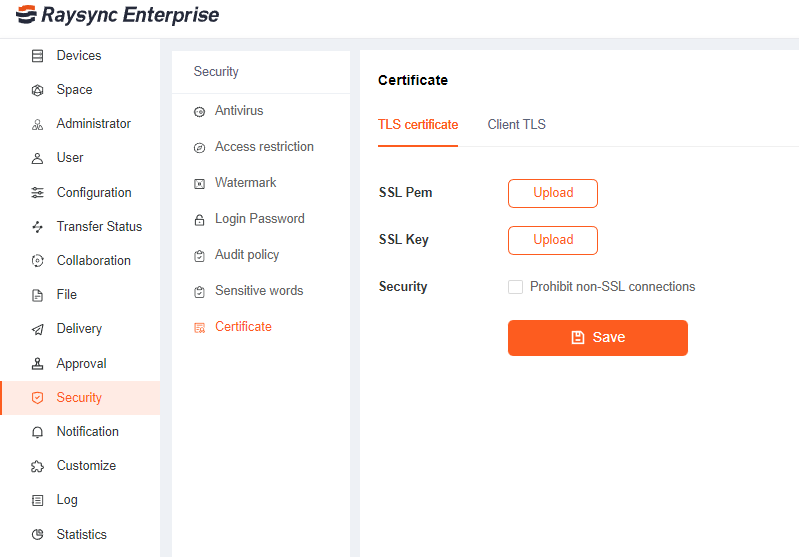
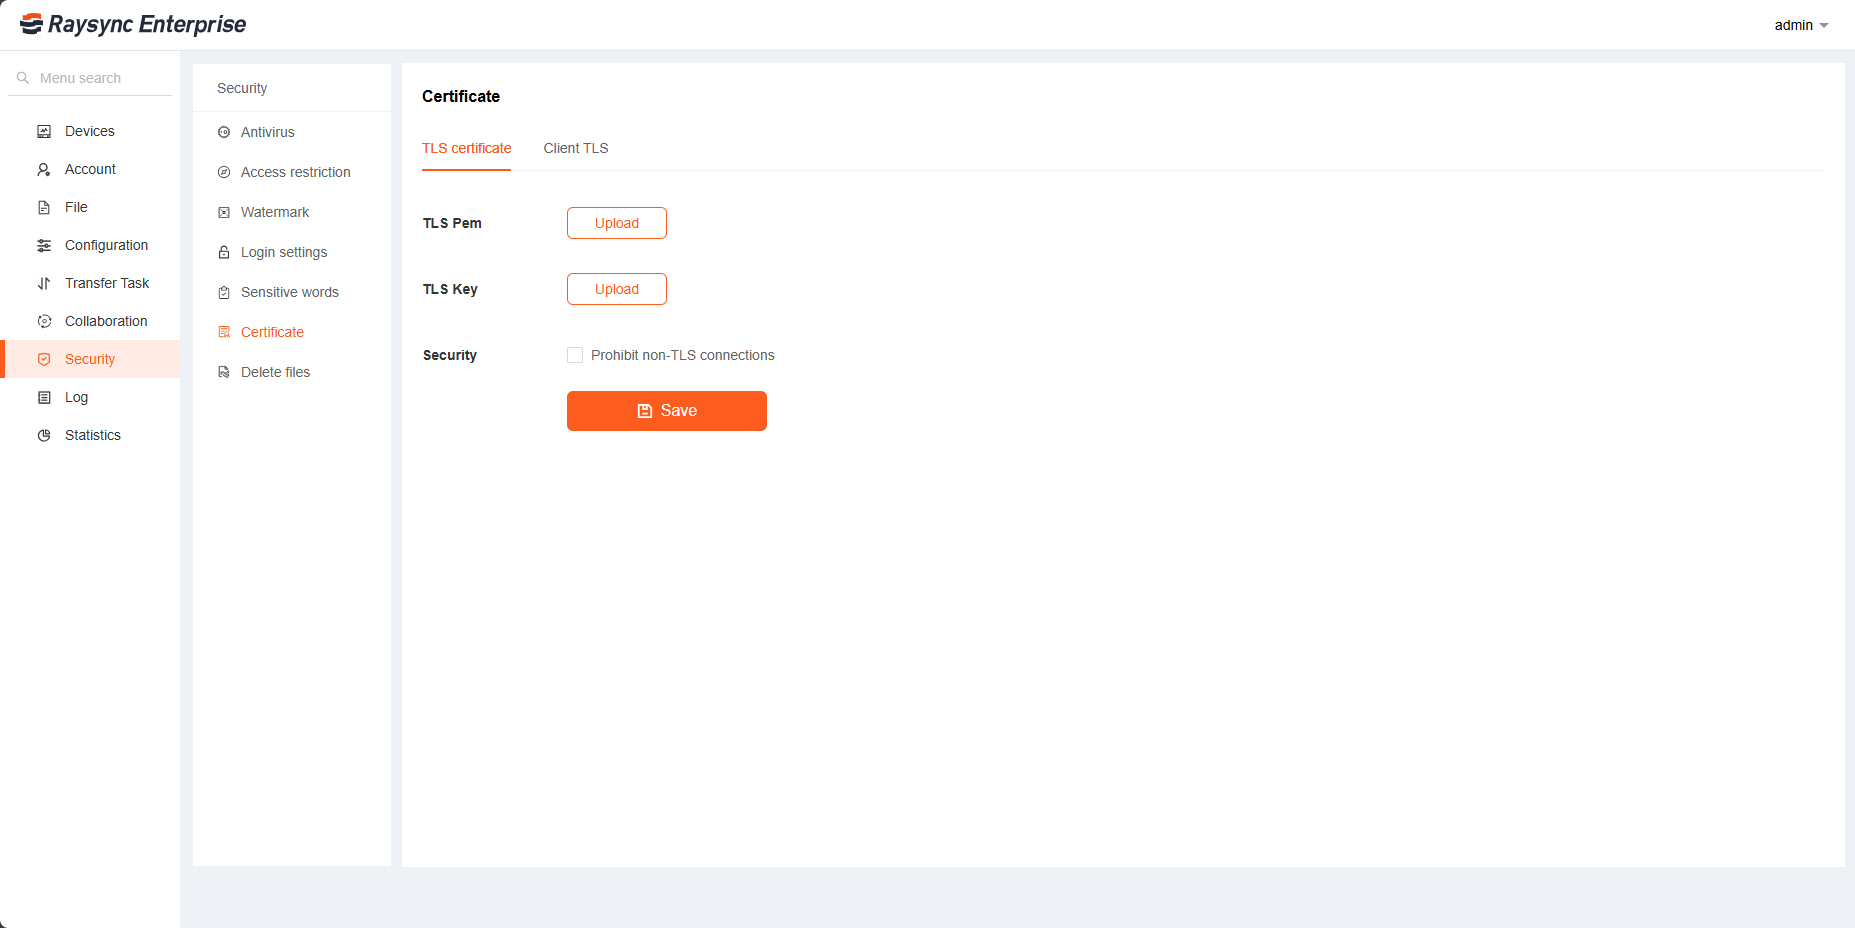
5.1 TLS certificates

Raysync provides encrypted certificate services that can be used for both HTTP encryption of the web and file transfer encryption. The default is to use Raysync's own encryption certificate, or you can use the user's own certificate for encryption. Fill in the correct certificate file and certificate private key, click Start Upload, and restart the server to take effect

If you select Prohibit non-SSL connections, the front-end user pages cannot be accessed using non-encrypted HTTP addresses. Note: The premise of configuring security settings is that the administrator needs to upload a valid TLS certificate.

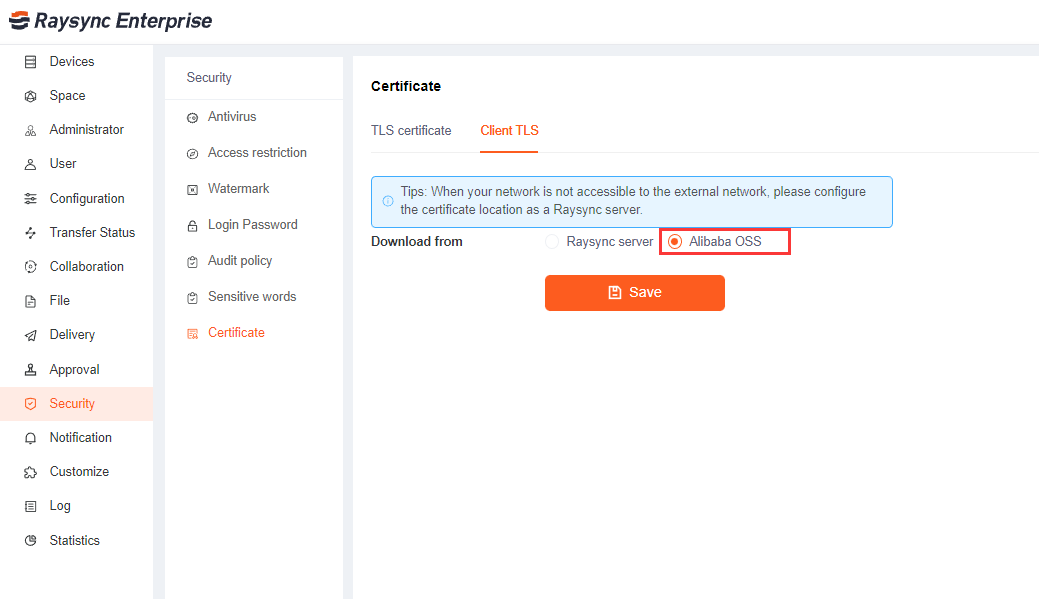
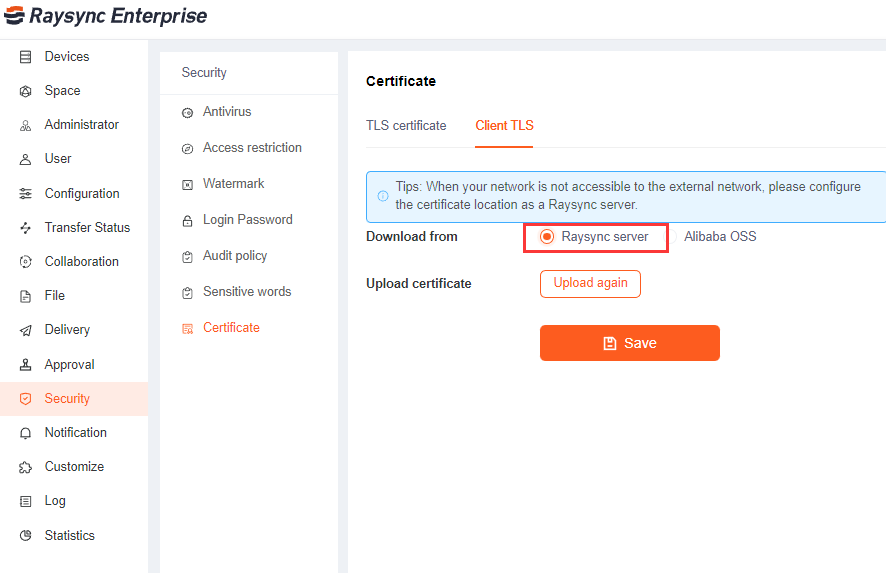
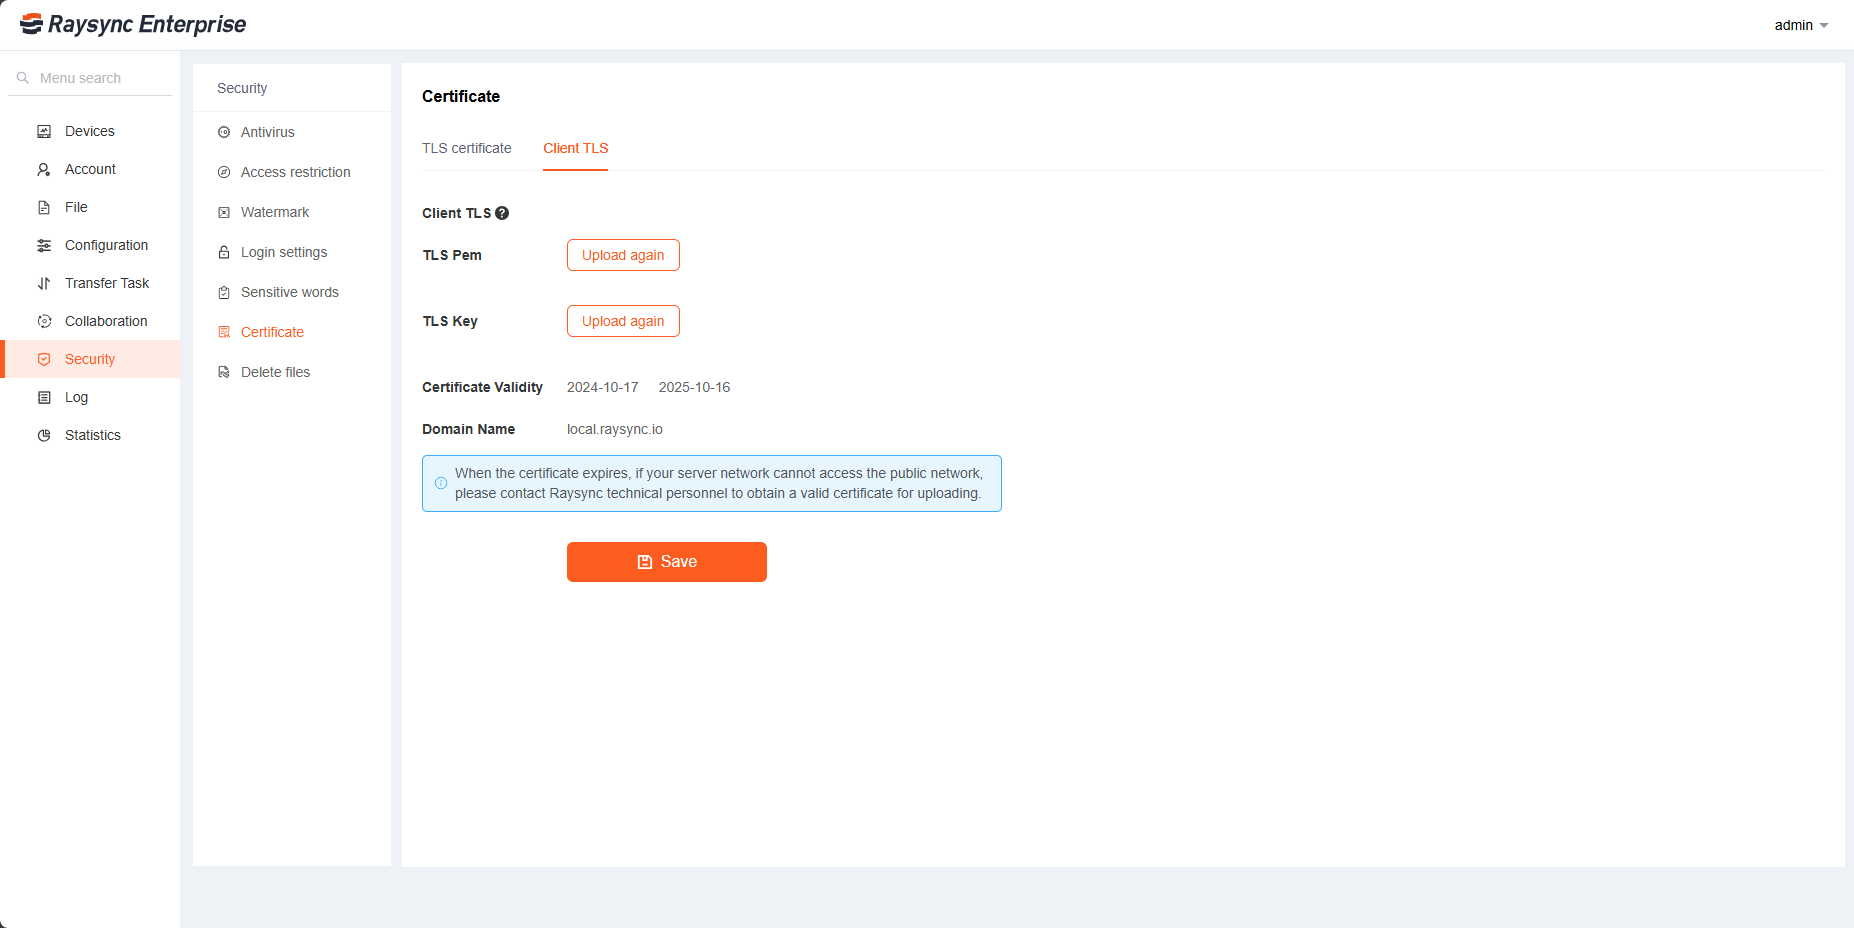
5.2 Client Certificate

Raysync Client certificate is the certificate used by the client to connect with the browser. Available in two ways:

One is to obtain the latest certificate from the default Alibaba Cloud OSS. When the server can access the external network, Raysync will automatically download the latest client certificate from the oss storage when the oss certificate is updated.

The second is to download from the Raysync server. When the network cannot access the external network, please configure the certificate location as the Raysync server. Click to upload the latest certificate bundle. The certificate package is provided by Raysync staff. After uploading the certificate, click Save. Re-login to the client on the front-end page to download the client certificate.


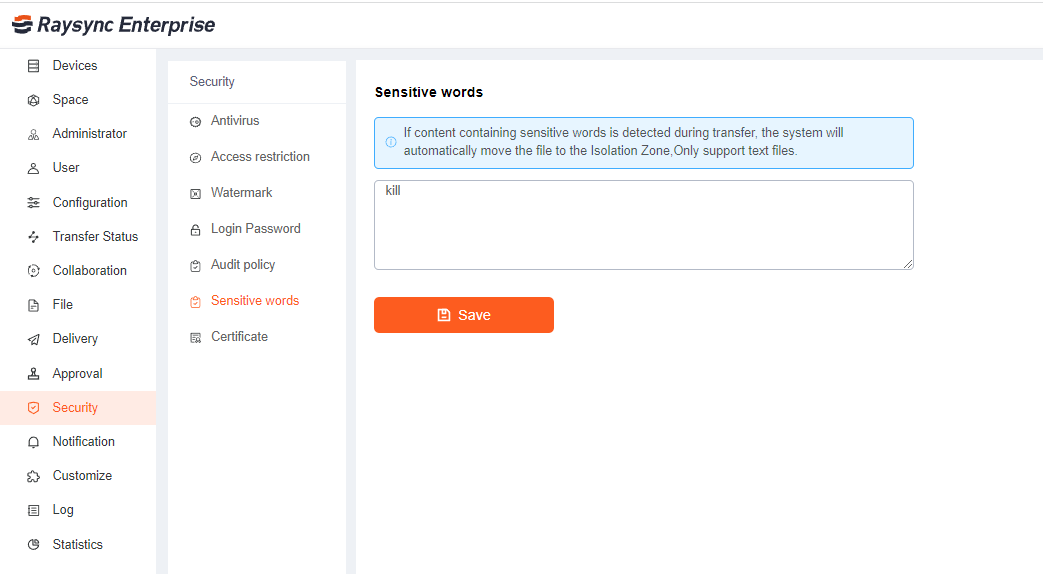
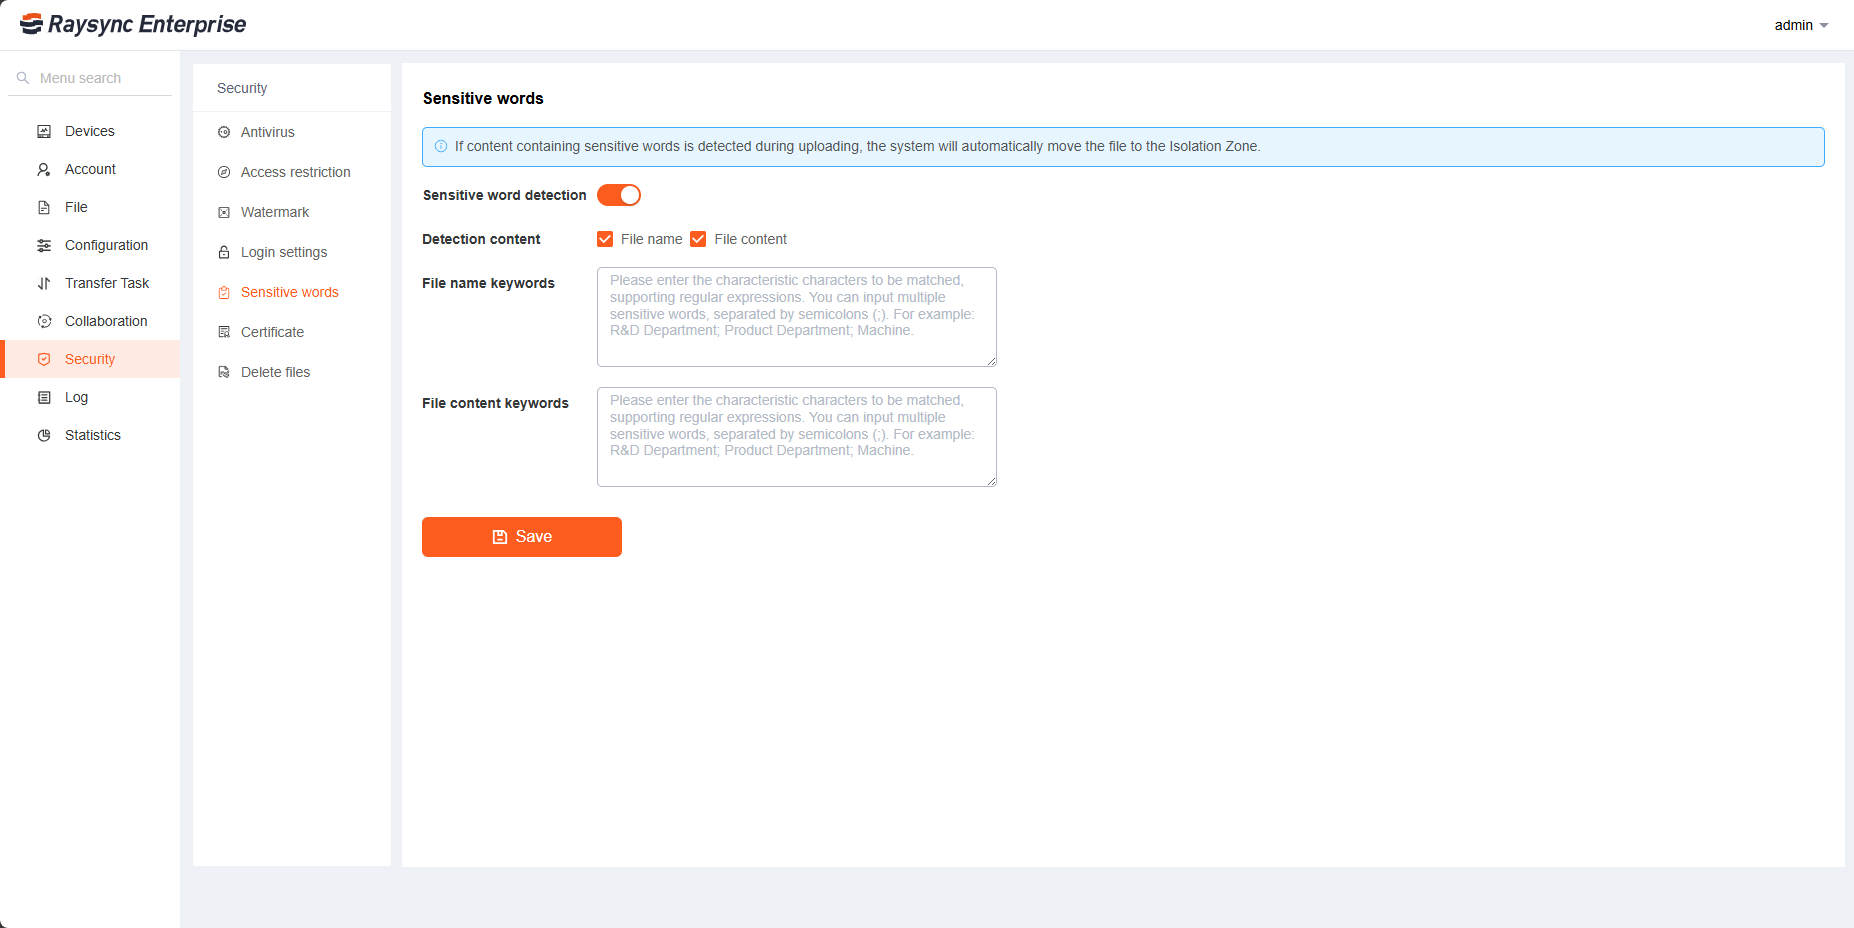
5. Detective Sensitive words

During the transmission process, the content of the file name and text file can be detected. The content of the file contains sensitive words. The system will automatically allocate the file to the isolation area.

If you need to detect the sensitive word  like "kill", the input box inputs the sensitive word "kill", click [Save] and then enable

Multiple sensitive words are separated by ;

6.10) Notification

Updated: 2022-11-30 09:24:48

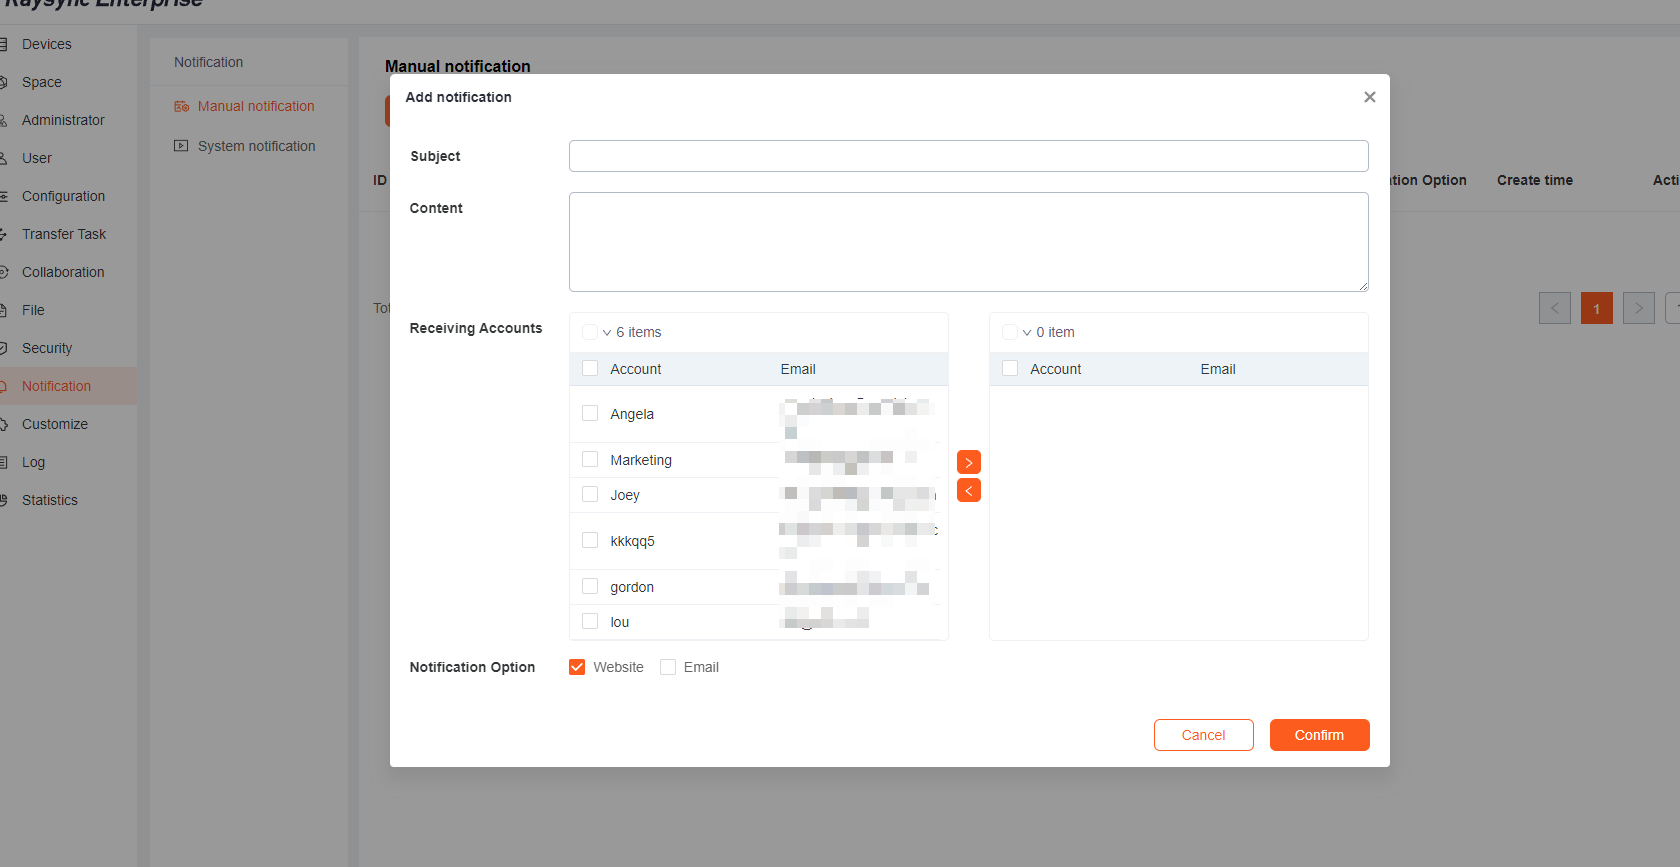
1. Manual Notification

The administrator can send the notification to the specified account by web page notification or email notification.
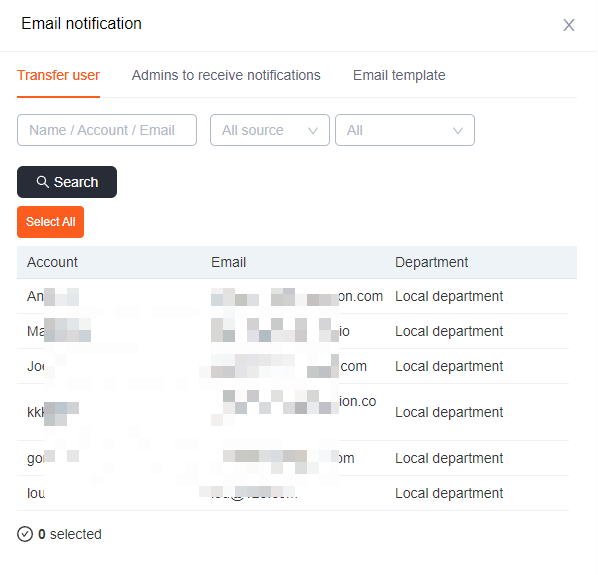
Click notification - Add Notification, edit message notification, select receiving account and notification method. (If email notification is selected, the administrator needs to configure the email in the Admin Portal in advance to send the notification successfully.)

通知英文

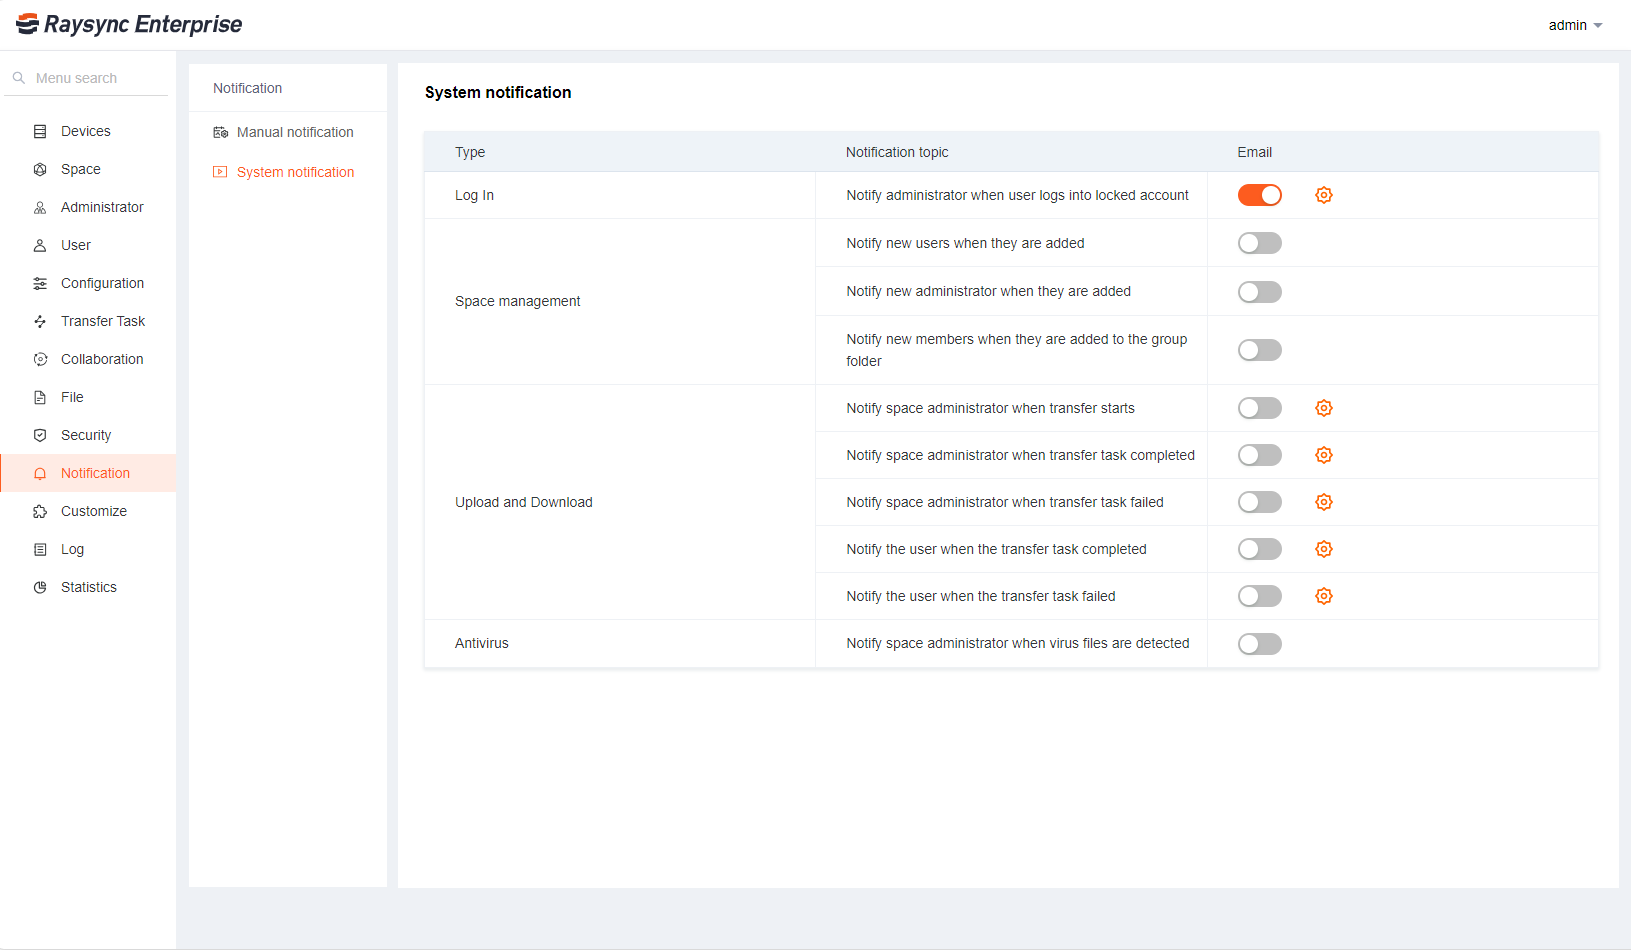
2. System Notification

System notifications are divided into four categories, namely Upload and Download, Space management and Antivirus

System notification

2.1 Space management

Function Description
Notify new users when they are added When the administrator adds a new member to a space, the system mailbox sends an email to the user, and the user can click the space name in the email to log in and jump to the space
Notify new administrator when they are added When the administrator adds a new administrators to the space, the system mailbox will send an email to the administrator, the administrator can click the space name in the email, and after logging in, he can jump to the space for space configuration
Notify new members when they are added to the group folder When the administrator adds a new member to the group folder, the system mailbox will send an email to the member, the member can click the group name in the email, and can jump to the group folder after logging in

2.2 Upload and download

Function Description
Notify space administrator when transfer starts When a member uploads or downloads a file in space, the system mailbox will send an email to all administrators of the space. The email contains the user name of the file being transferred, the number of files to be transferred, and a list of 5 files to be transferred.
Notify the creator when the transfer task completed When uploading or downloading files is completed, the system mailbox will send the upload or download completed email to the task creator. The email content includes the number of files and lists 5 files.
Notify the creator when the transfer task failed When uploading or downloading tasks have failed tasks, the system mailbox will send an email to notify the task creator. The email content includes the number of files that failed to upload this time and lists 5 files that failed to upload or download.

2.3 Antivirus

Function Description
Notify space administrator when virus files are detected When a user uploads a file containing a virus, the system mailbox will send an email to notify all administrators of the space. The content of the email includes the file name of the detected virus, virus type, upload space, upload path, and upload time.

6.11) Site Design

Updated: 2022-11-30 09:24:57

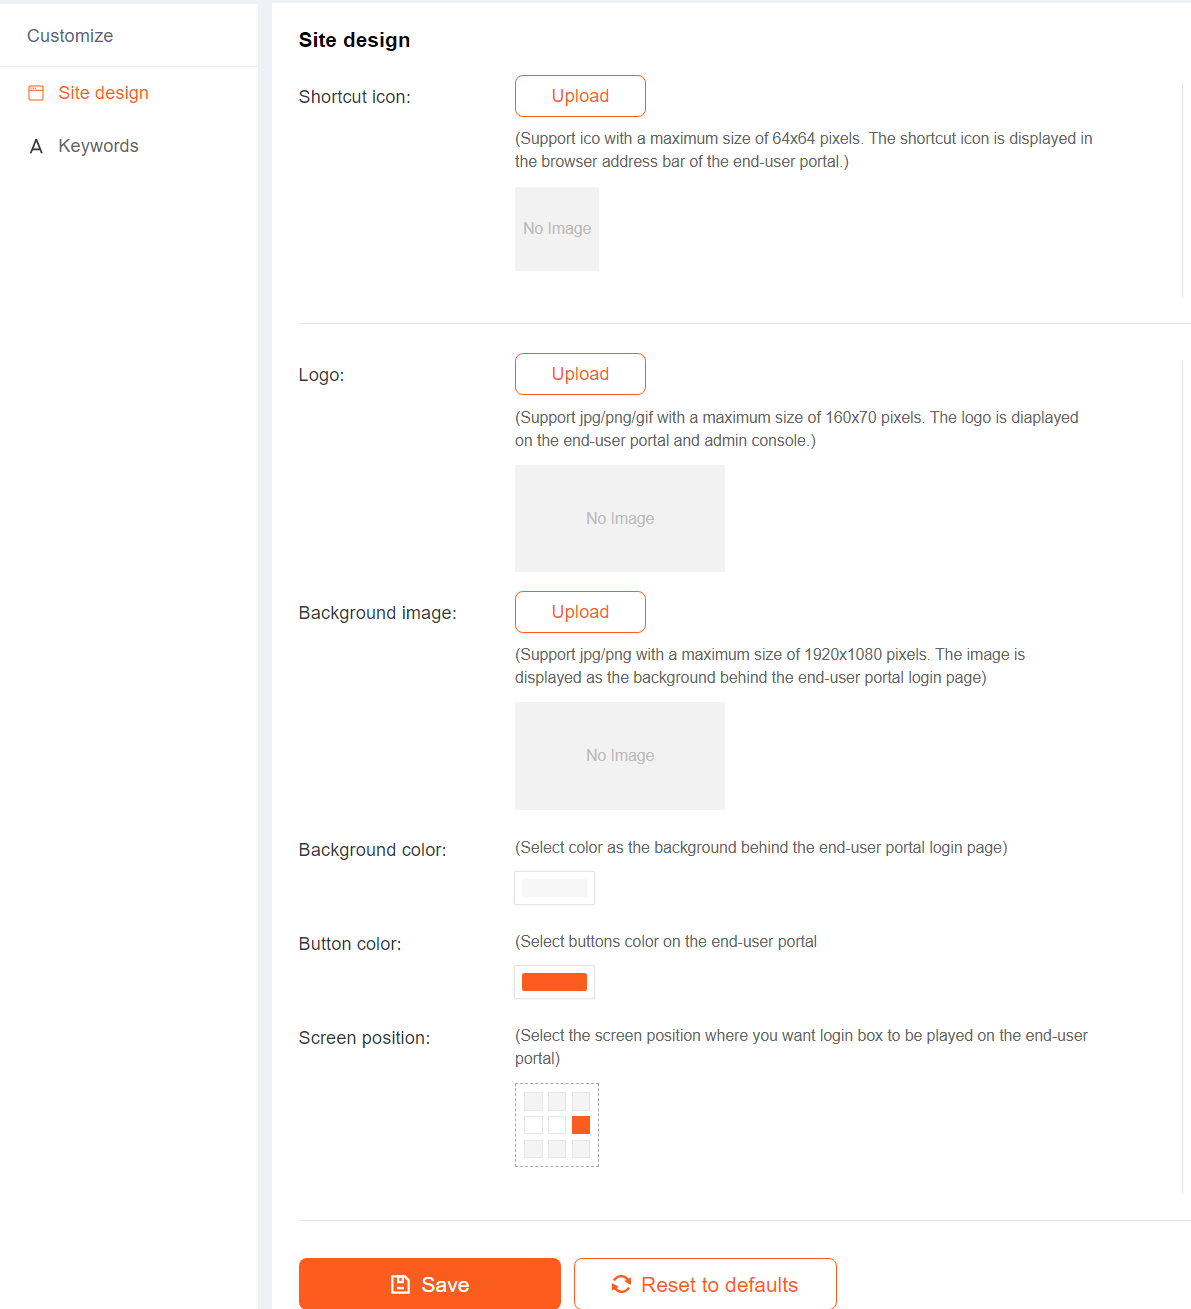
Support website customization and website keyword customization Website customization includes shortcut icon, logo, background image, background colour, button colour, screen position Keyword customization includes: company name, product abbreviation, company website

1、 Site Design

Click customize- Site design

自定义英文

2、 Site Keywords

Click customize- Keywords

关键字英文

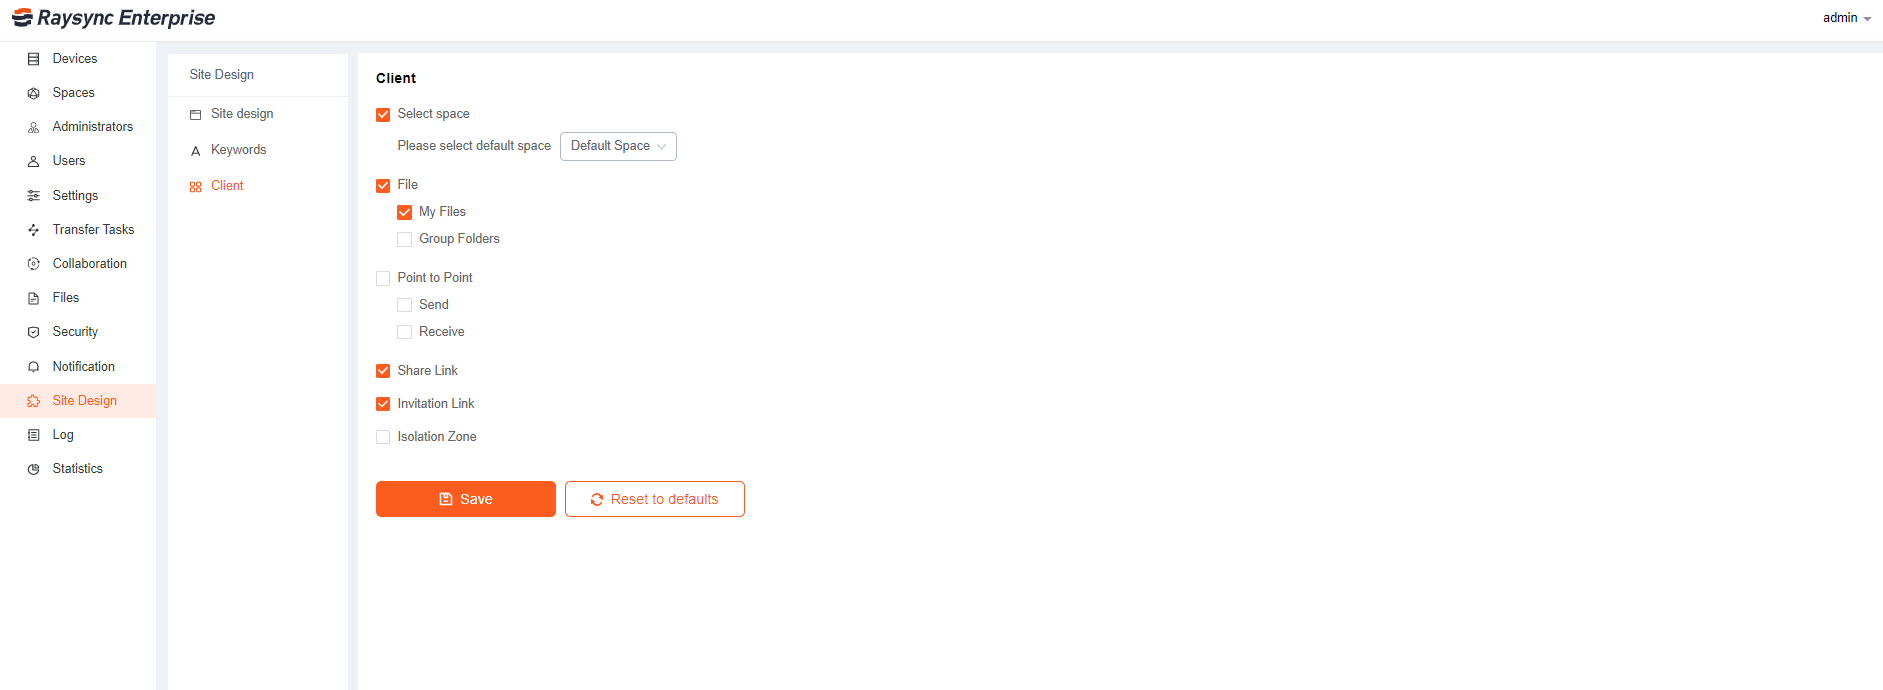
3、Client

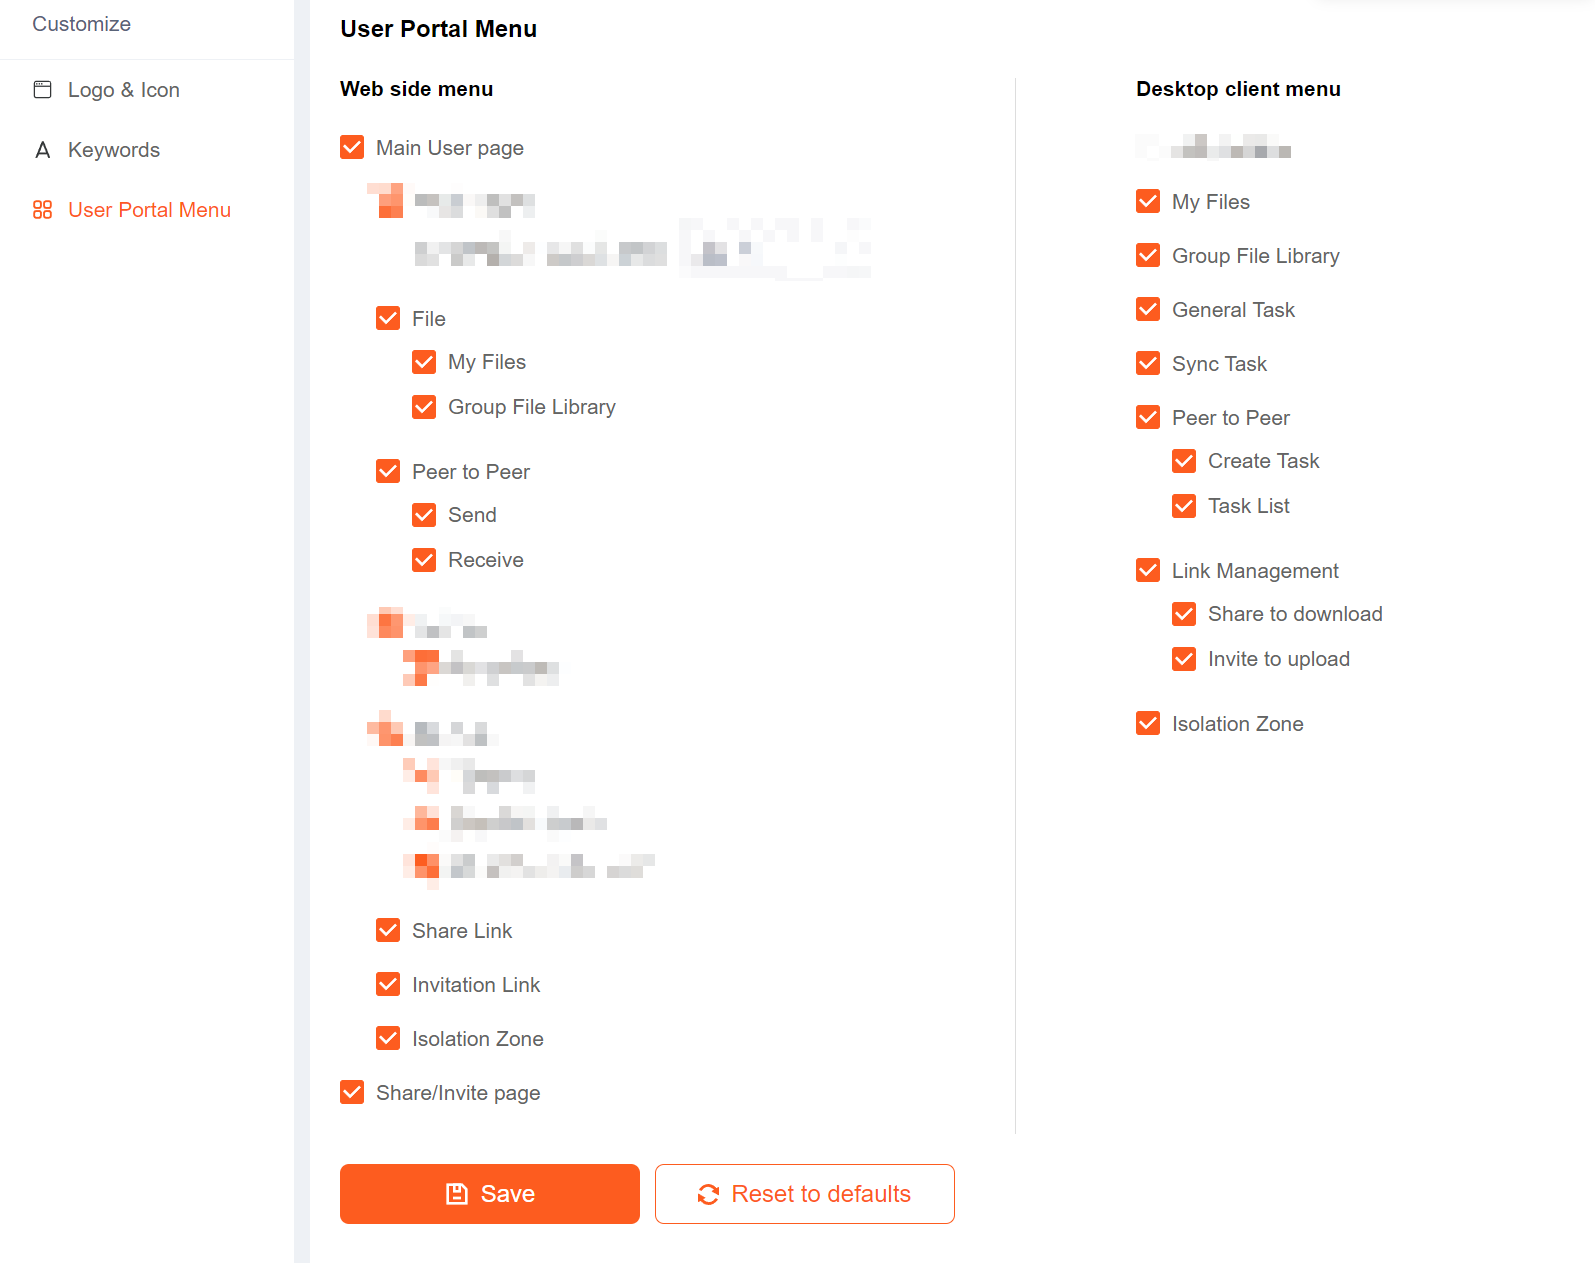
You can customize the modules on the User features, if you deselect it, it will not be displayed on the User features.

Client

example:

client 1

client 2

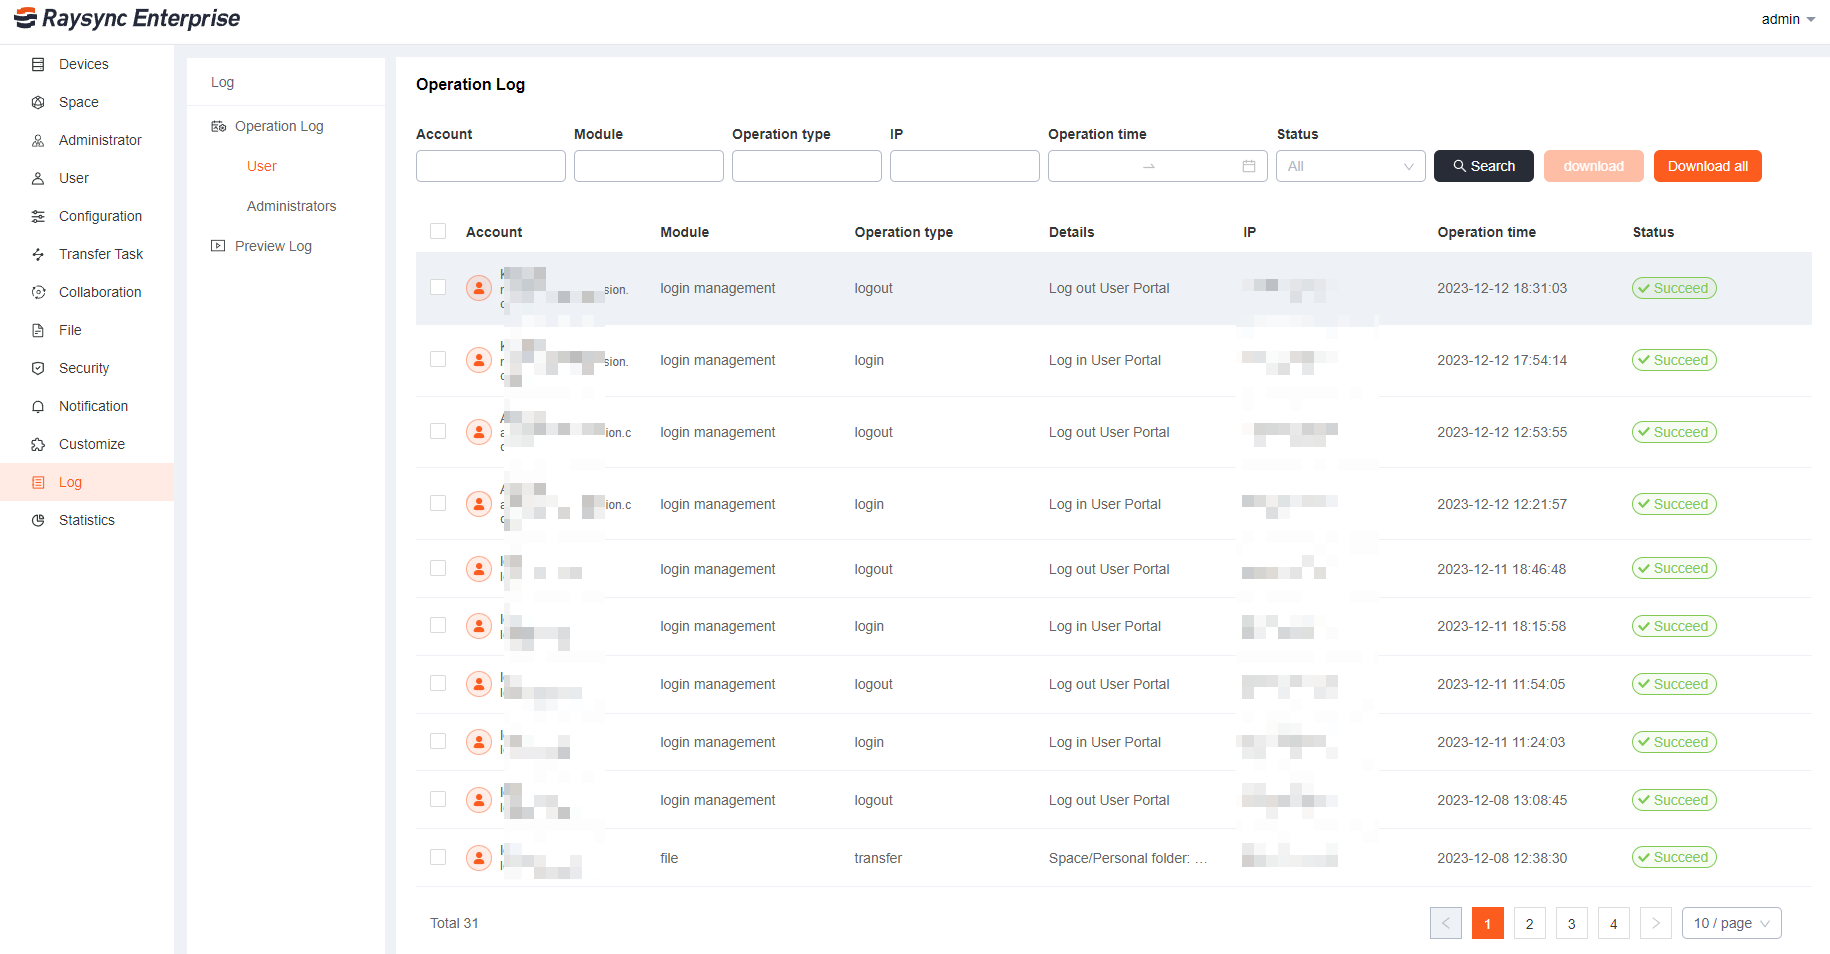
6.12) Log

Updated: 2022-11-30 09:25:05

For viewing the logs of administrator and frontend operations, as well as the logs of video previews

1. Operation Log

操作日志英文

2. Video Preview Log

视频预览日志英文

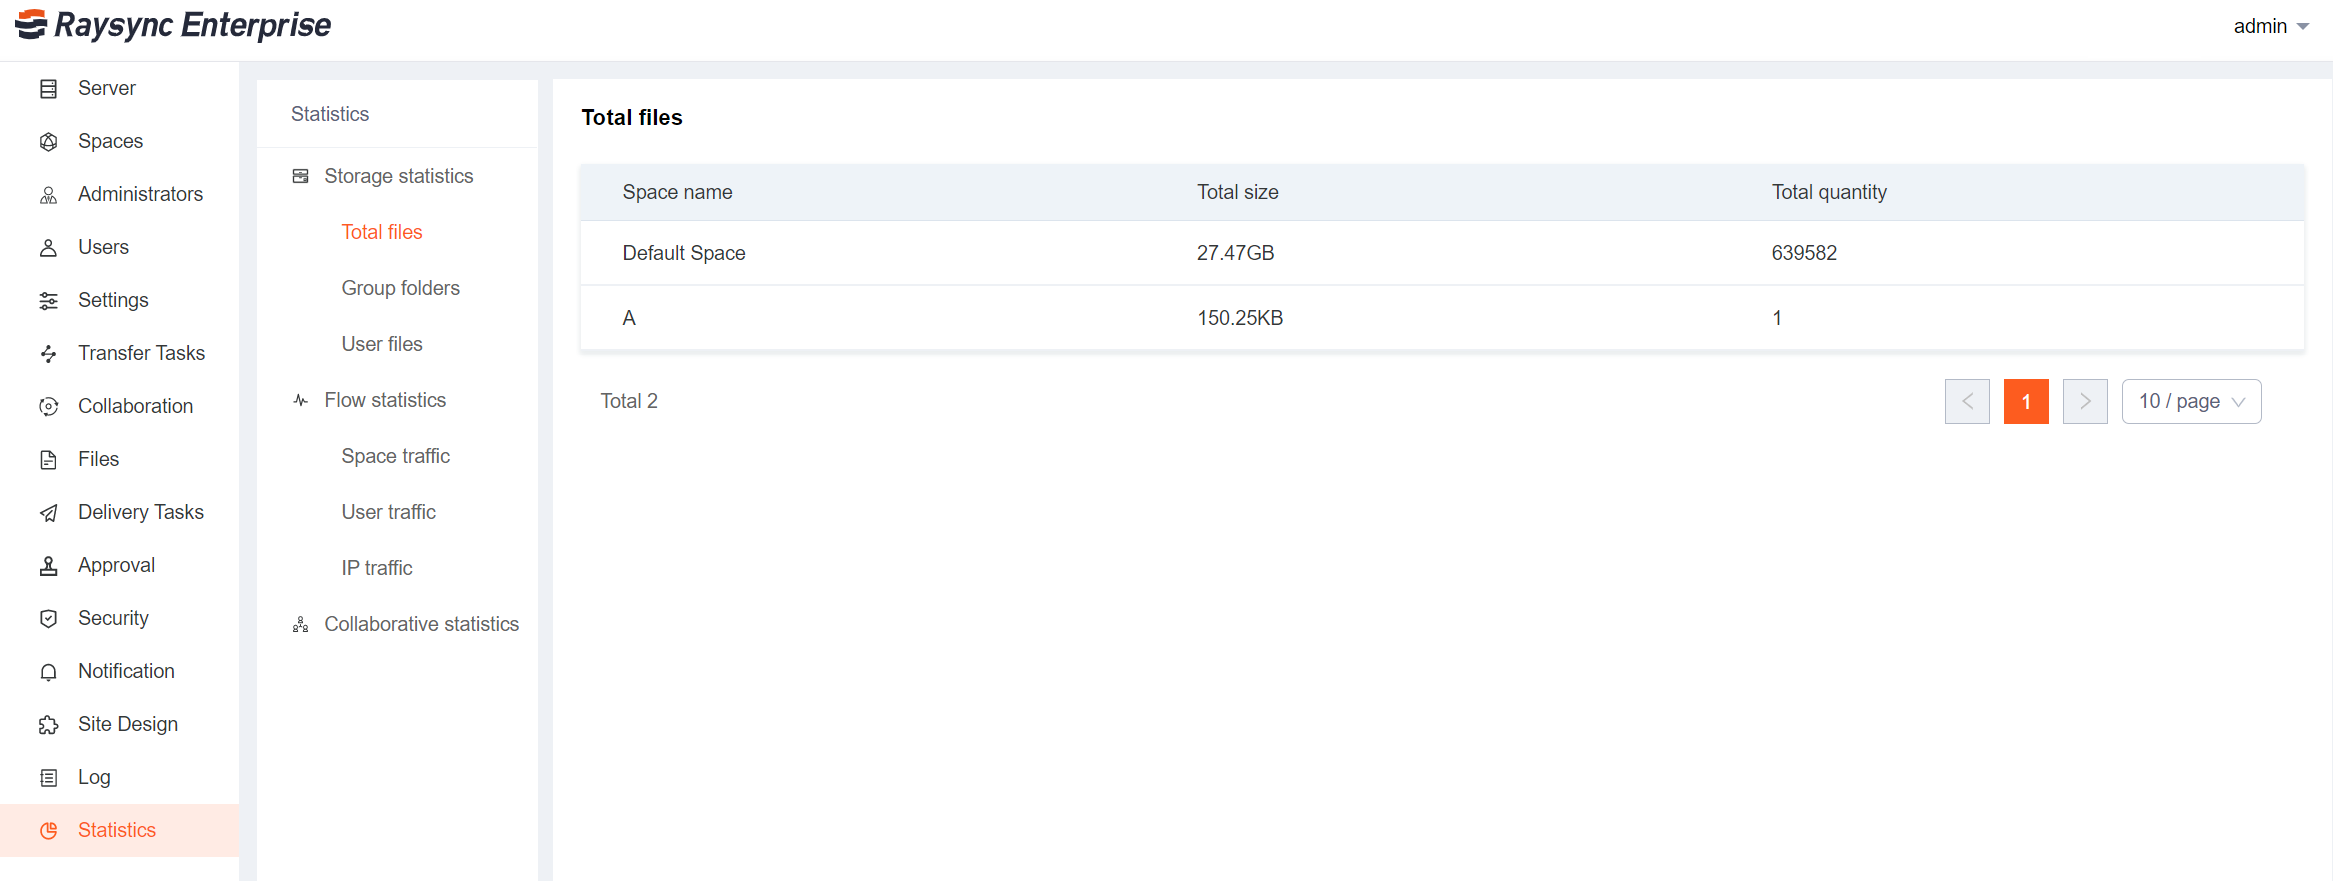
6.13) Statistics

Updated: 2022-11-30 09:25:21

Support the total amount of storage of space files, the total amount of personal files, the total amount of group folders, the statistics of the space flow, the statistics of member traffic, IP traffic, and collaboration statistics.统计英文

1. Timing Statistics

In spatial management-space statistics, regular statistics can be opened for personal file storage or group file inventory. After opening, full statistics will be performed according to the statistical cycle.

定时统计2

2. Real-time Statistics

Real-time statistics of storage usage when adding or reducing files on the Client, and real-time statistics of transfer traffic when transferring files.

7) User Portal Guide

7.1) Profile

Updated: 2022-11-30 09:17:13

1. User login

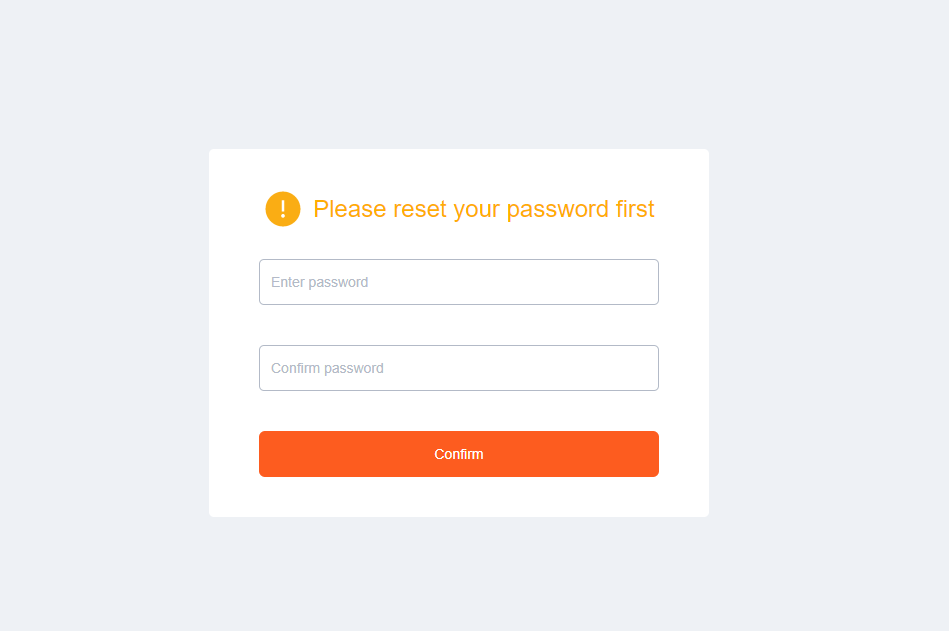
Login Process Please enter the login page, enter the correct user name and password, and click Login. The password needs to be changed for the first login and the new password is used to successfully log in.

  • Enter the user login page of Raysync. The URL address of the login page is generally the server IP + port number "8090" ( e.g.:192.168.1.1:8090)

  • Enter the login page, the page includes the user name and password. Enter the user name and password and click the Login button, (if the background management configures the user to reset the password for the first login)enter the reset password page, otherwise, a message will be displayed indicating that the user name or password is incorrect.login-en

login1-en

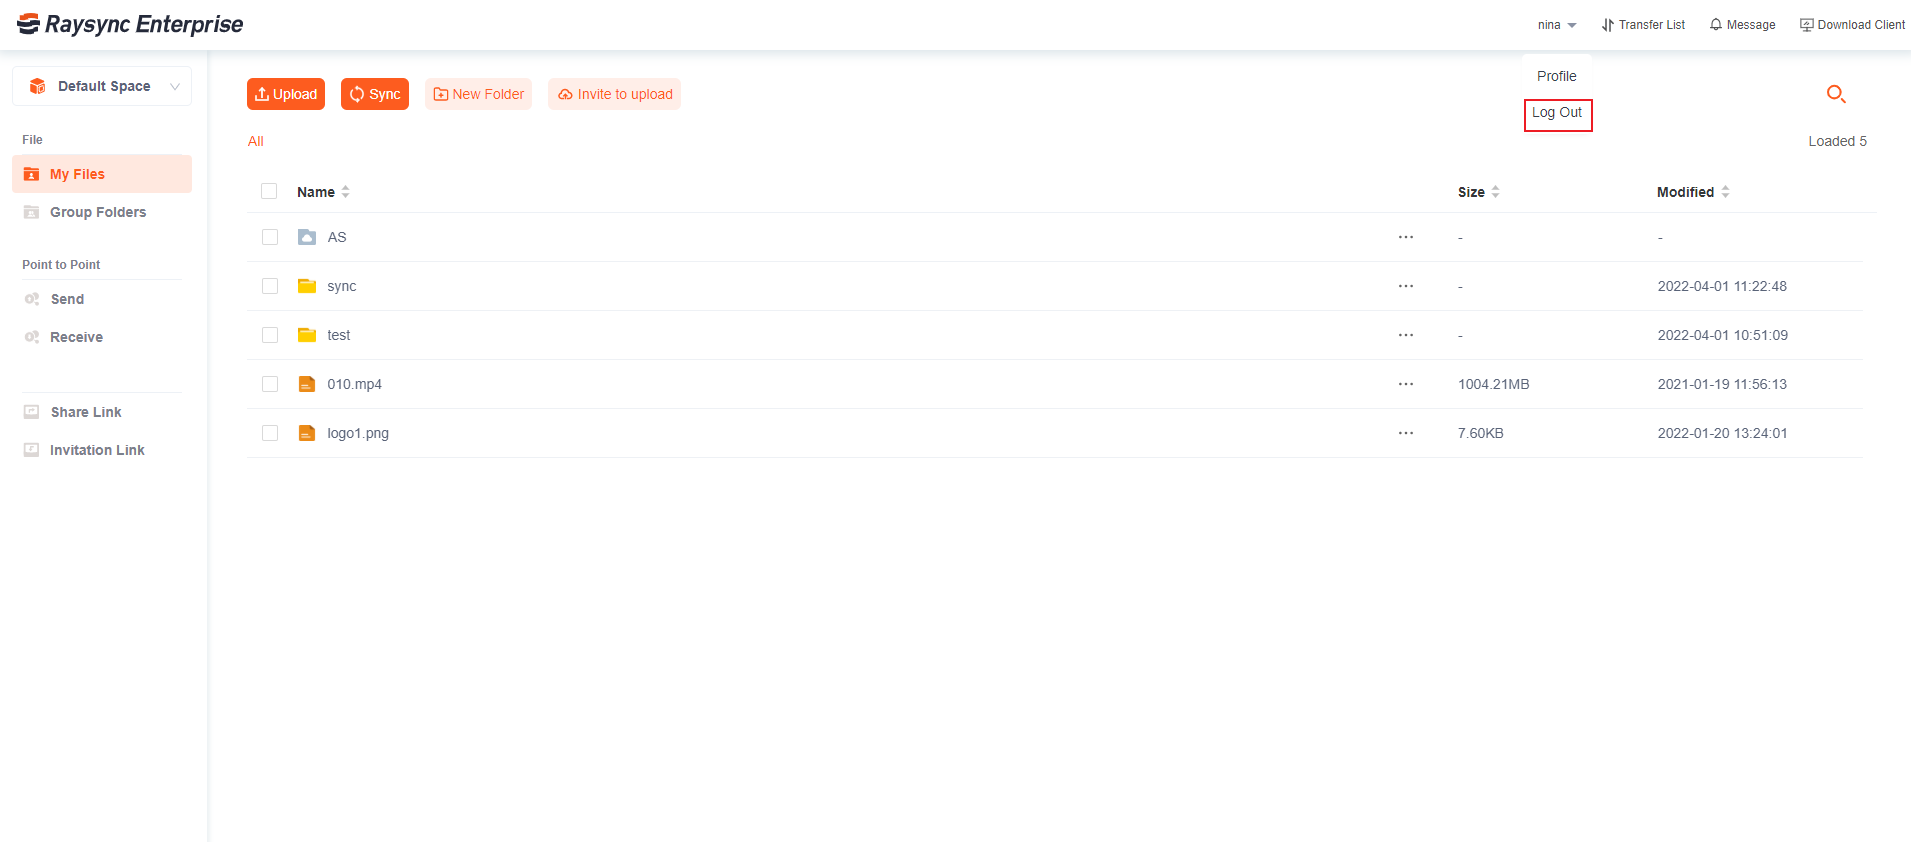
2. User Log Out

Click the user name button in the upper right corner to expand the options, click the Log Out button.logOut-en

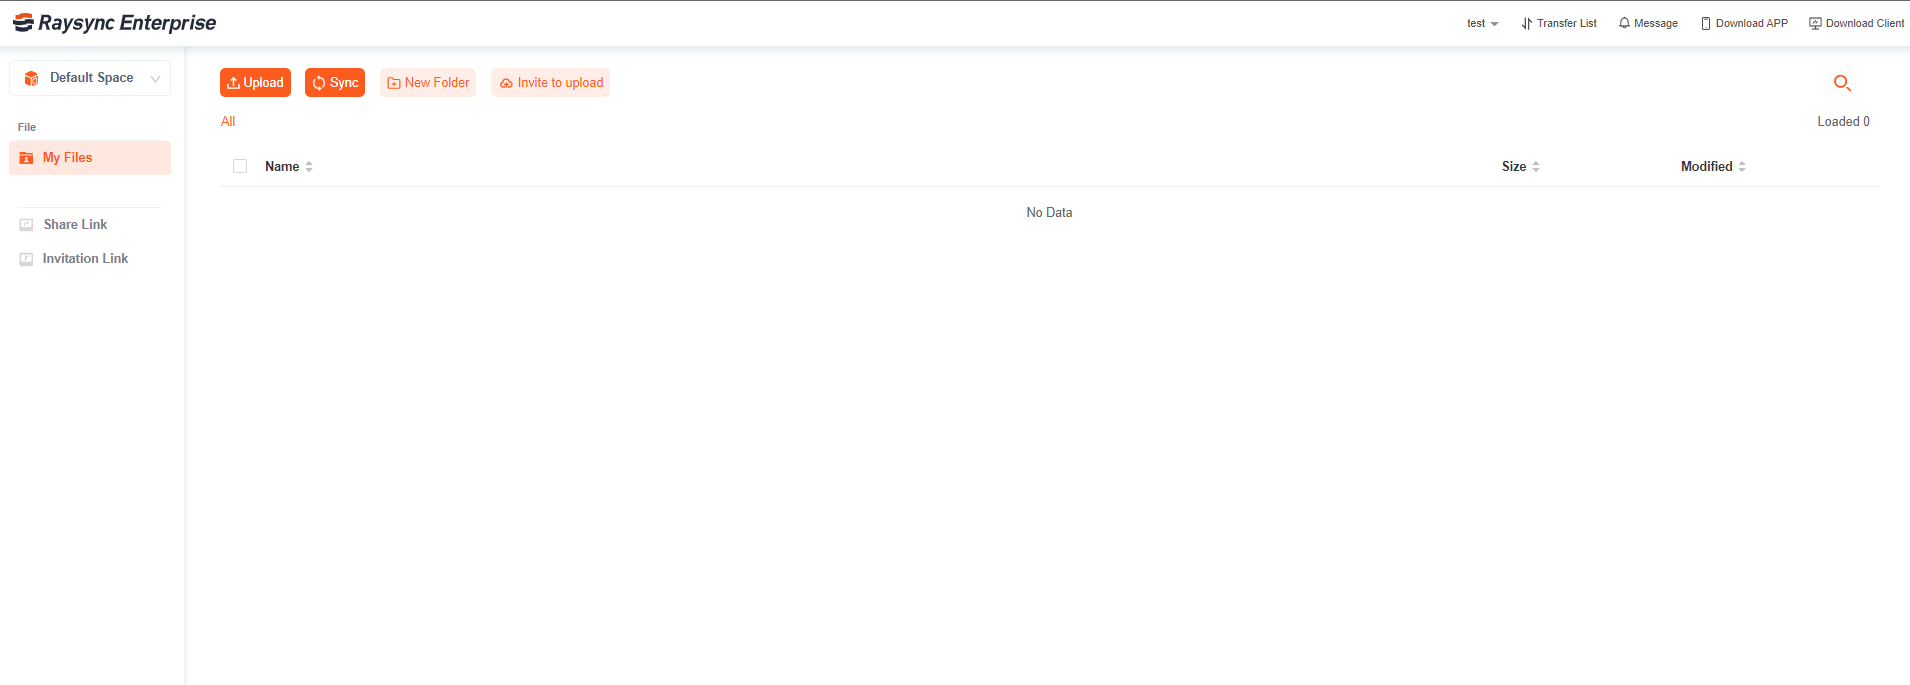
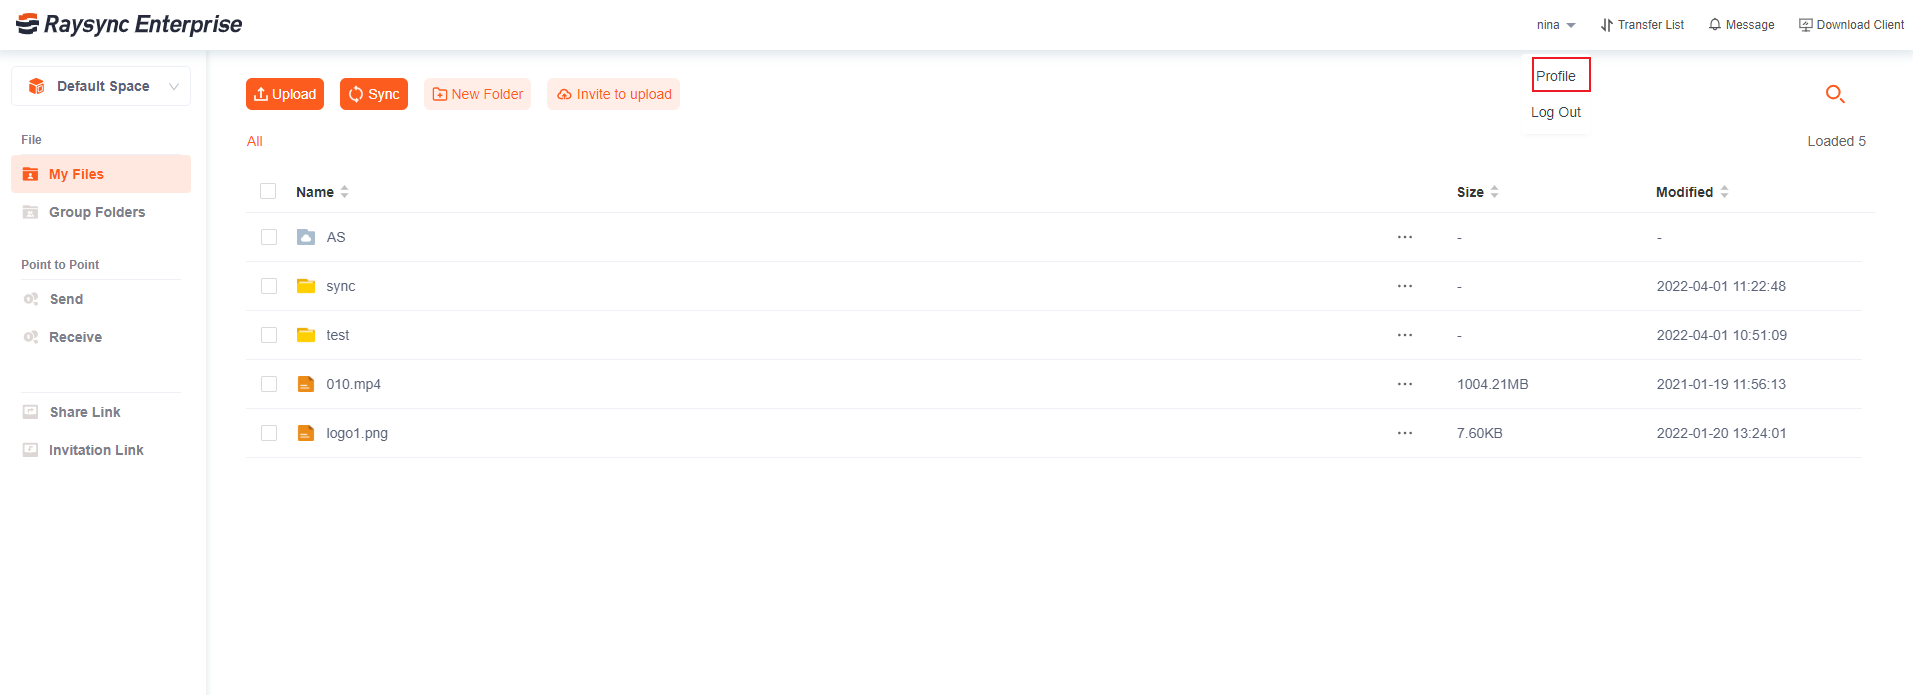
3. User Center

Click the user name in the upper right corner to expand options, and click the "Personal Center Button" button.profile-en

3.1 User Massage

Click User Massage, edit your real name and your login email.profile-1

3.2 Update Password

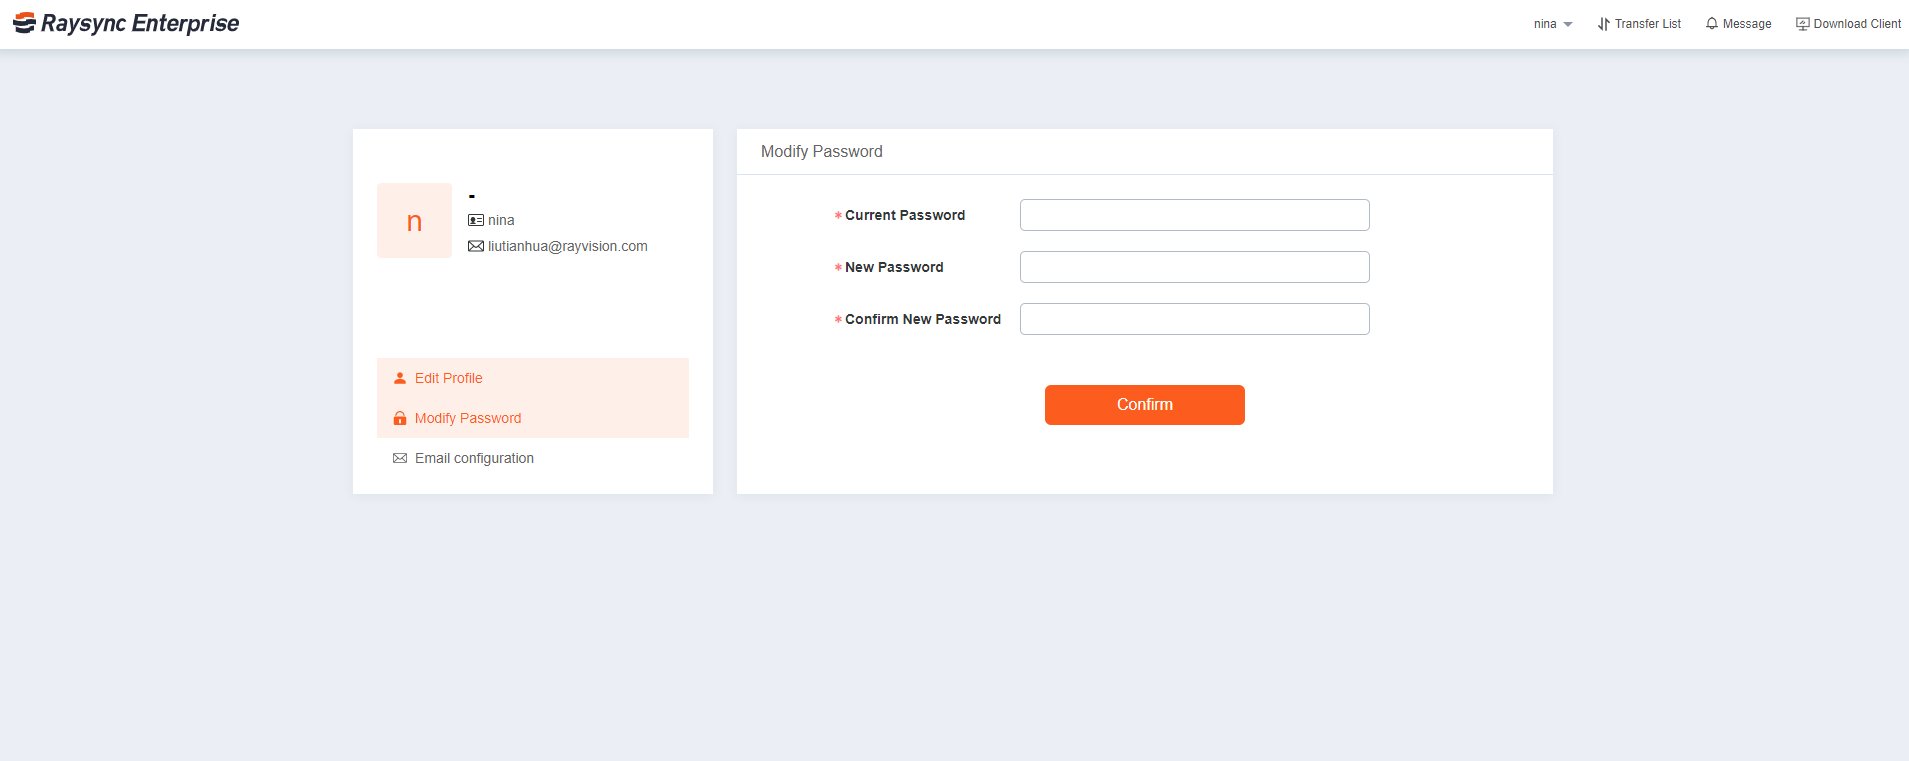
Click Update Password to change the login password of the account.profile-2

3.3 Mail Settings

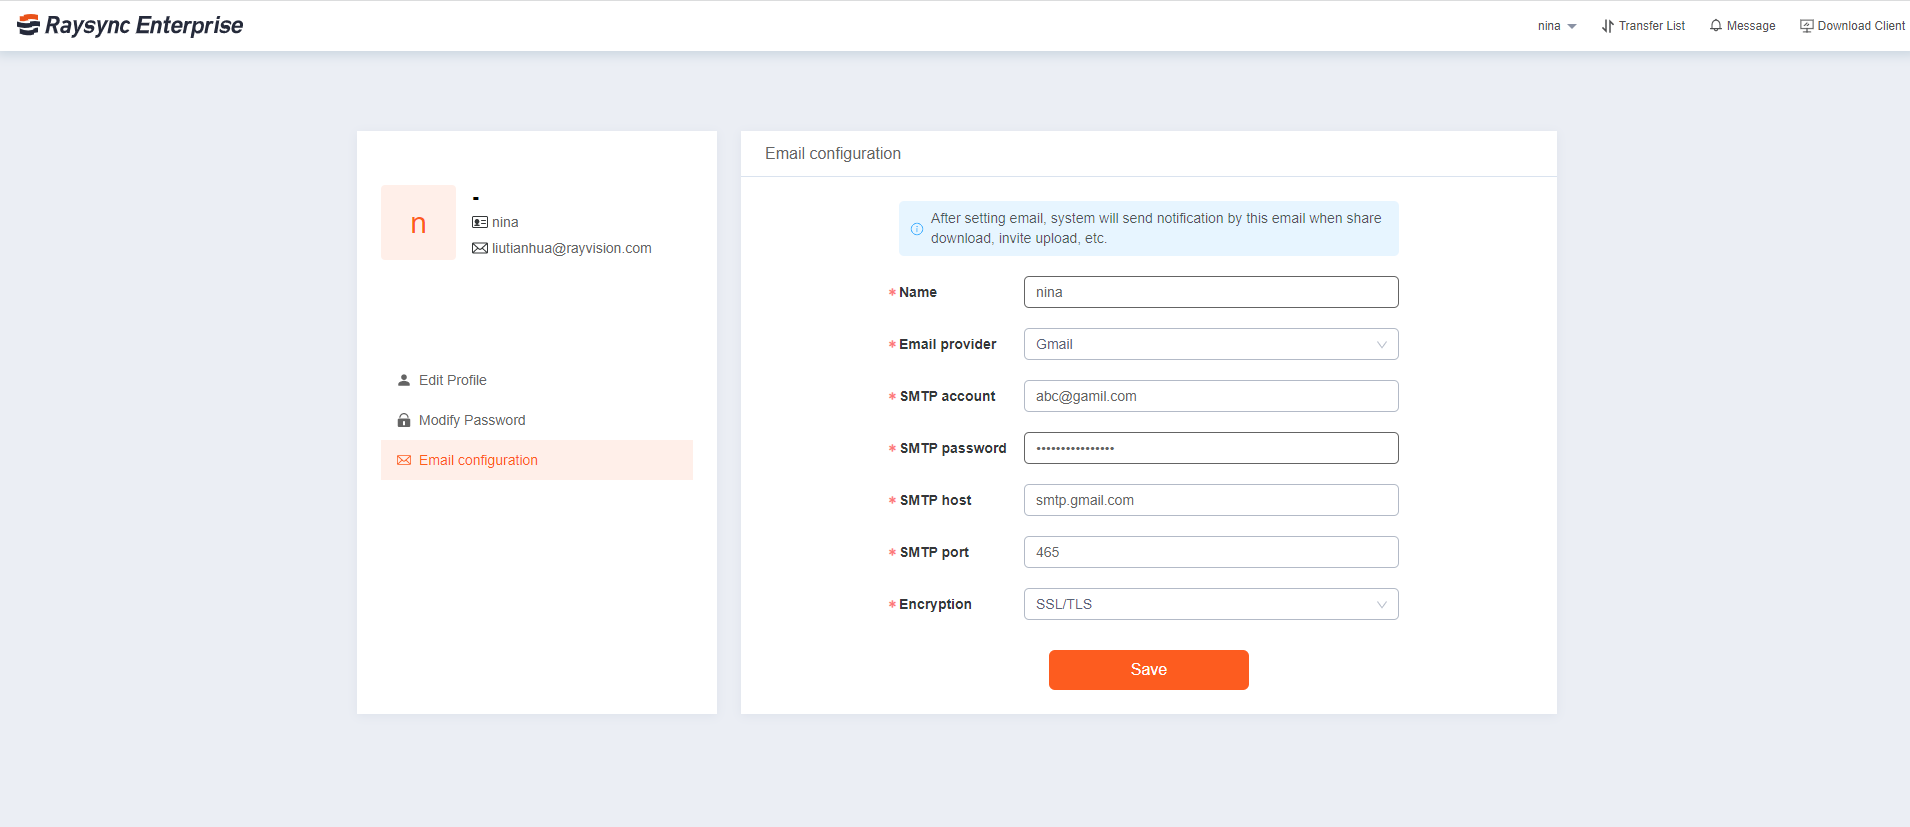
Click Mail Settings to configure the sender email address for sharing and downloading email notifications.profile-3

3.4 Forget Password

  • Click Forget Password, enter the user's login email, and use the received verification code to reset the password. Note: Forget password function needs to configure the system mail. For details, please refer to the server user guide - configuration - email configuration.forgotPwd1-en

  • Enter the user's login email address and click Next

forgotPwd2-en

  • Send the verification code, click NextforgotPwd3-en

code

  • If the verification code expires, please click Resend. The verification code expires in 10 minutes, and the resend time is 60 seconds.forgotPwd-4-EN

  • Enter a valid new password. Click Confirm Reset to complete the password modification. Note: The password needs to be 8 to 20 characters, including three combinations of uppercase letters, lowercase letters, numbers and characters, and the password cannot be the same as the username.

pwd-5-en

4 Download app

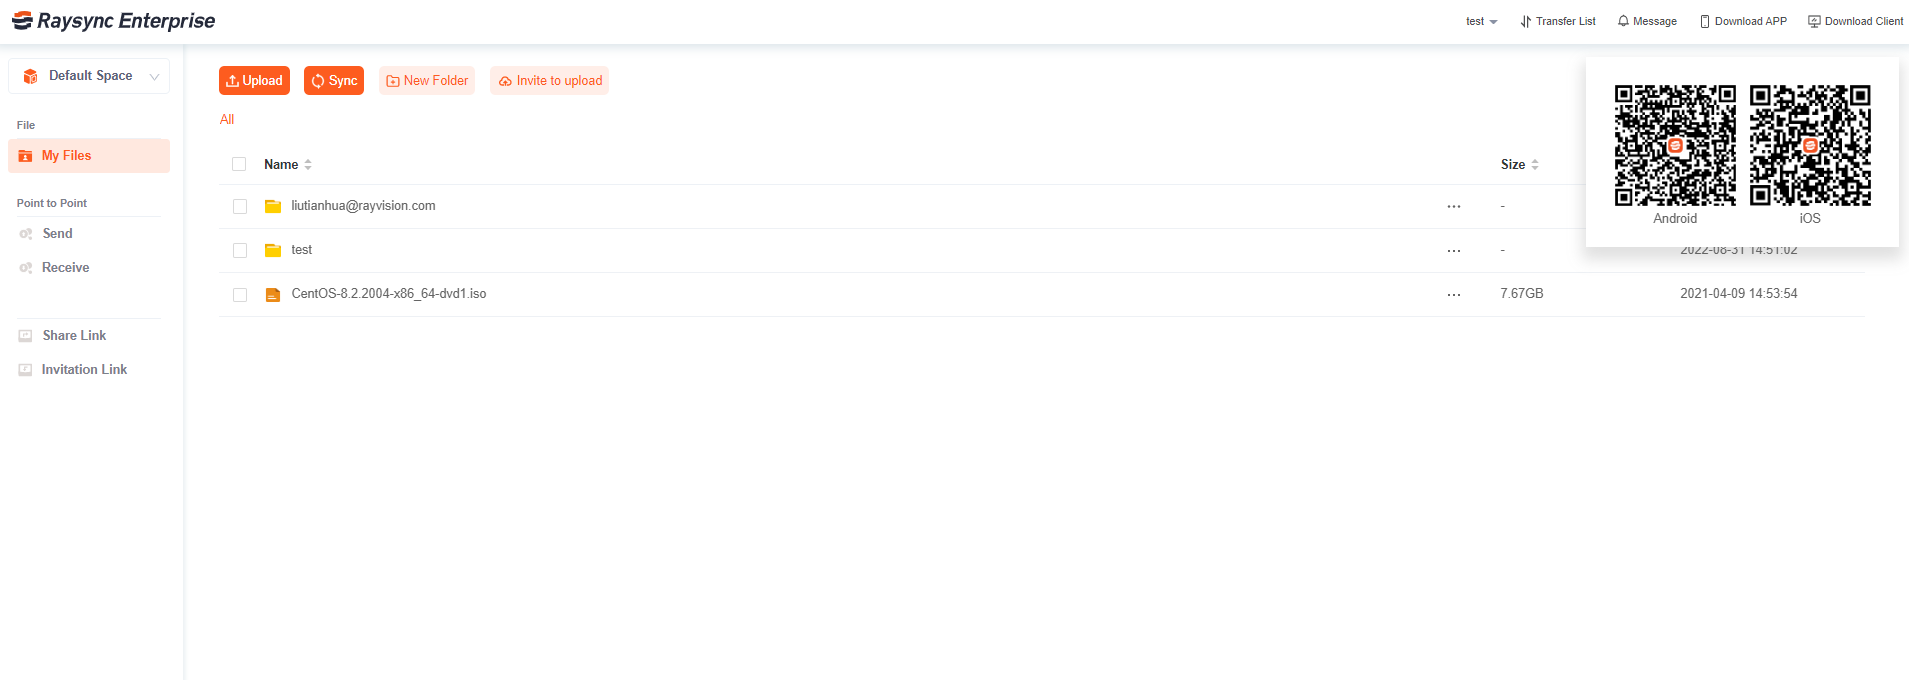
You can scan the code with the scan tool of the browser to obtain the installation package of the Android app or jump to the app store to install the raysync app.

download app

7.2) My Files

Updated: 2023-08-21 11:32:46

1 Client installation and uninstallation

Raysync client supports the installation of windows server 2008/ windows server 2012/ windows server 2016/windows 7/windows 8/windows 10/mac os 10.11 and above.

1.1 Download client

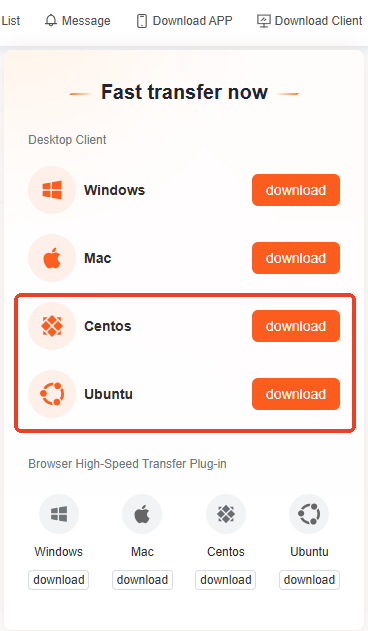
If the client is not installed or started, click the "Client Download" button and select the client of the corresponding platform to download.clientDownload en

1.2 Install the client

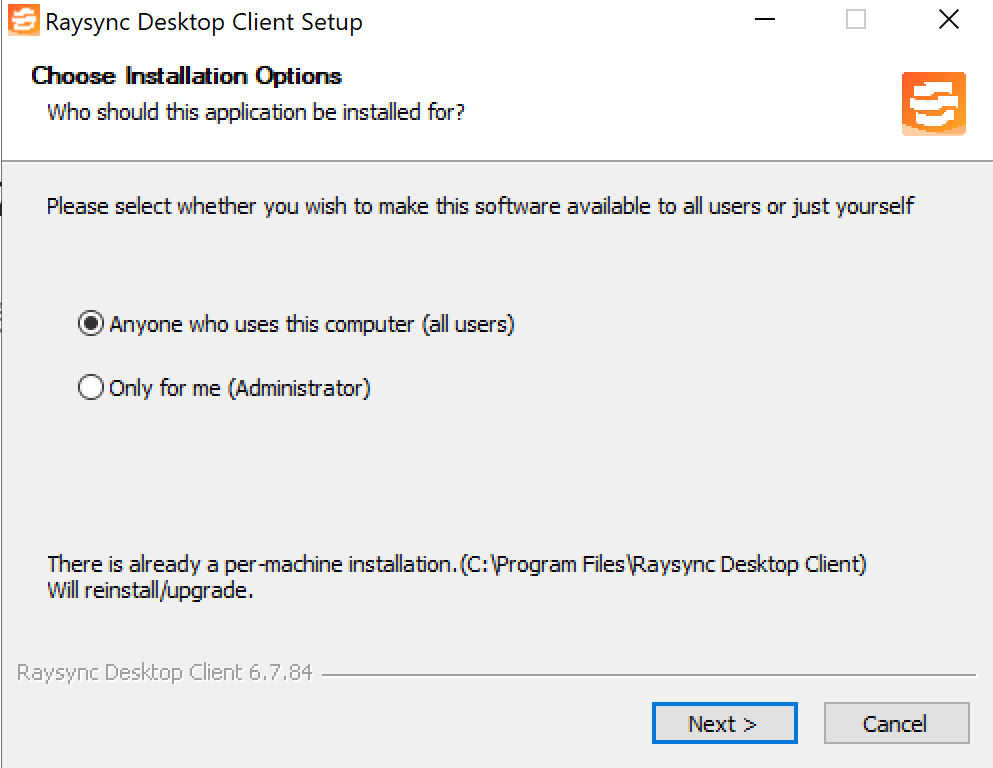
Installation process

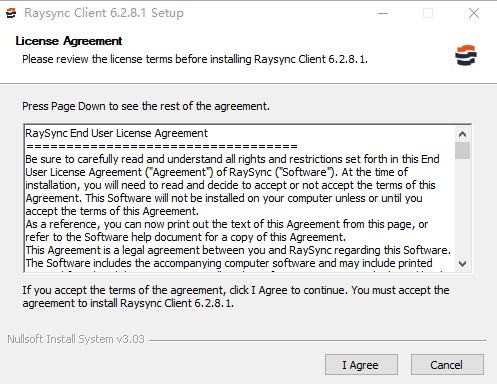
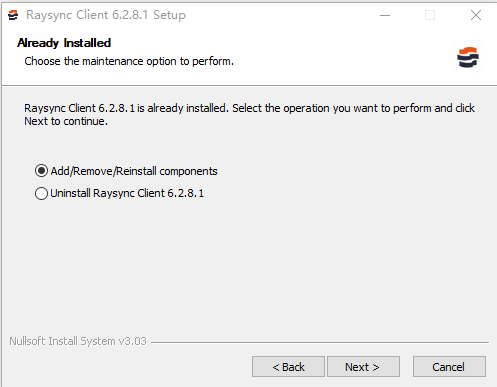
  • After the download is successful, double-click to open to start the installation, as shown below
  • Read the software installation agreement and click I accept to proceed to the next stepinstall 1 en

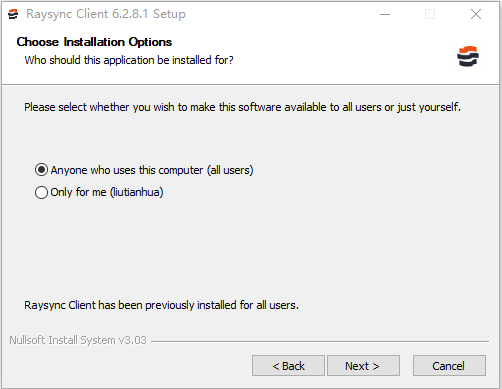
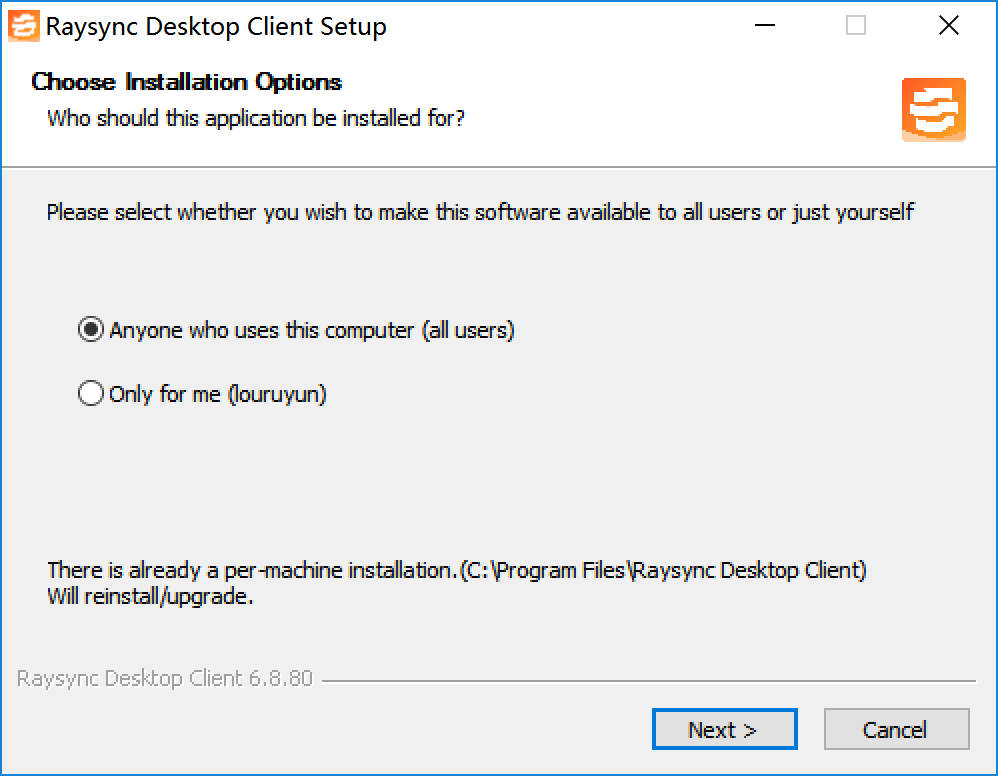
  • Select the installation option and click Nextinstall2 en

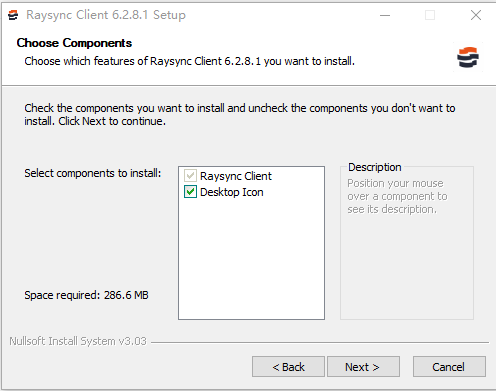
  • Select the components to be installed and click Next

install3-en

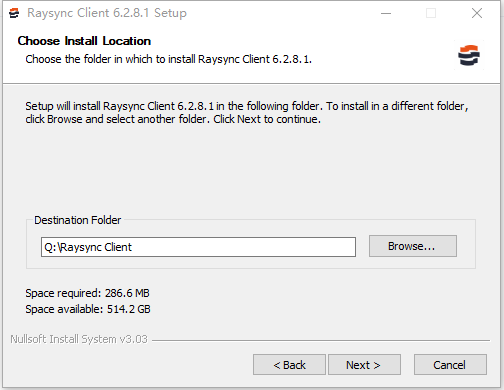
install4-en

  • Select the path to be installed and click Next

install5-en

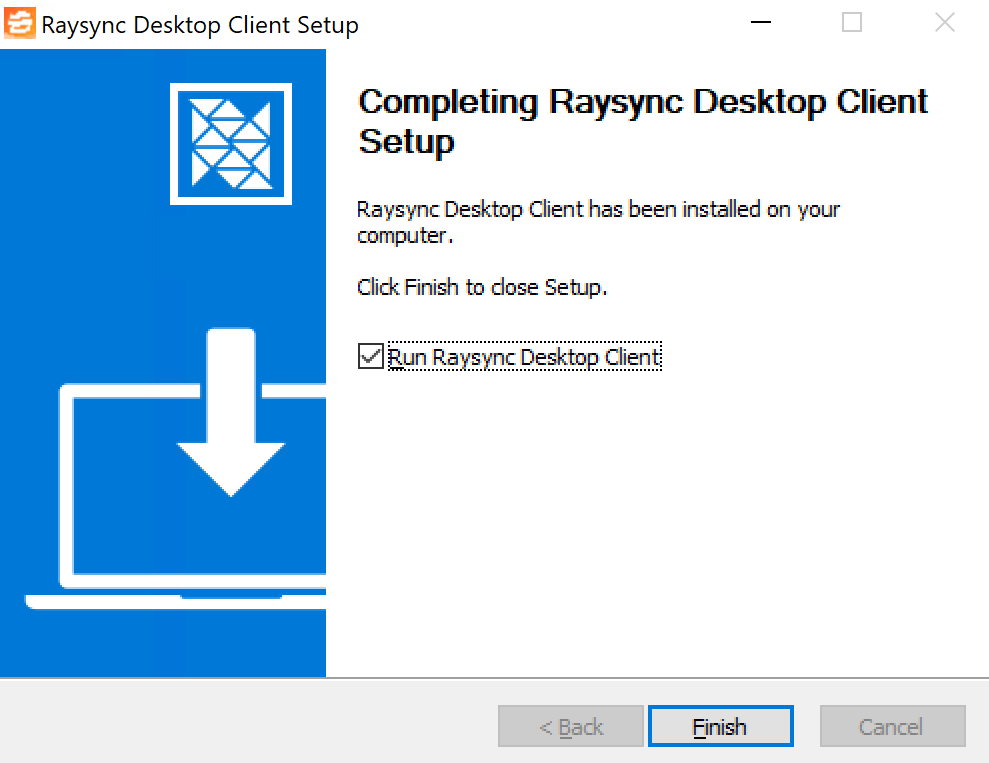
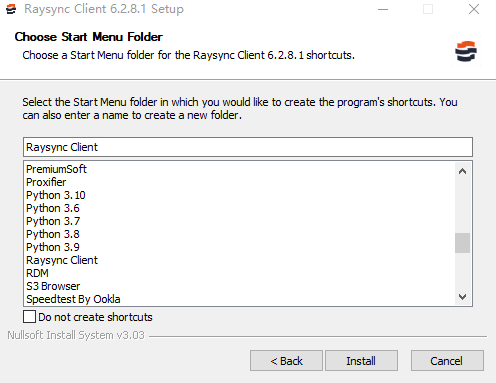
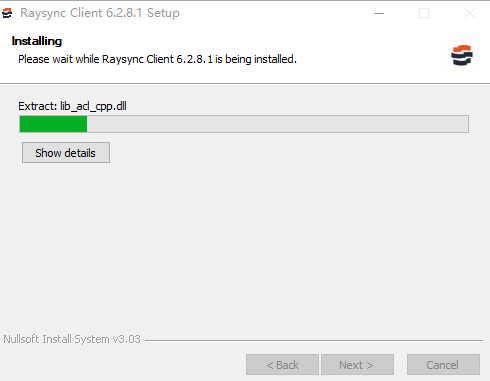
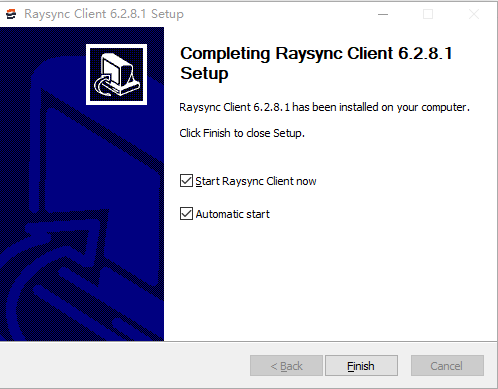
  • Select Install, and click Finish after the installation is complete

install6-en

install7-en

install8-en

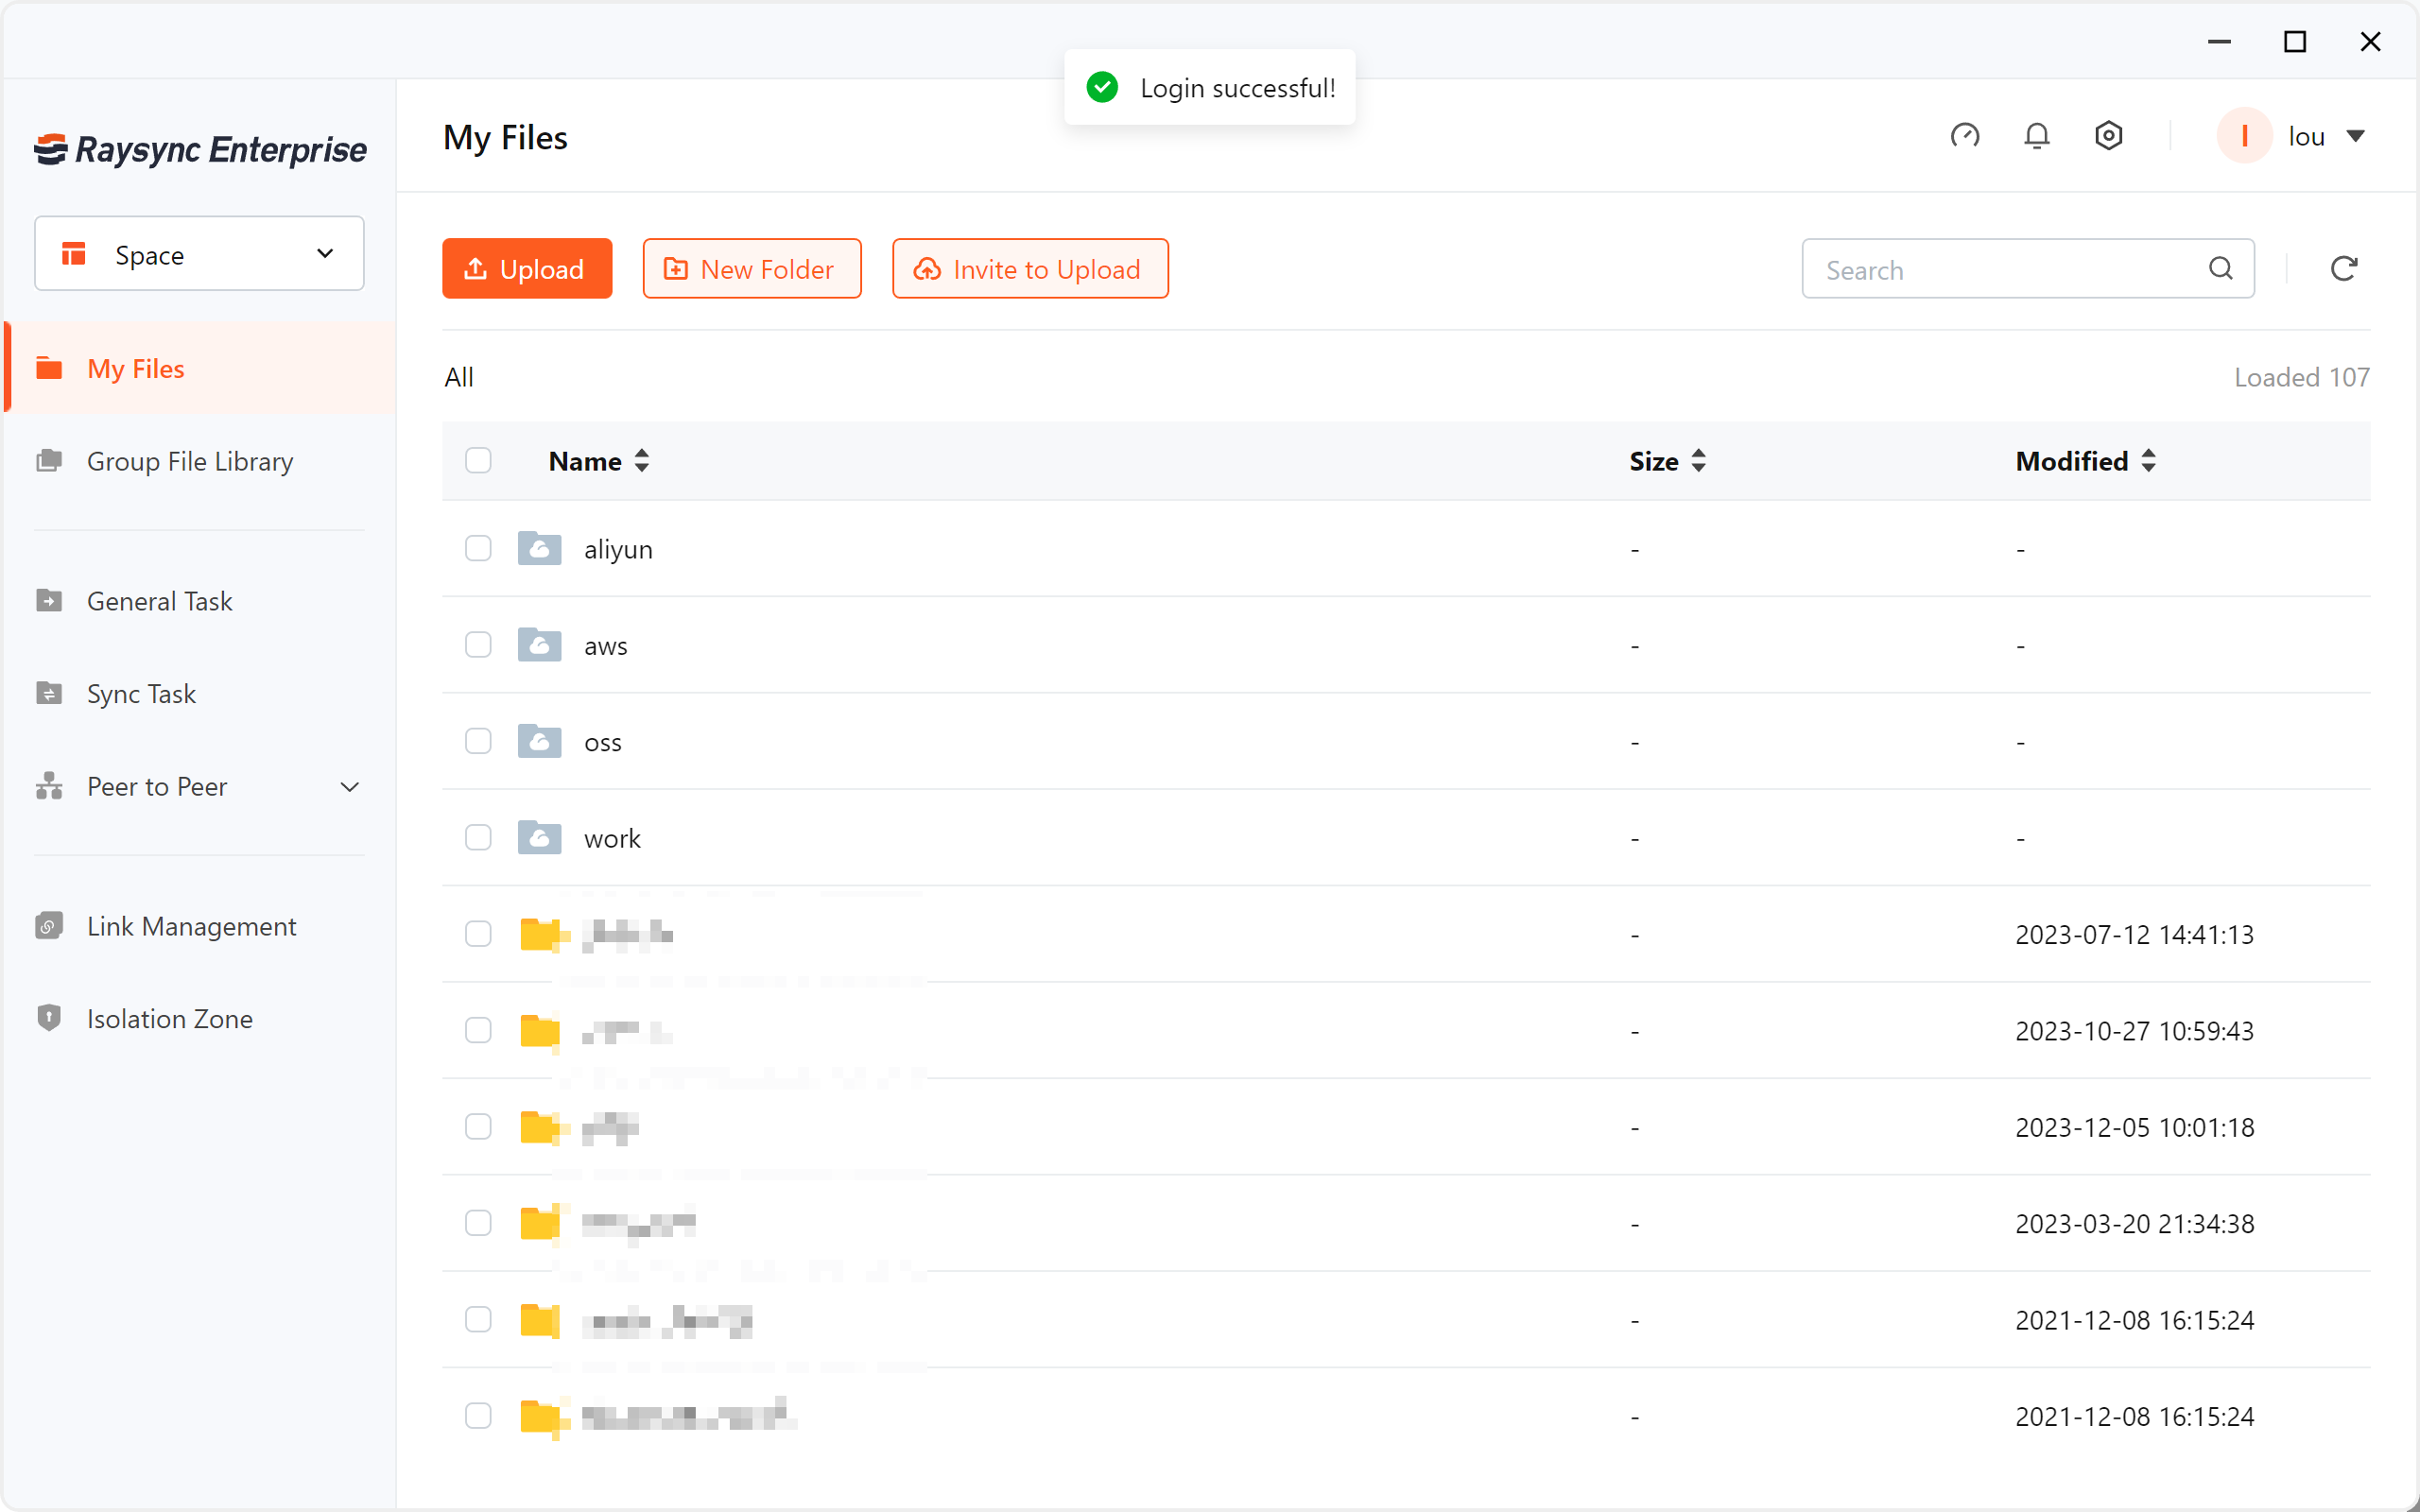
1.3 Start the client

Startup method 1

  • After the user logs in to the webpage, the system will check whether the Raysync client has been activated. If the Raysync client is not activated, it will automatically switch to the web page tcp connection mode, which only supports normal upload/normal download/invite to upload/ Share to download. If you need to use other functions, you need to start the Raysync client.

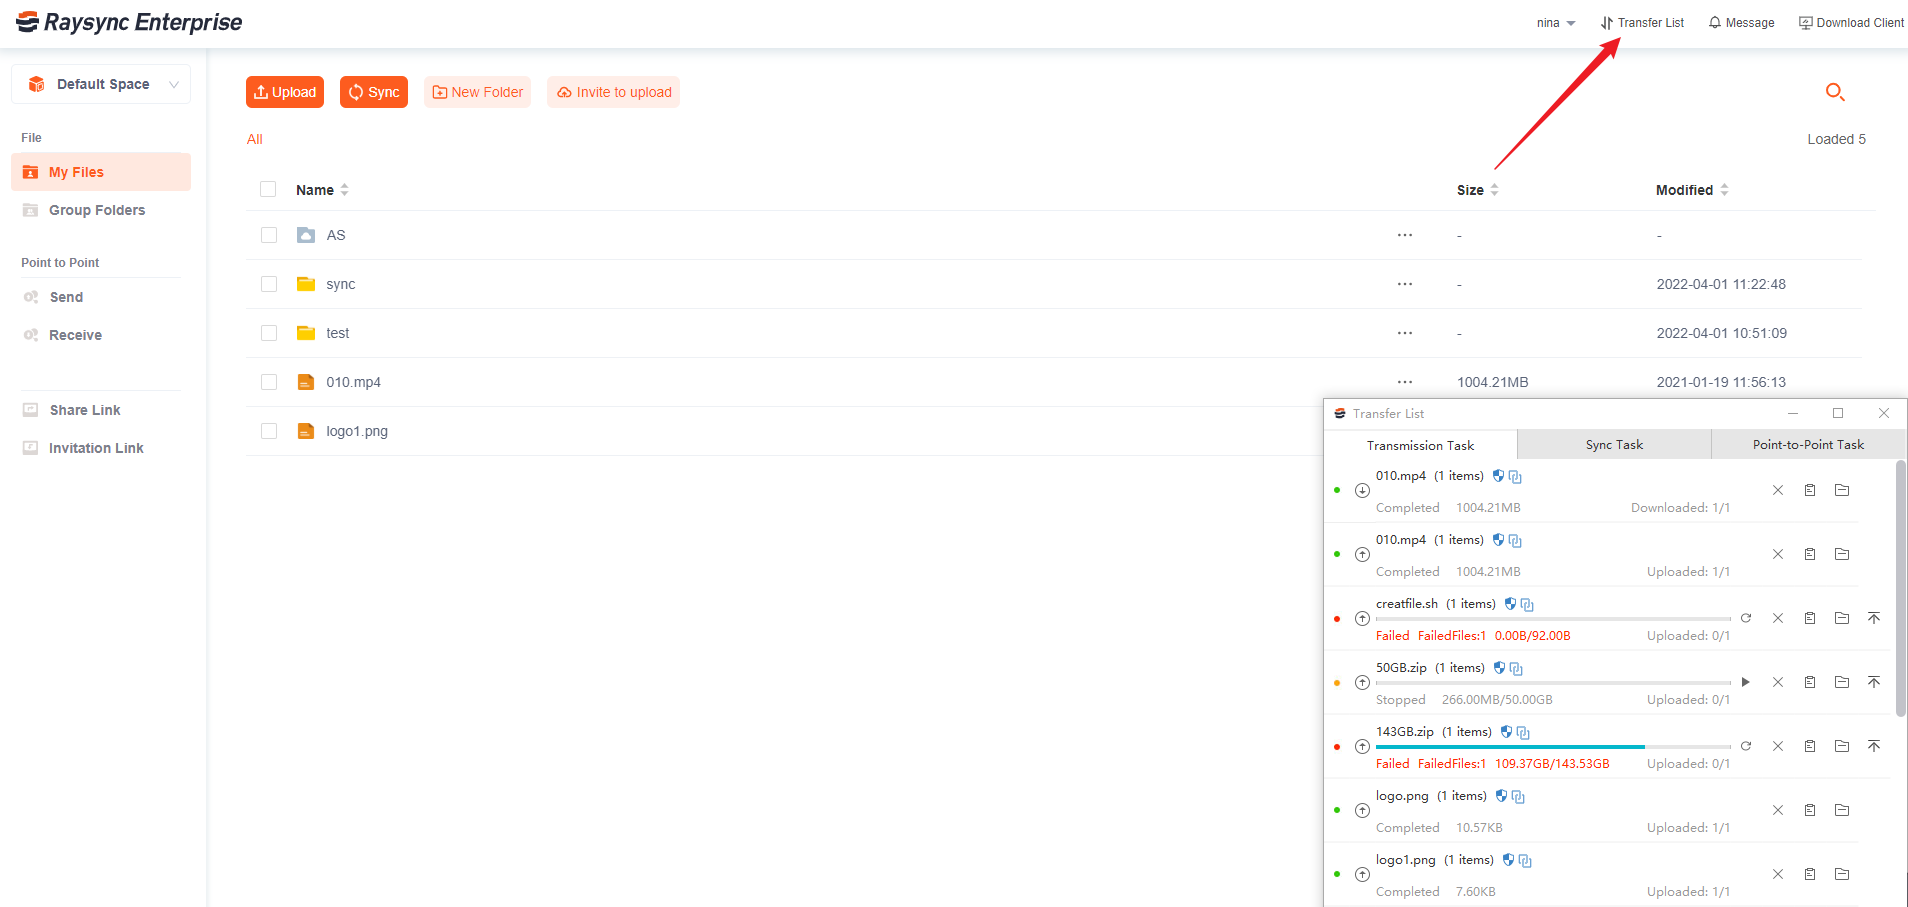
  • Click Transfer List on the Raysync front-end web page. The prompt dialog box for startup or download will pop up. Click the "Start" button.

  • A message is displayed asking you whether to open raysync-watch. exe. Click to open the application and wait until the startup is complete.
    transferList1-en

Startup method 2

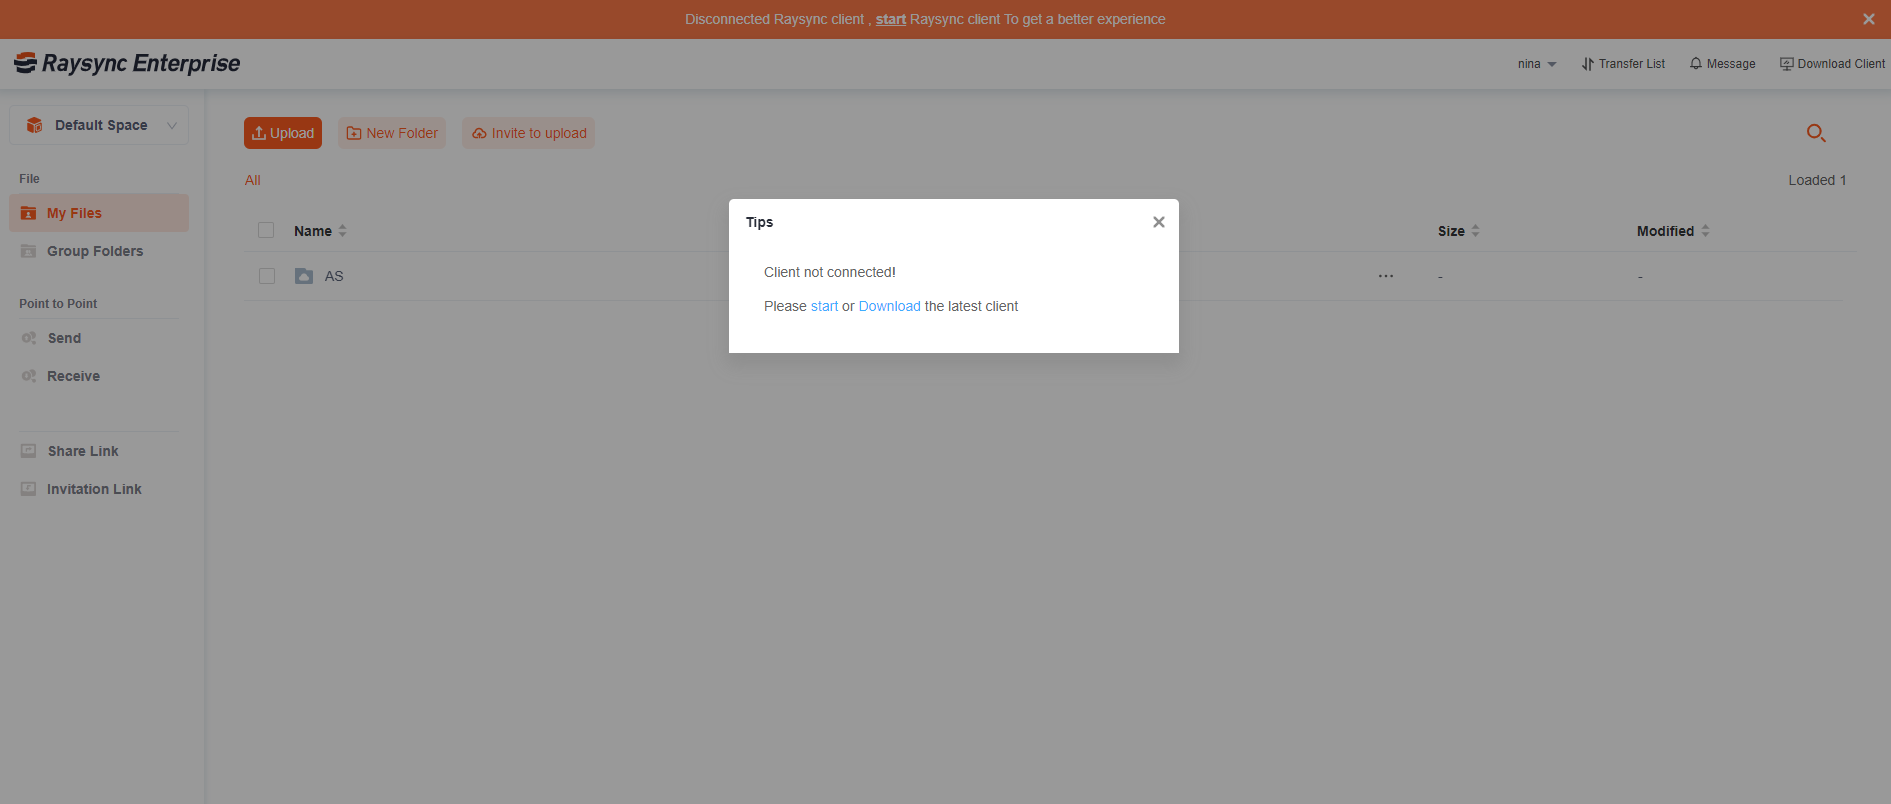
  • If the message that the client is not connected pops up, click "Start".
  • A message is displayed asking you whether to open raysync-watch. exe. Click to open the application and wait until the startup is complete.
    transferList2-en

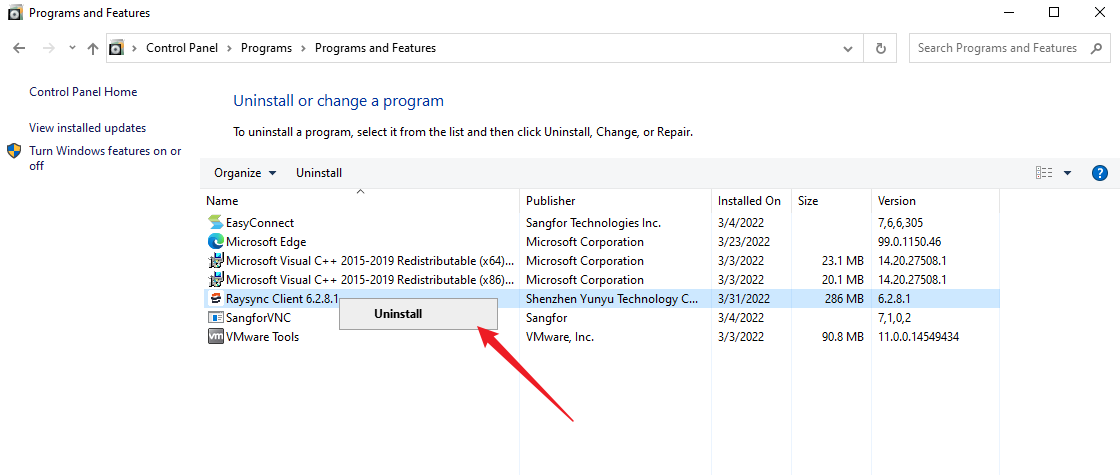
1.4 Uninstall the client

Uninstall method 1

  • Enter Windows "Control Panel" -> "Programs" -> "Programs and Features"

  • Select the Raysync client program, right-click to uninstall.

uninstall1-en

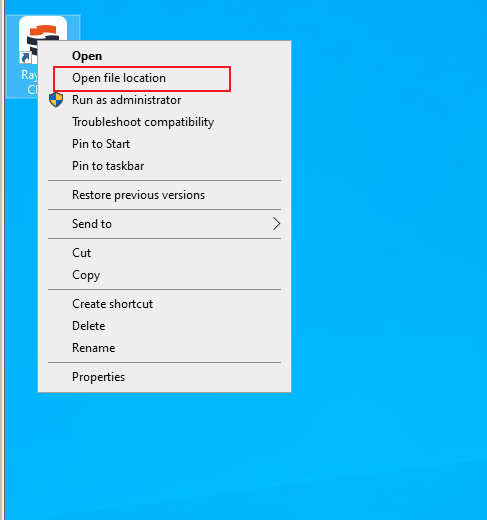
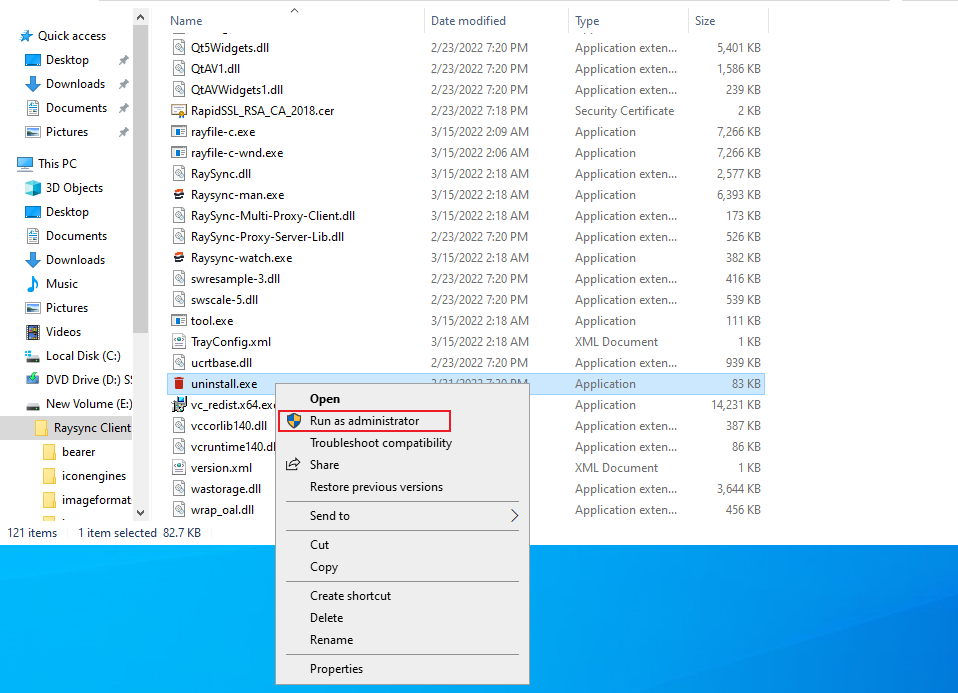
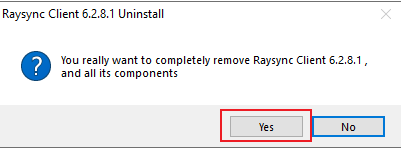
Uninstall method 2

uninstall2-2-en

uninstall-2-3-en

2 File Operations

Raysync supports two ways of transfer: web(without the client)and client. In the absence of a client (web), you can create a new folder/invite upload/download/share download/copy/move/delete/property/rename, while creating a synchronization task directory/previewing videos requires the installation of a client.

2.1 Upload file

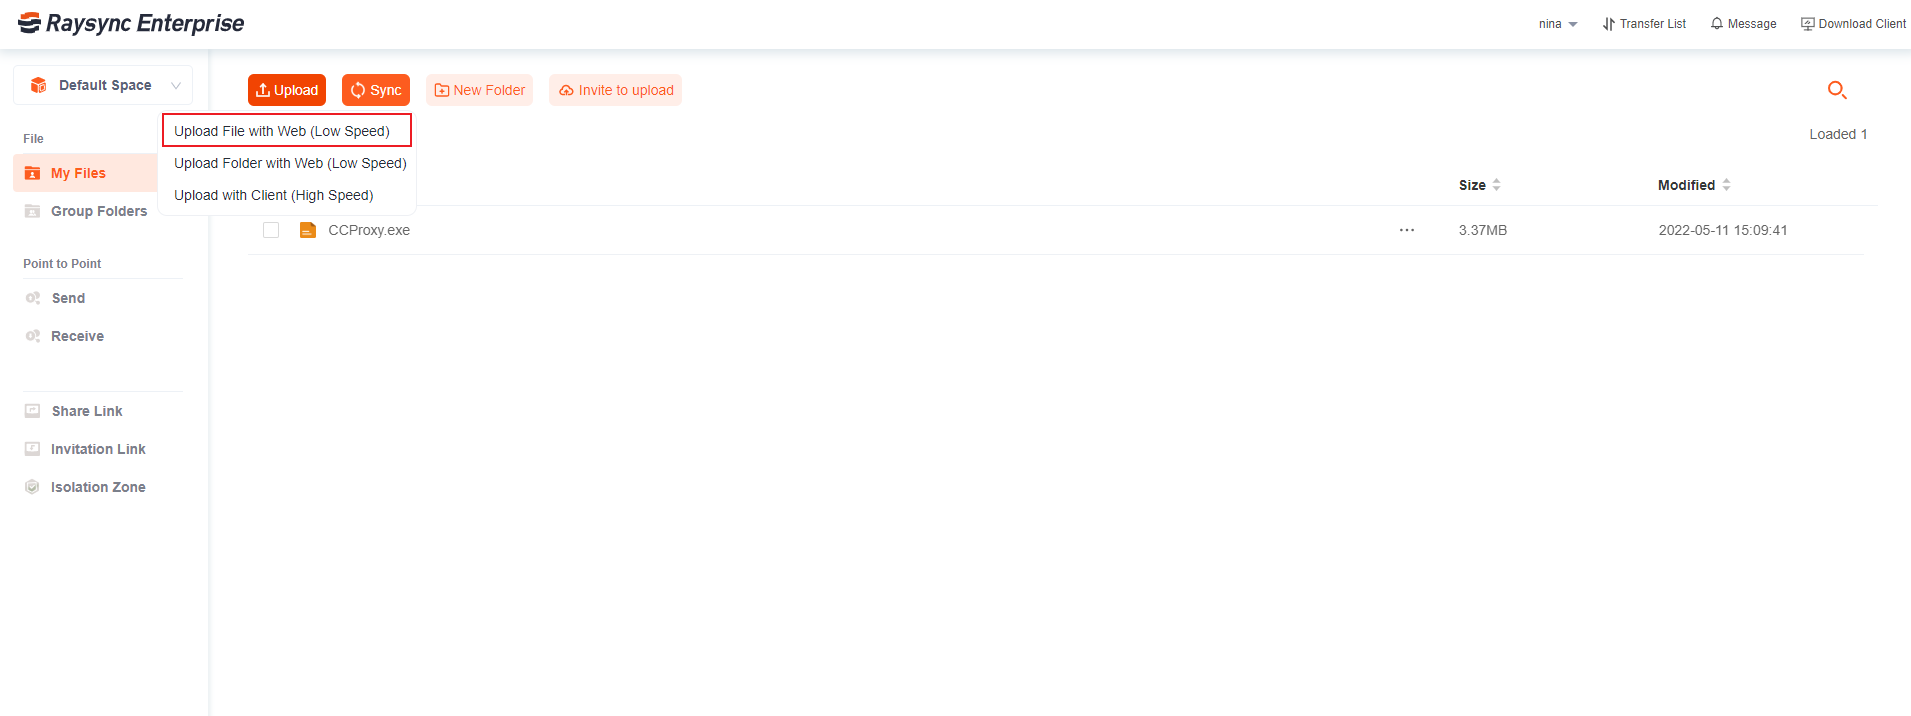
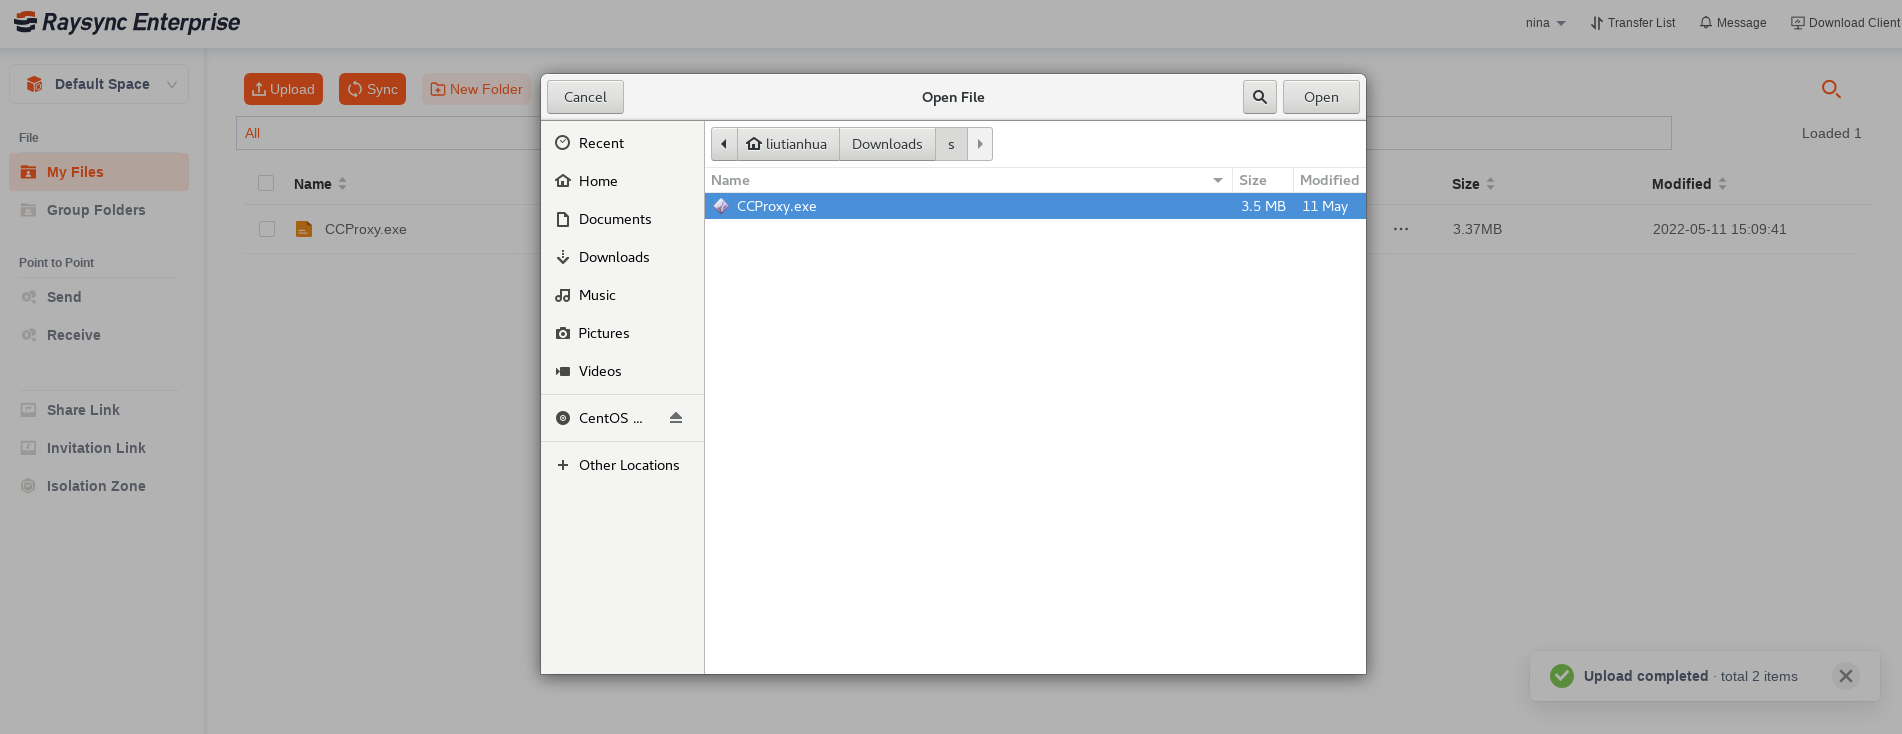
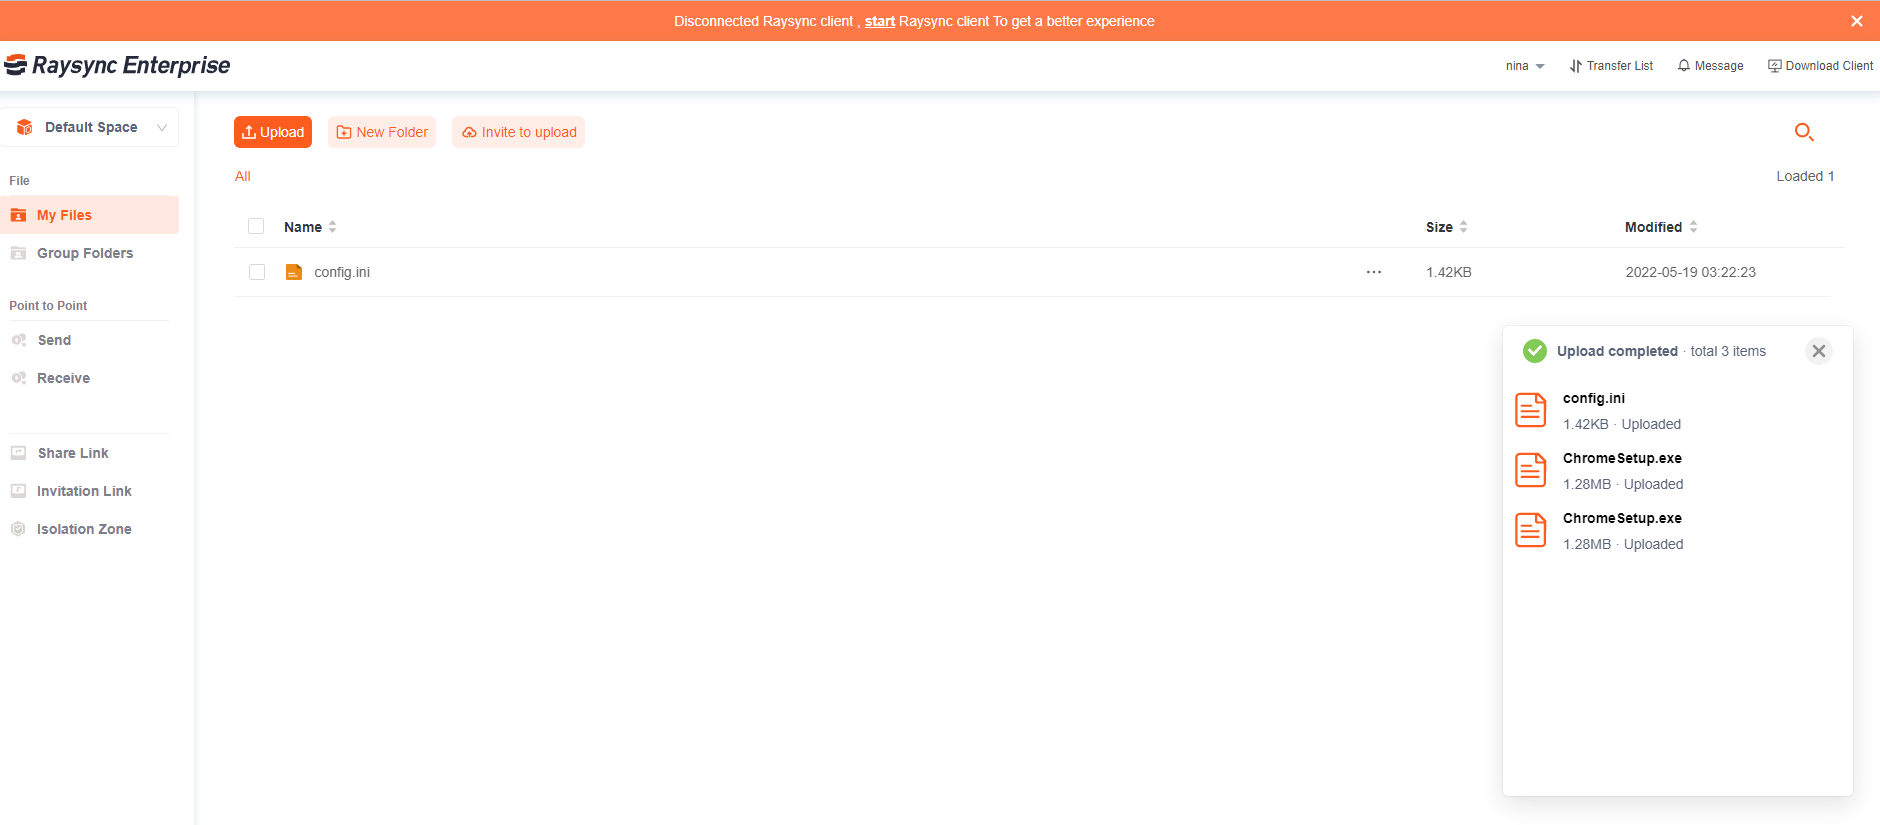
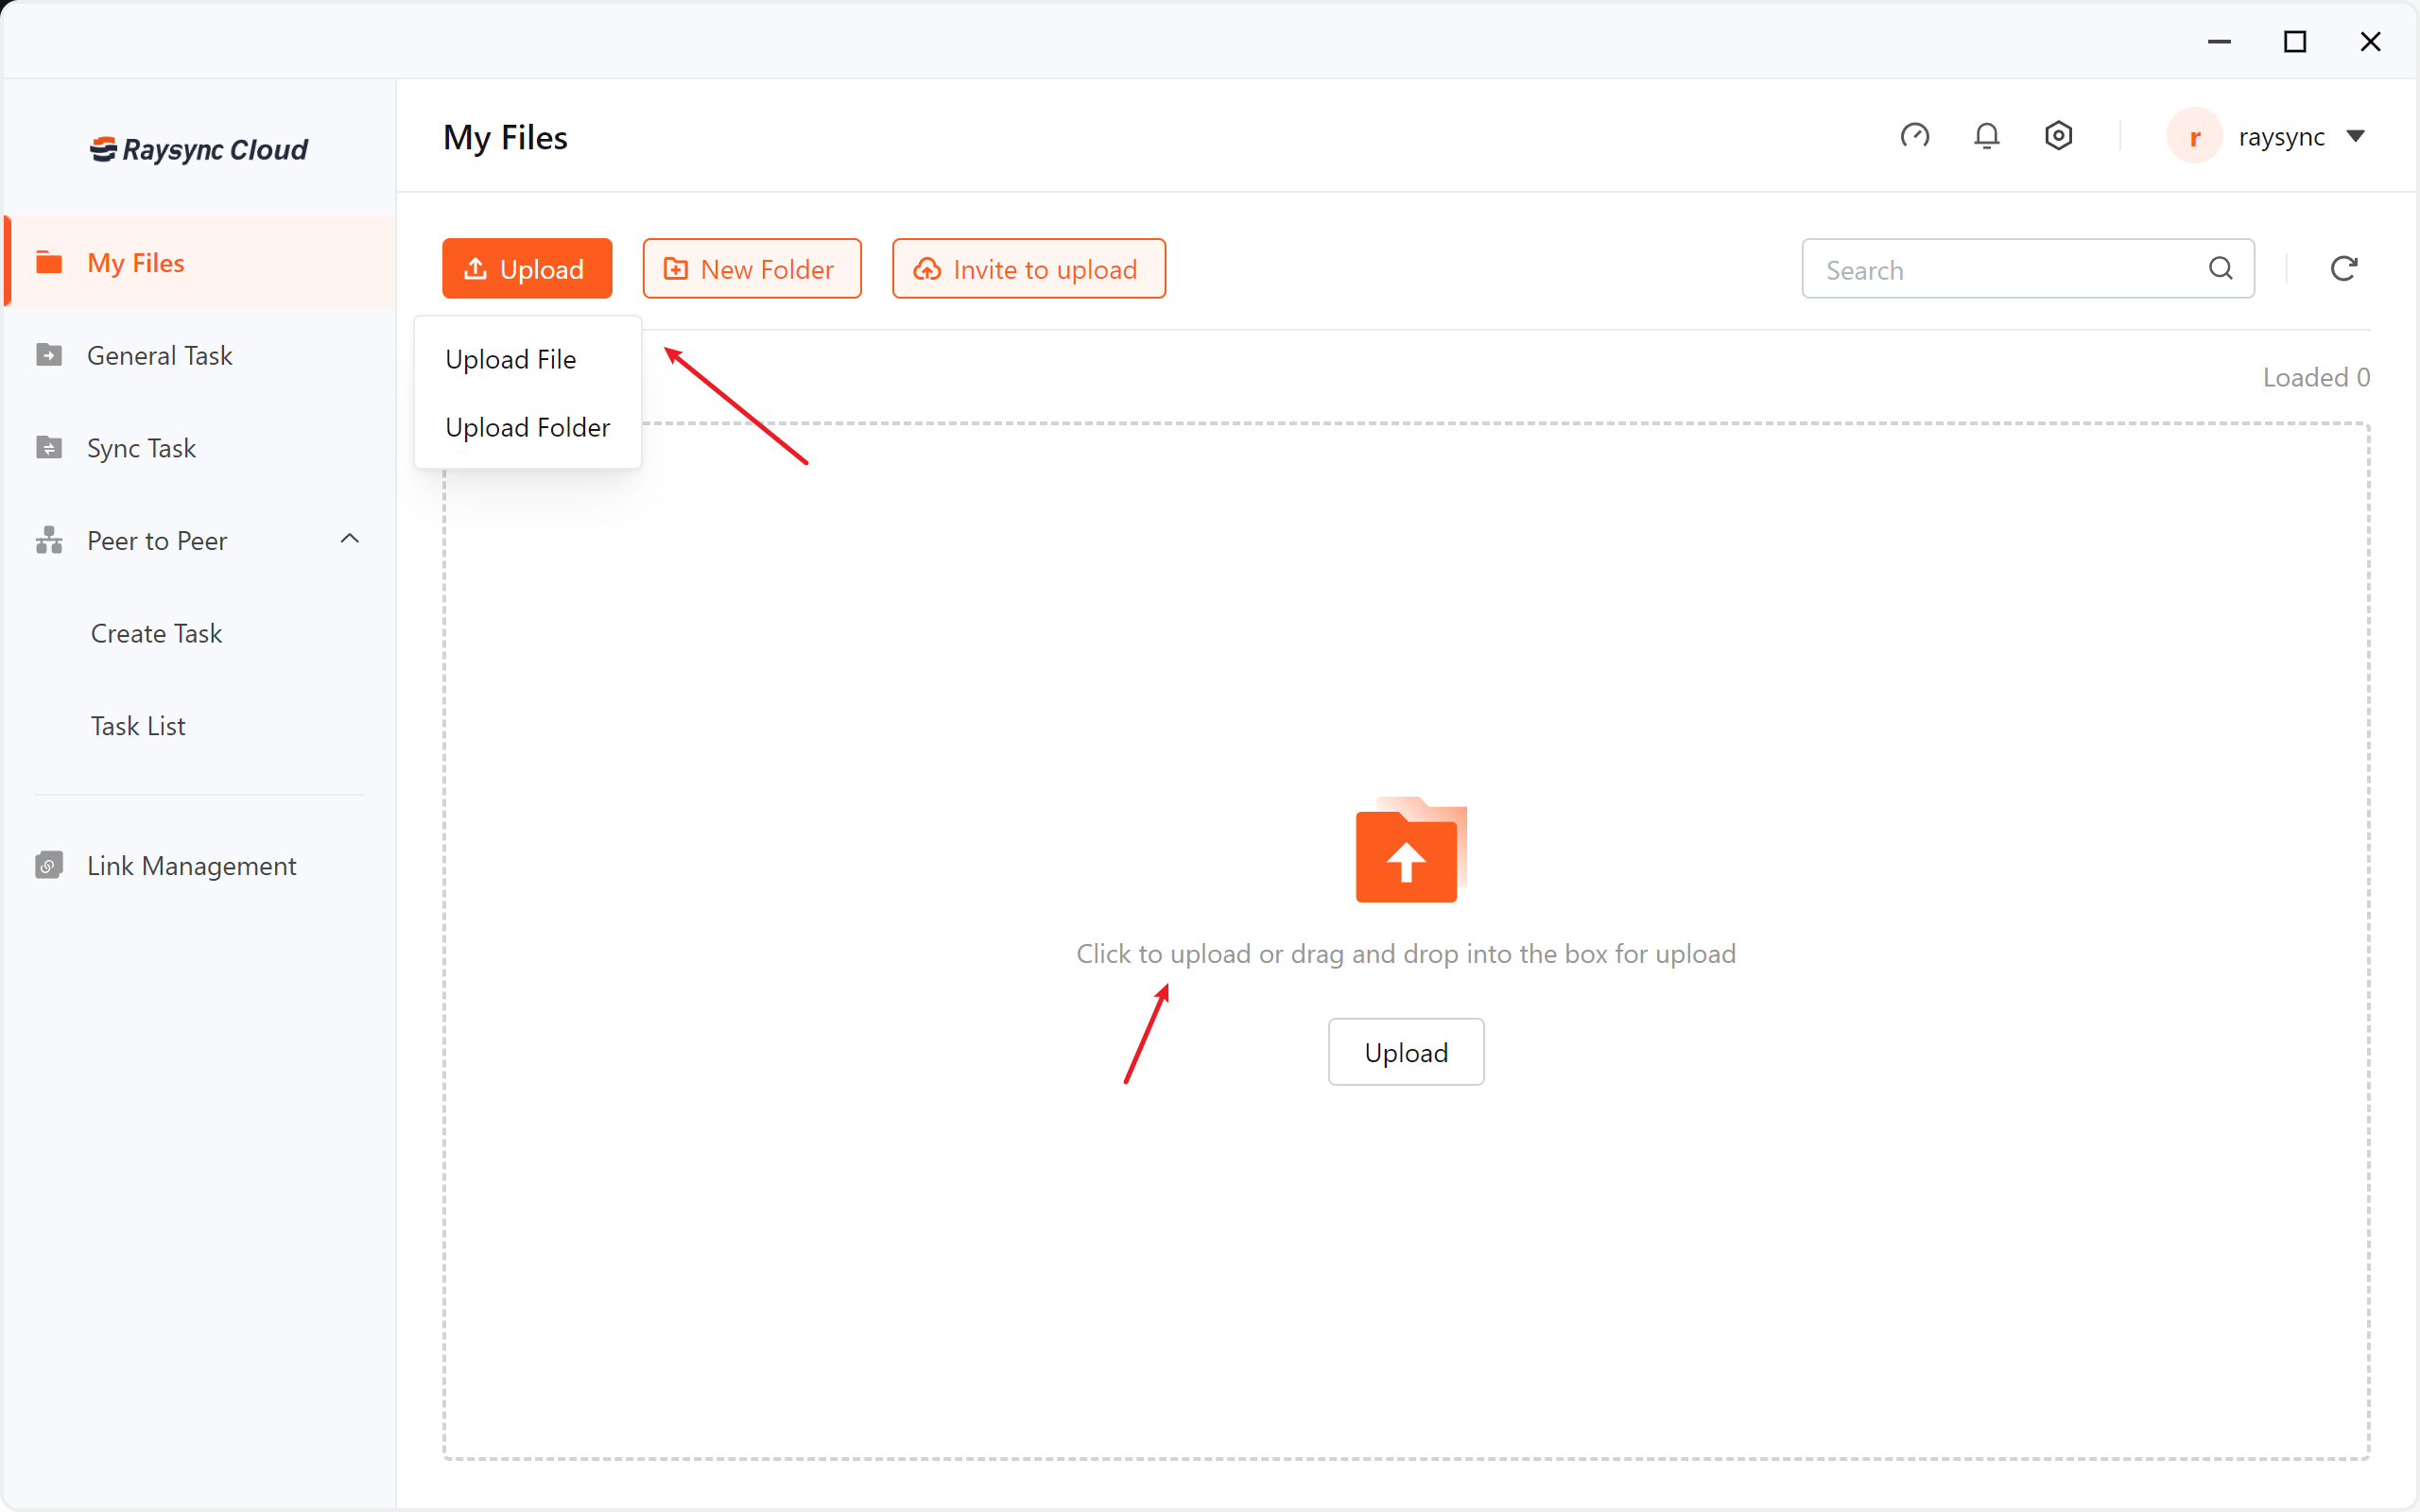
  • Click Upload file with web Select the file to upload You can view the transfer progress of the selected uploaded file in the transfer list of bottom right corner of the web

uploadFile web

uploadFile web2

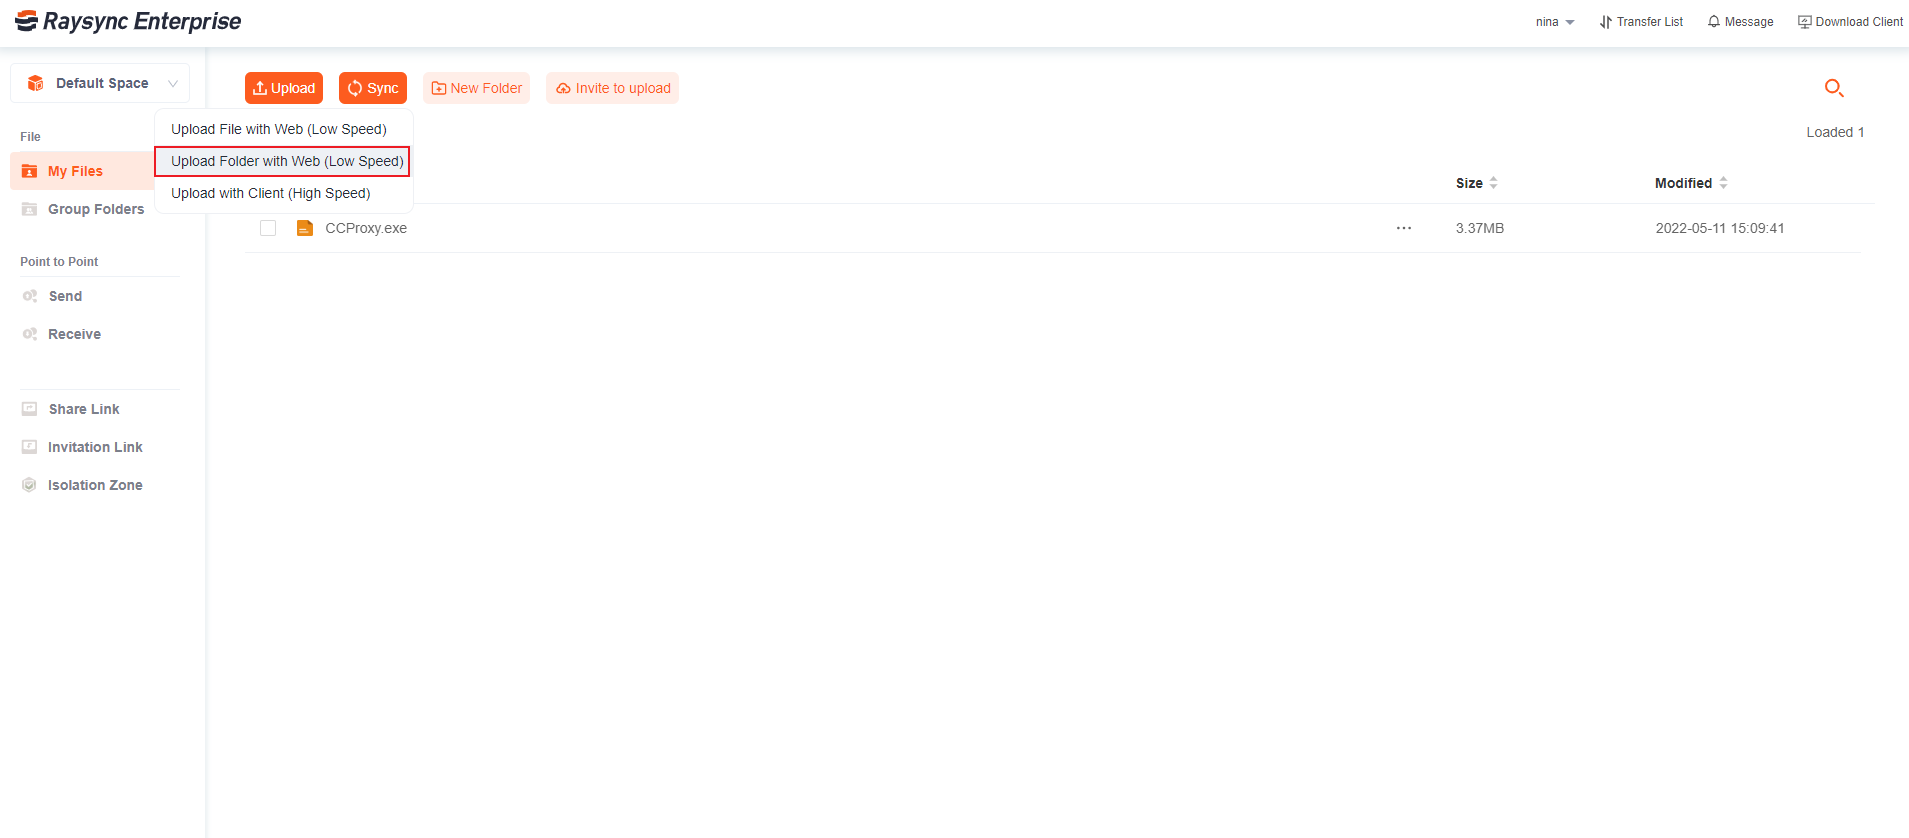
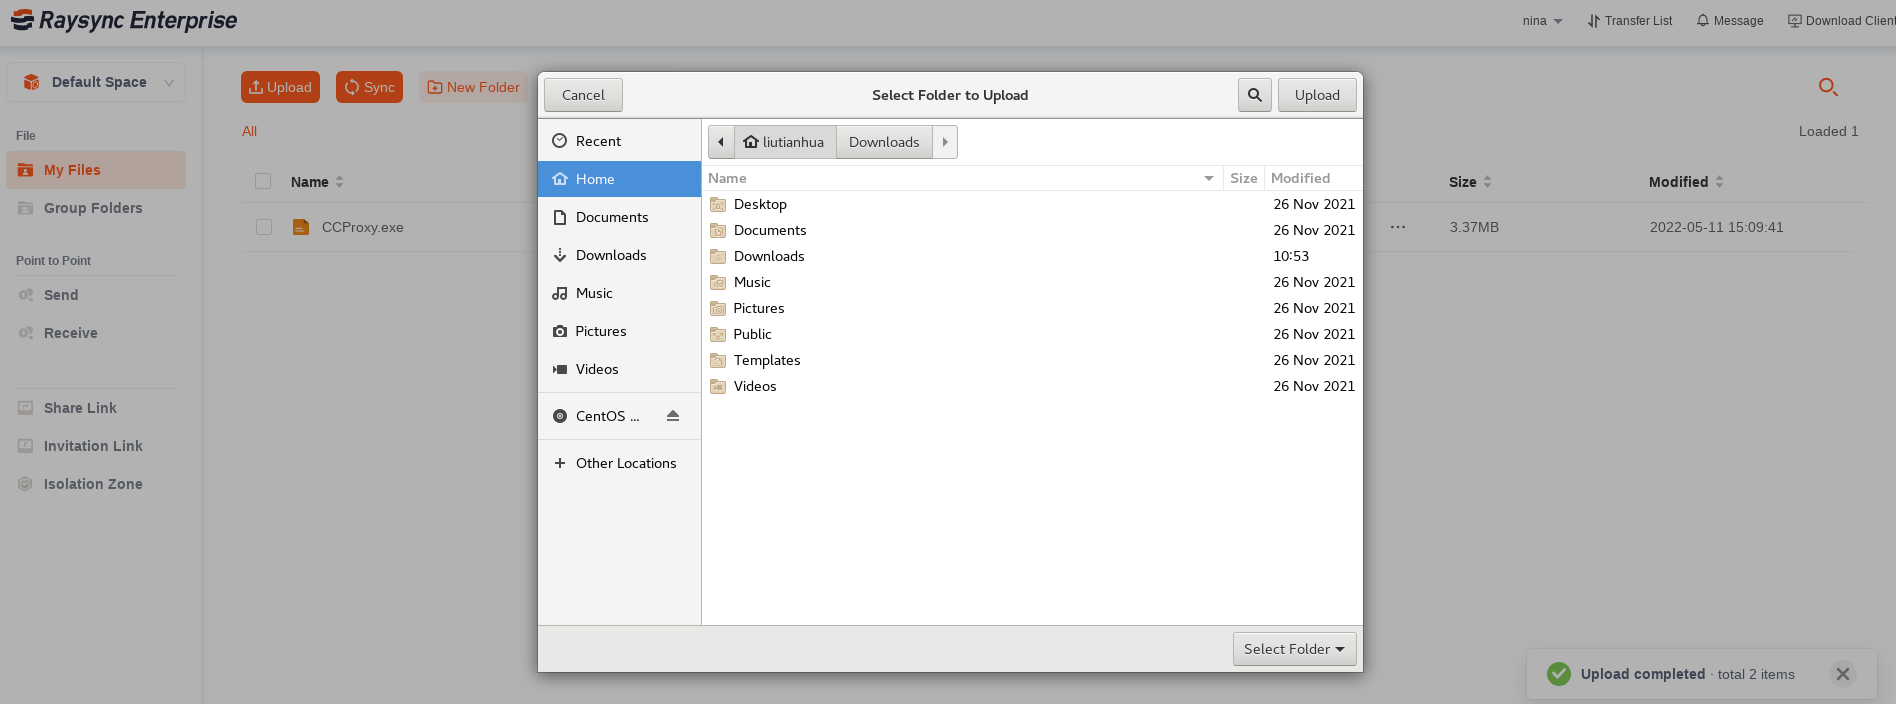
  • Click upload folder with web Select the folder to upload You can view the transfer progress of the selected uploaded files in a folder in the transfer list of bottom right corner of the web.(not applicable to empty folder)

uploadFolder web

uploadFolder web2

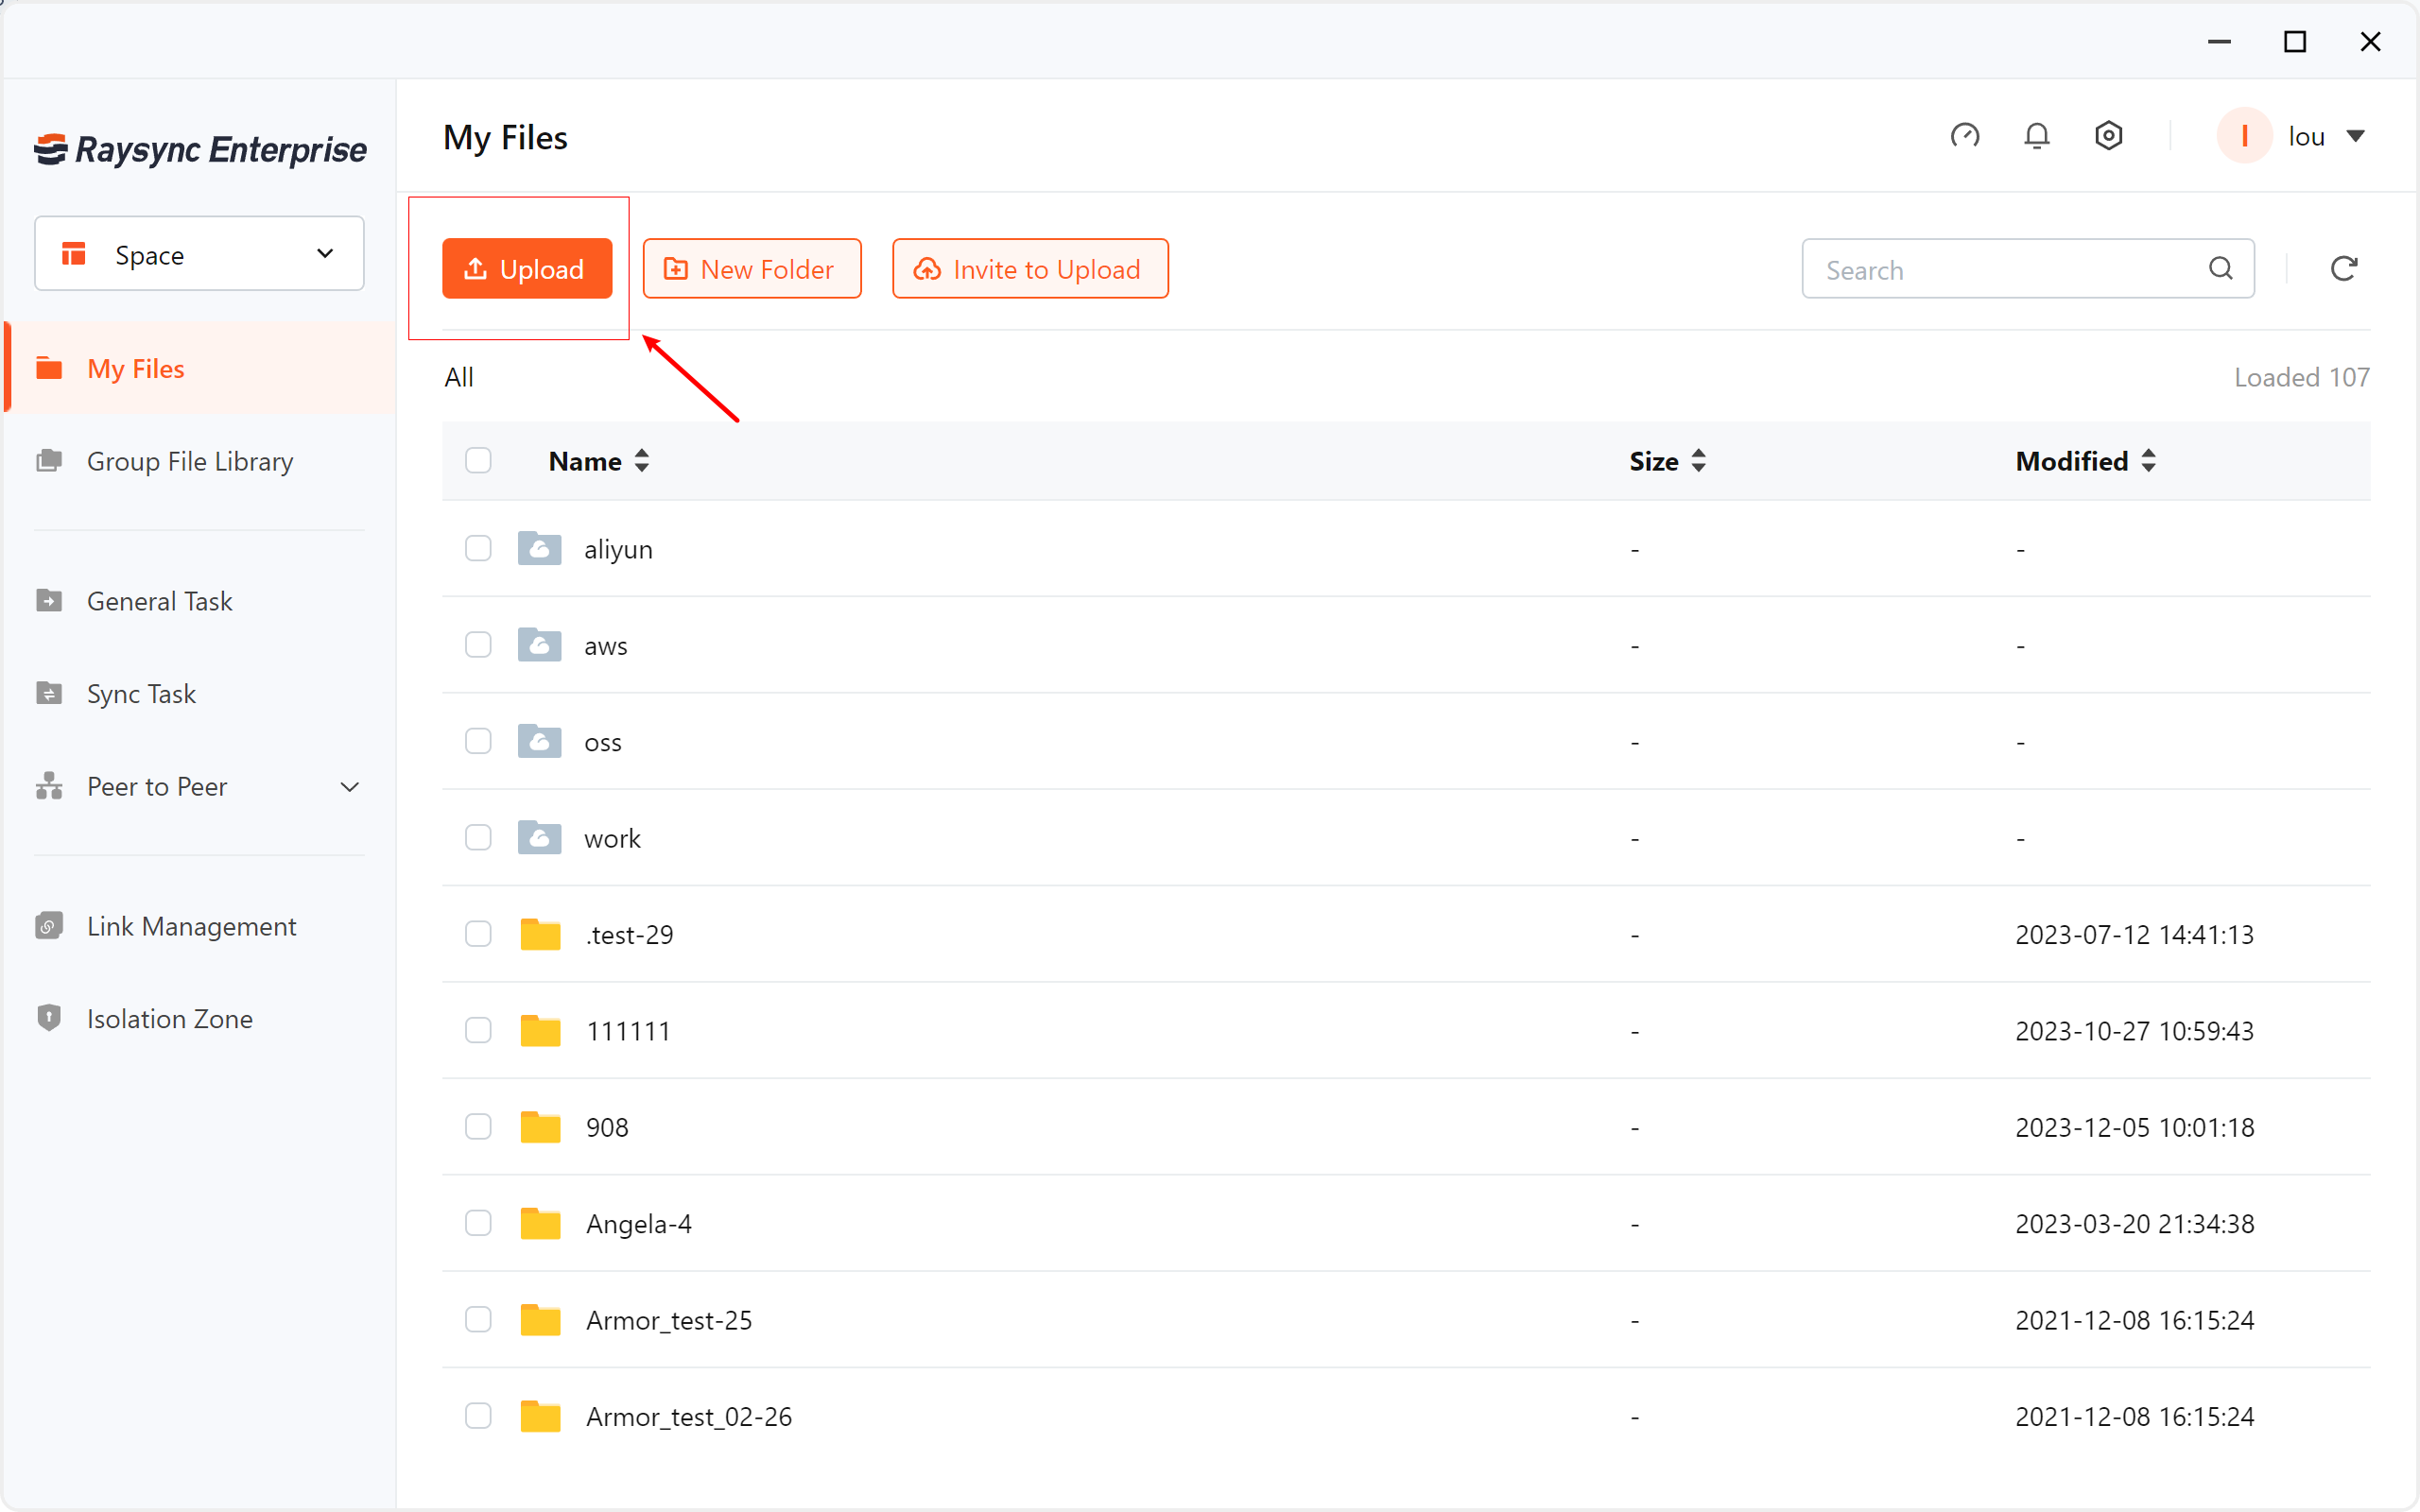
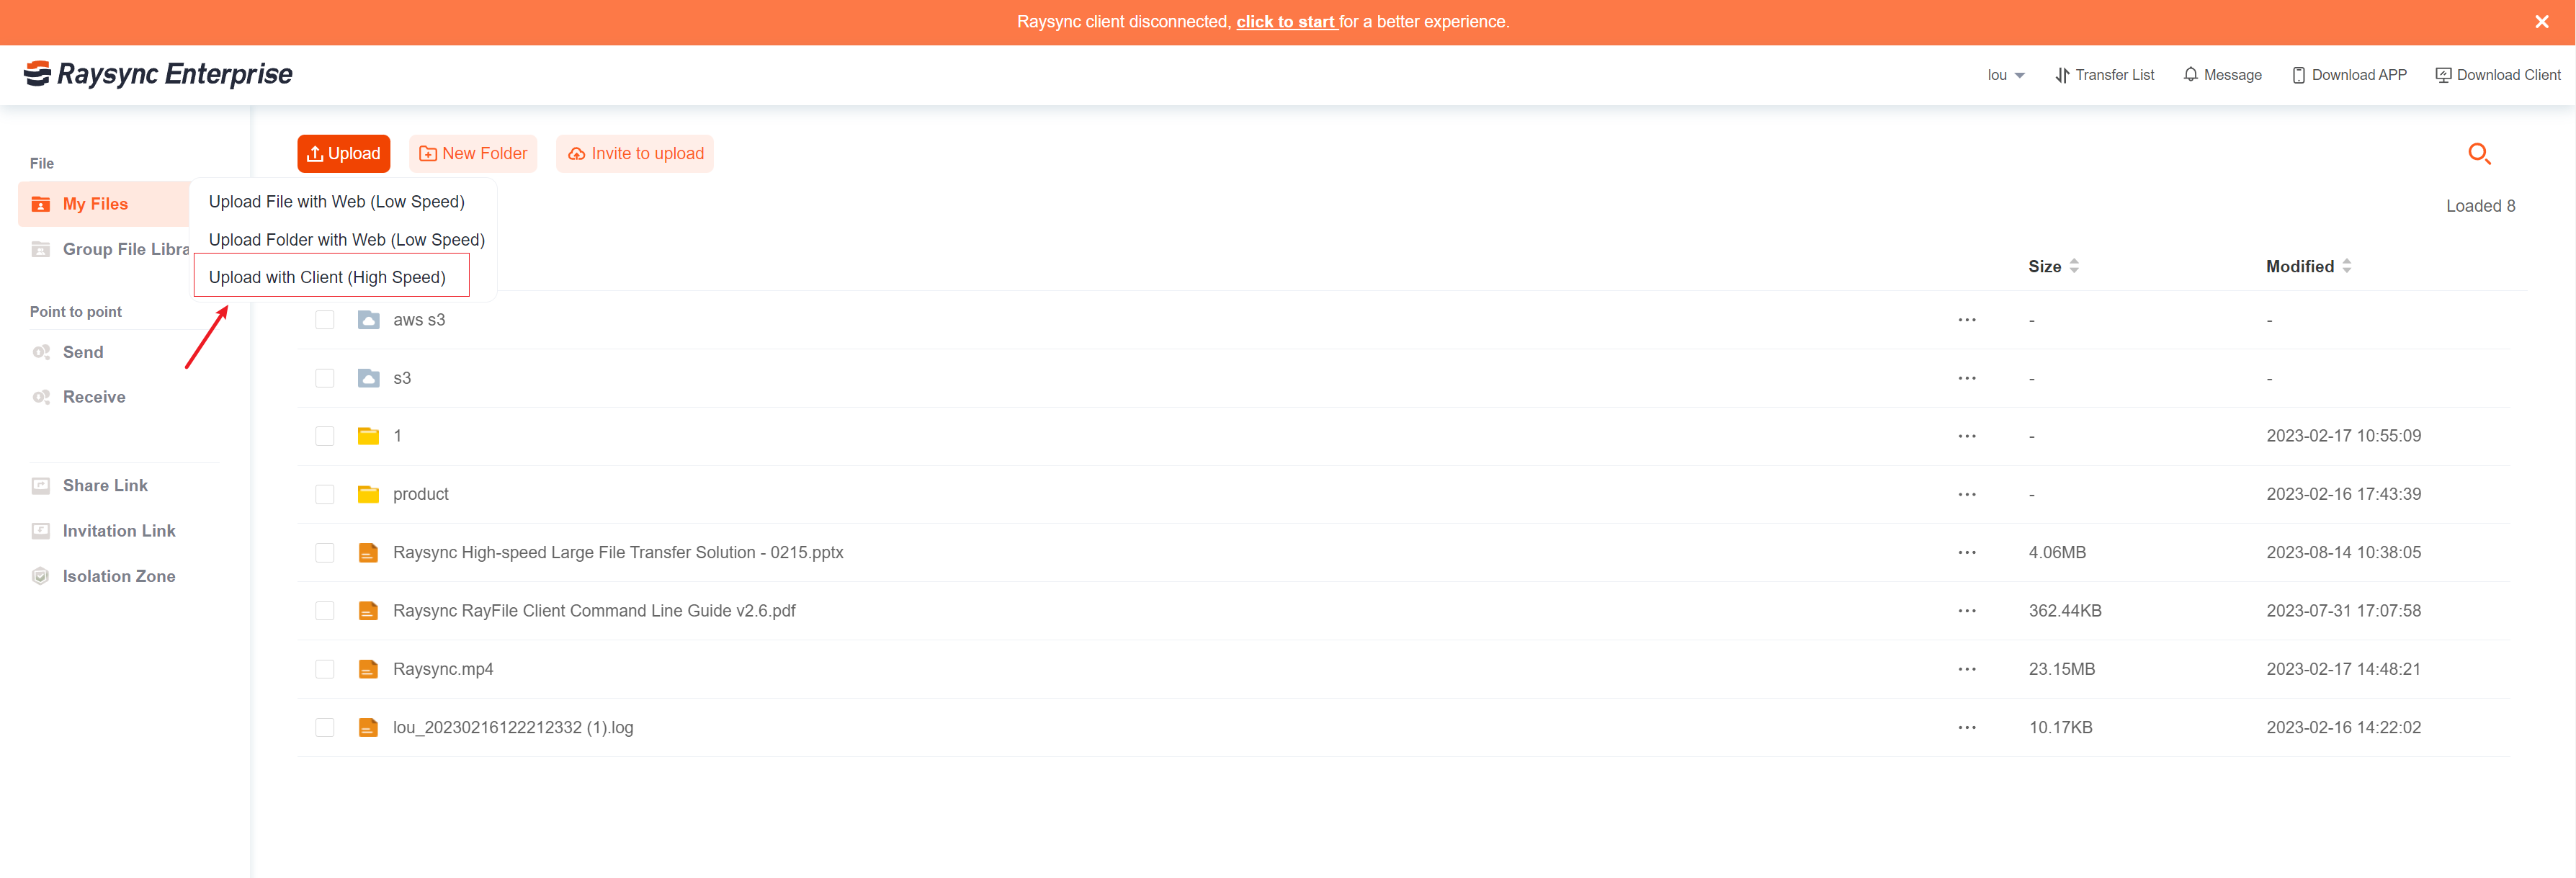
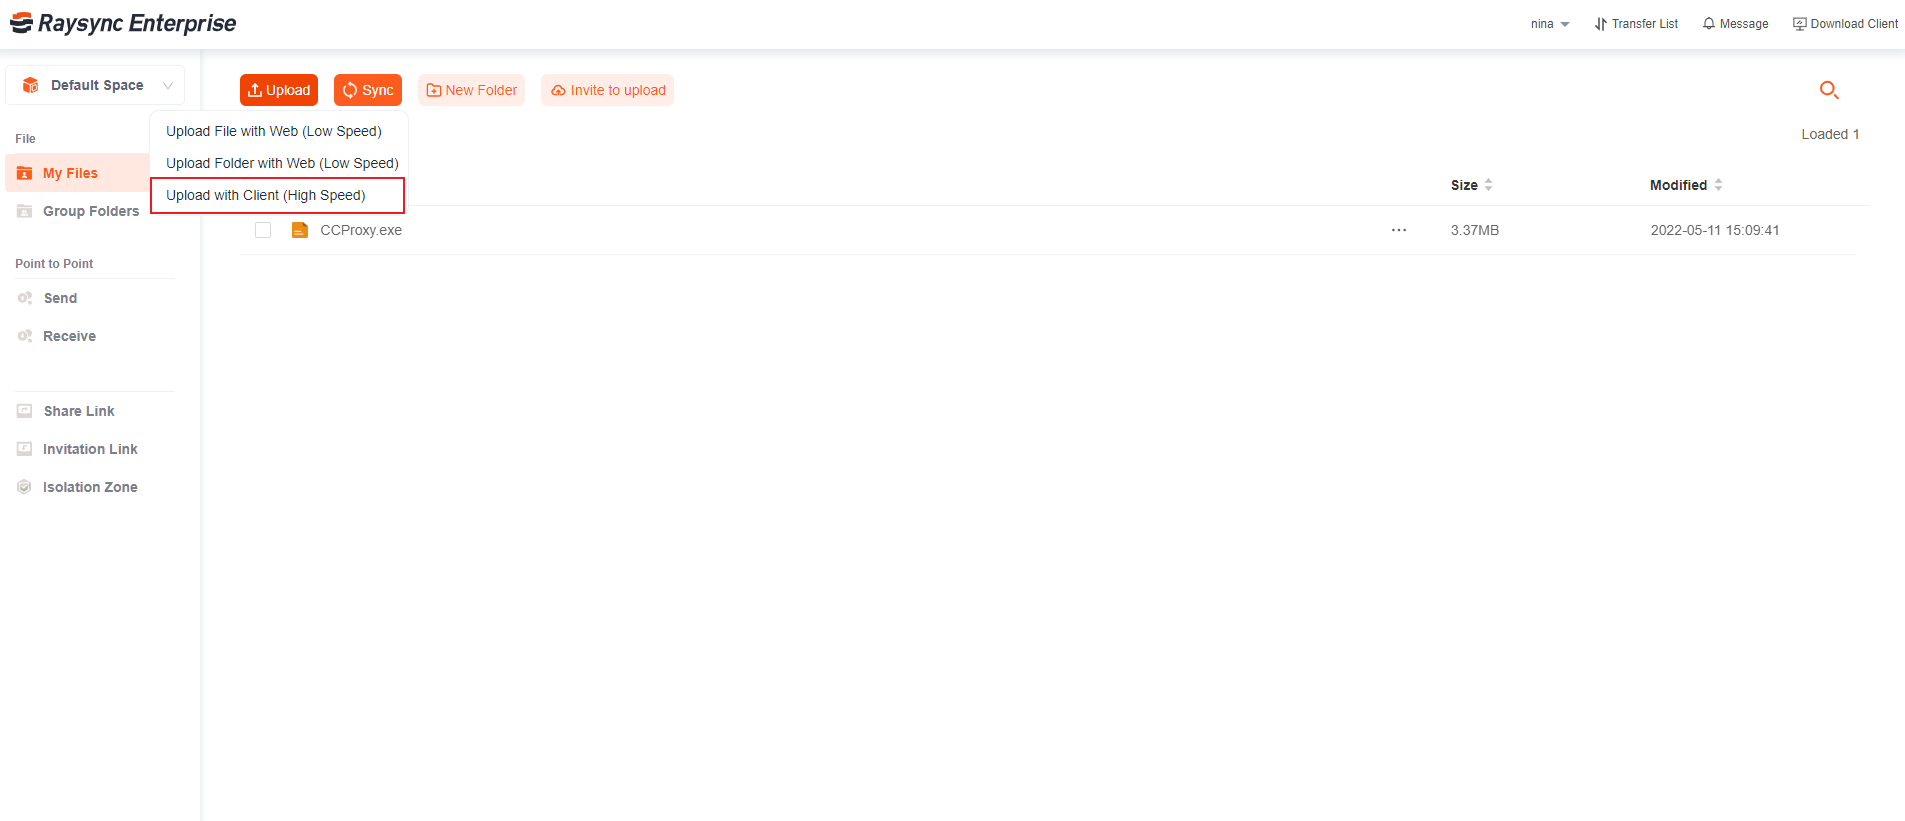
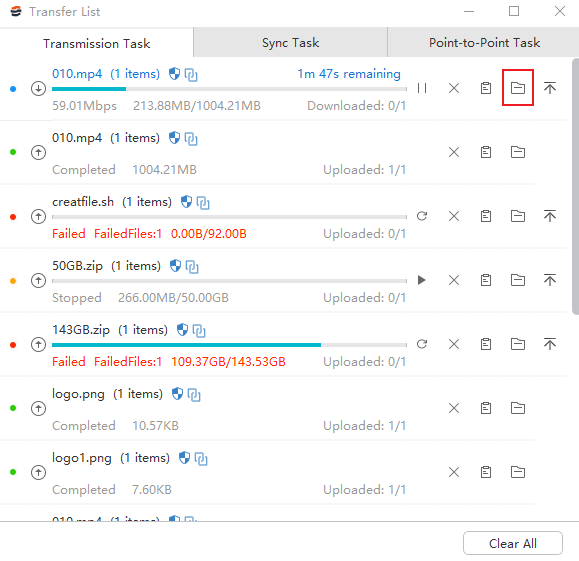
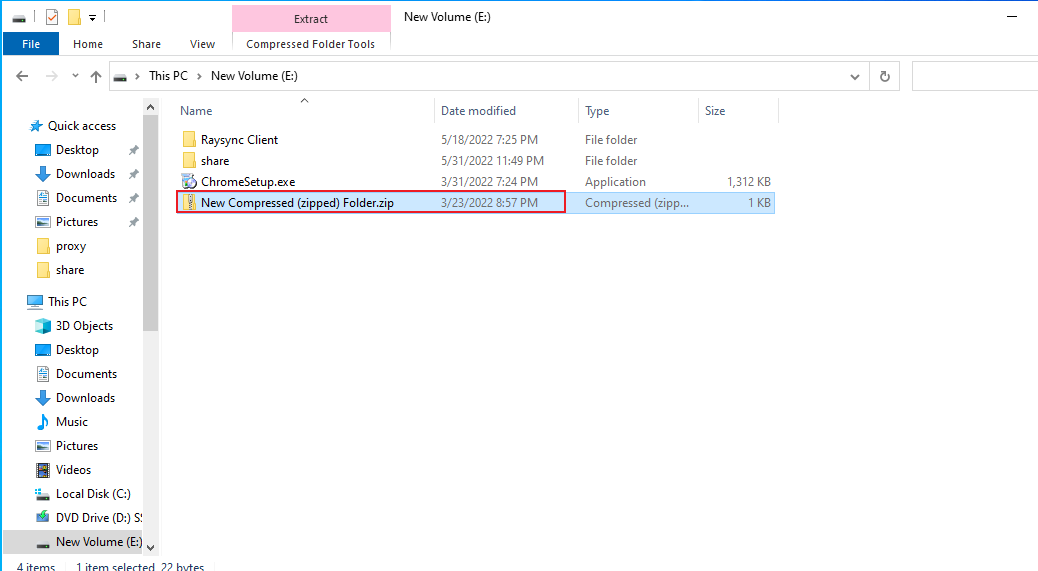
  • Click upload with client Select the file or folder to upload. You can view the transfer progress of the selected uploaded file in the transfer list of client.

    upload with client

transferList-en

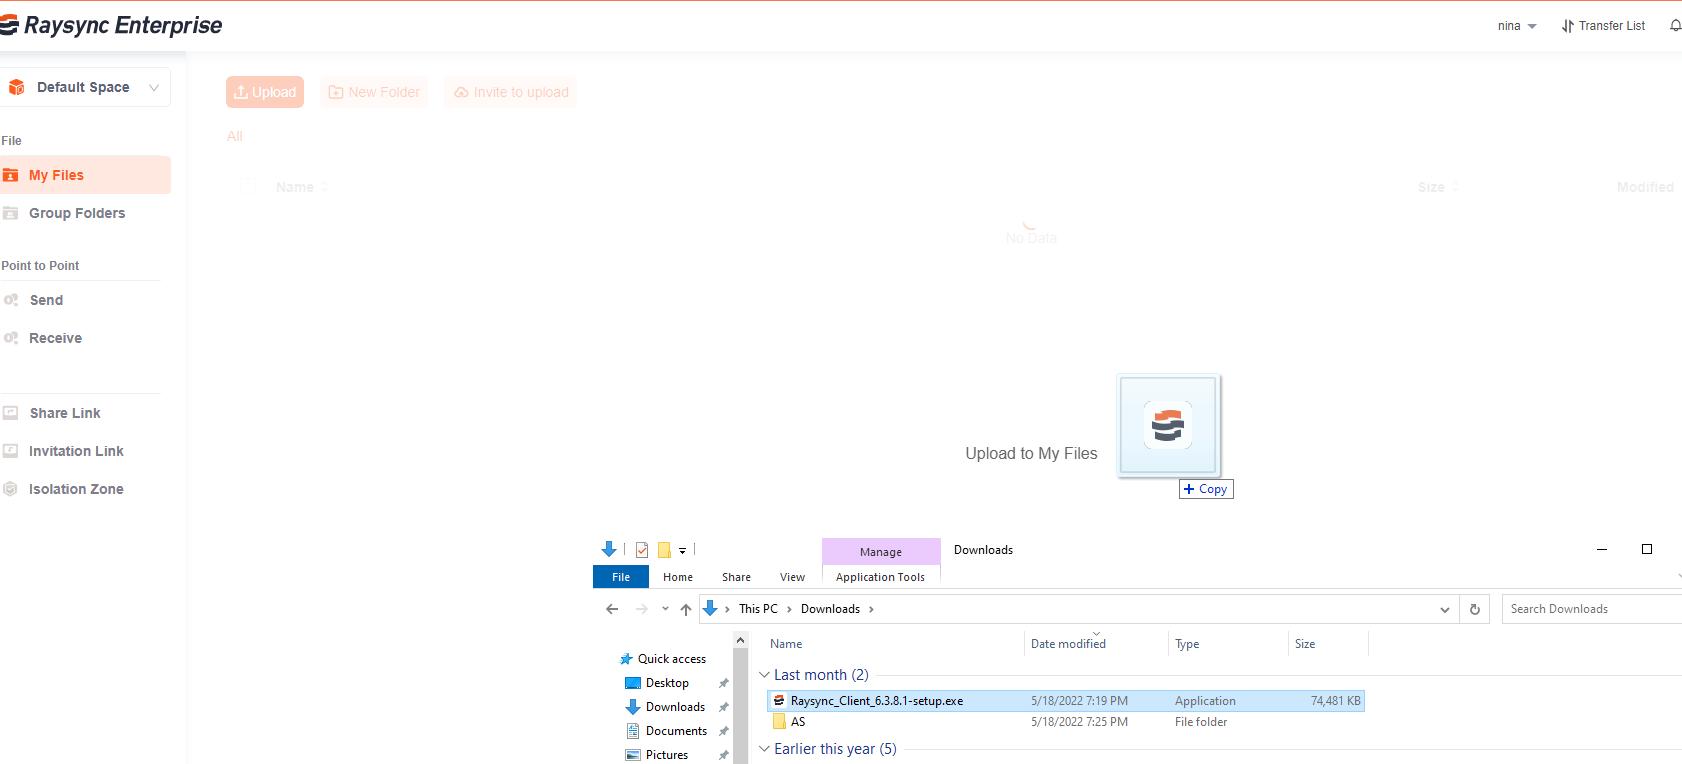
  • Drag and drop upload You can select and drag the file or folder you want to upload from the file manager, long press the left mouse button, and drag to the file list position of the raysync website, until the upload to my file/a directory appears, release the left mouse button to upload all the dragged files.

First step:

drop

Second step:

drop 3

Third step:

drop 2

2.2 Download file

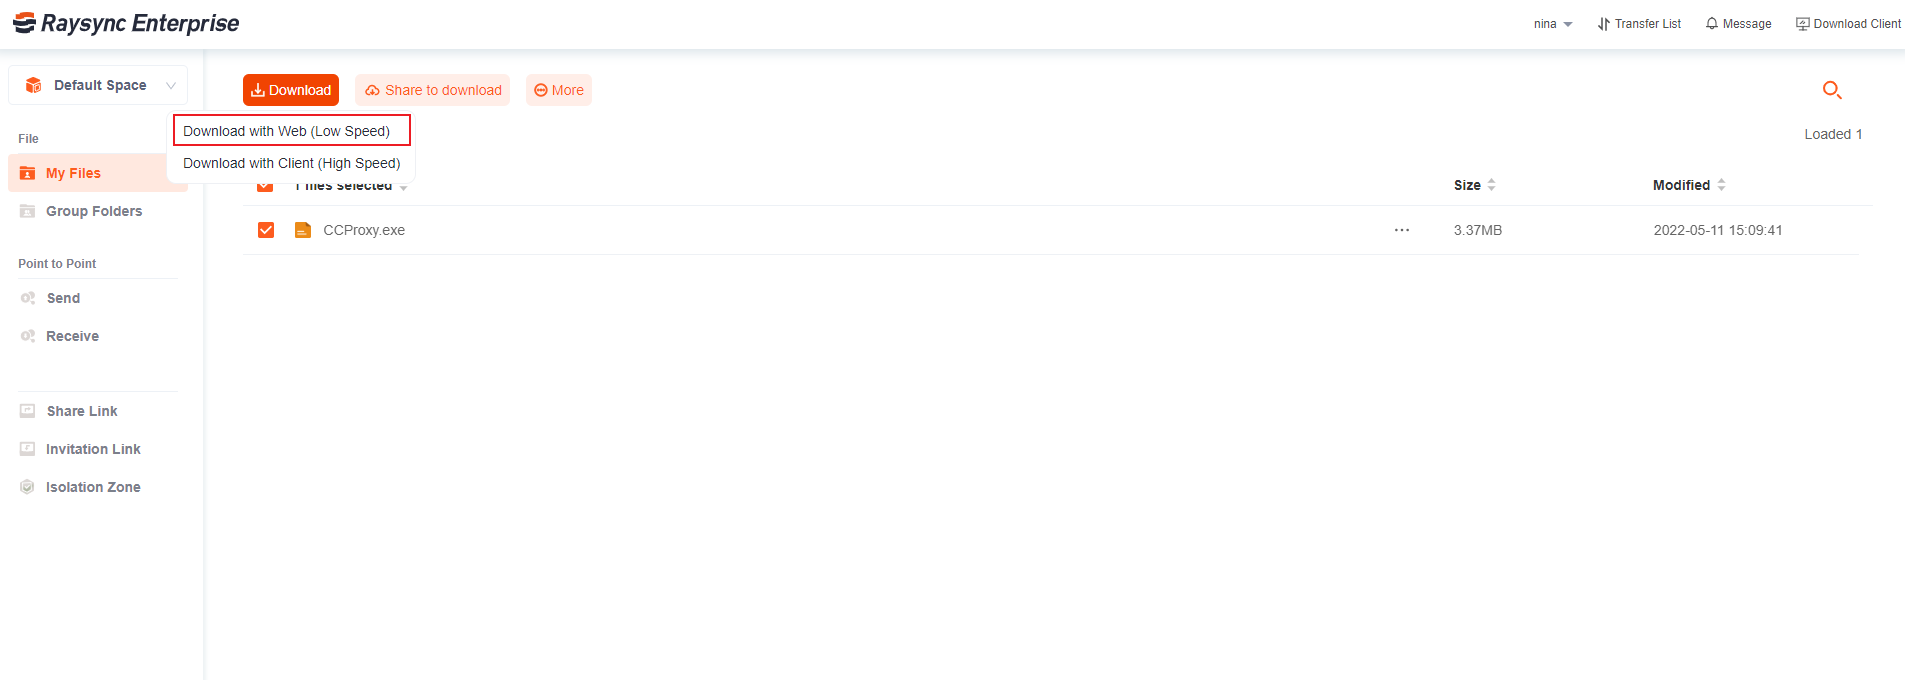
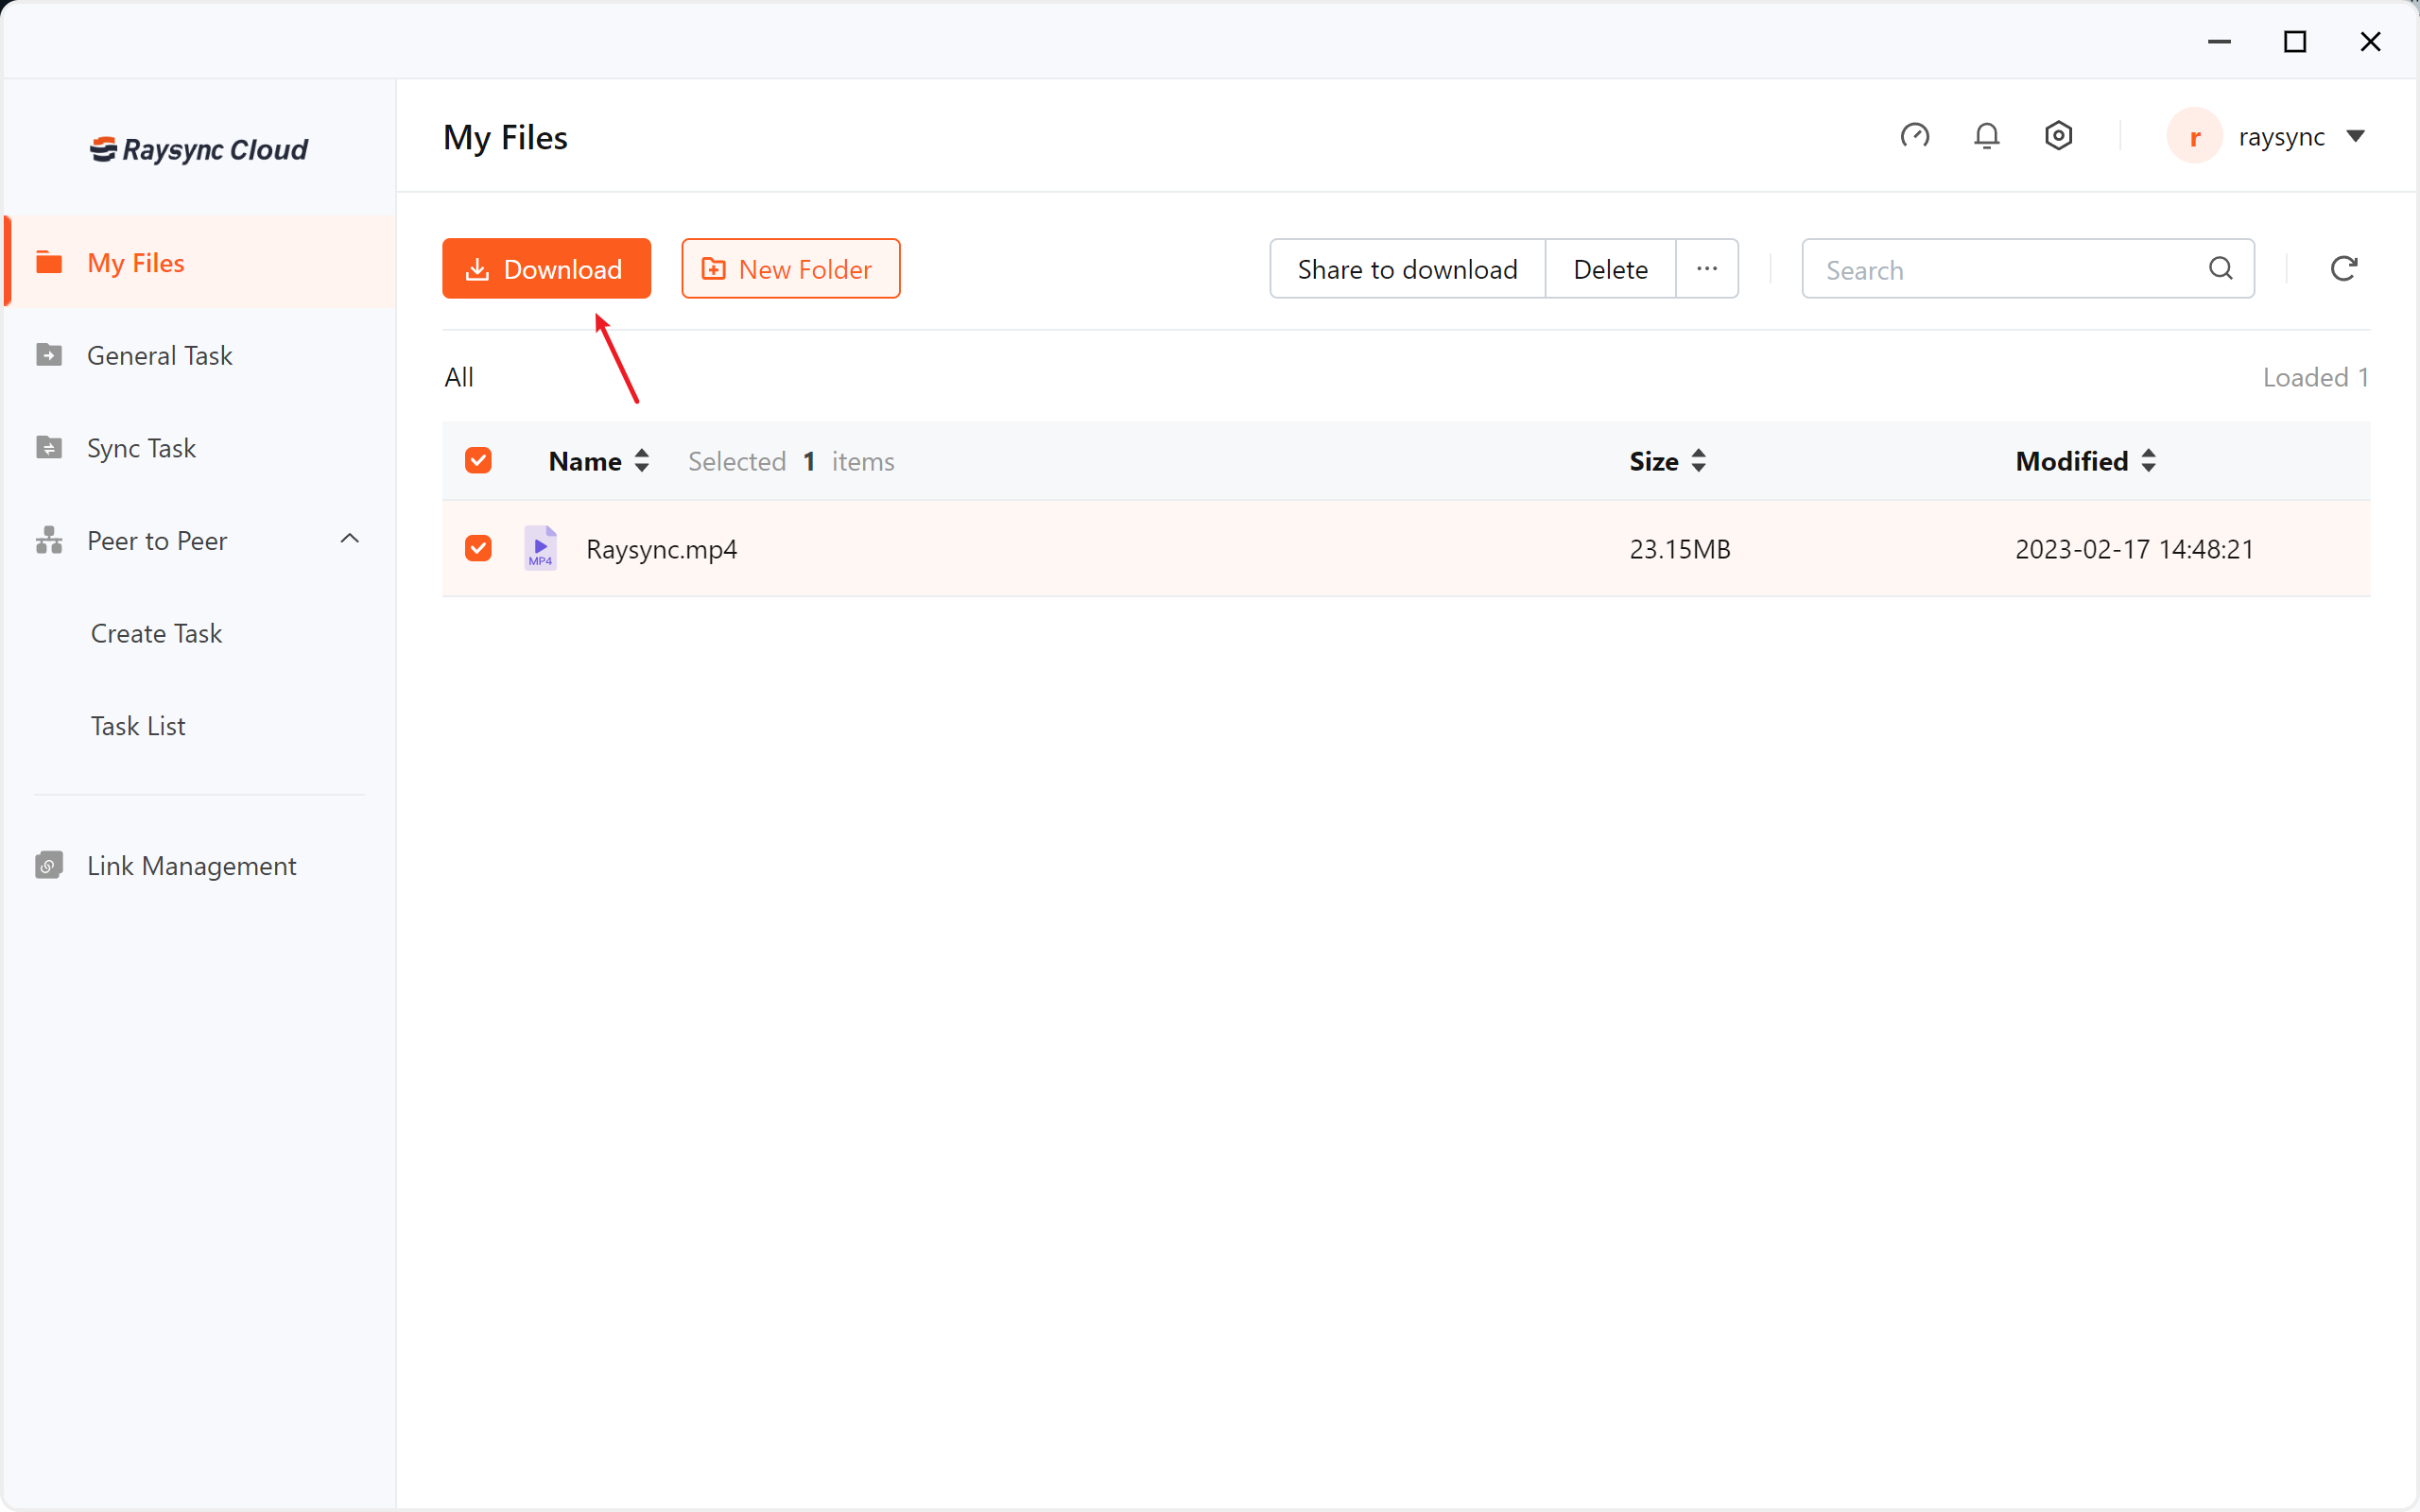
  • Select the file or folder to download Click the download with web,you can view the download progress of the selected file or folder in the browsers's downloads.

download Web

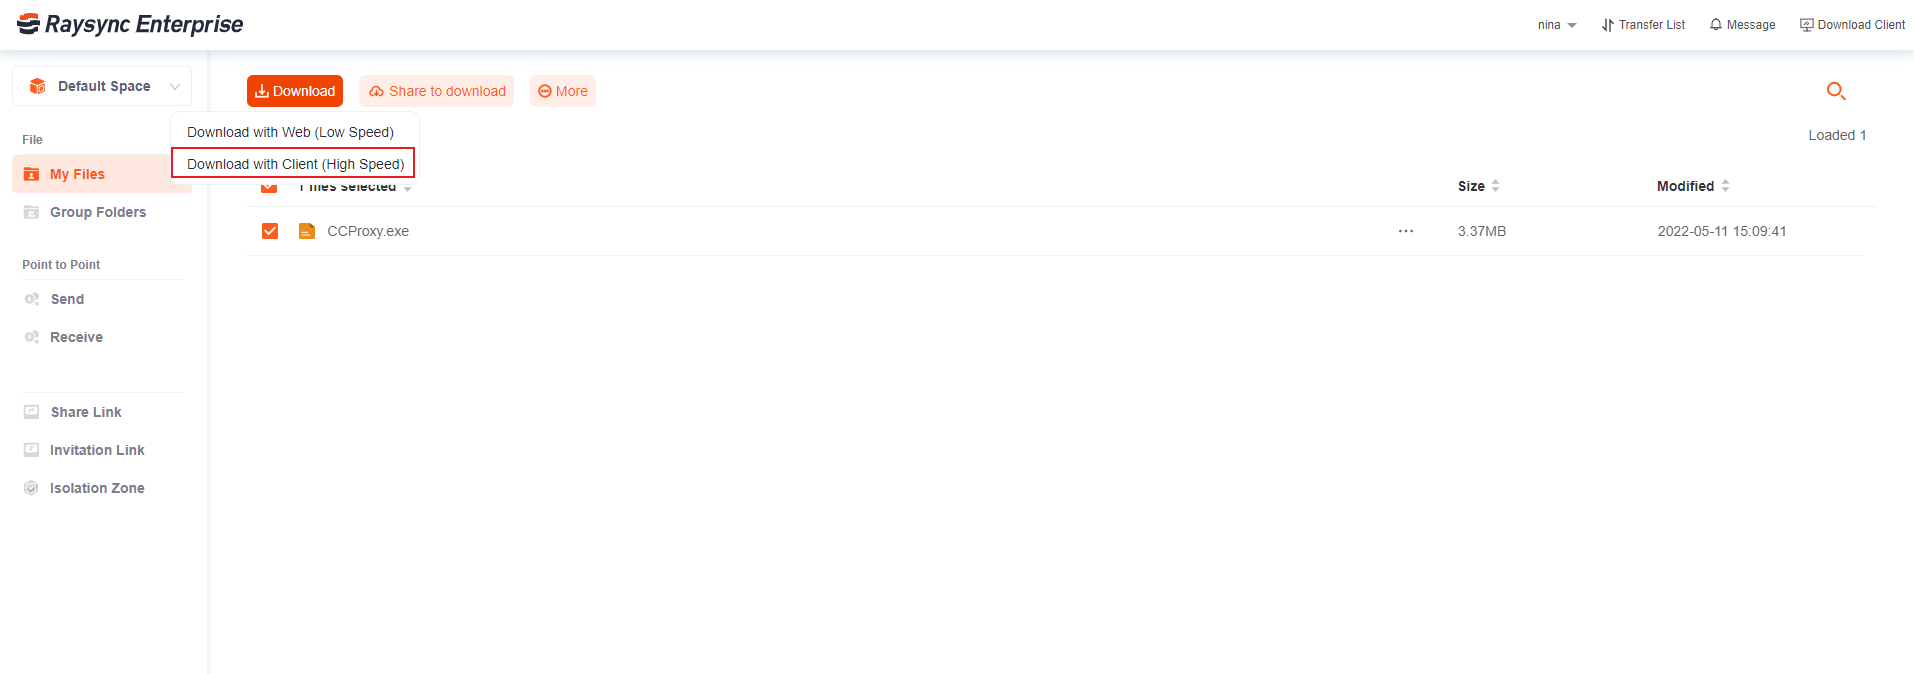
  • Select the file or folder to download Click the Download button or select Download in the operation bar

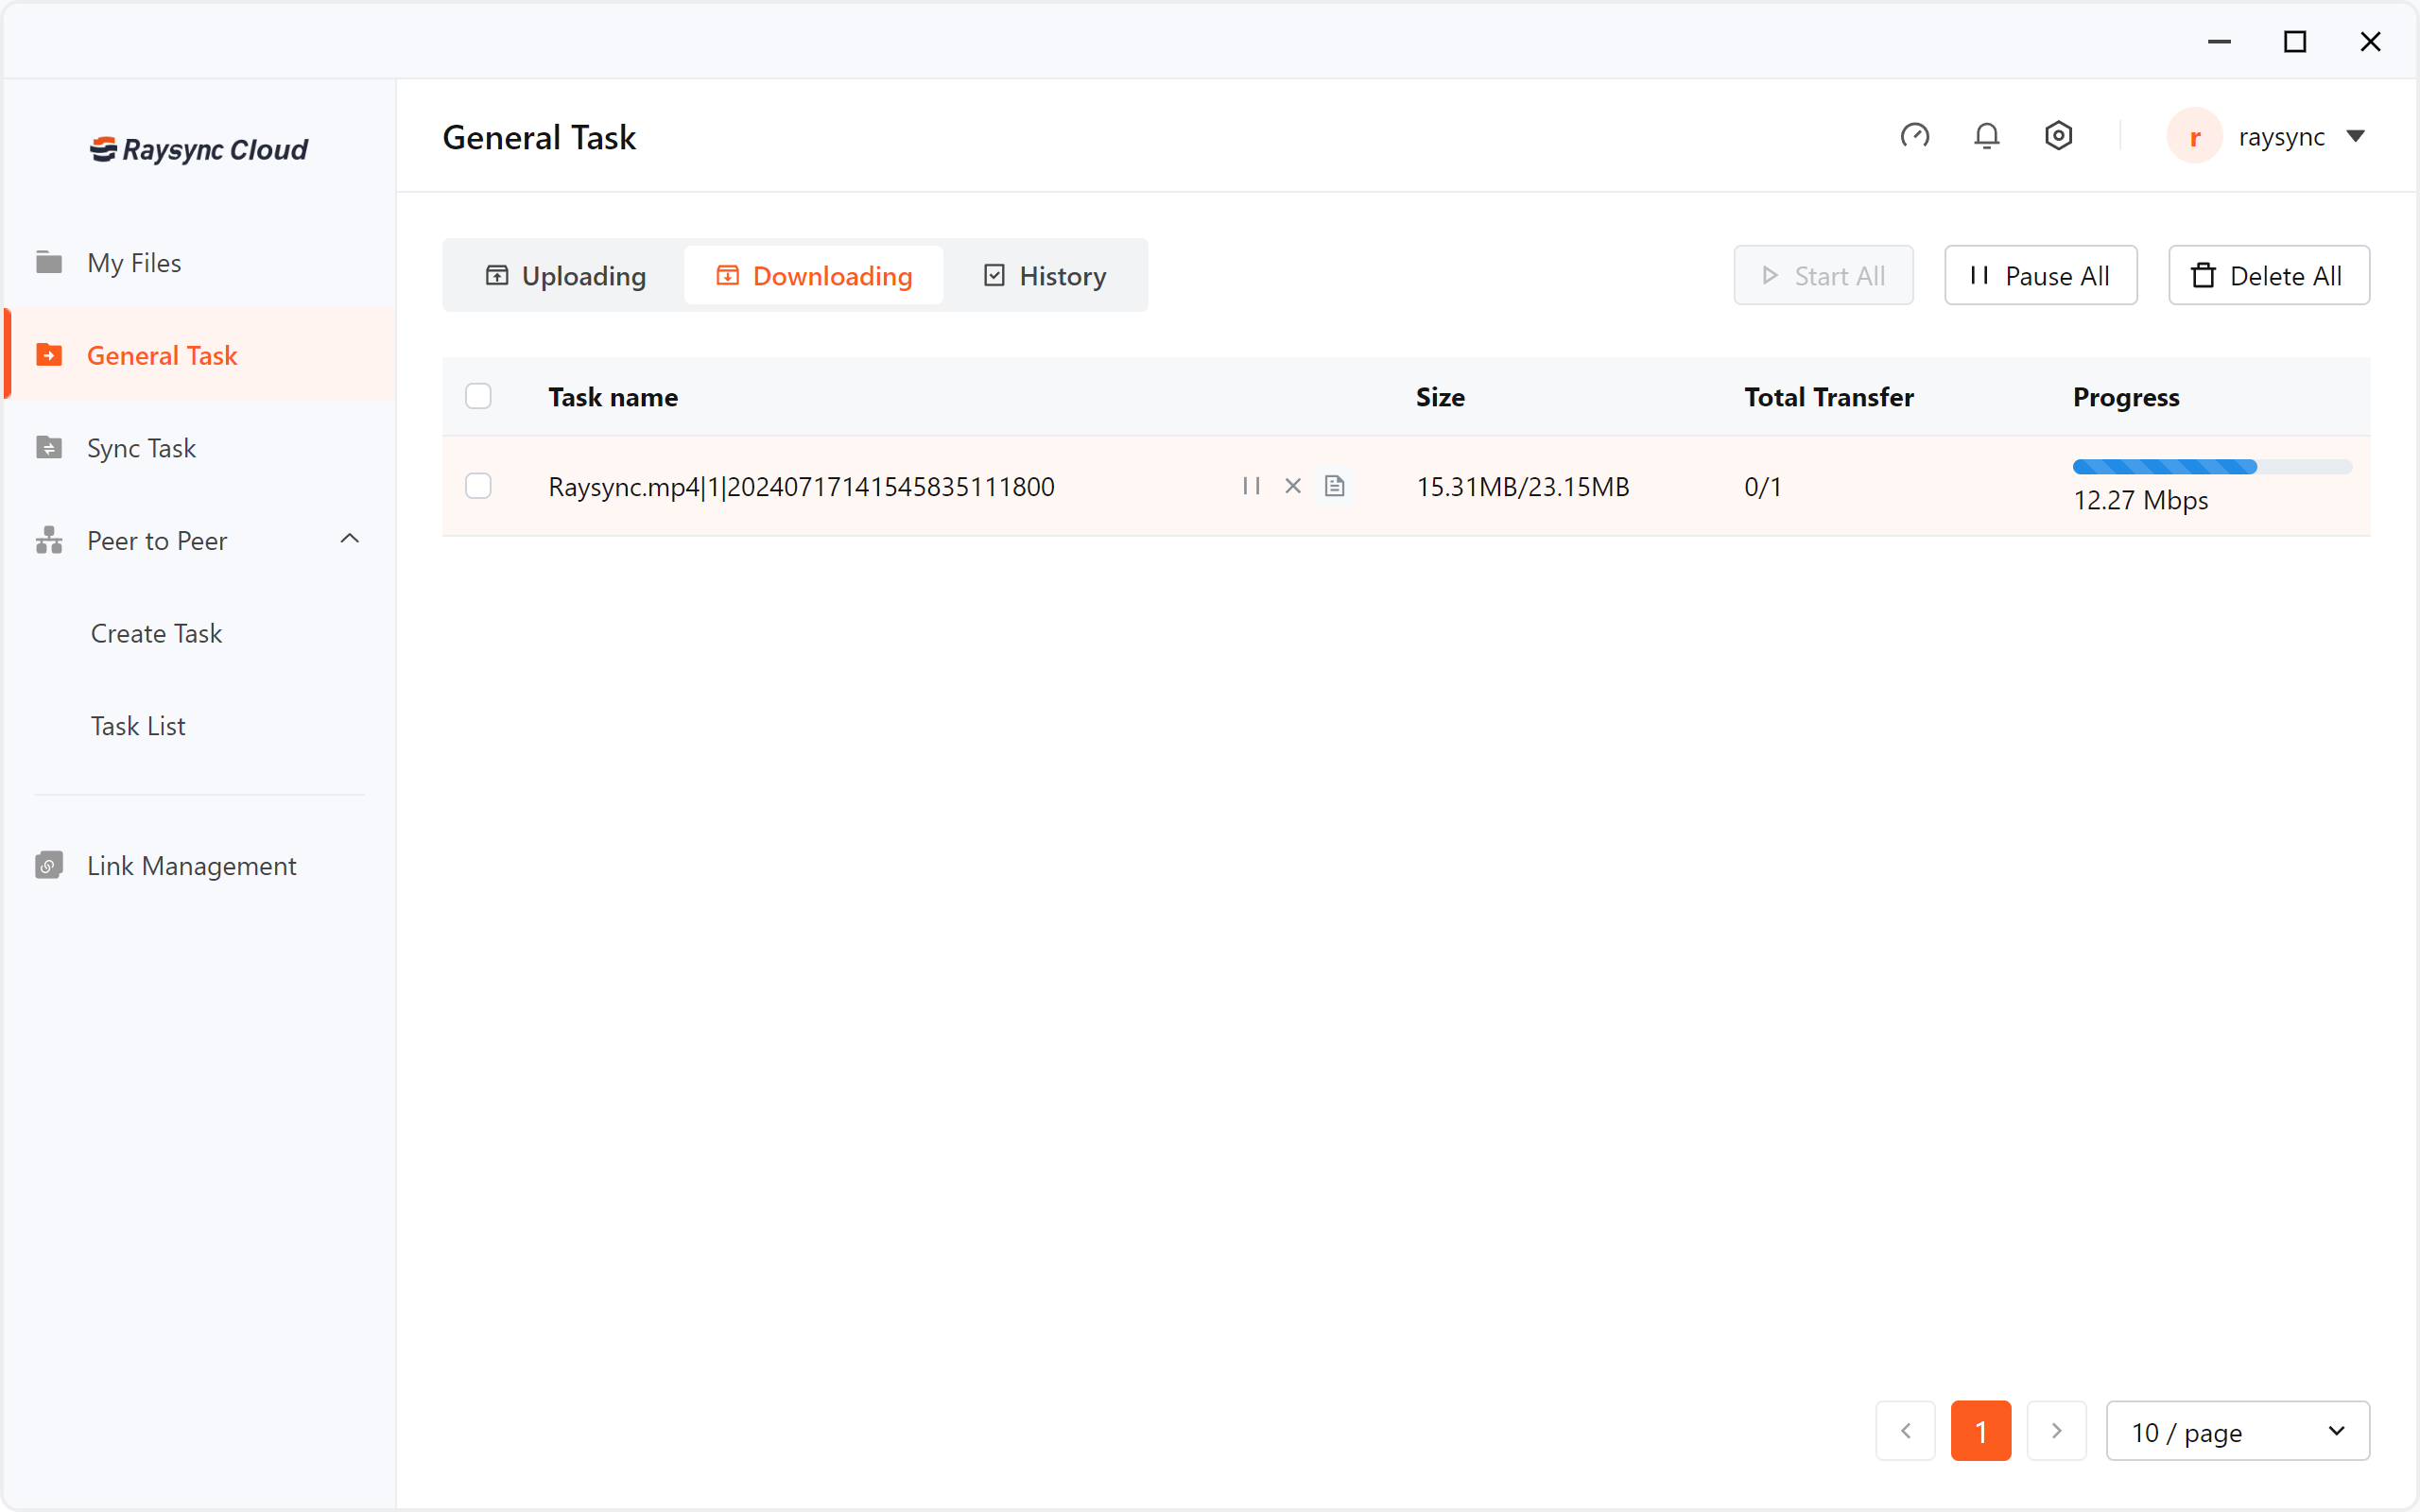
  • You can view the download progress of the selected file of folder in the transfer list of the client

  • After the file is downloaded, it will be saved in the selected path. Click the "Open File Directory" icon in the Raysync plugin to find the file just downloaded.

download Client

transferList-en

2.3 Create a new folder

  • Click the New Folder button

  • The default name of the new folder is "New Folder", you can enter a new folder name by yourself

  • After entering the name, click the Create button to completenewFolder-en

2.4 Rename

  • Select the file/folder to be renamed, and select Rename in the operation. Note: virtual directory does not support renaming on the client siderename-en

  • The file name becomes editable, enter the name that needs to be renamed

  • Enter the name and click OK to save

2.5 Delete files

  • Select the file/folder to be deleted, click the delete icon or select Delete in the operation

delete-en

2.6 Search

  • After clicking search, enter the name of the file/folder to be searched in the search box, such as: test
  • Click ENTER to search successfullyselect-en

2.7 Moving files

  • Select the file, click the Move button or move within the operation
  • Select the directory you want to move to, click to move heremove-en

2.8 Copy files

  • Select the file, click the Copy button or copy within the operation
  • Select the directory to be copied to, click Copy to thiscopy-en

2.9 Folder Properties

  • Select the folder whose properties you want to view, and click Properties of the operation to view the properties of the folder. Note: View properties are not supported for file folders
  • Pop-up folder properties popupproperties

2.10 Creat sync task

To use this synchronization function, you need the permission to use sync tasks in the user information configuration managed by the administrator in the server background.syncA

  • Click the Create Sync Directory Task button
  • Pop up a new synchronization directory pop-up box
  • Setup Instructions: Sync Directory

  • Enter the task name of the sync task, the source path, the target path, the sync frequencysync


Function Description
Task name The name of a synchronization task is displayed in the task list after it is successfully created.
Direction

1) One-way

Synchronize files from the server to the local;Synchronize files locally to the server.When the source path is the server,the file is synchronized from the server to the local.When the source path is the calculator,the file is synchronized from the local to the server.

2) Two-way

Raysync service will conduct two-way synchronization between radium speed server and local directories.

If the original path is local and the target path is the server, after the two-way synchronization is enabled, Raysync will first upload the locaI directory files to the server directory,and then download the files of the server directory to the local directory,so as to maintain the consistency between the server directory and the local client directory files.

Source path Select the source file path to be synchronized,support two-way synchronization,induding local to server or server to local, When selecting a file, you can use the [ctrl] key to select multiple paths of the same level.
Target path

Select the target path for synchronization to the server or local.

Sync schedule

Select the start time of the synchronization task,support two synchronization frequency settings.

1) Synchronize once a day at a fixed time.

For example, select "Daily 18:22", the synchronization task will start synchronization at 18:22 every day.

2)Synchronize every time period.

For example, select Every 60 seconds,the synchronization task will start synchronization every 60 seconds.

3)Synchronize once only.

For example,select"Once 12:00",the synchronization task will start synchronization once at 12:00.

4)Synchronize by week

If one or more dates are specified in a week,the synchronization will be performed at a certain time of the specified week.

For example,if you set 20:14 synchronization on Monday and Wednesday every week,you can synchronize at 20:14 on Monday and Wednesday.


security

  • Turn on encrypted transfersync2

sync2a

Document Handling

  • Selection of file processing method: retain file modification time; transfer only files and folders in the source directory; when the source file is deleted, the target file is automatically deleted; after each file sync is completed, the source file is automatically deleted; two-way sync


Function Description
Preserve modification time Enabled
Enabled: After the synchronization task is completed, the modification time of the file is the same with the local modification time.
Disabled: After the synchronization task transfer is completed, the modification time of the file is the same with the current client transfer completion time.
Only transfer source files Enabled: The folder of the first layer will not be transmitted
Disabled: All files and folders in the directory will be transferred.

Delete target file synchronously when source deleted

Enabled: if the file of the source or destination path is deleted, the other party's file will also be deleted synchronously.
For example, if the local directory A is synchronized to the server, if the "test" file in the A directory is deleted, the "test" file on the server will be deleted synchronously.
Tips: Root directory is not supported; "Delete Synchronously" and "Transfer source files only" can
notenabled both.
Delete source file after sync every file
done
Automatically delete the source directory after each synchronization is complete.

1) Delete all source directory and file

For example, synchronize the local A directory to the server. After the synchronization tasks are completed, the local A directory and the files in a directory will be automatically deleted.

2) Reserve the source directory structure

Only delete the files in a directory, neither Directory A and A directory of A are not deleted

File update  When the target file already exists and content is inconsistent with the source file,you have two
updatesways
1) Overwrite target file
Directly overwrite existing file contents
2) Overwrite if sou rse newer
Overwrite if the last modification time of the uploaded or downloaded file is newer than the time of the target file.
3) Append to the target file (Notapplicable to object storage)
Append the new file contents to the end of the target file
4) Rename file
Rename the source file when the source file has the same name as the target file
For example: if test exists in the target path, if a test with different content is uploaded, the newly uploaded file will be renamed to test(1).


File Filter

  • Eligible files can be filtered during transfer to skip transfer. For example, filter out log type files, or filter files with a file size exceeding 1GB.

sync4a

2.11 File preview

Click on the picture or video file to preview it online

Preview Process

  • Picture Preview Check the picture you want to preview, click the location of the file name, you can preview it online.
  • The picture format supports preview such as png,jpg,gif,jpeg,bmp,ico preview-en

preview2-en


  • Also can preview video files such as mp4,avi,mov

preview3-en

2.12 Isolation zone

2.12.1 Virus blocker

  • If the file you upload through the website contains a virus.

uploadVirusWEB

  • If the file you upload through the client contains a virus.

uploadVirusClient

2.13.2 Virus view

  • You can view the virus type and other information of the isolated file through the file name.

name

  • You can view the virus type and other information of the isolated file through the isolation time.

time

7.3) Group Folders

Updated: 2022-11-30 09:16:21

Group space can support multi-user collaborative file management.

  • Select - Group File Folder in the left navigation bar to enter the group, and open the page to display all the group file libraries that the current user is in.group-en

  • Select to enter any group file library, all files and folders of the group file library will be displayed

  • You can select any file/folder in the group file library to download and upload, create sync tasks, create new folders, and delete operations, which are the same as uploading, downloading, creating sync tasks, creating new folders, and deleting in personal space. Note: The group file supports users to share external links

group2-en

7.4) Peer to Peer

Updated: 2023-09-26 10:20:01

Raysync client supports direct transfer between user and client, data does not upload on the server, the server only carries out data traffic transit. User A is online, user A provides his own transfer ID and key, other users can connect to user A through the transfer ID and key, and the data is transferred directly to user A's computer without uploading on the server's disk.

1.1 Send point to point transfer file


  • Click Point to Point on the web page to enter the point-to-point transfer interface

  • Enter the recipient's device ID or Email(The device must be online), select the file name to be sent, click start to transfer, that is, the point-to-point transfer task is created successfully

Note: The recipient needs to turn on the Allow to receive files button on the web page

1.2 Receive point to point files

  • Click Point to point Receiveon the web-page to enter the point to point receiving operation interface
  • If the recipient does not want to receive direct transfer files sent by others, click the web page to uncheck Allow to receive point files
    or Turn off the receiving files  on Raysync Client

  • Transfer Status Description

description

1.3 View  point to point transfer task

7.5) Share Link

Updated: 2022-11-30 09:16:43

1.1 Create share link

  • Select the file/folder you need to share, support select multiple files/folders to share at the same time.share-en

  • Pop up file/folder sharing settings box You can set whether to allow users to download, whether to set a password, link expiration time and set file aliases, email notifications to partners, download notifications and other functions. Note: There are two ways of email notification: one is administrator notification, which requires the configuration of the system administrator's email. (For details, please refer to "Admin Portal Guide" - User Editing - Security Settings.) The other is user notification, which is configured in the email settings of the personal center. (For the method of configuring email, please refer to "User Guide" - User Center - Email Settings.) The configuration is displayed according to the administrator's configuration. If the administrator notification is set, the email cannot be configured.

share2-en

  • Click to create the share link, the link access password will be automatically generated.share2-en

share5-en

1.2 Access the share link

  • Enter the share link address in the browser, enter the password, and click OKshare6-en

  • Enter the file list of shared download links and click the download button to start downloading.share7-en

1.3 Share link management

  • Cancel the share links Select the link that needs to be canceled in the sharing link, click Cancel, and click OK to cancel the sharing.share4-en

share8-en

share-9-en

  • Turn on the device binding Note: To enable this function, the administrator needs to enable it on the server background. For details, please refer to the setting-sharing link in the "Admin Portal Guide". If the second device accesses the link, it will prompt that the device has been bound.share10-en

7.6) Invitation Link

Updated: 2022-11-30 09:16:56

1.1 Create an invite to upload link

  • Enter the folder where you want to invite uploads, such as the "Raysync" directory, and click the "Invite to upload" button.invite-en

  • Pop-up folder invitation upload settings box, you can set the link expiration time, email notification and upload notification

  • Click Create Link, a link and an access password will be generated by defaultinvite2-en

  • Click Copy Link, you can copy the link and password and send it to your partner.invite3-en

1.2 Visit the invite to upload link

  • Enter the link address of invite to upload in your browser, enter your password and click OKinvite-9-en

  • Enter the file list of invite to upload link, click Upload to start uploading files

  • Enter the file list of invite to upload link, click New Folder, you can create a new folder, or upload files to the new folder. Note: The file list shows all the files and folders in the invited directory, for example, if the invitation is uploaded to "Raysync" directory, it will show all the files and folders in the directory of "Raysync".invite-11-en

1.3 Manage invite to upload links

  • Cancel the link
  • Select the link you want to cancel and click cancel invitationinvite-5-en

invite-8-en

invite-6-en

7.7) Cilent Settings

Updated: 2023-08-21 11:39:34

1 Transfer List

  • The transfer list can display the progress/speed of the transfer task/the number of files that have been transferred/the total number of files in the task/the file task details included in the task/task transfer speed curve and other information, and the transfer list also supports task pause/start /delete/sort and other operations.transferList-en-1

  • Click Transfer List in the upper right corner of the web-page or right-click the client and select Transfer List to enter the transfer list

The transfer list includes three types of tasks: common transfer tasks, sync directory tasks, and direct transfer tasks.

transmissionTask

1.1 Common transfer tasks

1.1.1 View task details

  • Click on the task name Enter the task details to view the task transfer speed. Including graph, transfer mode, average speed, delay, packet loss rate, message size.

speed-en

  • Click the task details to view the file name, file size, progress, error reason, number of file transfers, and file transfer statustaskDetails

1.1.2 Common transfer task lists

  • Support task deletion, pause, start, open local directory, clear, retry, top task and other operations. Hover over the button to view the function of the button.You can select multiple tasks to delete by pressing Ctrl + mouseStatus

1.2 Sync directory task

1.2.1 Sync Directory Task List

  • Most of the functions of synchronizing the task list of the directory are the same as those of ordinary tasks, and will not be explained again. The following is a description of the different functions of the Sync Directory task.syncTask1

1.2.2 Sync task status

  • Idle: when the task sync frequency mode is interval time and the time point has not yet reached
  • Schedule: When the task sync frequency method is daily fixed time point and the sync time has not yet arrived
  • Idle (completion time): When the task sync frequency mode is daily fixed time point and the sync has been completed, but the next sync time point has not yet reachedstatus-22

1.2.3 Editing sync tasks

  • Support editing a single task, click the Edit button The Edit Sync Directory Task pops up, and you can edit the sending change time, security, file processing method, file update, and file filtering method.
  • After modification, click Save, the modification is successful.updateSYNC-EN

  • Sync upload

  • Sync download
  • Two-way syncsyncTask2

1.3 Point-to-point tasks

1.3.1 Point-to-point task list

  • After the sender creates a direct transfer task successfully, the client of the sender and receiver will directly transfer the task transfer list, and you can view the current task progress, task speed, task file number, task status, task details, etc. of the sender and receiver.p2pTask-en

1.3.2 Task Status Pause Status Description

statusInstraction

1.3.3 Delete direct transfer task

  • Click OK to delete the direct transfer task
  • After the task of the client list is successfully deleted, the record corresponding to the direct upload list of the web-page will also be deleted at the same time

P2P-DELETE

2 Transfer Settings

2.1 Transfer

Function Description

tranmission1

2.2 Bandwidth

  • Supports setting the maximum and minimum speeds for uploading and downloading. A value of 0 means no limit

2.3 Peer-to-Peer

  • The client supports setting the save path of the received direct-passing files,  Updating the direct-passing ID, and turning off the receiving files

2.4 Advanced Settings

Function Description
Automatically run at start up Raysync client will automatically run when the computer reboot unexpectedly.
Enable hash check  Enabling hash verification can verify every single file when upload or download, and ensure the integrity and correctness of files. If the hash check of the local file and the server file are inconsistent, the file will be retransmitted. If the hash check of the two files is consistent, the transmission will continue.
Priority to use TCP The tcp transmission mode will be preferentially used during the transmission after enabled. So that our files will be lost during transmission.
Priority  to use encrypted transfer  The tcp transmission mode will be preferentially used during the transmission after enabled. So that our files will be lost during transmission.
Preserve file timestamps after transfer completed  Keep the modification time of the transmitted file after enabled.
Enable Rsync check  If the local file and the server file Rsync check result are inconsistent, the file will be retransmitted; If only part of the two files is not the same, the consistent part will be skipped and the different part will be transferred. If the two file have the same Rsync verification, It will continue to transfer. 
Rename file when the target file already exists  Rename the target file when it already exists
Only download new files When the target file already exists,the user will fail to download the same file.
Timeout  increasing the timeout time can maintain the effect of Raysync transmission when the network is poor.
Check before transfer start ,It will not start until file is no change in 3~30s The transfer will be checked once at the beginning of the transfer, when the file has not changed within 3-30 years, the file will actually start the transfer. When the file is changed within the specified time, the file will not be transferred. Avoid transferring files that are in use and ensure the integrity of the transferred files.
Preserve file ACL attribute It is a mechanism for permission control of files or directories. It can control the access permissions of users or groups to files or directories. Acls enable administrators to finer control file or directory access permissions to better protect system security. Retention is only supported between the same systems.


2.4 Proxy

  • For the needs of company's security control, employees' computers do not have direct access to the Internet, but need to go through the company's proxy server to access the Internet. SOCKS5 is currently the most commonly used generic proxy server.

  • Click SOCKS5, enter the correct proxy service host, proxy port, proxy user and password. Click OK to connect to the SOCKS5 proxy.

2.6 Default server

  • Support setting the default connection server address and login user when opening the client.
  • Enter the correct server address, login username and password, and click Save

.

3 Error detection

  • Right-click the client and select Error Detection to access error detection. You can view the client version number, program version number, whether it is started as administrator, client related configuration information, server related information, and in case of transmission abnormalities or failures, clicking this option will generate an error detection report and automatically fix the problem.

4 Log Setting

  • Right-click to Log Setting can be configured to retain the cycle of client logs, automatically compress the client log in 24 hours, and support the collection of customers on the same day.

5 About Raysync

  • Right-click the client and select About, check the client version number, and check whether it is the latest version of Raysync

6 Exit

  • Exit the client connection and use the web page to transfer files.

8) FAQ

Updated: 2022-11-30 09:01:32

1. Frequently asked questions Q&A

1.1 The website cannot connect Raysync, indicating that it is not started.

  1. Check if Raysync has been started and the icon in the lower right corner has appeared. Click 【Start】on the webpage;

  2. It is possible that the user registry cannot be written normally whether Raysync is not started under the protection of software such as 360/ Kingsoft AntiVirus software, resulting in the inability to start from the web page. Meanwhile, Raysync needs to be run manually.

  3. Right click the Raysync icon and select Error Detection to check whether the local domain name resolution, system time, system agent and certificate are in "normal" status whether Raysync has been started and still "Prompt that the client has not been started". The browser may have turned on the proxy whether the system proxy displays an exception, and the Raysync client needs to be turned off before starting. If the certificate is abnormal, it needs to be confirmed whether the version of Raysync client is the latest version and whether the certificate has expired.

1.2 Web Page Prompt Server Connection Timeout

Client check:

Right click the Raysync icon and select Error Detection to check whether the "server domain name" and "server address" are correct server addresses. You can ping the resolved addresses under the cmd command line to see whether they are connected.

Server check:

The server checks whether the user's permission/home directory and other information have been changed and needs to restart the client.

1.3 Client Login Timeout

Try to right click the client to modify the UDP message size in Raysync setting to a smaller value;

1.4 The speed is slower than ideal

Client check:

Test the bandwidth of the external network. The speed test is recommended to detect the local upload and download bandwidth and check whether the speed has reached the speed bandwidth limit.

Confirm whether the telecom operator of the client is consistent with the telecom operator of the server;

Server check:

1.Enter the background of the corresponding server to check if the license is activated and whether the bandwidth in the license information is the expected bandwidth;

2.Check the current network traffic in the server to confirm if there are more users and other users have already occupied the bandwidth of the server;

  1. Check whether the disk read-write rate of the server has reached the peak value, and confirm if other users of the server are reading and writing files, thus affecting the file read-write storage of other users.

1.5 The downloaded file cannot be found under the network path

Map the path to the network disk, delete the old task, download and select the saved path to the network disk again;

1.6 Upload/Download Files Always Display "Reading Files"

Client check:

1.Check whether the directory the user is transferring contains a large number of files. Whether there are a large number of files, it needs to wait for the client to read them;

2.Right click customers to set Raysync timeout time to 60s or longer, delete old tasks and reselect tasks for transmission.

Server check:

Check the reading performance of the directory under the server, for example: enter the server directory to execute ls to respond quickly, and execute du–a | wc-l to count the total number of files under the directory.

We use cookies to ensure that we give you the best experience on our website. By clicking any link on this page you are giving your consent to our Cookies and Privacy Policy.